To avoid these ads, REGISTER NOW!

Show us your welding projects

pancholasvegas

Well-known member
Joined
Nov 6, 2017
Messages
251
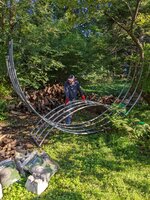
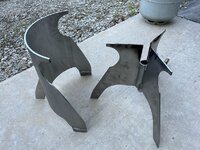
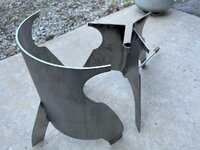
Finished painting my “butler” for my welding table today. Threw this together testing various settings on the welders, and out of necessity because there’s only so much room on the small fab table I have.

IMG_1284.jpeg


One side holds the tig torch, the other holds the mig gun.

IMG_1285.jpeg


There’s also a hat rack, and helmet holder. It’s telescopic with multiple settings, which are held with wire pins. Thinking about adding wood or expanded metal tops to the areas above the wheels to hold some smaller items.

IMG_1286.jpeg


I didn’t necessarily need it to be this tall, but I’ll find it handy for hanging my auxiliary fuel tank on when working on bikes and whatnot.
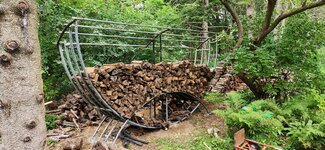
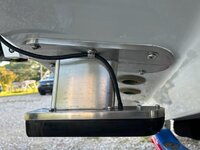
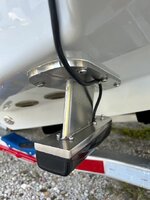
 
To avoid these ads, REGISTER NOW!

jblnut

ALLIANCE MEMBER
Joined
Jan 17, 2015
Messages
6,979
Location
In the Middle of MN
This 50yr old auger will live on as something else as soon as I get it home !!
KIMG2368.JPG

Shove it in the shop to work on in the AC while it's 95f and terrible outside.
KIMG2373.JPG

Some OSHA approved rigging to take it apart .....
KIMG2374.JPG

It came apart without an issue !!
KIMG2375.JPG

Now for the welding fun !! Doesn't that look like a swing set ? Kiddos have been asking for a bigger swing set for a while now so I figured I could build one for them. Mama Bear hasn't seen it yet. I'm sure she'll be oh so impressed with my ability to take junk and build it into something the kids will end up getting their tongues stuck to this winter :lol_hitti
KIMG2397.JPG

The far end will have a rope with a saucer seat deal to sit on while the close end will have a set of monkey bars and a fire pole somehow. I have a nice chunk of 3" 316SS I'll use for the pole but I'm not sure how I'm going to mount it yet. I'm leaning towards having it out past the monkey bars with it supported by the top of the auger but I'm not sure how yet.
KIMG2398.JPG
 

BlueBomber

Well-known member
Joined
Sep 14, 2013
Messages
3,201
Location
Outside Boston, MA
Nicely re-purposed, jdlnut!

I'm nearly finished with a firewood rack made from 14' diameter trampoline frames I've collected for free over the last five years. The top bars keep the main hoops from spreading and will get a curved shingle roof this weekend to protect the wood from rain.
 

Attachments

  • IMG_20230819_192208.jpg
    IMG_20230819_192208.jpg
    485.7 KB · Views: 185
  • IMG_20230819_192203.jpg
    IMG_20230819_192203.jpg
    352.7 KB · Views: 158
  • IMG_20230822_110546.jpg
    IMG_20230822_110546.jpg
    668.7 KB · Views: 142
  • 20230824_174350.jpg
    20230824_174350.jpg
    1.4 MB · Views: 128
  • 20230824_174538.jpg
    20230824_174538.jpg
    1.2 MB · Views: 126

iagsxr

Well-known member
Joined
Jan 10, 2010
Messages
1,499
Location
Vinton, Iowa
This is not welding but part of my push bumper project. The actual push surface is two layers of 3/4" plywood glued and screwed together. It will also be covered with tread cut from one of our right rear tires. 20230826_151213.jpg

Drilled and tapped the frame 1/4"-20. The finished bumper will have stainless buttonheads. Had these black socket heads laying around so I used them for mockup.

20230826_151233.jpg

It's blasted. Thought I'd get it all in primer today, but I'm going to let the glue dry overnight.
 

jblnut

ALLIANCE MEMBER
Joined
Jan 17, 2015
Messages
6,979
Location
In the Middle of MN
Nicely re-purposed, jdlnut!

I'm nearly finished with a firewood rack made from 14' diameter trampoline frames I've collected for free over the last five years. The top bars keep the main hoops from spreading and will get a curved shingle roof this weekend to protect the wood from rain.
Thanks !! When Mama Bear asked if I had time before harvest to build a swing set I doubt this is what she had in mind :lol_hitti

That is an awesome wood rack !! It looks really nice and looks like it'll keep things nice and dry. How much wood will it hold when it's full ?
 

mookandairin

Member
Joined
Aug 27, 2023
Messages
10
Here’s my nightmare work done by my cousin. I get to weld a bunch of it together. Hope my welding is as good as his!
 

Attachments

  • IMG_0990.jpeg
    IMG_0990.jpeg
    736.1 KB · Views: 145
  • IMG_0991.jpeg
    IMG_0991.jpeg
    697.1 KB · Views: 150
  • IMG_0995.jpeg
    IMG_0995.jpeg
    1 MB · Views: 151
  • IMG_0996.jpeg
    IMG_0996.jpeg
    729.9 KB · Views: 152
  • IMG_1002.jpeg
    IMG_1002.jpeg
    697.1 KB · Views: 149
  • IMG_1003.jpeg
    IMG_1003.jpeg
    760.6 KB · Views: 145
  • IMG_1004.jpeg
    IMG_1004.jpeg
    631.2 KB · Views: 159

BlueBomber

Well-known member
Joined
Sep 14, 2013
Messages
3,201
Location
Outside Boston, MA
Thanks !! When Mama Bear asked if I had time before harvest to build a swing set I doubt this is what she had in mind :lol_hitti

That is an awesome wood rack !! It looks really nice and looks like it'll keep things nice and dry. How much wood will it hold when it's full ?
Thanks, jblnut. Here it is after getting the roof finished this week. The rack is 14 feet across at the top and holds two rows of firewood. I calculate it can hold about 1.5 cords. It's still not enough, so I'm going to dip back into the trampoline frame stash for more smaller racks to set up behind the main one.
 

Attachments

  • 20230827_175645.jpg
    20230827_175645.jpg
    1.2 MB · Views: 165
  • 20230827_175700.jpg
    20230827_175700.jpg
    1.2 MB · Views: 165

jblnut

ALLIANCE MEMBER
Joined
Jan 17, 2015
Messages
6,979
Location
In the Middle of MN
This end where the chain and sprockets are is just begging for a way to dump water out of it.
That's a great idea !!!

Maybe with a chaff spinner off the back of an old combine to spin the water out for summer cooling effect.
Damn it .... I have a junk spinner as well lol. Just gotta figure out how to angle the fins the correct way so the water spins it !!

Maybe some paint? Just sayin.lol
Kiddos are talking about painting it. I said go for it !! It's worked itself down to rusty metal over the last 50yrs and will do so again without proper prep, which I was not about to do lol.

Why? Kids should be dirty. I've had rusty hands for most of 3/4 of a century.
I grew up dusty and dirty and so have they. Too many kids live in households that do not have proper access for the kids to get dirty. If you don't have to wash up after playing you haven't really have fun !!

Just seems unfinished. Well I guess it is exactly that. lol
I mentioned that GJ peeps thought it should be painted and that may have spurred them into painting it all kinds of colors. I said go for it if they want to !! Lily wants Purple, Alyssa wants pink and blue and Leo was just excited to get full of paint :lol_hitti

I have an old grain leg with a caged ladder and nice platform on top that may get turned into the firepole holder. It's 25' tall so it'll require some sort of a concrete base ... hmmmm :unsure:
 
To avoid these ads, REGISTER NOW!

sqznby

Well-known member
Joined
Oct 26, 2013
Messages
982
Location
Coastal NC
A friend just got back from the Bahamas and his friend (a native Bohamian) had made a quick no frills burner for his fresh catches out of scrap aluminum.
He asked if I could make one, this is my rendition of what he sent me. The last picture was how he made it.
Funny the radius of the cylinder I had was the same radius as his pot, worked out perfectly.
 

Attachments

  • burner-5.jpg
    burner-5.jpg
    113 KB · Views: 147
  • burner-4.jpg
    burner-4.jpg
    371.7 KB · Views: 122
  • burner-3.jpg
    burner-3.jpg
    164.7 KB · Views: 118
  • burner-2.jpg
    burner-2.jpg
    181.2 KB · Views: 120
  • burner-1.JPG
    burner-1.JPG
    905.8 KB · Views: 127

Jayman17

Well-known member
Joined
Feb 6, 2017
Messages
3,795
Location
Seattle, Wa
Making a base for a 6' diameter table with a big hole in the middle. While it may look like it's in primer in the last 2 pics, it was actually powder coated "ruddy brown" :headscrat

t1.JPG

t2.JPG t3.JPG t4.JPG t5.JPG t6.JPG t7.JPG t8.JPG t9.JPG IMG_0413.JPG
Great looking table, I love the top. What kind of wood did you use? Is this for a customer? Is this an outdoor table?
 

Jswain

Well-known member
Joined
Apr 26, 2013
Messages
2,457
Location
Calgary, AB
Some aluminum & mild steel tig practise. Feel free to critique or advise, I have pretty thick skin and am just starting.

Alum was 1/4" I had the machine set to ~160amps, 3/32" pure tungsten, 3/32" 4043 filler rod. Material was wiped with acetone & then stainless wire brushed before welding. Filler rod was wiped with scotchbrite pad then acetone. AC balance on auto, no pulse etc. CK slider for amperage control. Outside corner & the inside are the first I've ever attempted with the tig and the fitup was poor lol

Steel was 1/4" plate, machine was set to ~120amps(did the steel with a small inverter tig). 3/32" 2% lanthanated tungsten, 3/32" er70s-2 filler rod. Material cleaned with a resin fibre disc only. Used a foot pedal to get used to both, and started switching torch hands at the end bead for bead
 

Attachments

  • 20230908_193004.jpg
    20230908_193004.jpg
    806.7 KB · Views: 87
  • 20230908_192546.jpg
    20230908_192546.jpg
    750.9 KB · Views: 82
  • 1000003947-01.jpeg
    1000003947-01.jpeg
    535.9 KB · Views: 77
  • 1000003958-01.jpeg
    1000003958-01.jpeg
    477.8 KB · Views: 74
  • 20230909_185846.jpg
    20230909_185846.jpg
    1.1 MB · Views: 74
  • 20230909_190826.jpg
    20230909_190826.jpg
    1,000 KB · Views: 75
  • 1000003972-01.jpeg
    1000003972-01.jpeg
    1.4 MB · Views: 53
Last edited:

zmotorsports

ALLIANCE MEMBER
Joined
Oct 20, 2009
Messages
21,347
Location
Northern Utah
Some aluminum & mild steel tig practise. Feel free to critique or advise, I have pretty thick skin and am just starting.

Alum was 1/4" I had the machine set to ~160amps, 3/32" pure tungsten, 3/32" 4043 filler rod. Material was wiped with acetone & then stainless wire brushed before welding. Filler rod was wiped with scotchbrite pad then acetone. AC balance on auto, no pulse etc. CK slider for amperage control. Outside corner & the inside are the first I've ever attempted with the tig and the fitup was poor lol

Steel was 1/4" plate, machine was set to ~120amps(did the steel with a small inverter tig). 3/32" 2% lanthanated tungsten, 3/32" er70s-2 filler rod. Material cleaned with a resin fibre disc only. Used a foot pedal to get used to both, and started switching torch hands at the end bead for bead


For just starting out with TIG I think they look good. Nice and consistent which is where most struggle.

One tip on the aluminum joints. At the far end place a tack where you'll finish then as you approach the end and taper off the tack acts like a dam to prevent the heat from getting away from you. Then you can weld right up to the tack and actually use some of the tack as the last bit of filler for the weld. This will help with the end getting too hot and the weld width near the end.

Hope that makes sense.

Also, if you are using an inverter machine you can just use 2% Lanathanated for everything and no need to use pure for aluminum. Personally, I think the 2% Lanthanated holds a tip better for more detailed work.
 

Jswain

Well-known member
Joined
Apr 26, 2013
Messages
2,457
Location
Calgary, AB
For just starting out with TIG I think they look good. Nice and consistent which is where most struggle.

One tip on the aluminum joints. At the far end place a tack where you'll finish then as you approach the end and taper off the tack acts like a dam to prevent the heat from getting away from you. Then you can weld right up to the tack and actually use some of the tack as the last bit of filler for the weld. This will help with the end getting too hot and the weld width near the end.

Hope that makes sense.

Also, if you are using an inverter machine you can just use 2% Lanathanated for everything and no need to use pure for aluminum. Personally, I think the 2% Lanthanated holds a tip better for more detailed work.
I was using an inverter machine for the steel, but the machine I am keeping is a precision tig 225. I found it better with the pure tungsten but haven't tried the lanthanated again on aluminum after my first few sessions.

Thanks for the tip on the tack @ the end that makes total sense!
 

Crazyjake8493

Well-known member
Joined
Sep 26, 2014
Messages
3,951
Location
Upstate NY
Also, if you are using an inverter machine you can just use 2% Lanathanated for everything and no need to use pure for aluminum. Personally, I think the 2% Lanthanated holds a tip better for more detailed work.
When I started with TIG several years ago I tried multiple tungstens. I finally settled on 2% lanth for everything and that's all I've used since. Works great for everything I've ever needed to do.
 
To avoid these ads, REGISTER NOW!
Top Bottom