Farmall450
Well-known member
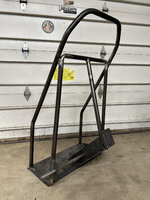
I couldn't find commercial loader cylinder supports/safeties/jacks that were any good or even close to the right size for my Ford 7109 loader (on a 2120 Ford tractor). Most people use angle iron, and I did too for my IH 284 and Kwik Way loader, but the 7109 doesn't really have a good flat spot for angle to purchase on the bottom, and I didn't really like how it would kick out, since I generally leave the loader up (supported) to save space, which means another tractor, etc might be right in front of it.
So, I used 2x2 square tube and some scrap plate to make my own. Exact height I wanted to avoid lights, overhead door, etc. I used small adhesive sliders/dots on the inside so it's essentially impossible to hit, scratch, or nick the rods when installing.
The ends that didn't have a nice perch do now, as I drilled holes whose ID would fit the OD of the cylinder pin boss. These freely pivot, and then there is a flat plate (relief plasma cut) which pushes against the end of the tube to secure the top side. I thought about adding tabs for a hitch/wire pin to ensure they can't be removed, and still might before paint, but gravity is on my side.
Don't mind the blue tape, I wanted to hide the rough edges so that they couldn't nick any chrome. Too cold to paint, no need to before summer; the stuff was already rusty anyhow. An aside, the new Hobart 27i Plasma did an awesome job on 120v for this project, even the plate. Far from good but good from afar, and much better than the Ask Tractor Mike or eBay ones. Naturally it was windy and raining/snowing, so the welds leave a little to be desired.