To avoid these ads, REGISTER NOW!

Show us your welding projects

ZTFab

Well-known member
Joined
Jan 6, 2008
Messages
397
Location
Upland, CA
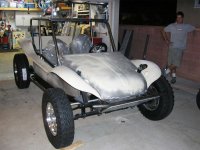
In the process of rebuilding the back-half of a sand car...

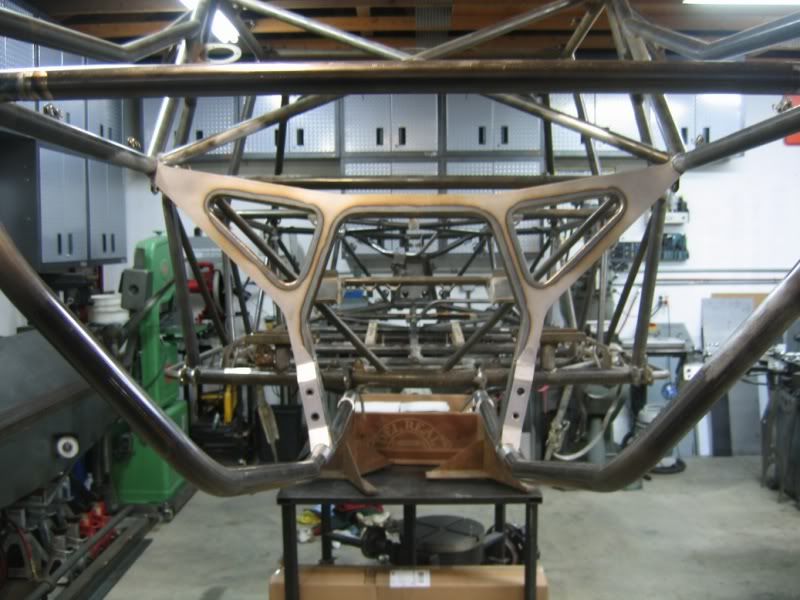
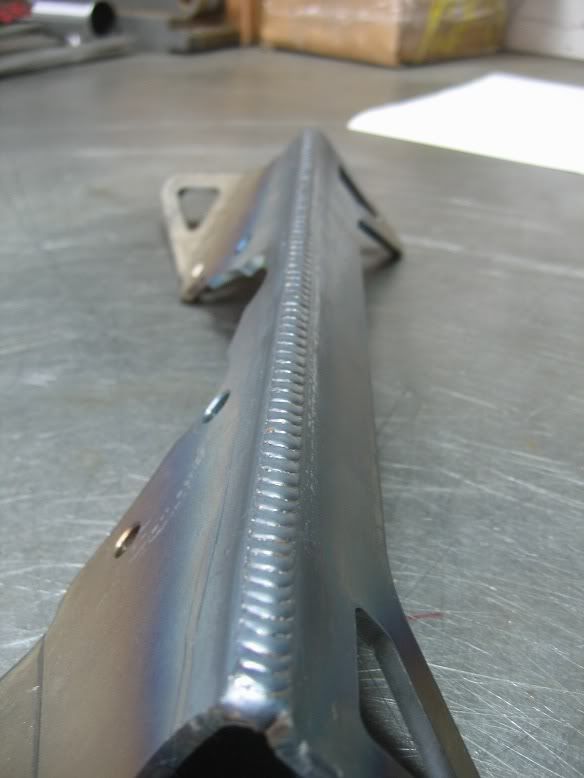
Built a new sheet metal bulkhead. It's approx 2' tall x 4' wide and 1.75" thick made of 10ga (.141").

IMG_2990.jpg


IMG_2989.jpg


IMG_2983.jpg


IMG_2981.jpg


IMG_2980.jpg


IMG_2991.jpg


IMG_2992.jpg


IMG_3004.jpg


IMG_3005.jpg


IMG_2998.jpg
 
To avoid these ads, REGISTER NOW!

nitrohog

Well-known member
Joined
Jan 23, 2011
Messages
76
Location
Illinois
Decided to build a sheet metal valentines present. I tried to reproduce her favorite flower, a stargazer lily. It was my first attempt at any sort of art so don't be too critical LOL.
IMAG0077.jpg
 

jinjaninja

Well-known member
Joined
Nov 1, 2011
Messages
149
totally tried to do the same thing after work valentines day..... im not an artistic person so its not amazing, but i think the thought was appreciated :D

IMAG1034.jpg
 

ME87

Well-known member
Joined
Jan 19, 2012
Messages
65
Location
Tucson
Is the sheet metal bulkhead strictly aesthetic or is there a structural purpose for not continuing with tube work? Looks very nice.
 

MichaelUser

Active member
Joined
Aug 18, 2008
Messages
40
Location
Fullerton, Ca
Hello,

I mostly linger because I am on so many forums that I get lost. Anyway, I am finishing up my buggy project. This was my first attempt so the welds aren't perfect.
The first pic is the first go around with the buggy. It was assembled and then sat while I remodeled the house for 2 years. Then the black and gray version is recent with the frame powder-coated and the pan sprayed with bedliner. I then painted the body flat black a-la cheap rustoleum from HD. One coat and done.
 

Attachments

  • Buggy.jpg
    Buggy.jpg
    111.9 KB · Views: 287
  • Going together 2.jpg
    Going together 2.jpg
    145.7 KB · Views: 286
  • IMG_1161.jpg
    IMG_1161.jpg
    141 KB · Views: 270
  • IMG_1172.jpg
    IMG_1172.jpg
    135.7 KB · Views: 250
  • IMG_1165.jpg
    IMG_1165.jpg
    145.4 KB · Views: 238

muibubbles

Well-known member
Joined
Apr 24, 2009
Messages
685
Location
nj
Here's some TIG welding from today.

20ga (.037") Stainless Steel

IMG_2961.jpg

SEE I KNEW IT. I called it waaaaay back in the other thread that you weld with a caliper and measure the distance from each weld to ensure .0000001 tolerances!!!!! :drool::drool::drool::drool::drool::drool:
 

ZTFab

Well-known member
Joined
Jan 6, 2008
Messages
397
Location
Upland, CA
Is the sheet metal bulkhead strictly aesthetic or is there a structural purpose for not continuing with tube work? Looks very nice.

Thanks. Just a different way of doing it. The chassis originally has tubing in that area but it failed miserably and I wanted to incorporate the trans mounts and some additional bracing.

Totally nice as usual ZT! To bad there just gonna beat the **** outta it when your done.:bounce:
What do you use for bending your tube?

Thanks. That's what they're built for! This one will have a Ford 351, aluminum heads, and a Vortech supercharger making 600+ HP running through a Fortin 5spd H-pattern transaxle.

I use a JD2 model 3 bender with an Enerpac 10 Ton Air/hydraulic setup.
 

ME87

Well-known member
Joined
Jan 19, 2012
Messages
65
Location
Tucson
I use a JD2 model 3 bender with an Enerpac 10 Ton Air/hydraulic setup.

Did you buy the adapter setup from JD2 or make your own? I've got the same bender and I'm trying to figure out the cheapest and best way to convert it to an air over/hydraulic setup.
 

bggrnchvy

Well-known member
Joined
Nov 14, 2011
Messages
579
Location
Pleasant Hill, CA
I was wondering if the tig/ plasma cutter that is next to your Miller machine has worked out for you. I see them listed on C/L all the time and wanted a review.

I have been looking into some classes for tig at the local college and maybe picking up the tig and plasma combo on special from Eastwood. I would love a nice Miller watercooled one but I am not sure my abilities are ready for that kind of a machine.

The plasma function works well enough. I've had to replace the gun though as the stock unit was junky. It's cut quite a few more complex sheetmetal parts up in it's 5 year life time.

The tig I've only used once (for lack of an Argon specific bottle) and works fine for a DC scratch start. I'm looking for a well love Syncrowave currently however.
 

ZTFab

Well-known member
Joined
Jan 6, 2008
Messages
397
Location
Upland, CA
Did you buy the adapter setup from JD2 or make your own? I've got the same bender and I'm trying to figure out the cheapest and best way to convert it to an air over/hydraulic setup.

I have the adapter from JD2.

Look over on offroadfabnet.com and you will find a lot of people who have converted their benders to hydro for less money.

Every time ZT posts pics, I'm just in awe. How many years have you been welding?

Thanks. :beer:

Almost 15 years
 

nitrohog

Well-known member
Joined
Jan 23, 2011
Messages
76
Location
Illinois
Dude, that rocks!!!

Thanks guys, in the end its the fact that she loved it that matters but a little positive reinforcement from you guys makes me want to keep my creativeness going lol :thumbup: And to think I bought the welder to do exhaust and body work :lol_hitti
 
To avoid these ads, REGISTER NOW!

Mario428

Well-known member
Joined
Dec 4, 2009
Messages
156
Location
PEI, Canada
Updating the front strut mounts on my T-Bird

When I originally built the T-Bird I used this setup.

SmallT-birdfrontheightadjust.jpg


Only problem was I ran out of adjustment and I have very little up travel of the strut. Tried a couple of different variations of the cup and brackets but could not get it where I wanted.

Decided this was the winter I would fix a lot of the little problems the car had and the strut mount was one of them.

So drew the front end setup in Solidworks and designed some brackets that held the top of the strut where I wanted it. Made up some holders to put the front wheel at ride height, some blocks under the frame to get it to ride height. Had laser cut and bent the brackets last weekend.
This is my new setup

StrutMNtall.jpg


StrutMNtRear.jpg


StrutMNtFront.jpg


Closeup of how I did the cup and bracket. I can change ride height by mounting this under or on top of the frame bracket. Or take another cup and weld a flange at a different point on the cup. Not an easy way to adjust ride height and travel but easy enough to do when the car is together in the spring.

StrutMNtCupFl.jpg


All welded up, just need to add a gusset and paint it.
 

bronson_91

New member
Joined
Aug 3, 2011
Messages
2
Damn, that is just beautiful. . . If I may ask, how thick is that trans-mount plate and what did you use to cut it with (particularly the inside cuts)?
 

ZTFab

Well-known member
Joined
Jan 6, 2008
Messages
397
Location
Upland, CA
ZTFab, are you using a CNC plasma to cut out your raw parts? Do you have a thread somewhere here about it you can point me to?

I don't own a CNC Plasma. I usually hand cut all my parts on my bandsaw but recently started using Cody at So Cal Plasma Craft to do all of the parts on this project.

I designed everything in SolidWorks then sent him the files. He definitely knows how to run his machine, which is a Torchmate 2x4 with a Hypertherm plasma.

Damn, that is just beautiful. . . If I may ask, how thick is that trans-mount plate and what did you use to cut it with (particularly the inside cuts)?

Thanks....see above about the cutting.

The mount is 3/16" thick.

:beer:
 

cnc-me

Well-known member
Joined
Jan 6, 2010
Messages
1,183
Location
MI
ZT, your welds and fab work is fantastic!
Its almost better than the "Hot Women" thread here on GJ.
:lol_hitti
 

Mario428

Well-known member
Joined
Dec 4, 2009
Messages
156
Location
PEI, Canada
mario, I see the front end is off that Bird, along with the doors, any of the body left on it or are you doing more chassis work ?
Takes 5 minutes to strip most of the body panels off, all the fiberglass is 1/4 turned on. Doors are on pins, lift off once they are open 45 degrees.
 

Mario428

Well-known member
Joined
Dec 4, 2009
Messages
156
Location
PEI, Canada
Looking really good Mario.

:thumbup:
Thank you

Saw your post about using Solidworks, used Solidworks to draw up my front frame section to fit all the stuff. I measured the drivers side and made the parts to suit but ended up grinding a 1/16 here, an 1/8 there to make it fit really well. Pass side fell right into place, just clean the parts and paint, then weld. GRIN
 

ZTFab

Well-known member
Joined
Jan 6, 2008
Messages
397
Location
Upland, CA
Thank you

Saw your post about using Solidworks, used Solidworks to draw up my front frame section to fit all the stuff. I measured the drivers side and made the parts to suit but ended up grinding a 1/16 here, an 1/8 there to make it fit really well. Pass side fell right into place, just clean the parts and paint, then weld. GRIN

Yes, Solidworks is a great tool and a tremendous resource to have but like any other tool you have to know how to use it for it to be a benefit.

I've had clients who think that SolidWorks is a "fix-all" and a magic program. "Can't you just put it into Solidworks and have it tell you what to do?"

Um, no. :lol:

I've rarely had a tube chassis that I could simply mirror parts on and have them fit perfectly. Taking time to set reference plane(s) and an origin for measurements helps tremendously but the world is an imperfect place.:lol:
 

Duker

Well-known member
Joined
Sep 25, 2010
Messages
10,861
Location
Livingston, TX
ZT, (and others as well), when you post up a project onto the site of that beautiful handiwork could we impose upon you to maybe tell us the type of machine and perhaps the gauge/type metal and the settings you used to create those welds?

I know I am asking a lot as you have already been generous in posting your projects and answering questions, but for us rookie and wannabe welders and fabricators it would be huge help in our learning curve.

I can only dream of laying a bead down like the welds you have shown us but if I can at least get in the ball park through some expert knowledge... to me that is a home run! :bowdown:

Again, thanks for posting the projects and for the help you have already given to many of us.
 
To avoid these ads, REGISTER NOW!
Top Bottom