bsaint
Well-known member
Nice.


I used a 120 grit sanding pad on my angle grinder. Next step to polishing will be 220 grit on a pad sander, then of course the normal 400, 600, 800, 1000 step.

Looks good, I think that looks like a two burn box, lets see the blisters. I stop at 600 grit on aluminum you may try that, but I guess it depends what you use from there

Here is a coolant reservoir I am working on. Final product will get sanded and polished, but I am not quite there yet. Definitely not professional work, I have only been TIG welding for a couple months now and this is my first real big project.
Thanks! I actually did not burn myself, but I did ruin my gloves in the process. They're old so they were on the last leg and they just wore out.
Good call on stopping at 600, I'm not terribly familiar with the polishing process, so I figured I would do the same as I did on my pistol barrel (which is obviously made from high carbon steel). Hopefully that will speed up the polishing process since the guy needs the tank by the 1st of march
Nice work so far. Looks like you're getting pretty good at running aluminum beads. I'm going to be starting a very similar project soon (intercooler ice/water tank).

Do you guys tack these exhausts together in the vehicle then move them to the jig/table?
SM, where do you get your flexes? They look like vibrant units but i want to ask around.
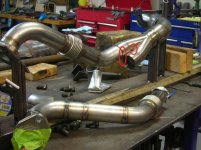
here's my latest project i've been working on the last couple days at work.


Animal control?
Child care?
I was under the impression you don't want to grind your aluminum welds down since the strength is top of the weld and it will be prone to cracking?
Exhaust looks great, but how in the world do you weld the sections I circled in red? Especially when the other pipe is attached?
 .
. I was under the impression you don't want to grind your aluminum welds down since the strength is top of the weld and it will be prone to cracking?
Someone correct me if I am misinformed.
I thought the root of the weld is the strongest, but you're right that it all plays a part in the strength of the weld. Since this is a non structural piece that won't see much pressure, heat, or what have you, I think it will be fine.

Magic and voodoo.
Actually the collector is welded from the inside and the portion where the two pipes enter the collector, I welded one tube fully then inserted the other tube and welded 98% of it as normal. To weld the last 2% I just pulled the Tungsten WAY out on my big gas lens and cranked up the argon. It was pretty easy to reach from both sides.
 because I can't even see how you can fit a tungsten in between the 2 pipes on the left circle
 I thought the root of the weld is the strongest, but you're right that it all plays a part in the strength of the weld. Since this is a non structural piece that won't see much pressure, heat, or what have you, I think it will be fine.
")
I can't remember the exact terminology, but on steels, where you can melt both sides in without filler and get a good bond, the root is pretty strong.
Aluminum however, most of the strength comes from the filler material (weld bead). The material washed in from both pieces of metal doesn't bond very strong without it. If I can find the names for it, I'll edit this post.


I was under the impression you don't want to grind your aluminum welds down since the strength is top of the weld and it will be prone to cracking?
Someone correct me if I am misinformed.
Exhaust looks great, but how in the world do you weld the sections I circled in red? Especially when the other pipe is attached?
Добрый день, зашел просто посмотреть, не удержался хочу выразить вам свое восхищение. Все аккуратно и красиво, вы молодцы!
Per Google Translate:
Good afternoon, came just to see, could not resist I want to express to you my admiration. Everything neat and nice, you rock!
Не шучу. Сейчас строю свой дом. Сварил ворота в гараж. Поддерживающую балку. Клетки для животных. и по мелочам. Ещё есть свой грузовик, самосвал. Для себя все делаю сам.