
You are using an out of date browser. It may not display this or other websites correctly.
You should upgrade or use an alternative browser.
You should upgrade or use an alternative browser.
Show us your welding projects
- Thread starter neonnblack
- Start date
affende
Well-known member
Thanks for the feedback, I'll hit it with some 6011 rod tomorrow. That should get a lot better penetration I think.
Use 6010 or 6011 for penetration on the root. Cap it with 7018 or similar for overall strength. 6011 more prone to fatigue induced cracking.
A good rule of thumb is to never rely on 6010 / 6011 for strength by itself.
affende
Well-known member
Sounds good, I would have never thought of that myself. Great feedback is why I joined this forum
") . Not a problem.
. Not a problem.kald
Well-known member
Use 6010 or 6011 for penetration on the root. Cap it with 7018 or similar for overall strength. 6011 more prone to fatigue induced cracking.
A good rule of thumb is to never rely on 6010 / 6011 for strength by itself.
You are the first person I have ever heard say to not trust a 6010/11 for strength. We use multi pass 6011 AC(for extreme arc blow) vertical down(heat control/close proximity to plastic) extensively on heavy industrial equipment lifting attachments without a 7018 cap.
Last edited:
affende
Well-known member
You are the first person I have ever heard say to not trust a 6010/11 for strength. We use multi pass 6011 AC(for extreme arc blow) vertical down(heat control/close proximity to plastic) extensively on heavy industrial equipment lifting attachments without a 7018 cap.
A good weld is always stronger than the metal itself. 6011 or 6010 rod has a tensile strength of 60000psi where typical mild steel is only 45000psi.
The puddle formation and freezing of F3 rods tends toward increased stress risers and lower resistance to fatigue cracking.
I have used 6010 for high vibration piping as well as lifting applications. All of us welders have used f3 rods extensively without any kind of backup and we know its good.
For an experienced welder, it is not a problem. For a novice welder, on a trailer tongue, with difficulty getting penetration, i would not recommend a rod prone to fatigue cracking or stress risers without a secondary or tertiary cap to dispel as much stress as possible.
a good 6010 weld does not have 60KSI tensile strength. A good 6010 weld has a 60KSI MINIMUM tensile strength. There a very big difference in the two. We all know a good weld will outlast the strength of the parent material and will fail in the HAZ.
However, we are not talking about a good weld. We are talking about a novice welder that is having difficulty.
A lot of experienced welders forget to look at the context of the information being given in relation to the experience of the person the information is meant for. You dont explain the universe to a 3 year old do you? No.
No harm, no foul.
PAIGEJ ... i mean no disrespect you to by saying you are a novice welder. This is not meant to be an insult to you. We all learned to weld and we were all novice welders at some point.
affende
Well-known member
sulky repair for a friend of mine ... new bushings, new shaft, new neck. more to come.


Well, I am a novice welder and i appreciate any help i can get. Since my little 150 mig welder couldn't get enough penetration, i picked up a lincoln ac 225. Huge difference! Made some pretty ugly welds with the 6011 but came out much nicer with 7018 over the top. I probably added 3 lbs to the tongue but i don't think it will ever come apart 
affende
Well-known member
Well, I am a novice welder and i appreciate any help i can get. Since my little 150 mig welder couldn't get enough penetration, i picked up a lincoln ac 225. Huge difference! Made some pretty ugly welds with the 6011 but came out much nicer with 7018 over the top. I probably added 3 lbs to the tongue but i don't think it will ever come apart
OP
neonnblack
Well-known member
If youre gonna go with gloves, go with legit welding gloves or nothing. anything else is just going to burn up quickly.
And some people, me included just dont like wearing it. You cant make a decent weld if your uncomfortable.
And some people, me included just dont like wearing it. You cant make a decent weld if your uncomfortable.
kald
Well-known member
The puddle formation and freezing of F3 rods tends toward increased stress risers and lower resistance to fatigue cracking.
I have used 6010 for high vibration piping as well as lifting applications. All of us welders have used f3 rods extensively without any kind of backup and we know its good.
For an experienced welder, it is not a problem. For a novice welder, on a trailer tongue, with difficulty getting penetration, i would not recommend a rod prone to fatigue cracking or stress risers without a secondary or tertiary cap to dispel as much stress as possible.
a good 6010 weld does not have 60KSI tensile strength. A good 6010 weld has a 60KSI MINIMUM tensile strength. There a very big difference in the two. We all know a good weld will outlast the strength of the parent material and will fail in the HAZ.
However, we are not talking about a good weld. We are talking about a novice welder that is having difficulty.
A lot of experienced welders forget to look at the context of the information being given in relation to the experience of the person the information is meant for. You dont explain the universe to a 3 year old do you? No.
No harm, no foul.
PAIGEJ ... i mean no disrespect you to by saying you are a novice welder. This is not meant to be an insult to you. We all learned to weld and we were all novice welders at some point.
Next time instead of "A good rule of thumb is to never rely on 6010 / 6011 for strength by itself." maybe say(although I fundamentally disagree) "A good rule of thumb for a novice to is to never rely on 6010 / 6011 for strength by itself."
IMO, Paigej needs to learn to run a quality pass with a 6011 before making the 7018 cap. A flawed root with a 6011, even with a good 7018 cap is still a flawed/defective weld and not as strong as just a good 6011 weld by itself.
As I'm sure you would agree, a flawed root cannot simply be fixed by running a good cap.
No disrespect intended to you either Paigej!!
alpinewhite
Well-known member
PaigeJ, why didn't you just get one of these?

http://www.amazon.com/dp/B004QEM78Y/?tag=atomicindus08-20
Am I missing something? Likewise, no disrespect. The curiosity is bugging me.
http://www.amazon.com/dp/B004QEM78Y/?tag=atomicindus08-20
Am I missing something? Likewise, no disrespect. The curiosity is bugging me.
Attachments

PaigeJ, why didn't you just get one of these?
http://www.amazon.com/dp/B004QEM78Y/?tag=atomicindus08-20
Am I missing something? Likewise, no disrespect. The curiosity is bugging me.
^^
Cost of materials for my modified tongue was about $30, plus it's more fun this way!
tncumminsguy
Well-known member
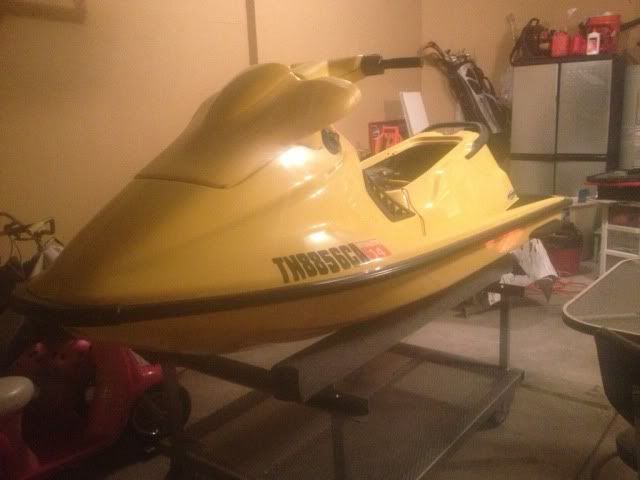
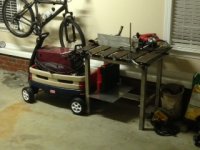
I built a PWC shop stand based off a picture on the internet, then some of my own ideas tossed into the mix. Took a little longer than expected , but the next couple should go really easy. This first one was about 4in to tall
My buddy gave me 14ft of 2x2 .12 so I made than my base frame because I wanted a tray to hold parts etc. Then I used 1.5" .120 for the uprights, and some 1/4 angle to hold the ski. It is completely over kill but most metal was free and I am swapping to the entire frame will be made from 1.5" but can't decide on thickness 20ft of .120 1.5" was 54.00
Also would (4) 6"x6" 1/8 plate bolted to strong casters, then welded to the square tubing at each corner, be strong enough for a 1200 pound jet ski?
Vegaman_Dan
Well-known member
I'd want to gusset those corners if you're going to be putting a jetski on top of that frame. Since you're going to push this around loaded, you're asking for that frame to turn into a parallelagram. Small corner gussets will definitely prevent that.
Plus... gussets look cool.
Plus... gussets look cool.
SiGmA_X
Well-known member
Nice cart!
Would you also gusset from the uprights to the long front-back bars, with angle cuts on both ends to fit? I imagine the metal is thick enough as-is, tho maybe not the 1/4" angle - but IANAE and do not play one on the internet. I just melt stuff sometimes. I would have gone with a square tube I think, or maybe turned the angle onto its 'back' (angle part facing down) and notched the uprights. Angle is dang strong, but it just looks awkward how the rails sit on top of the angle.
Would you also gusset from the uprights to the long front-back bars, with angle cuts on both ends to fit? I imagine the metal is thick enough as-is, tho maybe not the 1/4" angle - but IANAE and do not play one on the internet. I just melt stuff sometimes. I would have gone with a square tube I think, or maybe turned the angle onto its 'back' (angle part facing down) and notched the uprights. Angle is dang strong, but it just looks awkward how the rails sit on top of the angle.
zmotorsports
ALLIANCE MEMBER
I built a PWC shop stand based off a picture on the internet, then some of my own ideas tossed into the mix. Took a little longer than expected , but the next couple should go really easy. This first one was about 4in to tall
My buddy gave me 14ft of 2x2 .12 so I made than my base frame because I wanted a tray to hold parts etc. Then I used 1.5" .120 for the uprights, and some 1/4 angle to hold the ski. It is completely over kill but most metal was free and I am swapping to the entire frame will be made from 1.5" but can't decide on thickness 20ft of .120 1.5" was 54.00
Also would (4) 6"x6" 1/8 plate bolted to strong casters, then welded to the square tubing at each corner, be strong enough for a 1200 pound jet ski?
Nice looking PWC stand. I built two of these for a customer several years ago and they were actually quite a fun project. I had them powder coated to match his and his wife's PWC.
Mike.
aka Larry
Well-known member
I'd want to gusset those corners if you're going to be putting a jetski on top of that frame. Since you're going to push this around loaded, you're asking for that frame to turn into a parallelagram. Small corner gussets will definitely prevent that.
Plus... gussets look cool.
I agree. Right now you have zero triangulation and adding some with definitely increase the strength.
Compton
Member
Have had the stomach virus for four days now so in between restroom visits I decided to throw together my welding / fixture table. Borrowed some ideas from some fellow members.
This is how far I got yesterday. (Pictures)
Things left to do: install casters; bolt down top; remove mill scale from plates; align plates with straight edge; grind and polish the ugly s/s mig welds.
Eventually want to mount my welder on the bottom shelf but the shelf will have to be changed from the current configuration. I was low on material and time so I just slapped the 6" flat bar in there to hold it all square while I welded it out. If I put my machine on the lower shelf I will have to install a drip pan to protect the top of the machine from lubricants, slag, sparks, etc.
Any thoughts, ideas, criticism?
Attachments


zmotorsports
ALLIANCE MEMBER
Over the past several years when I have worked on motorcycles and have had to remove the rear tires it has been a little unnerving to raise the rear of the bike so far off of the deck of the lift with a scissor jack to clear the tire of the fender. I have debated on selling on of my motorcyle lift tables and get one with the drop out bottom for this reason but then I saw a guy's Ranger lift table on the motorcycle section that had an overhead hoist setup for this reason.
I decided last night while I had a customers bike on the lift to fabricated an overhead hoist assembly that could be disassembled and stored when not in use. I had some steel from a couple of previous jobs so I scrounged around and found some steel that would work.
The only out of pocket expense was the cable winch ($33.07 Grainger) and 25' of 3/16" 7x19 cable ($5.00 Bolt & Nut Supply).
Here is what I started with.

I didn't have any square tubing that was a direct fit for one sliding inside another so I improvised. I used some 2" square tube cut into two 4" pieces. I then added 1/4" to two of the sides so that a piece of 1.5" square tube would slide inside of them "snugly" or without slop. I decided on 40" total width which would allow me to raise larger baggers if needed without having to worry about scratching the saddlebags.
I found the center of the square tube top support and marked for the cable pulley centerline. I then welded the cable winch to the top support and added some jam bolts to the tube connectors.

One of my welds on the cable winch.

Welded on nut for extra thread on the jam bolts.

For the vertical pieces, I cut some 1.5" x .095" ERW tubing and cut them at 5 degrees off of vertical so the load would be somewhat pre-loaded on the feet and less "tippy" when weight is on the hoist.
Here are a couple of my welds from the vertical tube to the 1.5" square tube bases.


Here is a picture of the base after painting and in position. I added some support/gussets to help with the strength. I am sure I overbuilt this thing but I didn't want to take a chance on my bikes let alone a customers. You know how those Harley guys are about their pride and joy.

Completed and lifting the bike up off the table.

Overall it works great and I can disassemble it for storage. I think I am going to make a hanger to hang the two vertical supports on the wall and the hoist assembly can be stored under a bench.
Total cost is less than $40.00 due to the fact that I already had the steel. I lot less expensive than buying one.
Mike.
I decided last night while I had a customers bike on the lift to fabricated an overhead hoist assembly that could be disassembled and stored when not in use. I had some steel from a couple of previous jobs so I scrounged around and found some steel that would work.
The only out of pocket expense was the cable winch ($33.07 Grainger) and 25' of 3/16" 7x19 cable ($5.00 Bolt & Nut Supply).
Here is what I started with.
I didn't have any square tubing that was a direct fit for one sliding inside another so I improvised. I used some 2" square tube cut into two 4" pieces. I then added 1/4" to two of the sides so that a piece of 1.5" square tube would slide inside of them "snugly" or without slop. I decided on 40" total width which would allow me to raise larger baggers if needed without having to worry about scratching the saddlebags.
I found the center of the square tube top support and marked for the cable pulley centerline. I then welded the cable winch to the top support and added some jam bolts to the tube connectors.
One of my welds on the cable winch.
Welded on nut for extra thread on the jam bolts.
For the vertical pieces, I cut some 1.5" x .095" ERW tubing and cut them at 5 degrees off of vertical so the load would be somewhat pre-loaded on the feet and less "tippy" when weight is on the hoist.
Here are a couple of my welds from the vertical tube to the 1.5" square tube bases.
Here is a picture of the base after painting and in position. I added some support/gussets to help with the strength. I am sure I overbuilt this thing but I didn't want to take a chance on my bikes let alone a customers. You know how those Harley guys are about their pride and joy.
Completed and lifting the bike up off the table.
Overall it works great and I can disassemble it for storage. I think I am going to make a hanger to hang the two vertical supports on the wall and the hoist assembly can be stored under a bench.
Total cost is less than $40.00 due to the fact that I already had the steel. I lot less expensive than buying one.
Mike.
Trey T
Well-known member
Awesome. I need on of those gantry crane.
5mall5nail5
Well-known member
Made a fixture for a turbo manifold

Finished Jig by Jon Kensy, on Flickr

Jiggin' it by Jon Kensy, on Flickr

Jiggin' it by Jon Kensy, on Flickr
Finished Jig by Jon Kensy, on Flickr
Jiggin' it by Jon Kensy, on Flickr
Jiggin' it by Jon Kensy, on Flickr
zmotorsports
ALLIANCE MEMBER
Made a fixture for a turbo manifold
Nice TIG weave there. Looks great.
Mike.
HellaFab
Well-known member
Planning to make a lot of those manifolds?
SOLID fixture!
Did you check the runout on that flange (both the long one for the head and the turbo flange fixture after you made it? with that much heat I wouldnt be surprised if it warped. especially the really long head flange.
I like to use a spare head if i have one or can find one cheap.
Matt
5mall5nail5
Well-known member
Nice TIG weave there. Looks great.
Mike.
Thanks!
Planning to make a lot of those manifolds?
SOLID fixture!
Did you check the runout on that flange (both the long one for the head and the turbo flange fixture after you made it? with that much heat I wouldnt be surprised if it warped. especially the really long head flange.
I like to use a spare head if i have one or can find one cheap.
Matt
I actually clamp everything down to an existing manifold flange bolted down to a heatsink. I don't think I have a shot of the thing all bolted down but I am very careful about warpage. I actually welded it up with a manifold in it. The manifold used to jig it fits perfectly square against both flanges. When I do a final weld on the long flange I actually "pre warp it" the opposite direction by clamping it to my welding table with a 1/16" welding wire under it to push the middle up.
Last edited:
I wanted to put a receiver hitch mount on my open car trailer so I could use my winch mount. I didn't want the receiver mount on the trailer deck. I used a piece of 6"x6" x 1/4" angle iron scrap I had and cut a Harbor Freight hitch tube in half and welded it to the angle. I wanted the tube flush to the angle so I trimmed off the bottom of the reinforcement ring on the tube and put a 45 degree bevel on both pieces so the weld would be flush.
I had a little piece of the angle iron I had cut off for clearance and I welded that on for a little reinforcement. I then bolted it to the front of the trailer. I will pull it back off later and paint it. I am a very novice welder so critique my welds all you want, I need advice LOL!
I used it already tonight to unload a truck, made it much easier than the come-a-long! Just wish I had it when I loaded that truck up!
Attachments


mebuildit
Well-known member
I built an RV gate for the side of my house, and as added peace of mind I added a wheel. It really didn't need one, but I wanted to make sure that this 11 1/2 wide x 8 foot tall gate didn't sag. Well my driveway is sloped away from the house so the wheel had to follow the terrain slope. After a lot of head scratching, I came up with this.


jmlcolorado
Well-known member
I built an RV gate for the side of my house, and as added peace of mind I added a wheel. It really didn't need one, but I wanted to make sure that this 11 1/2 wide x 8 foot tall gate didn't sag. Well my driveway is sloped away from the house so the wheel had to follow the terrain slope. After a lot of head scratching, I came up with this.
I like it! Does it work well?
We have a trash bin gate at work and the parking lot does the same thing. The wheel was welded solid at the end and it contacts the ground when closed, but it looses contact about half way open. I've been trying to figure out a way to prevent that. Looks like your idea does the trick!

zmotorsports
ALLIANCE MEMBER
I built an RV gate for the side of my house, and as added peace of mind I added a wheel. It really didn't need one, but I wanted to make sure that this 11 1/2 wide x 8 foot tall gate didn't sag. Well my driveway is sloped away from the house so the wheel had to follow the terrain slope. After a lot of head scratching, I came up with this.
Absolutely beautiful job. I love it. I wish we didn't have snow and winter **** to have to contend with or I would copy something like that for my gate.
Mike.
alpinewhite
Well-known member
I built an RV gate for the side of my house, and as added peace of mind I added a wheel. It really didn't need one, but I wanted to make sure that this 11 1/2 wide x 8 foot tall gate didn't sag. Well my driveway is sloped away from the house so the wheel had to follow the terrain slope. After a lot of head scratching, I came up with this.
Do you find that the tension on the wheel stays the same? What you need is a setup that varies the height but not the tension. Most spring-based setups will lose/increase tension when stretched/compressed depending on whether the spring is in compression/tension.
aka Larry
Well-known member
I built an RV gate for the side of my house, and as added peace of mind I added a wheel. It really didn't need one, but I wanted to make sure that this 11 1/2 wide x 8 foot tall gate didn't sag. Well my driveway is sloped away from the house so the wheel had to follow the terrain slope.
Wow, a coil-over and 4-link for a gate wheel! Damn. Nice work man.
NASTYZEN
Well-known member
Wow! Double wishbone, coil over suspension for your door! I've seen race cars with less fancy set ups.
SM Racing
Well-known member
If you will flip the shock/spring assembly over, you will cut the unsprung weight. HAHA
However if you flip the assembly over you can keep the water from building up on the top of the shock.
However if you flip the assembly over you can keep the water from building up on the top of the shock.
NASTYZEN
Well-known member
You could go further by adding a cantilever rocker arm with a push rod and lower the unsprung weight even more. Change over the metal caster wheel to an Aluminum one with low profile rubber.
Is that a Kohni shock?
Is that a Kohni shock?
alpinewhite
Well-known member
I vote for active suspension to control the ride height. Laser-guided, maybe.
IONH
Well-known member
Did someone say.. airbags?
kazlx
Well-known member
My buddy had a 'production' motorcycle hauler and got rear-ended. It was easier to build another one than to try and fix the old one. Funny thing is, the welds on his original one are welds I would never let leave my garage for something used to haul like that.


Last edited:
ilovevocs
Well-known member
I built an RV gate for the side of my house, and as added peace of mind I added a wheel. It really didn't need one, but I wanted to make sure that this 11 1/2 wide x 8 foot tall gate didn't sag. Well my driveway is sloped away from the house so the wheel had to follow the terrain slope. After a lot of head scratching, I came up with this.
I love it. Thanks for sharing.
michakaveli
Well-known member
I love it. Thanks for sharing.
Cool!