To avoid these ads, REGISTER NOW!

Show us your welding projects

zmotorsports

ALLIANCE MEMBER
Joined
Oct 20, 2009
Messages
21,327
Location
Northern Utah
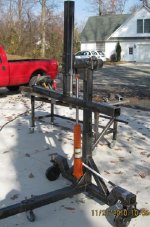
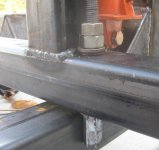
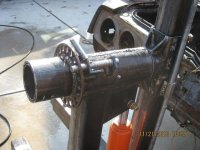
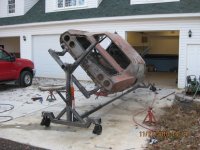
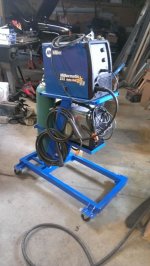
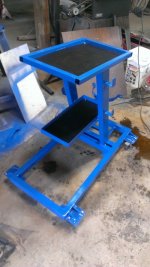
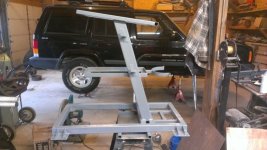
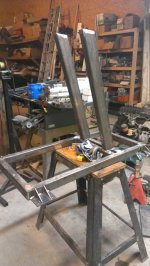
My buddy had a 'production' motorcycle hauler and got rear-ended. It was easier to build another one than to try and fix the old one. Funny thing is, the welds on his original one are welds I would never leave my garage for something used to haul like that.

Nice job.

I know what you mean about some "production" welds. I was packing the wheel bearings and undercoating my FIL's travel trailer a couple of years ago and decided to give the undercarriage a once over. I was amazed at the piss poor quality and quantity of the welds holding the spring shackles to the frame. Something like that would never have even left my shop.

Mike.
 
To avoid these ads, REGISTER NOW!

HellaFab

Well-known member
Joined
Feb 10, 2013
Messages
210
Location
Kingston, Ontario
Had a good day of welding.


One of the pics I happened to snap of me welding the tip to the adapter.

Straight pipe for the women [they like it loud ;) ].

902002_351547894945253_508548090_o.jpg
 

Jersey Tom

Member
Joined
Mar 1, 2013
Messages
14
Just a simple start - TIG cart. All 0.065 wall 1" square tube and 16 gauge sheet, mild steel. Painted it with Rustoleum "Safety Blue" which I feel like is a pretty good match to "Miller Blue."

ypDz9oyl.jpg


For the first time doing any TIG in 6 years (and only a little over 1 year of doing it back then) I feel like my beads are at least decent. Been much more **** about fit-up and clean work pieces, and much more deliberate in my torch placement and pedal usage. In the past I used to just go "wide open" on the pedal and zip through tapping away with the filler rod... came out decent, but more ripply than "stack of dimes" and would wander a bit with position and bead diameter.

cx5Yfdgl.jpg
 

zmotorsports

ALLIANCE MEMBER
Joined
Oct 20, 2009
Messages
21,327
Location
Northern Utah
Just a simple start - TIG cart. All 0.065 wall 1" square tube and 16 gauge sheet, mild steel. Painted it with Rustoleum "Safety Blue" which I feel like is a pretty good match to "Miller Blue."

ypDz9oyl.jpg


For the first time doing any TIG in 6 years (and only a little over 1 year of doing it back then) I feel like my beads are at least decent. Been much more **** about fit-up and clean work pieces, and much more deliberate in my torch placement and pedal usage. In the past I used to just go "wide open" on the pedal and zip through tapping away with the filler rod... came out decent, but more ripply than "stack of dimes" and would wander a bit with position and bead diameter.Quote]


Looks good. I think that is the same color I used when I fabricated my welding table to get it as close as possible to Miller blue.
15gv39h.jpg


Mike.
 

F-117HWK

Well-known member
Joined
Apr 17, 2012
Messages
283
Location
Virginia
Possibly a dumb question, but what would cause the metal to "sweat" a black liquid when welding to it?

I was making the attached last night and was having a bit of trouble. I was thinking it was possibly the two different types of metal between the gears and the little posts I had lying around, but thought yall may have some more insight. The welds were hideous compared to what I was laying down on my welding cart. I was not getting very good penetration on the welds either. :sad:
 

Attachments

  • Gear Pen Holder.jpg
    Gear Pen Holder.jpg
    134.7 KB · Views: 673

madosta

Well-known member
Joined
Sep 4, 2012
Messages
807
Location
Michigan
Possibly a dumb question, but what would cause the metal to "sweat" a black liquid when welding to it?

I was making the attached last night and was having a bit of trouble. I was thinking it was possibly the two different types of metal between the gears and the little posts I had lying around, but thought yall may have some more insight. The welds were hideous compared to what I was laying down on my welding cart. I was not getting very good penetration on the welds either. :sad:

Whoa those are some sweet gears. They definitely look hardened and chromed maybe. That is most likely what's causing you to not penetrate.
 

brawls43

Well-known member
Joined
Aug 29, 2012
Messages
133
Location
Minneapolis
They kind of look like the gear rotors for an oil pump. Could have been submerged in oil so long that despite looking clean, had oil in them. Which could leak out when heated and contaminate the welds.
 

F-117HWK

Well-known member
Joined
Apr 17, 2012
Messages
283
Location
Virginia
Whoa those are some sweet gears. They definitely look hardened and chromed maybe. That is most likely what's causing you to not penetrate.

Thanks, buddy grabs them from the scrap pile at work for me to play around with. This is what I was leaning towards on the penetration not occurring. Is there anything you can really do to avoid this, besides not using that type of metal?

They kind of look like the gear rotors for an oil pump. Could have been submerged in oil so long that despite looking clean, had oil in them. Which could leak out when heated and contaminate the welds.

Almost positive that is what these came out of on a diesel truck as they were contained withing a larger gear which had the teeth on the inside of the circle. I cleaned them before welding, but I never even really considered the oil having penetrated into the gears over time. Thanks.

PM = Powdered Metal

Can you elaborate?


Thanks all
 

Heavy Metal Doctor

Well-known member
Joined
May 26, 2010
Messages
5,417
Location
Mason Dixon Line
For ^ I don't have any explanation, but I can tell you I get the same thing -- odd welds / leeching **** -- happen when I weld to a bearing race to get something to grip and pull it from a blind hole. Not sure if it the plating or heat treating or a combination, but its those kinda heavy duty parts that do it.
 

F-117HWK

Well-known member
Joined
Apr 17, 2012
Messages
283
Location
Virginia
For ^ I don't have any explanation, but I can tell you I get the same thing -- odd welds / leeching **** -- happen when I weld to a bearing race to get something to grip and pull it from a blind hole. Not sure if it the plating or heat treating or a combination, but its those kinda heavy duty parts that do it.

Interesting. Thanks, glad to know Im not the only one seeing this.

Wiki is probably better at explaining than I am:
http://en.wikipedia.org/wiki/Powder_metallurgy

Basically it's the same process as used to make Oilite bushings. I believe it might also be used to make Gerotor oil pump rotors as well.....just a guess.

Cool thanks for the reading material.
 

HellaFab

Well-known member
Joined
Feb 10, 2013
Messages
210
Location
Kingston, Ontario
SO pumped with how the intake pipe for the turbo kit im building turned out.

for those of you not subscribed to my facebook page, here is a pic. couple more on my page.
521727_357722977661078_190076294_n.jpg


The customer is getting excited to say the least....
 

larry4406

Well-known member
Joined
Jan 27, 2006
Messages
19,060
Location
Northern Virginia
Here is the rotissorie I built.

Features include: (1) arbor locks with spring loaded pins where the pin handle holds the pin in the retracted position for one man operation; (2) hydraulic jacks for raising but hitch pins in double shear to ensure arbors are concentric; (3) bushed center of gravity adjuster to raise or lower body to adjust for balance (use deep well socket and impact gun on coupling nut); (4) caster wheels with brakes at all corners - I used an oil pan drain bolt to lock wheel at 90 degrees; (5) push handles on both ends.

A fun project that is getting its use now.
 

Attachments

  • Swivel wheel with brake and bolt lock.jpg
    Swivel wheel with brake and bolt lock.jpg
    78.1 KB · Views: 523
  • Rear Assembly.jpg
    Rear Assembly.jpg
    96.6 KB · Views: 542
  • Overall View.jpg
    Overall View.jpg
    112.4 KB · Views: 555
  • Bushed CG Adjuster.jpg
    Bushed CG Adjuster.jpg
    66.1 KB · Views: 540
  • Arbor with rotation lock.jpg
    Arbor with rotation lock.jpg
    94.5 KB · Views: 573
  • Body On.JPG
    Body On.JPG
    105 KB · Views: 609

aggierailroad

Well-known member
Joined
Jan 8, 2012
Messages
581
Location
Houston, TX
Here is some of mine, I am a total amateur welder. Will not show close up of welds especially after ZTFAB.

Looks great to me, it is an art in itself to weld fencing flat and square, especially on pieces that fit together like you have to do! Keep up the good work!
 

st cloud rustoms

Active member
Joined
Feb 8, 2013
Messages
29
Location
Saint Cloud, Florida
A friend of mine kept getting machines stolen off of his landscape trailer, so I built him a locking rack. Turns out, a lot more people want them so now I build one every once in a while and sell them on CL.

5_Ed5_Fd5_H83_E53nf3_Kbc92648ff53d46a91c6c.jpg


5_G15_K75_Je3_L13_Fc3_J3c92c0868b13f6f11752.jpg
 

03protege

Well-known member
Joined
Sep 13, 2012
Messages
3,104
Location
Louisiana
Thanks, buddy grabs them from the scrap pile at work for me to play around with. This is what I was leaning towards on the penetration not occurring. Is there anything you can really do to avoid this, besides not using that type of metal?l

You can bake the oil out, if you have a "crawfish" burner just throw it on top and get it cooking. May take some experimentation but I would think you could sweat it out in short order.
 
To avoid these ads, REGISTER NOW!

larry4406

Well-known member
Joined
Jan 27, 2006
Messages
19,060
Location
Northern Virginia
Larry, thats one hell of a nice looking rotissorie.

Thank you.

I studied many designs out there before building this. Most suffer from lack of keeping the arbors concentric which basically creates a bent crank and impedes rotation. I wanted to ensure concentric axis of rotation yet be able to tune the offset to get the car's CG on the axis of rotation which then balances the body. The nut and pneumatic impact make it quite easy. The hitch pins keep the axis of rotation in alignment without stress on the jacks

My welding skills still need great improvement.
 

bsaint

Well-known member
Joined
Apr 26, 2010
Messages
5,109
Location
Manchester, CT
Well I am fabbing up a cart for my oxy tanks and when I fitted the wheels I found a design error. So I programmed up some tabs to fix it.

Original location.
img2013041900196.jpg


Bracket from 12g mild steel. I formed it also in a vise.
img2013041900198.jpg


Welded them on.
img2013041900195.jpg

img2013041900194.jpg


That's better!
img2013041900199.jpg

img2013041900201.jpg


Now to fab up a tray and tank bar.
 

NASTYZEN

Well-known member
Joined
Jun 11, 2010
Messages
2,823
Location
St-Colomban,Que. Canada
Last weekends project that degenerated to 35 hrs labour....
Electronic weight scale platform. Mainly 2 x 4 x 1/8 Alu. tubing
The racing guys use it to set there corner weights.-

dscn2023m.jpg


dscn2018u.jpg


:beer:
 

zmotorsports

ALLIANCE MEMBER
Joined
Oct 20, 2009
Messages
21,327
Location
Northern Utah
Last weekends project that degenerated to 35 hrs labour....
Electronic weight scale platform. Mainly 2 x 4 x 1/8 Alu. tubing
The racing guys use it to set there corner weights.-

dscn2023m.jpg


dscn2018u.jpg


:beer:

Nasty, I don't know what to say. Beautiful work as always. You never cease to amaze.

Mike.
 

Black Sheep

Active member
Joined
Jul 19, 2011
Messages
25
Location
Manchester, MI
Here's my cart I just finished for my new toys...
 

Attachments

  • IMAG1271.jpg
    IMAG1271.jpg
    102.3 KB · Views: 342
  • IMAG1269.jpg
    IMAG1269.jpg
    94.8 KB · Views: 321
  • IMAG1268.jpg
    IMAG1268.jpg
    131.1 KB · Views: 3,523
  • IMAG1263.jpg
    IMAG1263.jpg
    133.1 KB · Views: 294
  • IMAG1237.jpg
    IMAG1237.jpg
    103.2 KB · Views: 283

E.rodz

Well-known member
Joined
Nov 11, 2009
Messages
2,434
Location
st.paul MN.
started this project years ago still trying to figure out how many more things I want it to be used for. so far English wheel,10 gauge nibbler,rivet driver,still coming up with more parts to use it for a powered bead roller I would really like to finish this things soon so I can paint it.IMAG0525.jpg
feb-march2009009.jpg
if anyone has any more ideas as what else I could use this for please let me know!
 

ert01

Well-known member
Joined
Jun 26, 2011
Messages
151
Here's my cart I just finished for my new toys...

Looks good! I made one very similar but I have my plasma up top and the 211 on the bottom.

You can buy plastic end caps to fit in those open holes in your square tubing. I buy mine on eBay all the time for dirt cheap. Helps clean up the final product.
 

Black Sheep

Active member
Joined
Jul 19, 2011
Messages
25
Location
Manchester, MI
Thanks! I thought about mitering the corners but then I realized the nozzle for the welder fits in there. I figured I'd leave it open so I could stick it in there when I need to set it down for a sec. However, after helping my dad clean out his barn yesterday I found a nice chrome handle from a tool box that will serve the same purpose so I'll have to look for some of those caps.
 

IMCA38

Well-known member
Joined
Sep 21, 2007
Messages
998
Location
Bennet, NE
Dad and I were at Northern the other day and he was looking at their timberjacks as he has several trees to take down this summer. I told him to save his money and I'd make him something. Here's what we came up with, sorry for the poor pic, its been raining all day and all night, so it was cooped up in the garage.
 

Attachments

  • timberjack.jpg
    timberjack.jpg
    147.6 KB · Views: 461
To avoid these ads, REGISTER NOW!
Top Bottom