
You are using an out of date browser. It may not display this or other websites correctly.
You should upgrade or use an alternative browser.
You should upgrade or use an alternative browser.
Show us your welding projects
- Thread starter neonnblack
- Start date


On corner joints like that I typically cut the points off of each piece. When you put them together, you should have a nice valley in there to fill with the weld. Very little grinding should leave you with a nice edge and no loss in strength.
Did a quick little sketch in MS Paint so you can see what I mean.
Make sure you take only a little off at a time though as it will vary based on the thickness of the material, too much and you will have to bridge the gap and essentially rebuild the corner.
Did a quick little sketch in MS Paint so you can see what I mean.
Make sure you take only a little off at a time though as it will vary based on the thickness of the material, too much and you will have to bridge the gap and essentially rebuild the corner.
Attachments
CubbyChowder
Well-known member
- Joined
- May 16, 2013
- Messages
- 175
Thought I'd post up some pictures of my first project utilizing my new Harbor Freight tubing roller with SwagOffroad weld-on wings, bottle jack/pipe threader kit and 1.5" square dies. I built this wall mounted decorative shelf for my girlfriend for Christmas (she hasn't seen it yet), and started out by lightly rolling some 1.5" square tube to have a nice subtle bend.
Sorry for iPhone quality photos, I will take high quality photos once she opens it.
I then built these two outer frames:

I connected them and added "X"s with various sizes of square tube. This is the final metal frame:


I cut out all these wood slats to fill up the empty space in the X's and sit flush with them:

In the process of staining them. I later sanded them lightly and restained:

And the finished product. The first photo displays the true color of the wood the best, the rest show how it all looks together:


Let me know what you guys think!
Sorry for iPhone quality photos, I will take high quality photos once she opens it.
I then built these two outer frames:
I connected them and added "X"s with various sizes of square tube. This is the final metal frame:
I cut out all these wood slats to fill up the empty space in the X's and sit flush with them:
In the process of staining them. I later sanded them lightly and restained:
And the finished product. The first photo displays the true color of the wood the best, the rest show how it all looks together:
Let me know what you guys think!
welder4956
Well-known member
On corner joints like that I typically cut the points off of each piece. When you put them together, you should have a nice valley in there to fill with the weld. Very little grinding should leave you with a nice edge and no loss in strength.
Did a quick little sketch in MS Paint so you can see what I mean.
Make sure you take only a little off at a time though as it will vary based on the thickness of the material, too much and you will have to bridge the gap and essentially rebuild the corner.
I do all of my square tube corner joints this way. Trim off the points on the outside edge, bevel the sides and fillet weld on the inside corner. Very clean result.
aka Larry
Well-known member
Thought I'd post up some pictures of my first project utilizing my new Harbor Freight tubing roller with SwagOffroad weld-on wings, bottle jack/pipe threader kit and 1.5" square dies. I built this wall mounted decorative shelf for my girlfriend for Christmas (she hasn't seen it yet), and started out by lightly rolling some 1.5" square tube to have a nice subtle bend.
Looks great man. I really like the flush inlay with the wood. Nice touch.
1/2 Cup
Member Emeritus
Thought I'd post up some pictures of my first project utilizing my new Harbor Freight tubing roller with SwagOffroad weld-on wings, bottle jack/pipe threader kit and 1.5" square dies. I built this wall mounted decorative shelf for my girlfriend for Christmas (she hasn't seen it yet), and started out by lightly rolling some 1.5" square tube to have a nice subtle bend.
Sorry for iPhone quality photos, I will take high quality photos once she opens it.
I then built these two outer frames:

I connected them and added "X"s with various sizes of square tube. This is the final metal frame:


I cut out all these wood slats to fill up the empty space in the X's and sit flush with them:

In the process of staining them. I later sanded them lightly and restained:

And the finished product. The first photo displays the true color of the wood the best, the rest show how it all looks together:


Let me know what you guys think!
It has my tick of approval.

CubbyChowder
Well-known member
- Joined
- May 16, 2013
- Messages
- 175
Looks great man. I really like the flush inlay with the wood. Nice touch.
It has my tick of approval.
Thanks guys, the flush inlays is sort of my thing that I like to incorporate into each project I do. Here a few higher quality photos of a couple other tables I've made over the past few months.
I designed this table to be used with an L-shaped sectional couch, hence the triangular shape. It includes a custom metal frame with flush sitting wooden slats. This one took me a LONG time:


And I built this table for my mom for her birthday back in July. She wanted a coffee table for her living room, and had a 30" piece of nice round glass which she wanted as a top, so I designed and built a metal frame for it to sit on. This one is kind of difficult to photograph:


CubbyChowder
Well-known member
- Joined
- May 16, 2013
- Messages
- 175
CubbyChowder those tables are off the hooooooook...I want one...
On the shelf you made for your girl friend how did you attach the wood inlays to the frame?
Thanks man, the top one is actually for sale, however shipping it would probably be crazy expensive.
As for the inlays, I glued them all to two separate boards which sit behind them. Once the inlays were glued on, I could remove the back section in one piece and the bottom section in another piece. I cut the backing board so that it fits very snug in the metal frame, to where I would need a few taps with a rubber mallet to pop it in place and it's just wedged in there now, not going anywhere
NASTYZEN
Well-known member
Chuby, those tables are real cool. Lots of work in those.
RivennHewn
Well-known member
Hey chubs, how are you attaching the wood?
They look great!
They look great!
CubbyChowder
Well-known member
- Joined
- May 16, 2013
- Messages
- 175
Chuby, those tables are real cool. Lots of work in those.
Thank you sir
Hey chubs, how are you attaching the wood?
They look great!
On the table, I welded 1/4" round bar all along the inside of the metal frame and the wood slats just sit on them, they aren't fastened. They just pop in and out.
Hot Chop shop
Well-known member
On corner joints like that I typically cut the points off of each piece. When you put them together, you should have a nice valley in there to fill with the weld. Very little grinding should leave you with a nice edge and no loss in strength.
Did a quick little sketch in MS Paint so you can see what I mean.
Make sure you take only a little off at a time though as it will vary based on the thickness of the material, too much and you will have to bridge the gap and essentially rebuild the corner.
This is exactly what I was looking for!!! I knew you guys were holding out on me and making me do extra grinding. It's a Christmas miracle!
This is what they look like since I never thought to make a valley there...

Thanks for taking the time to make a sketch!
Aquaticbob
Well-known member
Thanks guys, the flush inlays is sort of my thing that I like to incorporate into each project I do. Here a few higher quality photos of a couple other tables I've made over the past few months.
I designed this table to be used with an L-shaped sectional couch, hence the triangular shape. It includes a custom metal frame with flush sitting wooden slats. This one took me a LONG time:
And I built this table for my mom for her birthday back in July. She wanted a coffee table for her living room, and had a 30" piece of nice round glass which she wanted as a top, so I designed and built a metal frame for it to sit on. This one is kind of difficult to photograph:
Those tables are phenomenal! The welds look they aren't even there on the one for your mom
 I would love to have a table like that in my house! Do you fabricate for a living? I bet you could have a pretty lucrative business selling those amazing tables to the right buyers
This is exactly what I was looking for!!! I knew you guys were holding out on me and making me do extra grinding. It's a Christmas miracle!
This is what they look like since I never thought to make a valley there...
Thanks for taking the time to make a sketch!
Sure thing, always glad to help. Post up how it goes!
Has anyone made some floor standing speaker stands? I am brainstorming currently. These will just be for bookshelf-sized front left and front right speakers for a bedroom surround sound system. The speakers are about 8"deep and 6" wide give or take a few inches if I had to guess. Need to be at least 3'-4' off the ground to get the stage up above the bed height. All ideas welcome!
Mike.ASC
Well-known member
Cubby Chowder , That is some great looking work you've done !
Mike
Mike
Duker
Well-known member
Cubby, That is some great work. I only have one negative, you are killing me using that number two pine in that Triangular table! You have a table that could be in a RISD gallery showing and you used a low grade wood for a fine piece of work.
Maybe its my upbringing as a third generation furniture & cabinet maker but I think cherry or claro walnut or even better some Texas Mesquite would have been the ticket. I am sure I will have pine lovers decry my comments and for the record I do use pine (mostly long-leaf) but I think a fine hardwood is the way to go for the work you are producing. There is only a few board feet of lumber in that triangular table so the additional cost would have been marginal but the effect would have been huge!
Here is a deal for you...I think your short changing the quality of your work so much using that low grade pine that I will give you some Mesquite for that table if you pay the shipping! You wont have to stain it just cut and finish with a quality finish. Cabinet grade mesquite is going for $12-15 a bd ft. so I am serious in how much I think it will improve the look.
Again, great work, looking forward to seeing more!")
Maybe its my upbringing as a third generation furniture & cabinet maker but I think cherry or claro walnut or even better some Texas Mesquite would have been the ticket. I am sure I will have pine lovers decry my comments and for the record I do use pine (mostly long-leaf) but I think a fine hardwood is the way to go for the work you are producing. There is only a few board feet of lumber in that triangular table so the additional cost would have been marginal but the effect would have been huge!
Here is a deal for you...I think your short changing the quality of your work so much using that low grade pine that I will give you some Mesquite for that table if you pay the shipping! You wont have to stain it just cut and finish with a quality finish. Cabinet grade mesquite is going for $12-15 a bd ft. so I am serious in how much I think it will improve the look.
Again, great work, looking forward to seeing more!
Hot Chop shop
Well-known member
Hey quick question for anyone not out doing last minute shopping!
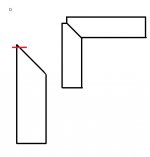
When capping the ends of square tubing do you v the plate down into the tube? Or set it on top with a beveled edge going down?
I hope that makes sense it might be up to the person but wanted to know
If there was a right way?
I have attached two terrible cell phone pics trying to explain what I mean.
Thanks and happy holidays!

Or

When capping the ends of square tubing do you v the plate down into the tube? Or set it on top with a beveled edge going down?
I hope that makes sense it might be up to the person but wanted to know
If there was a right way?
I have attached two terrible cell phone pics trying to explain what I mean.
Thanks and happy holidays!
Or
kazlx
Well-known member
On corner joints like that I typically cut the points off of each piece. When you put them together, you should have a nice valley in there to fill with the weld. Very little grinding should leave you with a nice edge and no loss in strength.
Did a quick little sketch in MS Paint so you can see what I mean.
Make sure you take only a little off at a time though as it will vary based on the thickness of the material, too much and you will have to bridge the gap and essentially rebuild the corner.
I usually cut for miters by cutting straight pieces to length, minus 2x the wall thickness (if doing both ends, say for a square). Then I just cut the miter for a 45 right to the inside edge of the tube.
kazlx
Well-known member

HellaFab
Well-known member
Hey quick question for anyone not out doing last minute shopping!
When capping the ends of square tubing do you v the plate down into the tube? Or set it on top with a beveled edge going down?
I hope that makes sense it might be up to the person but wanted to know
If there was a right way?
I have attached two terrible cell phone pics trying to explain what I mean.
Thanks and happy holidays!
similar to the second picture... you don't need to bevel it though. just grind it off square and the weld will fill the whole thing in.
Make sure you tack each corner before welding though or you will be in for a world of hurt trying to get it welded nice and tight.
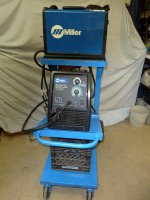
Made some progress on my welding table today, still waiting on casters and need to clean up the top.
Any tips on getting the top nice and clean? I have tried a wire cup on my angle grinder and 80 grit on disk sander, and I am not making much progress lol.
top is 3 1/2'x6' 3/4"
legs are 2x2" 1/4"

IMG_0344.jpg by 1upmoto, on Flickr

IMG_0345.jpg by 1upmoto, on Flickr

IMG_0349.jpg by 1upmoto, on Flickr

IMG_0355.jpg by 1upmoto, on Flickr
Any tips on getting the top nice and clean? I have tried a wire cup on my angle grinder and 80 grit on disk sander, and I am not making much progress lol.
top is 3 1/2'x6' 3/4"
legs are 2x2" 1/4"
IMG_0344.jpg by 1upmoto, on Flickr
IMG_0345.jpg by 1upmoto, on Flickr
IMG_0349.jpg by 1upmoto, on Flickr
IMG_0355.jpg by 1upmoto, on Flickr
Last edited:
Hot Chop shop
Well-known member
Made some progress on my welding table today, still waiting on casters and need to clean up the top.
Any tips on getting the top nice and clean? I have tried a wire cup on my angle grinder and 80 grit on disk sander, and I am not making much progress lol.
top is 3 1/2'x6' 3/4"
legs are 2x2" 1/4"
Table is coming along real nice. To remove the mill scale I used 3 of these paint stripper things... Worked grrrrrrreat for me.

Those feet look familar since I just bought 8 of them LOL. Did you get them from JC WInco?
Table is coming along real nice. To remove the mill scale I used 3 of these paint stripper things... Worked grrrrrrreat for me.
Nice, ill pick some of those up and give them a try.
EdT
Well-known member
Belt sander
AmickRacing
Well-known member
I haven't been doing much in the terms of welding lately, but a few things have been stuck together.
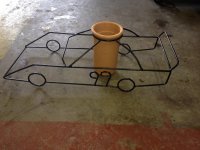
Made a race car flower planter holder gadget for a fellow racers daughter.
Made a fireman for a firefighter friend of mine.
Also made a new cage for my fuel cell in the race car too, but there's no pictures of it for some reason.
Made a race car flower planter holder gadget for a fellow racers daughter.
Made a fireman for a firefighter friend of mine.
Also made a new cage for my fuel cell in the race car too, but there's no pictures of it for some reason.
Attachments


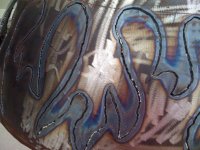
Not sure if I posted this or not. I do a bunch of welding art, mostly critters I call mechanimals. This was the last thing I welded and my first attempt at a motorcycle.
Is that a cage from a VW IRS axle?
vartz04
Well-known member
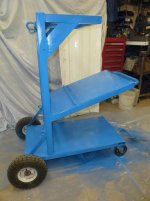
Built this today mostly of stuff being thrown out at work. I have a total of about $25 into this and it took 3 hours to make. If all of the welds hold I'll strip it down and paint it.

Sent from my SPH-L710 using Tapatalk

Sent from my SPH-L710 using Tapatalk
Table is coming along real nice. To remove the mill scale I used 3 of these paint stripper things... Worked grrrrrrreat for me.
I just watched a "Trucks!" episode where that was the best mechanical thing they found. Better was a really big bead blast cabinet!
vartz04
Well-known member
I used the same discs to remove all the paint off the cub cadet I "restored"
Sent from my SPH-L710 using Tapatalk
Sent from my SPH-L710 using Tapatalk
ishiboo
Well-known member
N00b project but I am proud! Just put my Zoro 30% off Millermatic to use in the first weld I've done in probably 5 years. Cold outside and I my helmet kept fogging up or the weld would have actually looked pretty decent. I loaded the tire next to a curb and cranked on it and it held, penetration seems good. I had the voltage a bit low for what I was welding.
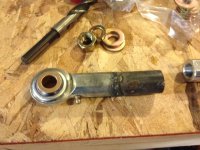
The Kubota tie rod ends were $360 a piece and are non-greasable. The tractor has 4300 hours and a new set would have probably lasted another 4300 hours, however the golf course who owned the tractor also messed up the bores (since they're tie rods they were tapered) by trying to grind and welding the loose tie rod shafts, so even if I wanted to spend $720 on new rod ends, they wouldn't have worked.
Bought 3/4 greasable rod ends, cut the existing sleeves off (M20-1.5) and welded them to the new rod ends. Used a bronze bushing in the rod end to bring the 3/4 down to 5/8", and ran a 5/8 grade 8 bolt through. The heim joints will not last as long as tie rod ends, but they'll likely outlive the serviceable life of the tractor. I'm hoping the fact the rod end is slightly higher does not snap the casting there by exerting more leverage.
Two tie rods were $20, plus I spent another $30 in hardware for a total of $50 for two rod ends, or a savings of $670. Can't wait to make a welding table (local guy has a 4x8x5/8 for sale right now!) and build some cool tractor stuff for spring!
The Kubota tie rod ends were $360 a piece and are non-greasable. The tractor has 4300 hours and a new set would have probably lasted another 4300 hours, however the golf course who owned the tractor also messed up the bores (since they're tie rods they were tapered) by trying to grind and welding the loose tie rod shafts, so even if I wanted to spend $720 on new rod ends, they wouldn't have worked.
Bought 3/4 greasable rod ends, cut the existing sleeves off (M20-1.5) and welded them to the new rod ends. Used a bronze bushing in the rod end to bring the 3/4 down to 5/8", and ran a 5/8 grade 8 bolt through. The heim joints will not last as long as tie rod ends, but they'll likely outlive the serviceable life of the tractor. I'm hoping the fact the rod end is slightly higher does not snap the casting there by exerting more leverage.
Two tie rods were $20, plus I spent another $30 in hardware for a total of $50 for two rod ends, or a savings of $670.
Can't wait to make a welding table (local guy has a 4x8x5/8 for sale right now!) and build some cool tractor stuff for spring!Attachments


CubbyChowder
Well-known member
- Joined
- May 16, 2013
- Messages
- 175
Those tables are phenomenal! The welds look they aren't even there on the one for your mom
Thanks man! I don't really do anything for a living yet haha but I would like to try out making some money with this stuff!
Cubby Chowder , That is some great looking work you've done !
Mike
Thanks Mike!
Cubby, That is some great work. I only have one negative, you are killing me using that number two pine in that Triangular table! You have a table that could be in a RISD gallery showing and you used a low grade wood for a fine piece of work.
Maybe its my upbringing as a third generation furniture & cabinet maker but I think cherry or claro walnut or even better some Texas Mesquite would have been the ticket. I am sure I will have pine lovers decry my comments and for the record I do use pine (mostly long-leaf) but I think a fine hardwood is the way to go for the work you are producing. There is only a few board feet of lumber in that triangular table so the additional cost would have been marginal but the effect would have been huge!
Here is a deal for you...I think your short changing the quality of your work so much using that low grade pine that I will give you some Mesquite for that table if you pay the shipping! You wont have to stain it just cut and finish with a quality finish. Cabinet grade mesquite is going for $12-15 a bd ft. so I am serious in how much I think it will improve the look.
Again, great work, looking forward to seeing more!
Man, I can't thank you enough for the kind words and advice. To be perfectly honest, I am still very new to all of this and have very little knowledge on woodwork and different types of wood in general. I'm still pretty new to working with metal as well, but I plan on learning a lot more in the future. I just recently acquired my own shop space and have been investing all my time and money into new tools and skills, and also a BMW project which has lasted almost 2 years now. I plan on doing a lot more custom furniture stuff in the future, so I will post up any new work that I do. My favorite approach is to have a general idea of what I'm building and come up with new ideas as I'm building it, kind of keeps things fun and interesting for me.
I also really appreciate you offering to give me some wood for free! That is incredibly nice of you, I would be honored to use some in my next project. Do you have an idea of how much shipping would be? I'm pretty tight on money at the moment, I might have to wait a month or two to catch up before I can take you up on that awesome offer!
Cubby - I agree wholeheartedly with Duker. Your work is outstanding. You put a ton of time and effort into that project and it paid off big. Now you need to finish the piece off with the proper wood. I know you said you are tight now, I get that. When finances permit, go get some nice stuff. Its too nice a project to have the low grade lumber inserts. Find some boards with a beautiful grain and no visible knots. If the wood is nice, no need to stain. Put a nice clear shellac or poly on it and let the natural grain show.
Again, excellent work sir!
Last edited:
BD1
Well-known member

BellyUpFish
Well-known member
Not sure if I posted this or not. I do a bunch of welding art, mostly critters I call mechanimals. This was the last thing I welded and my first attempt at a motorcycle.
Could you do an airplane?
PCO6
Well-known member
That looks great.Built this today mostly of stuff being thrown out at work. I have a total of about $25 into this and it took 3 hours to make. If all of the welds hold I'll strip it down and paint it.
Sent from my SPH-L710 using Tapatalk
A wheel barrow on steroids.Robert Hall
Well-known member
Nice!
Last edited: