To avoid these ads, REGISTER NOW!

Show us your welding projects

Engine

Well-known member
Joined
Jan 9, 2014
Messages
646
Location
Kentucky
I'm in the process of making my second welding cart. It will be for a Hobart Stickmate welder that I recently bought.

Like the first one, the welds are nothing to get excited about, but the cart serves the purpose and it is strong.

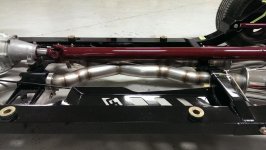
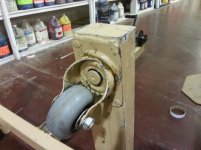
I'll post a few pics made during the build. The first two are the basic frame and the second two are the cart with the wheels, etc.

The bottom shelf will hold the welder and the top is for a tool box. The slats for the top shelf are 1/8" plate that I stiffened by heating along the edges and bent over a little. You can easily see the hammer marks.

The hangers for the cables stick out too far and I'll have to do something to tuck them in a little tighter. I'm thinking about heating and bending them in some. Oh well, it wouldn't be a real project without at least one screw up. And I think my camera seems to emphasize the defects. :dunno:

20ich2b.jpg

5l1kee.jpg

e1ao8g.jpg

2rn8pyb.jpg
 
To avoid these ads, REGISTER NOW!

yaidunno

Well-known member
Joined
Feb 10, 2011
Messages
1,336
Location
WI
Finished up my exhaust plumbing project the other day.
 

Attachments

  • IMAG0174.jpg
    IMAG0174.jpg
    142.2 KB · Views: 365
  • IMAG0175.jpg
    IMAG0175.jpg
    151.9 KB · Views: 391

Engine

Well-known member
Joined
Jan 9, 2014
Messages
646
Location
Kentucky
Finished up my exhaust plumbing project the other day.

That's a true example of skilled welding. The fit up was the biggest challenge on that one, I'm sure. :thumbup:

The kind of projects I've been doing (welding carts) aren't in the same league. In fact, not even in the same ballpark. Ya gotta start somewhere tho. :lol:
 

yaidunno

Well-known member
Joined
Feb 10, 2011
Messages
1,336
Location
WI
That's a true example of skilled welding. The fit up was the biggest challenge on that one, I'm sure. :thumbup:

The kind of projects I've been doing (welding carts) aren't in the same league. In fact, not even in the same ballpark. Ya gotta start somewhere tho. :lol:

Thanks much. Yes, as you can imagine, the fitment of the pipe pieces was the most challenging and time consuming part of the project.

Keep up the good work yourself. I've got no formal education or training in fabrication and welding; just trial, error and patients.
 

welder4956

Well-known member
Joined
Apr 8, 2010
Messages
3,059
Location
Birmingham, AL USA
Thanks much. Yes, as you can imagine, the fitment of the pipe pieces was the most challenging and time consuming part of the project.

Keep up the good work yourself. I've got no formal education or training in fabrication and welding; just trial, error and patients.

Lets hope it's not because of your welding.:D
 

Stroked383

Well-known member
Joined
Nov 22, 2012
Messages
148
Location
St. Louis MO
After playing with my new plasma cutter on some angle I buzzed the air bag perches down to gain as much clearance as possible after I lowered the rear of the dually 5 inches.
9615BFBD-F320-4B7B-A64D-13437B86006C_zpsk0wnnzgk.jpg

42E3FCE5-D9C0-43AD-A234-734040D127E5_zpsz9apiflr.jpg
 

welder4956

Well-known member
Joined
Apr 8, 2010
Messages
3,059
Location
Birmingham, AL USA
Thanks much. Yes, as you can imagine, the fitment of the pipe pieces was the most challenging and time consuming part of the project.

Keep up the good work yourself. I've got no formal education or training in fabrication and welding; just trial, error and patients.

Very nice work by the way. You definitely have "The Knack".
 

GaleForce

Active member
Joined
Feb 13, 2014
Messages
30
Location
Ontario, Canada
Finished up my exhaust plumbing project the other day.

Thanks much. Yes, as you can imagine, the fitment of the pipe pieces was the most challenging and time consuming part of the project.

Keep up the good work yourself. I've got no formal education or training in fabrication and welding; just trial, error and patients.

Beautiful project you have there! I'm currently shopping welders, hopefully I can teach myself to weld at least half as good as you.
 

Engine

Well-known member
Joined
Jan 9, 2014
Messages
646
Location
Kentucky
Finished the cart I was working on. A little orange color to brighten up the place.

I may regret making the cable hangers so large, but I plan on adding about 50ft. of cable. They are a little flimsy and stick out like big ears. Time will tell whether they will hold up in the real world. If not, then that's what cut-off wheels are good for.

I'll put the welder on tomorrow and put this thing to use.
oqg400.jpg


x1dft1.jpg


2e6d9wo.jpg
 

Engine

Well-known member
Joined
Jan 9, 2014
Messages
646
Location
Kentucky
I finally loaded up the Hobart Stickmate welder on the cart. Everything seems to fit, so now I can burn some rods.

The toolbox is one of the Stanley Bostitch water seal types with a rubber gasket around the lid. I'm going to keep 7018 rods in it to keep them dry. Since I don't have a rod oven, I'm using this "Damp Rid" product to absorb moisture in the box. It's the same as the desiccant packs that come inside lots of other products. I have been using it in another box where I store mig wire and it keeps everything rust free, so maybe it will help with the sticks as well.

2r73f5f.jpg


2zps045.jpg


2yo7hpu.jpg


5l8njb.jpg
 

GaleForce

Active member
Joined
Feb 13, 2014
Messages
30
Location
Ontario, Canada
I finally loaded up the Hobart Stickmate welder on the cart. Everything seems to fit, so now I can burn some rods.

The toolbox is one of the Stanley Bostitch water seal types with a rubber gasket around the lid. I'm going to keep 7018 rods in it to keep them dry. Since I don't have a rod oven, I'm using this "Damp Rid" product to absorb moisture in the box. It's the same as the desiccant packs that come inside lots of other products. I have been using it in another box where I store mig wire and it keeps everything rust free, so maybe it will help with the sticks as well.

2r73f5f.jpg


2zps045.jpg


2yo7hpu.jpg


5l8njb.jpg

Nicely done. Very tidy. :thumbup:
 
To avoid these ads, REGISTER NOW!

great white tj

Well-known member
Joined
Apr 12, 2009
Messages
545
Location
Ocala Fl.
Finished the cart I was working on. A little orange color to brighten up the place.

I may regret making the cable hangers so large, but I plan on adding about 50ft. of cable. They are a little flimsy and stick out like big ears. Time will tell whether they will hold up in the real world. If not, then that's what cut-off wheels are good for.

I'll put the welder on tomorrow and put this thing to use.
oqg400.jpg


x1dft1.jpg


2e6d9wo.jpg

I like it, nice work...
 

ndr1968

Well-known member
Joined
Apr 18, 2012
Messages
207
Location
Oklahoma
I have this roll stock loading dolly at work. The castors have long ago gone bad on it and I have decided to replace them. As you can see in the photos they are welded on and I have my work cut out for me to get the old ones off!

The hoist will never see more than around 150 pounds loaded onto it so my question is:
“Why couldn’t I just go with front and rear fillet welds along the edge as shown in the photo but skip filling the four bolt holes?” It sure would make removal a lot easier if the job had to be done again in future! Thanks!
 

Attachments

  • 20140321_083720.jpg
    20140321_083720.jpg
    140.8 KB · Views: 299
  • 20140321_083815.jpg
    20140321_083815.jpg
    139.4 KB · Views: 243

beakie

Well-known member
Joined
Feb 21, 2014
Messages
492
Location
Ontario, Canada
I have this roll stock loading dolly at work. The castors have long ago gone bad on it and I have decided to replace them. As you can see in the photos they are welded on and I have my work cut out for me to get the old ones off!

The hoist will never see more than around 150 pounds loaded onto it so my question is:
“Why couldn’t I just go with front and rear fillet welds along the edge as shown in the photo but skip filling the four bolt holes?” It sure would make removal a lot easier if the job had to be done again in future! Thanks!

it looks like there are rivets in place of atleast 2 of those "bolt holes"
in which case they are doing nothing anymore, and may have been used to hold casters in place. until welded properly.

if you fillet weld as you mention, it will work just fine.
 

Engine

Well-known member
Joined
Jan 9, 2014
Messages
646
Location
Kentucky
I have this roll stock loading dolly at work. The castors have long ago gone bad on it and I have decided to replace them. As you can see in the photos they are welded on and I have my work cut out for me to get the old ones off!

The hoist will never see more than around 150 pounds loaded onto it so my question is:
“Why couldn’t I just go with front and rear fillet welds along the edge as shown in the photo but skip filling the four bolt holes?” It sure would make removal a lot easier if the job had to be done again in future! Thanks!

I just had to remove one caster from a welding table I built recently. I had welded the edges all around and it was a ***** to cut it off. I used a 4.5" angle grinder with a cutoff wheel to do it. It is hard to keep the wheel parallel to the frame while cutting off the weld without cutting into the frame, but it can be done.

I suggest doing what I did on your next one; only weld the edges that can easily be reached with a cutoff wheel in case you ever need to replace them. Actually, there isn't any need to weld them that solidly as the welds aren't being stressed much during use, since the weight of the hoist and load is mainly over the center of the caster baseplates and very little torque is placed on the welds due to the small offset of the caster wheels.
 

Stooge

Well-known member
Joined
Mar 24, 2013
Messages
3,533
Location
South Shore, MA
I was feeling a little inspired this morning looking through this thread and decided to make something that wasnt car parts, so i finished my raisin bran, used the box to cut out some shapes and went from there. First time trying to make a sheetmetal flower so i kind of made it up as i went

 
Last edited:

AndrewV

Well-known member
Joined
Dec 28, 2013
Messages
1,368
Location
Fl
That looks great stooge.
Make some more, and post them up on ebay. Someone would love to have some.
 

erat

Active member
Joined
Feb 23, 2014
Messages
27
That was one of my first "jobs" when i was in highschool. Mostly flowers that would stick in the ground, but i made just about anything.
I made metal lawn art out of scrap metal i garbage picked. Sold it at art fairs and street fairs. Even the internet. I made a ton of money doing that. I'm sure there are still hundreds of them floating around lawns metro Detroit.

Then i grew up and had to start paying taxes.


Just fusion welded.
This is a good exercise for controlling heat. I pulled two that were pretty different. Should have set my panel a little more accurate, but i was in a crunch.


Other than the heat marks, you can't even tell they're welded. :)

Should have put a scale down, these are about 1.8" long.
 

welderwayne

Member
Joined
Mar 24, 2014
Messages
6
Location
Calgary Alberta
Hi guys, and gals, new to your site. Here's a few projects I have done but it's a hard sell. By the way this is all done in steel....NOT BRONZE!!!
 

Attachments

  • HPIM1053.jpg
    HPIM1053.jpg
    143.6 KB · Views: 183
  • scan0001.jpg
    scan0001.jpg
    157.7 KB · Views: 191
  • 004.jpg
    004.jpg
    146 KB · Views: 205
  • scan0012.jpg
    scan0012.jpg
    98 KB · Views: 200
  • hunting party.jpg
    hunting party.jpg
    132.2 KB · Views: 202
  • 20130106_225249.jpg
    20130106_225249.jpg
    138.2 KB · Views: 165

erat

Active member
Joined
Feb 23, 2014
Messages
27
What's even more funny is that i'm clamping together 5 pieces of steel.
Don't even get me started on tolerances...

I may get a photo tomorrow of the finished product. This product is for one of the big 3. :)
 

erat

Active member
Joined
Feb 23, 2014
Messages
27
2.5"

Not mine, it's my place of employment.

We recently stuck it in the devlieg and milled it flat. It's also in the other picture i posted above.
 

Engine

Well-known member
Joined
Jan 9, 2014
Messages
646
Location
Kentucky
I like the Hobart cart. Good fit for that type of garage.

Thanks.:thumbup:

I have to work out of my home garage and storage space is limited. Mostly, I have to do projects outside on a concrete slab and sometimes out in the driveway. I have to make things that are "all-terrain" if you know what I mean.
 

erat

Active member
Joined
Feb 23, 2014
Messages
27
Not the final product yet.
Rollers that sit on top didn't come in like they should have today.

 
To avoid these ads, REGISTER NOW!
Top Bottom