To avoid these ads, REGISTER NOW!

Show us your welding projects

Hot Chop shop

Well-known member
Joined
Apr 12, 2013
Messages
628
Location
Las Vegas
Here's the final!


Looks like you put a lot of thought into it and it turned great!

I need to put more thought into my stuff... It's easier for a noob like me to weld in the "ideal position" during the fabrication process instead of trying to weld upside down or even worse once it's already painted... This may have happened to me after I saw duker's welding table and I wanted to steal some of his ideas, adding afterwards not as easy!
 
To avoid these ads, REGISTER NOW!

Robert Hall

Well-known member
Joined
Jan 17, 2011
Messages
414
Location
Utah
Looks like you put a lot of thought into it and it turned great!

I need to put more thought into my stuff...

Thanks, and thanks to all.

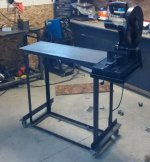
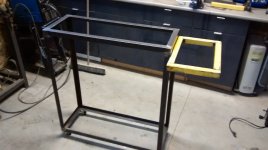
I quoted you to point out a couple things. This cart has been on the books for some time.

Granted I had a good idea of what I needed, and I think there are a couple of warts on this still, but I usually make it a point not to point out my own mistakes.

I still would do a couple of things differently as for example, I have to be careful of pulling the leads too hard, as the thing does have height, I dont want to pull it over :shocking:

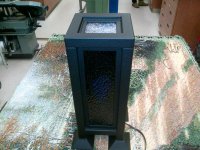
The aesthetic is a difficult thing with me always. How far do you go with something that you know is going to get trashed as it is used professionally but if a customer sees it, you dont want it to look like **** too. So instead of a powdercoat I used rattle cans and engine enamel. Its hardened quite well and I think the paint looks good.

Im actually still thinking about the wheels a bit. I would like a little more width on the front casters but its working and looks decent so off I go to attempt to actually do something that I will get paid for.

Just wanted to vocalize a bit of the thought process I think we all go through.

Cheers to you all.
 

E.rodz

Well-known member
Joined
Nov 11, 2009
Messages
2,434
Location
st.paul MN.
looks like I got in a little wrapped up in my little project gone a little out of control.


now on to the rest of the exhaust system.
 

Steve in Louisiana

MEMBER EMERITUS
Joined
Aug 9, 2012
Messages
76
why don't people weld without at least a long sleeve shirt and some gardening gloves or something?

i wear at least a sweat shirt and have some fireproof gloves when i do.

My son who is a chemical engineer wanted to play with my Miller 251 & run some beads & gob some stuff together. I told him you need a long sleeve shirt at least. He ignored that advice. After a few hours of playing he stopped. Next day he was hurting . . . burned arms and neck . . . He now wears a shirt with long sleeves if he even walks by a welder . . . lol lol lol
 

yaidunno

Well-known member
Joined
Feb 10, 2011
Messages
1,336
Location
WI
Erodz, nice work. Where did you source the mandrel bent tubes from? That 180 on the back of the muffler is really tight, I like.
 

Techie1961

Well-known member
Joined
Feb 18, 2014
Messages
1,520
Location
Pickering Ontario Canada
I needed a little help with lawn work as the back ain't what it used to be so I designed a bucket add on to attach to my John Deere 54" blade. I had a few criteria that needed to be met though. First, I wanted it to be installable without having to modify the original blade. It had to be strong enough to ram into a pile of sand or gravel without worrying about strength. It had to be able to "cradle" the load so that it didn't fall out during transport.

I came up with a bucket that goes backwards past the blade when in loading position by 8". When you are full, the blade rotates forward but doesn't open. You end up with nearly 7 cu. ft. of capacity. When you are ready, it rotates forward and dumps the load.

There's a video of how it works on Youtube but it wasn't painted yet. It was in development stage.
 

Attachments

  • WP_20140420_09_33_13_Pro.jpg
    WP_20140420_09_33_13_Pro.jpg
    131.3 KB · Views: 209
  • WP_20140420_09_33_28_Pro.jpg
    WP_20140420_09_33_28_Pro.jpg
    154 KB · Views: 194
  • WP_20140420_09_33_42_Pro.jpg
    WP_20140420_09_33_42_Pro.jpg
    153.6 KB · Views: 201
  • WP_20140420_09_34_25_Pro.jpg
    WP_20140420_09_34_25_Pro.jpg
    149.6 KB · Views: 188
  • WP_20140420_09_34_59_Pro.jpg
    WP_20140420_09_34_59_Pro.jpg
    130.4 KB · Views: 168

hateeyes

New member
Joined
Mar 14, 2014
Messages
1
I was bored, needed a lamp and had plenty of scrap. :bounce:
lamp.jpg


lamp3.jpg

Pretty nice lamp!, very creative.
 

Jon Jacobs

Well-known member
Joined
Mar 4, 2012
Messages
413
Location
London Ont Canada
Heres a soldier I built out of automotive tubing for a local firm that manufactures dip sticks and dip stick tubes. Its made entirely out of their products. Dip sticks for hair. If you turn the oil filler cap the lamp comes on.

The box lamp was a Christmas gift. The stained glass panels are all different colors. It was powder coated.
 

Attachments

  • 100_0938.jpg
    100_0938.jpg
    137.3 KB · Views: 212
  • box lamp 1.jpg
    box lamp 1.jpg
    133 KB · Views: 160
  • box lamp 3.jpg
    box lamp 3.jpg
    112.6 KB · Views: 169

scraptor

Member
Joined
Mar 9, 2014
Messages
15
Looks like you put a lot of thought into it and it turned great!

I need to put more thought into my stuff... It's easier for a noob like me to weld in the "ideal position" during the fabrication process instead of trying to weld upside down or even worse once it's already painted... This may have happened to me after I saw duker's welding table and I wanted to steal some of his ideas, adding afterwards not as easy!

I fabricate for a living , factory machinery and fixtures mostly. If I can roll something into a better position to weld I will, just trying to do the best job I can. Welding in position is an important skill to learn , but don't be ashamed to roll your work to a position you are comfortable with.
 

KMScott

Well-known member
Joined
Feb 14, 2012
Messages
4,632
Location
Daufuskie Island, South Carolina
I fabricate for a living , factory machinery and fixtures mostly. If I can roll something into a better position to weld I will, just trying to do the best job I can. Welding in position is an important skill to learn , but don't be ashamed to roll your work to a position you are comfortable with.

When I was a apprentice learning how to weld injection molds, my instructor said over and over ( you can not roll a battle ship) he had me welding in all positions. Now I position my work the easiest I can. So I totaly agree with you scraptor.
Here is what I welded last week for a friend that did not want a new set built for his Chas Parker Vise. I am a little rusty, haven't welded for a while but did bail him out.
 

Attachments

  • Chas Parker Broken 4-500 jaws (3).jpg
    Chas Parker Broken 4-500 jaws (3).jpg
    144.6 KB · Views: 404
  • Chas Parker Broken 4-500 jaws (2).jpg
    Chas Parker Broken 4-500 jaws (2).jpg
    146.7 KB · Views: 444
  • Chas Parker Broken 4-500 jaws (1).jpg
    Chas Parker Broken 4-500 jaws (1).jpg
    73 KB · Views: 427

ndr1968

Well-known member
Joined
Apr 18, 2012
Messages
207
Location
Oklahoma
.
Here is what I welded last week for a friend that did not want a new set built for his Chas Parker Vise. I am a little rusty, haven't welded for a while but did bail him out.

So, that inside bead had to be ground or machined back down in order for the parts to fit back up again?
 

KMScott

Well-known member
Joined
Feb 14, 2012
Messages
4,632
Location
Daufuskie Island, South Carolina
So, that inside bead had to be ground or machined back down in order for the parts to fit back up again?

Yes, the weld is soft and can be carbide burred out fairly easy, I even sent a burr with the repair. I channeled out the area pretty good and the vise can be chamfered in that area so it should be OK, those jaws would cost him $150 to replace with custom built new ones.
 

falcongarage

Member
Joined
Aug 2, 2012
Messages
24
Wow - just read through this whole thread... awesome.

A few recent projects of mine over the next few posts

A welding table:
A simple 2' x 4' welding table. Nice and sturdy for the lighter duty projects I do. I cut the top on the plasma table with 1/2" holes on a 6" grid for clamps.

A cheap old desk light with base removed leaving a 1/2" shaft at the bottom....which just happens to drop into the holes I burned into the table top for clamps. And just lifts out when not needed. Feeling pretty pleased with myself for how simple and useful this is.
 

Attachments

  • lamp .jpg
    lamp .jpg
    129.1 KB · Views: 342
  • clamps 2.jpg
    clamps 2.jpg
    139.7 KB · Views: 345
  • clamps.jpg
    clamps.jpg
    86.5 KB · Views: 382
  • welds.jpg
    welds.jpg
    71.5 KB · Views: 346
  • 5.jpg
    5.jpg
    72.8 KB · Views: 333
  • 4.jpg
    4.jpg
    65.7 KB · Views: 328
  • 3.jpg
    3.jpg
    98.6 KB · Views: 287
Last edited:
To avoid these ads, REGISTER NOW!

falcongarage

Member
Joined
Aug 2, 2012
Messages
24
Cut off saw table:
I bought a MK Morse dry cut saw a while ago (which is awesome and cuts steel like butter!) and finally got some time to make a stand for it.

I added an adjustable fence and sliding end stop...then changed the actual end stop to be less "flexy". Because the sliding end stop only works past the fence I needed a different approach for the fence stop. I basically just welded a clamp onto a square cut piece of 2x3x.25" angle and it works awesome!

Everything is nice and square to the blade which makes it easy to cut accurately now....finally.
 

Attachments

  • sq end stop fence.jpg
    sq end stop fence.jpg
    60.5 KB · Views: 188
  • welded stop_clamp.jpg
    welded stop_clamp.jpg
    97.4 KB · Views: 198
  • sq end stop.jpg
    sq end stop.jpg
    134.4 KB · Views: 201
  • table b.jpg
    table b.jpg
    105.5 KB · Views: 255
  • saw table 1.jpg
    saw table 1.jpg
    125.4 KB · Views: 258
  • saw table.jpg
    saw table.jpg
    92.2 KB · Views: 203

falcongarage

Member
Joined
Aug 2, 2012
Messages
24
CNC Plasma table

I bought some gantry/ Z axis parts from Precision Plasma and put together a 4' x 4' plasma table. Every shop should have one of these :).

Does a great job on everything from 20g up to 3/8 - might work fine on 1/2" too but I haven't cut anything that thick yet.
 

Attachments

  • owls.jpg
    owls.jpg
    85.9 KB · Views: 241
  • cnc47.jpg
    cnc47.jpg
    125 KB · Views: 306
  • cnc32.jpg
    cnc32.jpg
    73.3 KB · Views: 247
  • cnc10.jpg
    cnc10.jpg
    141.5 KB · Views: 230
  • cnc3.jpg
    cnc3.jpg
    102.4 KB · Views: 200
  • cnc1.jpg
    cnc1.jpg
    108.3 KB · Views: 196
  • a 1:4" cut.jpg
    a 1:4" cut.jpg
    67.3 KB · Views: 228

mrgm

Well-known member
Joined
Dec 13, 2010
Messages
199
Location
TX
CNC Plasma table

I bought some gantry/ Z axis parts from Precision Plasma and put together a 4' x 4' plasma table. Every shop should have one of these :).

Does a great job on everything from 20g up to 3/8 - might work fine on 1/2" too but I haven't cut anything that thick yet.

If I may ask, what was your total $$ to final product?
 

E.rodz

Well-known member
Joined
Nov 11, 2009
Messages
2,434
Location
st.paul MN.
Erodz, nice work. Where did you source the mandrel bent tubes from? That 180 on the back of the muffler is really tight, I like.
the rear fittings are from ebay they are doughnuts stamped super tight radius, most of rest of the elbows are from a company called Modern Automotive performance they sell them in 90deg 45 deg. and j bends with 180 deg. and I just cut them were necessary here is a link to there site.
http://www.maperformance.com
Awesome work E.rodz!
Thanks I am learning something new every day and I feel I am getting better at welding thin stainless.

Impressive as always Rodz!!:beer:
Thanks for the compliment I feel like this has been more then I had intended. looks like another project getting out of hand.lol.

Very impressive work. Thanks for sharing the pictures.

Mike.
Thanks for taking interest in my project I hope to get alot more done in the next couple of weeks.

Is it going to be a twin turbo setup? Just curious as it has forward facing headers, and the tie in isn't visible in the pictures.
Cool at any rate.
:drool:
yes this is going to be a twin turbo set up as well. hope to get that part done next.
 

sberry

Banned
Joined
Jun 18, 2005
Messages
35,747
Location
Brethren, Michigan
Super custom belt tensioner wrench for a 3.8 dodge. Little neighbor job on a trailer. The geometry was fukked up from the factory, you could see where it got started right then some knob spun off and mounted the axle in the wrong location.
 

Attachments

  • wrench pump.jpg
    wrench pump.jpg
    142.2 KB · Views: 261
  • trailer pallet.jpg
    trailer pallet.jpg
    142.9 KB · Views: 344
Last edited:

DenisG

Well-known member
Joined
Jul 14, 2013
Messages
1,278
Location
Milwaukee
1/2" EMT fittings for fencing around my wife's raised bed garden:
 

Attachments

  • DSC00744a.jpg
    DSC00744a.jpg
    78 KB · Views: 396
  • DSC00741a.jpg
    DSC00741a.jpg
    140.1 KB · Views: 293
  • DSC00740a.jpg
    DSC00740a.jpg
    54.7 KB · Views: 339
  • DSC00737a.jpg
    DSC00737a.jpg
    55.9 KB · Views: 308
  • DSC00735a.jpg
    DSC00735a.jpg
    106.3 KB · Views: 331

DenisG

Well-known member
Joined
Jul 14, 2013
Messages
1,278
Location
Milwaukee
Here's a cast aluminum repair i did a while back. don't do a lot of aluminum, so i was pretty happy with this.

Looks like a good weld, but what was the thing you were repairing? Did you leave the hose and sensor(?) on when you welded?
 

gball

Well-known member
Joined
Feb 18, 2010
Messages
106
Location
Northern Michigan
Looks like a good weld, but what was the thing you were repairing? Did you leave the hose and sensor(?) on when you welded?

it was a Harley Davidson Sportster engine that had the rear mount broke off from a accident. and yup, left the hose and speedo pick up in it and the oil too. nothing melted or exploded if a fiery ball of fury either... luckily.
 

DenisG

Well-known member
Joined
Jul 14, 2013
Messages
1,278
Location
Milwaukee
it was a Harley Davidson Sportster engine that had the rear mount broke off from a accident. and yup, left the hose and speedo pick up in it and the oil too. nothing melted or exploded if a fiery ball of fury either... luckily.

Good save. Hope the rider was lucky as well.
 

sevenzeronova

Well-known member
Joined
Mar 23, 2014
Messages
53
Smoker I made last winter.
All walls and doors insulated with 3000°F ceramic.
All doors have boiler gasket P type
Gravity fed chute to fire box reverse burn.
Removable racks and grease trap to bottom with ball valve.


In place!


LumpyMusic

Well-known member
Joined
May 2, 2012
Messages
492
Location
Phoenix Arizona USA
MIG Torch Holder -

Leaf spring plate base
Scrap piece of bent flat stock
Couple pieces of some kind of pipe
Cheap pair of HF MIG pliers

MigTorchHolder-01.jpg


Ground one of the plier tips off, welded the pliers to the stand. Snip MIG wire the usual way, insert torch nozzle to the "stop" but with the pliers stationary, it's easier to do with gloves on. The other usual plier functions (grip nozzle, grip tip) still function just fine.

**

In the background is my "Redneck Weld Screen". Discarded bifold metal closet doors. Set them up anywhere to contain weld and grinding splatter.

MigTorchHolder-02.jpg


Table is a piece of 3/8 steel found in the desert, sitting (not anchored) on top of a commercial retail Metro Rack fixture, also a discard from somewhere. Second piece of pipe is for a regular, non-anchored pair of pliers, or whatever. Clamp it to the welding table with my ground clamp while in use to make it a little more stationary.

**


MIG like TIG Baby!..:willy_nil

MigTorchHolder-03.jpg


Sgt Lumpy
 

LG63

Well-known member
Joined
Sep 7, 2012
Messages
1,003
Smoker I made last winter.
All walls and doors insulated with 3000°F ceramic.
All doors have boiler gasket P type
Gravity fed chute to fire box reverse burn.
Removable racks and grease trap to bottom with ball valve.

I know nothing about smokers but can definitely tell that is one well thought out and executed project. Very nice.
 

56rpm

Well-known member
Joined
Apr 19, 2012
Messages
354
Location
Bakersfield, Ca
Been missing my tig

I did some tig welding last weekend on the swing out door bars for my 69 mach one. Been years since I've used a tig, but I suppose it's like riding a bike. The tungsten was moving so much I thought I might have Parkinsons disease. Half my life ago at age 29, I could lay down a nice bead, but I can live with these. I used my brother's Miller syncrowave 200 as I sold my last tig, a new Miller Syncrowave 180, which I never used back in 2010. I bought my first tig back in 1995. It was a used Linde 305, too big for my needs but couldn't complain for $400. I've been searching for a used machine as I sure do miss having a tig.
 

Attachments

  • IMG_20140503_122943.jpg
    IMG_20140503_122943.jpg
    140.7 KB · Views: 351
Last edited:

Abeo

Well-known member
Joined
Oct 22, 2009
Messages
784
Location
Calgary, Ab
I made an intercooler pipe to replace the one that came in my kit that simply wouldn't fit. The old one was cast aluminum, and the steel replacement piece I made was actually lighter. Did 15 degree pie cuts on 3" pipe, and used a mandrel bent pipe for the 2.25" pipe... should have pie cut that as well in hindsight. Hand formed the transition cone from 18 gauge sheet, using tricks I've learned here from Robert. Came out better than I had hoped.

Tacked it together with my 0.035" flux core, which sucked...especially with the 18 gauge. Talk about warp and blowing holes...

Finished the welding with my buddies welder that was set up for MIG. Such a nice difference... but took a bit to learn how to weld with it versus flux.

I'm pretty proud of this, it's my first attempt at anything like this.
 

Attachments

  • IMG_20140518_162912 (Medium).jpg
    IMG_20140518_162912 (Medium).jpg
    133.4 KB · Views: 399
  • IMG_20140519_142121 (Medium).jpg
    IMG_20140519_142121 (Medium).jpg
    97.7 KB · Views: 444
  • IMG_20140519_155853 (Medium).jpg
    IMG_20140519_155853 (Medium).jpg
    122.8 KB · Views: 476
To avoid these ads, REGISTER NOW!
Top Bottom