To avoid these ads, REGISTER NOW!

Show us your welding projects

pepi

Well-known member
Joined
Mar 27, 2013
Messages
2,883
Location
Woodstock, GA
Just a quick observation, the mig has some flexibility when it comes to clean metal. It appears that you are trying to weld or burn thru the paint, as you see it can be done thus the comment about mig & flexibility.
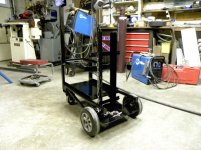
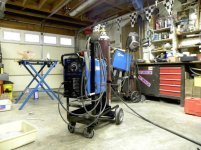
However grinding, sanding mill scale and paint from the surface, and a quick wipe with Acetone before you stitch it. The welds would be bright, the puddle will flow and over all be a much better joint. I took that same hand cart and made my tig cart, for 30 bucks, what the hell why reinvent the wheel or cart as in this case...good idea you had there.
attachment.php


attachment.php


attachment.php
 

Attachments

  • DSCN2502.jpg
    DSCN2502.jpg
    95.6 KB · Views: 2,466
  • DSCN2664.jpg
    DSCN2664.jpg
    113.1 KB · Views: 2,476
  • DSCN2667.jpg
    DSCN2667.jpg
    119.1 KB · Views: 2,475
Last edited:
To avoid these ads, REGISTER NOW!

ndr1968

Well-known member
Joined
Apr 18, 2012
Messages
207
Location
Oklahoma
Yeah I know. It was just a fast and dirty job. It doesn't show very well but I did grind off the paint where metal touched metal plus room for the bead. I left the mill scale there though...guess my farm shop 6011 habits are kinda hard to break! Thing is, my welds look pretty much as good as the originals. In fact, I think they probably will fail before my "gorilla" beads do!
 

duffman1278

Active member
Joined
Jul 4, 2010
Messages
27
Shop stool from a christmas tree stand and exercise machine seat that were getting thrown away at work.

GPWQJEe.jpg


2fa24ty.jpg
 

pepi

Well-known member
Joined
Mar 27, 2013
Messages
2,883
Location
Woodstock, GA
Yeah I know. It was just a fast and dirty job. It doesn't show very well but I did grind off the paint where metal touched metal plus room for the bead. I left the mill scale there though...guess my farm shop 6011 habits are kinda hard to break! Thing is, my welds look pretty much as good as the originals. In fact, I think they probably will fail before my "gorilla" beads do!

Oh no doubt, it is a wonder some of the manufactured stuff even holds together. Want a laugh next time your at like an HD or Lows check out the bird droppings on their trailers. Anyone buying one of those would be well advised to consider re-welding about 80% of the things, they are not the only ones, just the fastest example I can site.
 

ndr1968

Well-known member
Joined
Apr 18, 2012
Messages
207
Location
Oklahoma
Whoa! Some of your guys do just awesome work. Makes me feel like such a hack!

I love the air conditioner on the pickup! I remember my uncle had one on his
'52 Studie Commander.
 

Hinez Wengler

Banned
Joined
Jul 2, 2014
Messages
77
Location
Dusseldorf
Building this little guy for my boss to make some noise. It's 4"xxh pipe for the barrel I used 20" we'll casing for the wheels give it a classic five spoke, to keep it looking semi historic has a oak tongue it's not quite finished but it's started
Be care full with that. I have a friend in FL get in serious **** with badged Nazis over those.
 

PCO6

Well-known member
Joined
Dec 25, 2008
Messages
4,573
Location
Newmarket, Ontario
PC06 - nice stands. Do you have any sketches/dimensions of your stands or did you just wing it?
Thanks Larry. I looked at various stands on line and kind of winged it based on a few that I liked. I don't have any drawings. As I built the first one and figured it would work I cut pieces for the second one, which I still have to build.

The mag stand
I like it.

Oz
Thanks Oz. I used to store my welding magnets in a tool box drawer. I got my fingers pinched one too many times and determined it was time to come up with something better!
 

Jd34

Banned
Joined
Jun 27, 2014
Messages
177
With out a doubt this has been my biggest welding project. First I constructed the half block wall with columns every 15ft apart drilled holes in the cap block and inserted 1/2" flat bar as spindles and welded them to the top rail. It was all done outside except I did the gates in the garage. Here are some pics:


-Brent-

Well-known member
Joined
Dec 23, 2009
Messages
4,709
Location
Utah
Here are the axles to go under my wheeling rig. They need a little more work. I should get to fabbing, this weekend.

Axles Modded.jpg
 
To avoid these ads, REGISTER NOW!

PCO6

Well-known member
Joined
Dec 25, 2008
Messages
4,573
Location
Newmarket, Ontario
Very cool idea. Now if I could keep the metal chips of the so they stick is be good.
Thanks Robert. Funny that you say that. I thought I could "wash" the chips off with a few shots from my pressure washer but all I got was rusty chips. :lol:

I now blow them off as best as I can with compressed air. Wear a face shield and safety glasses though when you do.
 

xyster101

Well-known member
Joined
Jul 3, 2013
Messages
640
Location
Upstate NY
I was tired of the stupid pin and R clip for attaching the lawn cart to the ATV. I take the trash to the end of the driveway with it weekly. So I welded up a hitch and a tongue.

Came from Harbor Freight and was under $25 for both, I had the ball. Bonus, my 4x8 trailer takes the same ball!


ewils35

Well-known member
Joined
May 5, 2011
Messages
218
Location
Metro Detroit Area
I was tired of the stupid pin and R clip for attaching the lawn cart to the ATV. I take the trash to the end of the driveway with it weekly. So I welded up a hitch and a tongue.

Came from Harbor Freight and was under $25 for both, I had the ball. Bonus, my 4x8 trailer takes the same ball!


That's a cool idea
 

OverkillYJ

Well-known member
Joined
Aug 7, 2013
Messages
262
Location
Harleysville, PA
Just came across this thread. Here are some pics of my Jeep flares and rocker panels/steps, fabrication. Everything is made out of 1/8" angle iron, plate, and square tube, with the only exception being the backing plate and under armor for the rocker panels. There I used 3/16". The grey primer is all bare metal two part primer. I then painted it all with Monstaliner roll on bed liner.
 

Attachments

  • 10346629_10202985130420913_4101447004934103647_n.jpg
    10346629_10202985130420913_4101447004934103647_n.jpg
    114.9 KB · Views: 206
  • 10308374_10202985083059729_2760173841320134808_n.jpg
    10308374_10202985083059729_2760173841320134808_n.jpg
    136.7 KB · Views: 210
  • 10322431_10202985082459714_71912886616329668_n.jpg
    10322431_10202985082459714_71912886616329668_n.jpg
    48.1 KB · Views: 213
  • 10268625_10202985082099705_3096660133403249866_n.jpg
    10268625_10202985082099705_3096660133403249866_n.jpg
    136.9 KB · Views: 228
  • 1969159_10202985081779697_4679315448341599245_n.jpg
    1969159_10202985081779697_4679315448341599245_n.jpg
    123.4 KB · Views: 217
  • 10177977_10202985081739696_5717007376445800503_n.jpg
    10177977_10202985081739696_5717007376445800503_n.jpg
    129.7 KB · Views: 220
  • 10314487_10203013029398370_4812286738497429003_n.jpg
    10314487_10203013029398370_4812286738497429003_n.jpg
    133.8 KB · Views: 259

blacknblue

Well-known member
Joined
Jul 22, 2014
Messages
64
Location
Jacksonville FL
Hey guys, short time lurker first time poster. A buddy gave me an OLD Forney AC stick welder last September. I built a spare tire carrier and rear bumper for my jeep with it. I had a little self taught experience with a crappy HF SMAW machine. I quickly learned that I like 7018 rods better than 6011. I know I am no professional, but I learned a lot by watching the instructional videos on youtube (I believe it is the same one shown in some classes) and countless hours of watching ChuckE2009. He is very helpful. So with that being said. I decided to start burning metal.


Here is a picture of the bumper.


One of my better welds. I know I had a little porosity at the ends of the weld.


Swing arm stop


In March I decided to pull the trigger on a Hobart 210MVP. As I was in the middle of an axle swap, spring over, and tummy tuck on the jeep.

Here are some shots through the build of stuff I made.

Traction bar


Exhaust system


battery tray


and Sterling (named after the axle she was created from)


My next project is a welding table (anyone know where to get cheap steel in jax?). I have got a lot of great ideas from everyone throughout the thread. I hope to keep learning from you master fabricators! Cheers :beer:
 

zmotorsports

ALLIANCE MEMBER
Joined
Oct 20, 2009
Messages
21,311
Location
Northern Utah
Hey guys, short time lurker first time poster. A buddy gave me an OLD Forney AC stick welder last September. I built a spare tire carrier and rear bumper for my jeep with it. I had a little self taught experience with a crappy HF SMAW machine. I quickly learned that I like 7018 rods better than 6011. I know I am no professional, but I learned a lot by watching the instructional videos on youtube (I believe it is the same one shown in some classes) and countless hours of watching ChuckE2009. He is very helpful. So with that being said. I decided to start burning metal.


Here is a picture of the bumper.


One of my better welds. I know I had a little porosity at the ends of the weld.


Swing arm stop

In March I decided to pull the trigger on a Hobart 210MVP. As I was in the middle of an axle swap, spring over, and tummy tuck on the jeep.

Here are some shots through the build of stuff I made.

Traction bar


Exhaust system

battery tray


and Sterling (named after the axle she was created from)

My next project is a welding table (anyone know where to get cheap steel in jax?). I have got a lot of great ideas from everyone throughout the thread. I hope to keep learning from you master fabricators! Cheers :beer:

Nice job on the bumper/tire carrier. The swing away locking tab looks very similar to the way I did mine a couple of years ago on my JKU Rubicon.

Here is a link to my build thread.
http://www.forbiddenjeeps.com/jeep-builds/2677-project-dream-jeep.html

Also, here is a link to my son's build thread for his 2004 Wrangler Unlimited(LJ). We also did a tummy tuck and long-arms on it.
http://www.forbiddenjeeps.com/jeep-builds/2916-project-un-limited-funds.html

Mike.
 

blacknblue

Well-known member
Joined
Jul 22, 2014
Messages
64
Location
Jacksonville FL
Last edited:

ndr1968

Well-known member
Joined
Apr 18, 2012
Messages
207
Location
Oklahoma
I was tired of the stupid pin and R clip for attaching the lawn cart to the ATV. I take the trash to the end of the driveway with it weekly. So I welded up a hitch and a tongue.

Came from Harbor Freight and was under $25 for both, I had the ball. Bonus, my 4x8 trailer takes the same ball!

If you got a welder? You can heal the sins of the world! Good Job!
 

jnkpile

Well-known member
Joined
Feb 13, 2014
Messages
154
Built a rear section of frame for my brothers 83' Toyota 4x4 project
ve8apare.jpg
 
Last edited:
To avoid these ads, REGISTER NOW!
Top Bottom