Fyrme
Well-known member
Thanks guys. I appreciate the compliments. I wish I had a current project to throw up here.


 <2"x2"x1/8" angle, 1"x1"x1/8" square tube, & 1/8" plate>


And here it is mounted. I know it's not much but it's my first project with a welder and I'm pretty pleased!


grizzley disc sander stand. Chrome lug nuts sold separately.
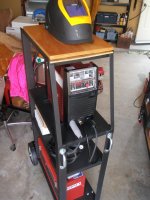
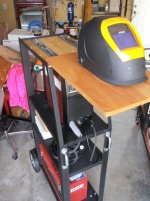
I've been wanting to learn to weld and the welders I work with said to go fcaw to learn on. Got a deal yesterday on a Lincoln 140 mig, cart, and auto helmet all new in the boxes. First project after playing around with it all day was to make a holder for all the duct/masking/painting/electrical etc. tape I have taking up room.
Started as two 12x3x1/8" plates and a 6'x1/4" rod.
Painted with Hammertone paint, I'll get a pic when it's on the wall.
Well now that you have that welder you're not going to need all that tape.
Little random rooster I made for my grandmaaaaaaaaaaaaaaaaa


OK, I’m sending this up the flag pole to see who salutes it or p____ on it!
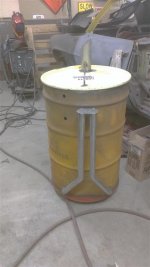
Our packaging dept. girl stood up on the foot ring of this old shop stool and broke it. The stool is at least 35 years old. I should have taken a before photo but I didn’t. The ring broke away from the legs in two places. The weld metal stayed on the legs, leaving weld shaped holes in the ring.
I used a wire brush wheel on the angle grinder and cleaned the metal down to bright and shiny. I cleaned the back two welds as well. I should have taken progressive photos I know but will have to describe what I did here. The first thing I did was set my Millermatic 140 to the high end of the 18 gauge auto setting scale. The first few attempts resulted in holes being burned, so I speeded up and got some pretty good beads along the upper and lower joint where the legs touched the ring. The beads were only about 3/16” wide but I think they had good fusion. Anyway, Then I proceeded to run a series of built up “stringer” beads over the first horizontal bead. Sure looks ugly but I think it will function as a big ’ol fat gusset. Double gussets that is, I ran these on tops and bottoms of the joints.
I guess my question is: Is this acceptable practice, or am I just squirting into the wind?


Fancy!
Interesting way to do the legs. Nice work.
That is the fun part of trying new things with our projects. We can experiment with different designs and methods and get some good practice in the process. Your dog dish looks great.
I was actually planning on using that same leg design on some bar stools I'm putting together. Cool dog, flat coated retriever?

Where would one rest his/her feet while sitting on a barstool like this?It's actually a Newfoundland... And I used the same design for a stool not too long ago.
Where would one rest his/her feet while sitting on a barstool like this?
MN4x4:
Thanks for the flowers! You are right, that’s precisely what I was trying to do. As far as grinding and painting? Nah! It’s a 35+ year old stool. Did you see the photo of it? It’s not going to suffer much from a few ugly welds and a little more missing paint. You think this one’s ugly, you should see what I did recently to the lawnmower I keep at camp! Parts of that look almost like freehand metal sculpture (of the blob from outer space)! Again, thanks for the reply and input. I was a little concerned. I sure don't want the "little" lady to hurt herself on account of my repair job.
something i've become accustomed to with the auto set features, atleast on my 211, the auto set doesnt always like the thinner stuff, especially older thinner materials and is more likely to cause some burn throughs and really frustrate you. depending on what im working on and how old the material is, better off just fine tuning the wire speed and voltage, auto set is great for thicker stuff though.
having said that, i dont think that stool rib is going anywhere anytime soon!
Where would one rest his/her feet while sitting on a barstool like this?