To avoid these ads, REGISTER NOW!

Show us your welding projects

Seiler

Well-known member
Joined
Feb 8, 2013
Messages
81
Location
Colorado
Seiler is that a 280dx with water cooler?

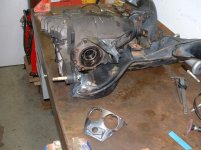
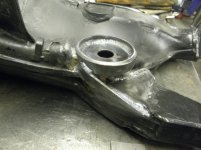
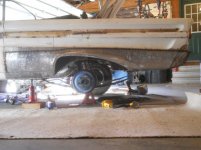
I won't be TIG welding the roots on the half cut side. The inside of the tube is covered in axle grease and dirt. I plan to root it with 6010, and either TIG or 7018 the rest.

It's only the 200DX with a water cooler. About a week and a half after I received my 200DX they announced the 280. I was pissed because the peak amperage on the 280 was exactly what I was looking for. :lol:

Hey Bud, how do you get these colors in your beads?

I'm getting a dull grey color using a #7 gas lens @ 12cfm and a #14 @ 20cfm.

I'm using the shop's HTP. I was trained on a miller and had no problems coming up with gold/blue colored welds.

Any help would be greatly' appreciated!

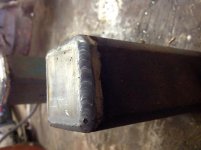
I think it comes down to technique with heat input and travel speed. I'm using a #7 cup with a gas lens as well, but my flow rate is around 20-25. You could try bumping up your flow rate a bit. I really focus on the information the puddle is telling me, whether I have too much heat/not enough, I'm traveling too fast/too slow or my angles are all jacked up and I adjust on the fly.

t100 brought up a good point, metal prep. I hit everything that has mill scale with a flapper wheel and wipe it down with isopropyl alcohol before I weld.

I do a slight up/down oscillation to help spread the puddle while I progress forward and I also "feed" the rod with my thumb. I don't dip. Next time I run a bead, I'll try to record a little bit of video. It's hard to explain but easy to show.

When I'm finished with a weld I also like to let the cup sit right where I stopped while the post flow runs out over the weld. Doing this is essential with stainless, but I find that it really helps with color on carbon steel as well.

Scott
 
Last edited:
To avoid these ads, REGISTER NOW!

Nortonscustom

Well-known member
Joined
Jun 5, 2008
Messages
375
Quick project last night. After tipping over my tig rod tubes for the millionth time, decided there needed to be a better way of holding them than the stand I was using. Figured might as well stick them on the side of the welder.


Scrap piece of angle and some 1" tube. Poked some holes and put an offset in the tubes.

tigrodholder1.jpg


Test fit.

tigrodholder2.jpg


Little Miller Blue touch up paint and I'm good to go.

tigrodholder3.jpg
 

spent21

Well-known member
Joined
Apr 9, 2013
Messages
168
Location
Franklin, Tn
I had a problem with my new exhaust and the subframe connector under the camaro.
IMG_20141123_145852449_zpsb6733151.jpg


I had stuffed it up in there, but with this cam, the engine and the exhaust move around too much for it to stay up in there. It spit the exhaust out of its spot I had it wedged in, and since the car is lowered, I was dragging this section on EVERYTHING.

I cut out the cross brace
IMG_20141123_154624617_zpsad1a6c9a.jpg


Relocated it to where it needed to be and scribed a line along the bottom
IMG_20141123_154644266_zpsc6c9f8c3.jpg


Cleaned up the weld points, beveled the edges, and burned it in. Don't laugh at my welding table.
IMG_20141123_170710110_zps5e34f256.jpg


I was working on the car in between laying coats of Polyurethane on some shelves I'm building for the wife, so I was running out of daylight. I got in a hurry repainting/installing and forgot to snap any more pix. I'll get some more of the finished product when I'm installing the wideband later.
IMG_20141123_145653204_HDR_zps19f0871b.jpg
 

Robert Hall

Well-known member
Joined
Jan 17, 2011
Messages
414
Location
Utah
I think you need a PHD to understand that Castercity site. I tried looking at their wheels for about 10 minutes and couldn't get to a final product that was the complete caster. Kudos to deciphering that.
I admit it is not the easiest to understand. If I can be of any assistance in helping you pick out a caster please let me know.
 

C-man405

Member
Joined
Sep 16, 2014
Messages
8
Location
Oswego illinois
Hey guys this is my welding project of the day, it is 2 inch lowering blocks for my dad 55 chevy. It was TIG welded by me and I am 16 years old.
 

Attachments

  • image.jpg
    image.jpg
    142.3 KB · Views: 241

Hot Chop shop

Well-known member
Joined
Apr 12, 2013
Messages
628
Location
Las Vegas
Hey guys this is my welding project of the day, it is 2 inch lowering blocks for my dad 55 chevy. It was TIG welded by me and I am 16 years old.


Sorry I have not figured out multiple picture posts yet.


No one likes a show off kid.... Now where's your lunch money!?

J/k that looks great to me! I'm sure the pros here can give better feedback like speed and heat and the coloring of the weld etc... But I will say the beads look consistent and they flow. I wish I would have learned to TIG when I was 16 then maybe by now I could lay a decent bead.
 

nine4gmc

Well-known member
Joined
Mar 24, 2012
Messages
14,357
Location
Dallas
No one likes a show off kid.... Now where's your lunch money!?

J/k that looks great to me! I'm sure the pros here can give better feedback like speed and heat and the coloring of the weld etc... But I will say the beads look consistent and they flow. I wish I would have learned to TIG when I was 16 then maybe by now I could lay a decent bead.

This^ :beer:
 

big_dan

Well-known member
Joined
Dec 6, 2014
Messages
59
Location
Tennessee
OK - Newbie to the GJ - just "discovered" it a few days ago and it feels like home! My favorite "projects" (or obsessions) are the old Falcons and Comets (64-65's) so a lot of my stuff revolves around them, but figured I would post a few pics to sort of introduce myself. Hello to all.

First 2 pics are examples of a few sheetmetal storage lockers / toolboxes I've built for local guys. I've built a bunch now but these are just a sample. 3rd pic is a hand-built 64 Comet lower quarter (originally stamped from "unobtanium") that I'm fairly pleased with. Last pic is handbuilt 2" long tube headers for a 65 Falcon with factory V8 front suspension and a 351C - super proud of these.

Enjoy, critique, comment away. Loving the site so far.

Dan
 

Attachments

  • g1.jpg
    g1.jpg
    36.4 KB · Views: 399
  • g2.jpg
    g2.jpg
    23.8 KB · Views: 341
  • g3.jpg
    g3.jpg
    41.6 KB · Views: 315
  • g4.jpg
    g4.jpg
    39.4 KB · Views: 279
Last edited:

Duker

Well-known member
Joined
Sep 25, 2010
Messages
10,861
Location
Livingston, TX
OK - Newbie to the GJ - just "discovered" it a few days ago and it feels like home! My favorite "projects" (or obsessions) are the old Falcons and Comets (64-65's) so a lot of my stuff revolves around them, but figured I would post a few pics to sort of introduce myself. Hello to all.


First 2 pics are examples of a few sheetmetal storage lockers / toolboxes I've built for local guys. I've built a bunch now but these are just a sample. 3rd pic is a hand-built 64 Comet lower quarter (originally stamped from "unobtanium") that I'm fairly pleased with. Last pic is handbuilt 2" long tube headers for a 65 Falcon with factory V8 front suspension and a 351C - super proud of these.


Enjoy, critique, comment away. Loving the site so far.


Dan


Dan.... Love the sheet metal work.... However... You just can't drop in here with those pics of the cabinets and not give us any details on how you fabricated these!! :)

When you start up another set of cabinets you will need to begin a build thread so that we can all check out how you did your embossing of the metal. :)

Welcome to the GJ looking forward to seeing more of your work....
 

xyster101

Well-known member
Joined
Jul 3, 2013
Messages
640
Location
Upstate NY
Wife and I love Christmas and wanted some big statment decorations at the end of our 550' driveway. First I rented a vibratory trencher to run the wire from the house to the end of the driveway. Had a friend help me.


Then I planned out some decortions that you would see on poles in villages. I have 30 pine trees that are over 50' tall and nothing short by the road, so the plan was to screw these to the trees.

Idea Sketches


Testing the layout to ensure I matched the length of the runs to the lights I bought.


I got some hexagonal stock for free from my father in law. Cut that up to weld.


A simple Jig on the my HF welding table.


A whole bunch of parts welded up.


I don't have a nice big welding table, so I used a 4'x4' piece of 3/4" OSB I had laying around and a bucket of water to weld the main parts together.


Keeping it all cool.


I added some 1.25" flat bar on two of the ends to use a mounting plates and painted it all white.


Longest part was putting the lights on it. Took almost 2 hours to wire and tape the lights on.


The first 2 are hung up about 8' in the air. I plan to have 3 more up by next weekend.


Hot Chop shop

Well-known member
Joined
Apr 12, 2013
Messages
628
Location
Las Vegas
I wish I had a drive way like that :(
Oh yeah and awesome lights! I have often thought about making a Xmas tree out of scrap metal for the front yard that is just rock here in the desert... But I always draw it out and it turns into a lot of metal used up and where do I store a 20 foot metal creation for the other 11 months of the year situation.
 
To avoid these ads, REGISTER NOW!

KMinAF

Well-known member
Joined
Mar 5, 2011
Messages
698
Location
Fairview Utah
Got tired of of rolling load straps that were cold, wet and sometimes a bit frozen, heck even when its warm they are still a pain to roll up so I made my own simple strap roller upper.
 

Attachments

  • DSCF6724.jpg
    DSCF6724.jpg
    146.4 KB · Views: 329

xyster101

Well-known member
Joined
Jul 3, 2013
Messages
640
Location
Upstate NY
I do get a lot of snow. We had over 90" last winter, BUT when you have a large driveway and places to park 6 cars indoors, it is no big deal. I use the ATV to plow, takes 45 minutes and maybe 10 minutes to snow rake the roof.
People who live in towns and cities have to shovel that plow snow, that blows.
First snow this year was about an inch.
 

roofster

Well-known member
Joined
Jul 1, 2008
Messages
200
Location
NE Indiana
My HF Bandsaw stand

Copied some others and made this last month. Still need to get a foot pedal.
1x1 tubing either 1/8 or 090 wall, don't remember. Table is about 12x13 7ga.

IMG_20141105_151053.jpg

IMG_20141128_185756.jpg

IMG_20141105_151300.jpg


And a weld pic
IMG_20141102_113221.jpg
 

ndr1968

Well-known member
Joined
Apr 18, 2012
Messages
207
Location
Oklahoma
Re: My HF Bandsaw stand

Copied some others and made this last month. Still need to get a foot pedal.
1x1 tubing either 1/8 or 090 wall, don't remember. Table is about 12x13 7ga.

Looks more like 14 gauge. Did you leave the hang over on there for strength? Or because it was easier to weld? Just now learning to weld square tubing myself. The overhang actually looks kinda cool imo.
 

ndr1968

Well-known member
Joined
Apr 18, 2012
Messages
207
Location
Oklahoma
xyster: Now you get to wrestle some more stuff back up into the attic at the end of the season! heh heh. Really looks good though and I bet the perks make it all well worth it!
 

ndr1968

Well-known member
Joined
Apr 18, 2012
Messages
207
Location
Oklahoma
I just posted this over on WW and thought you guys might like to see it too.

I got "re involved" in welding back in 2012. Here in Oklahoma that was a really hot summer!

I found that putting on my welding jacket and taking it back off again was not too much trouble but I couldn't conveniently don and doff my pants without eventually upsetting the neighbors!

I went to Tandy leather and picked up a nice piece of leather off their seconds table. I think it was less than $40.00.
Then I got out the Stitch Awl, rooted around and came up with an unused nylon battery strap and proceeded to make myself an apron to protect my legs. Later, I noticed that in certain grinding positions that I was burning holes in my nice BSX welding jacket so I used the remaining leather to sew on some guard patches.

Except for the occasional hot one that nips at my ankles I'm now a cool and happy camper!
 

Attachments

  • 20141210_143318.jpg
    20141210_143318.jpg
    142.8 KB · Views: 209
  • IMG_0638.jpg
    IMG_0638.jpg
    145.8 KB · Views: 303
  • 20141209_162733.jpg
    20141209_162733.jpg
    146 KB · Views: 192
  • 20141209_162748.jpg
    20141209_162748.jpg
    143.8 KB · Views: 203

BD1

Well-known member
Joined
Mar 18, 2007
Messages
4,602
Location
north side
With all that pretty new stuff it looks like you jumped out of a Sears catalog.
Now all you need is socks and boots! :D. :beer:
 

NUTTSGT

Super Moderator
Staff member
Joined
Sep 14, 2009
Messages
50,853
Location
Northern Central Ohio
I'm going to swap out some new carbon fiber scba bottles for a neighboring FD. I need a larger than normal crowfoot wrench. It looks like only Snap On ($68)will have it so I did what anybody else would do, made my own.


keith5064

Well-known member
Joined
Mar 16, 2014
Messages
109
Been reading forum for awhile now, lots of great ideas.( This is my first post.)I built this airbag jack out of a spare bag I had laying around. Haven't really tested it on anything very heavy, but I suspect it will come in handy one day.. Forgot to mention: 1/4" steel base welded together and bolted to bottom of bag.
 

Attachments

  • uploadfromtaptalk1418337018729.jpg
    uploadfromtaptalk1418337018729.jpg
    152.9 KB · Views: 242
Last edited:

keith5064

Well-known member
Joined
Mar 16, 2014
Messages
109
Another pic:
 

Attachments

  • uploadfromtaptalk1418337505080.jpg
    uploadfromtaptalk1418337505080.jpg
    149 KB · Views: 238
  • uploadfromtaptalk1418337760233.jpg
    uploadfromtaptalk1418337760233.jpg
    147.6 KB · Views: 190

roofster

Well-known member
Joined
Jul 1, 2008
Messages
200
Location
NE Indiana
Re: My HF Bandsaw stand

Did you leave the hang over on there for strength? Or because it was easier to weld? Just now learning to weld square tubing myself. The overhang actually looks kinda cool imo.

ndr1968, Mostly I left the overhang for ease of welding. I was able use fillets and I felt less chance of burn through compared to no overhang and a stronger joint. Glad you like.
 

600SL

Well-known member
Joined
Apr 26, 2012
Messages
1,794
Location
Connecticut
Lots of nice welding **** on this sight. So I thought I would add my own. Although I didn't do the welding, I did design the parts and tack weld the parts for the welder.

These are parts required to install a MB V12 engine into a 1986 MB 560SL
 

Attachments

  • Expansion Tank Installation A.jpg
    Expansion Tank Installation A.jpg
    141.5 KB · Views: 188
  • Expansion Tank Installation D.jpg
    Expansion Tank Installation D.jpg
    147.3 KB · Views: 178
  • Expansion Tank Welded.jpg
    Expansion Tank Welded.jpg
    144.7 KB · Views: 182
  • DSCF0007.jpg
    DSCF0007.jpg
    143.9 KB · Views: 179
  • DSCF0006.jpg
    DSCF0006.jpg
    145.9 KB · Views: 192
  • PC220007.jpg
    PC220007.jpg
    138.3 KB · Views: 180
  • PC160014.jpg
    PC160014.jpg
    144.5 KB · Views: 180

Ackattack

Member
Joined
Dec 9, 2014
Messages
18
Location
Valley Center KS
Custom radius arm front suspension for a solid axle in my 97 chevy crew cab truck. The arms are tied into the transmission crossmember. Its also running a 12valve cummins engine.


brawls43

Well-known member
Joined
Aug 29, 2012
Messages
133
Location
Minneapolis
Lots of nice welding **** on this sight. So I thought I would add my own. Although I didn't do the welding, I did design the parts and tack weld the parts for the welder.

These are parts required to install a MB V12 engine into a 1986 MB 560SL

Got any pictures of the shoehorn you used to shove that V12 in there? Awesome work!
 

600SL

Well-known member
Joined
Apr 26, 2012
Messages
1,794
Location
Connecticut
Got any pictures of the shoehorn you used to shove that V12 in there? Awesome work!

Thanks

Here's a few pictures of it going in, A pic at Lebanon Valley Dragway and one going through the turns at Deals Gap.
 

Attachments

  • GoingA.jpg
    GoingA.jpg
    140.8 KB · Views: 220
  • Going B.jpg
    Going B.jpg
    134.9 KB · Views: 168
  • Going C.jpg
    Going C.jpg
    134.2 KB · Views: 163
  • Going E.jpg
    Going E.jpg
    140 KB · Views: 152
  • Gone.jpg
    Gone.jpg
    144.7 KB · Views: 214
  • Samson at LVD 6-4-2011.jpg
    Samson at LVD 6-4-2011.jpg
    115.3 KB · Views: 187
  • img_4747.jpg
    img_4747.jpg
    152.6 KB · Views: 181

Wrench 2201

Well-known member
Joined
Feb 8, 2012
Messages
84
Location
Central, IN
I love flipping through this thread! Lots of cool projects every one,thanks for the reading material.

Here is a project I finished just before graduation. My school was donated this 12 L Cummins ISX and we needed a frame to hold it. It will eventually be in running condition and used by students in the lab for the diesel engine management class.
All welds were done using a Hobart*, .035 wire. All the material was reclaimed tubing from a no-longer-used platform for a Mustang Dyno (it is now mounted in the floor).
The last pic shows my "signature" done by spot welding dots together and then grinding them down with a flapdisc on an angle grinder.

Since I'm moving to Indiana and starting a new job soon it might be a while before I get to do any more welding. This project was my attempt to go out with a bang! It is also the largest thing I have ever built.

*edit* Hobart Beta MIG 200
 

Attachments

  • ISX_frame_1.jpg
    ISX_frame_1.jpg
    79 KB · Views: 268
  • ISX_frame_2.jpg
    ISX_frame_2.jpg
    100.6 KB · Views: 241
  • ISX_frame_3.jpg
    ISX_frame_3.jpg
    86.3 KB · Views: 219
  • ISX_frame_4.jpg
    ISX_frame_4.jpg
    97.1 KB · Views: 288
  • ISX_frame_5.jpg
    ISX_frame_5.jpg
    74.2 KB · Views: 215
  • ISX_frame_6.jpg
    ISX_frame_6.jpg
    111.9 KB · Views: 245
Last edited:
To avoid these ads, REGISTER NOW!
Top Bottom