To avoid these ads, REGISTER NOW!

Show us your welding projects

little d

Well-known member
Joined
Nov 13, 2009
Messages
815
Location
NW Oklahoma
Boost,
I second a thread on the bender. Ive seen plans on them, just never seen anyone go step by step building one.
 
To avoid these ads, REGISTER NOW!

brawls43

Well-known member
Joined
Aug 29, 2012
Messages
133
Location
Minneapolis
I built one of the Frank Takac's benders and posted some pics of the build back when we were building it in order to build our race car roll cage.
P3060001.JPG

Start: http://teambearpatrol.blogspot.com/2010/02/starting-bender.html
Welding: http://teambearpatrol.blogspot.com/2010/02/more-work-on-bender-kills-chopsaw.html
Bending: http://teambearpatrol.blogspot.com/2010/03/build-day-36-more-pics.html

Frank has a nice set of plans.
 

little d

Well-known member
Joined
Nov 13, 2009
Messages
815
Location
NW Oklahoma
Boost,
thank you, I thought you built the bender itself and not just the stand but again, thanks for the post.

Brawles,
thanks,
when I get the time I'll spend some time on your blog and check it out,
D
 

Todd.Brock

Well-known member
Joined
Jul 15, 2008
Messages
4,248
Location
Cincinnati
I'm a Roanoke College grad. I had a buddy with a a farm in Bedford and roommate from New Castle. Live in old SW for a lot of years.
 

bmxdad

Well-known member
Joined
Feb 18, 2014
Messages
2,539
Location
Puyallup, WA
How do these look ... also, what is the paint looking residue? Using solid wire with 75/25 gas.
 

Attachments

  • Cart5.jpg
    Cart5.jpg
    140 KB · Views: 326
  • Cart6.jpg
    Cart6.jpg
    138.2 KB · Views: 304

amusick10

New member
Joined
Nov 2, 2014
Messages
2
How do these look ... also, what is the paint looking residue? Using solid wire with 75/25 gas.
Just pulled the impurities out, no harm no foul.

I think some have said silicon or something too but I'm not sure.

Sent from my HTC One_M8 using Tapatalk
 

welder4956

Well-known member
Joined
Apr 8, 2010
Messages
3,053
Location
Birmingham, AL USA
How do these look ... also, what is the paint looking residue? Using solid wire with 75/25 gas.

Those are silica deposits. The weld wire uses silicon for deoxidation, when it combines with oxygen in the puddle it produces silica. You should be able to break them off with a chipping hammer or a couple of light taps with a cold chisel.
 

doojus

Well-known member
Joined
Dec 10, 2014
Messages
236
Finished up the squat rack that I had to drill a million holes on, pretty glad to be done with it finally.


20150605192321ada.jpg


20150606135315.jpg
 

bmxdad

Well-known member
Joined
Feb 18, 2014
Messages
2,539
Location
Puyallup, WA
How wide, from the inside, is it? Looks a little narrow, but probably the angle.

Are the plates on the bottom permanent ... one looks backward? Looks like a nice project, how many linear feet of the big tubing is there?
 

doojus

Well-known member
Joined
Dec 10, 2014
Messages
236
How wide, from the inside, is it? Looks a little narrow, but probably the angle.

Are the plates on the bottom permanent ... one looks backward? Looks like a nice project, how many linear feet of the big tubing is there?


It's 43" across and 30" deep, it's the exact dimensions as racks you would see in gyms.

About the feet... They are permanent. I drilled the holes on one of the verticals wrong apparently, so the cups would only fit smoothly with it turned around. I told the guy I'm making it for that I could plasma gouge the welds off and and possibly damage the tube or plate to get it off and turn it around, he didn't seem to care too much about it being backward. One of those live and learn deals, this was my first major fabrication project so I made quite a few mistakes.


I think we bought 48' of 3x2" 11 gauge and had a little left over.
 
Last edited:

SLYDIT

Well-known member
Joined
Mar 28, 2014
Messages
195
heres my driveway gates. 2" squre tubing with 1" cross bars. grooved shadow clad plywood. the ply will be stained a very dark grey/brown colour. the bolts are 304 stainless coach bolts which should really pop visually frame wil be black powder coat.
 

E12-535iTurbo

Well-known member
Joined
Feb 27, 2014
Messages
492
Location
The Netherlands
I like your gate design, so is it completed now? If so, please post another photo or two. What kind of bender are you using? How about the hinge system?

http://www.garagejournal.com/forum/showthread.php?p=4913898#post4913898

There are a lot more pictures there. But to answer your questions:
1. I've made a bending jig from particle board and hand bend both curved profiles over that jig.
2. The hinges are premade weld-on types which I purchased. They were about 6 euro's a piece and are well capable of the load. There is a picture of them in the topic link I posted.
 

1953mercury

Well-known member
Joined
Nov 25, 2012
Messages
701
Location
Steamboat Springs CO
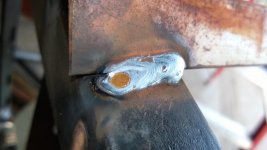
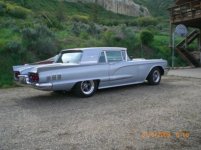
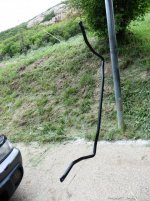
Broke the front sway bar on the T-Bird over a year ago. Only one source for this and with shipping was closing in on $400. Most sway bars run less than half that amount. So after my usual procrastination I decided to try welding it. Now, I realize the safety Nazi's will frown on this approach, but it seemed like the thing to do, so I did it. Took some measurements, vee'd it out wide from two sides, preheated, and welded it up with a high nickle rod in multiple passes with a lot of furious peening after each pass. Had a pile of lime set up and once I had it built up where I wanted it, I set it in the lime and piled some more on top. Let it set overnight and cleaned it up with a grinder the next day. Painted it and installed it. Have a few hundred miles of spirited driving on it now, and no signs of distress. Mike
 

Attachments

  • 0905310034.jpg
    0905310034.jpg
    88.3 KB · Views: 163
  • P1000469.jpg
    P1000469.jpg
    142.7 KB · Views: 164
  • P1000466.jpg
    P1000466.jpg
    149 KB · Views: 163
  • P1000464.jpg
    P1000464.jpg
    144.5 KB · Views: 181
  • P1000463.jpg
    P1000463.jpg
    142.1 KB · Views: 179
  • P1000462.jpg
    P1000462.jpg
    152.4 KB · Views: 180
  • P1000461.jpg
    P1000461.jpg
    141.6 KB · Views: 207

56rpm

Well-known member
Joined
Apr 19, 2012
Messages
354
Location
Bakersfield, Ca
I needed to make an engine crossmember for my 69 Mustang in order to lower the engine. The stock crossmember wouldn't allow any drop of the engine. So I drew up some plans, bent some tube, notched the ends and welded it up.


]


The crossmember is welded upside down on the welding fixture.


zmotorsports

ALLIANCE MEMBER
Joined
Oct 20, 2009
Messages
21,311
Location
Northern Utah
I needed to make an engine crossmember for my 69 Mustang in order to lower the engine. The stock crossmember wouldn't allow any drop of the engine. So I drew up some plans, bent some tube, notched the ends and welded it up.


]


The crossmember is welded upside down on the welding fixture.


Nice work.:thumbup: 
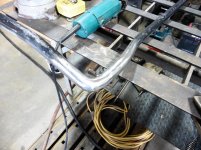
Good planning and execution. Turned out great.

Mike.
 
To avoid these ads, REGISTER NOW!

bagged89s10

Well-known member
Joined
Mar 13, 2005
Messages
4,607
Location
CT
I needed to make an engine crossmember for my 69 Mustang in order to lower the engine. The stock crossmember wouldn't allow any drop of the engine. So I drew up some plans, bent some tube, notched the ends and welded it up.


]


The crossmember is welded upside down on the welding fixture.


Nice work on that crossmember. Sure beats the way I built a similar bolt on crossmember for the rear shocks on my truck a long time ago. I remember welding it on the floor and angle grinding the notches for tubing.

Was that notching done on a mill? Can't tell on the pic.

Good work! :thumbup:
 

zkling

Well-known member
Joined
Jan 23, 2007
Messages
16,939
I needed to make an engine crossmember for my 69 Mustang in order to lower the engine. The stock crossmember wouldn't allow any drop of the engine. So I drew up some plans, bent some tube, notched the ends and welded it up.

Great job, a good welded tubing joint always starts with a close fitting notch. :thumbup:
 

doojus

Well-known member
Joined
Dec 10, 2014
Messages
236
A couple years back I built an infinity rig for a relative starting a crossfit gym.

Even with a mag drill, I never wanted to drill another hole again.


I'm cringing just thinking about drilling that many holes, holy ****.

There's a place here that does laser cutting, I'd probably just outsource if I had to do it again.
 

doojus

Well-known member
Joined
Dec 10, 2014
Messages
236
Family has a horse business, I made some aluminum jumps for them. The old wood jumps are smoked after about 2 years and they're also too heavy for little people to move easily. I can pick these up with one hand, but they're strong enough that I could sit on the suspended jump

tmp89602015061121321.jpg
 

Robert Hall

Well-known member
Joined
Jan 17, 2011
Messages
414
Location
Utah
I had a client ask for a gun display case for a shotgun that her dad found in 1977 while our hunting.

The shotgun is circa 1900 or so I'm told.

It's been displayed in a semi exploded fashion and held in place by 316 stainless steel fabricated and each standoff is held by a #10 stainless screw.

uploadfromtaptalk1434226320348.jpg

uploadfromtaptalk1434226366235.jpg

uploadfromtaptalk1434226561823.jpg
 

doojus

Well-known member
Joined
Dec 10, 2014
Messages
236
Made this little parts bin out of 1/16" 6061 for my old man for father's day. The autogenous weld on the front didn't come out quite as good as I wanted but ah well.

11232124101530204720.jpg


17181101530204721478.jpg
 

56rpm

Well-known member
Joined
Apr 19, 2012
Messages
354
Location
Bakersfield, Ca
Was that notching done on a mill? Can't tell on the pic.

Good work! :thumbup:

Thanks guys for the kind words, you've really made my day! Yes, the notching was done on a mill. That idea was stolen from Kris at 44 Bikes Frame Shop who is an outstanding fab guy here on GJ.
 

kazlx

Well-known member
Joined
Oct 30, 2012
Messages
2,851
Location
Tustin, CA
Did you make the feet? Those are nice ... simple design, but a nice touch.

Yes, CNC plasma. The top was a plain round from Lowes. I beat it up with some chain and stained it. I machined up a collar that's underneath to mount the top as well. Everything besides the top was scrap I had laying around. Figured as long as I was testing cuts on the plasma, might as well make something for the wifey.
 

E12-535iTurbo

Well-known member
Joined
Feb 27, 2014
Messages
492
Location
The Netherlands
Finished the gate:

View media item 51365
And some close up's of the installation (back, left and front, right):

View media item 51364View media item 51363
Some details of the hinges as requested:

View media item 51367View media item 51368
Building process:

View media item 50693
Building a jig to cold bend the profiles over:
View media item 50695View media item 50694View media item 50701View media item 50702
Rough layout and welding (everything is TIG welded):
View media item 50696View media item 50777View media item 50698View media item 50697

No crushed profiles because of added support tubes. And recessed mounting screws:
View media item 50779View media item 50780
TIG-welding seems to go well:
View media item 51225
The end result was sandblasted, thermal sprayed and powder coated for maximum corrosion resistance.
 
To avoid these ads, REGISTER NOW!
Top Bottom