To avoid these ads, REGISTER NOW!

Show us your welding projects

E12-535iTurbo

Well-known member
Joined
Feb 27, 2014
Messages
492
Location
The Netherlands
So did you physically bend this? How did you keep the tubing from buckling?

Awesome job by the way :thumbup:

Thanks!

I did physically bend this. It was a nice work out. I reasoned that key things are to keep the profile level with the jig while bending and to have the welded seam at the inner radius against the jig. Other than that it was just a matter of leverage and powah! :)
 
To avoid these ads, REGISTER NOW!

RK-REX

Member
Joined
May 15, 2008
Messages
21
Location
Mid-Michigan
Made this little parts bin out of 1/16" 6061 for my old man for father's day. The autogenous weld on the front didn't come out quite as good as I wanted but ah well.

11232124101530204720.jpg


17181101530204721478.jpg
Can't wait until my little guy is able to do stuff like that for me.
 

RK-REX

Member
Joined
May 15, 2008
Messages
21
Location
Mid-Michigan
You could definitely help speed the process along by getting him a TIG when he's old enough [emoji106]
He has access now and a whole shop full of tools, but at ten, he has only taken an interest in the mill. I think the sparks from the mig scare him a bit and the tig is too boring for a wound up little kid. [emoji1]
 

Bruster04

Active member
Joined
Sep 12, 2014
Messages
43
I have one going on greatlakes 4x4

Specs are
Dodge king pin dana 60 5.13 gear Detriot locker 35 inner and outer axle shafts
14 bolt rear 5 13 welded
3 link front and 4 link rear
Coil springs
355/th350/np205
Bald 42s

Working now on mounting the motor and trans..need to order new seats,steering shaft and steering wheel then I can start building the new cage
 

rtull32

Well-known member
Joined
Feb 14, 2015
Messages
63
I have one going on greatlakes 4x4

Specs are
Dodge king pin dana 60 5.13 gear Detriot locker 35 inner and outer axle shafts
14 bolt rear 5 13 welded
3 link front and 4 link rear
Coil springs
355/th350/np205
Bald 42s

Working now on mounting the motor and trans..need to order new seats,steering shaft and steering wheel then I can start building the new cage
Nice! Good looking rig!
 

Bruster04

Active member
Joined
Sep 12, 2014
Messages
43
I have one going on greatlakes 4x4

Specs are
Dodge king pin dana 60 5.13 gear Detriot locker 35 inner and outer axle shafts
14 bolt rear 5 13 welded
3 link front and 4 link rear
Coil springs
355/th350/np205
Bald 42s

Working now on mounting the motor and trans..need to order new seats,steering shaft and steering wheel then I can start building the new cage
9ebec599b824f7e625c476a2d2aeb528.jpg
d70bb107e6c08a085e0c3db51fe15e92.jpg
dd81333689de90a78ccdd72abbea1144.jpg
 

doojus

Well-known member
Joined
Dec 10, 2014
Messages
236
The horse jumps I made went less than 2 weeks before someone ran one of the feet over with a tractor. I assumed it would happen, just not immediately. So I modified the feet and made them much shorter by cutting about 8" off each, and welded end caps on them so hopefully the next time they get run over they'll offer more resistance. If that doesn't work I may have to switch the design over to use flat plate for the feet or put on gussets that extend all the way to the end of the feet.


20150621103306oco.jpg


20150620225620.jpg


20150621115157oyo.jpg
 

crewchief888

Well-known member
Joined
Dec 3, 2009
Messages
13,736
Location
NW indiana
picked up a hand shear about a month ago, havent been able to put it to use yet.

been looking for a suitable base for it..
found a mangled HD trailer jack that was being scrapped at work, torched of what i could use,
then scrounged around i my scrap at home until i found enough pieces...

welded it up, then it needed paint..

couldnt decide between pink or purple..

went with the purple... gonna save the pink for something else :bounce:


:beer:
 

Attachments

  • shear stand 004.JPG
    shear stand 004.JPG
    62.5 KB · Views: 217
  • shear stand 002.JPG
    shear stand 002.JPG
    76.8 KB · Views: 239

robert_dean

Member
Joined
Apr 4, 2015
Messages
15
Location
Saginaw,MI
How do these look ... also, what is the paint looking residue? Using solid wire with 75/25 gas.

Pretty late for a comment, but I'll give one anyway. Looks pretty good, maybe a touch fast on travel speed. Slow up just a bit, add a very subtle weave and you'll have a perfect weld puddle. And as others have said, the deposits are a simple by-product of the welding process and are perfectly normal.

What type of machine and what settings were you using? I always like to ask as every machine is different. I've been welding( Journeyman Millwright) for 20 years now, and me personally I usually leave my MiG set at 19 volts and 310-330ipm(inches per minute) wire speed. I run that for any over 12ga sheet metal and up to 3/8" plate, just varying my travel speed. Sheet metal I use 16 volts and 200 IPM. The Mill finish on tube and sheet metal can sometimes be quite a pain to burn through to get proper penetration!! You grind that back to clean metal and weld that joint again with the same settings and you'll have a much nicer looking and better penetrating weld! Keep up the good work!!!
 

Bruster04

Active member
Joined
Sep 12, 2014
Messages
43
What holds the springs in place? Is there a cup and strap still to be made?

Nice project ...
Bottom will be getting a 4"od piece of pipe and a coil retainer.Limiting straps will also be in place once I cycle the suspension and set my shocks up.
 

bmxdad

Well-known member
Joined
Feb 18, 2014
Messages
2,539
Location
Puyallup, WA
Pretty late for a comment, but I'll give one anyway. Looks pretty good, maybe a touch fast on travel speed. Slow up just a bit, add a very subtle weave and you'll have a perfect weld puddle. And as others have said, the deposits are a simple by-product of the welding process and are perfectly normal.

What type of machine and what settings were you using? I always like to ask as every machine is different. I've been welding( Journeyman Millwright) for 20 years now, and me personally I usually leave my MiG set at 19 volts and 310-330ipm(inches per minute) wire speed. I run that for any over 12ga sheet metal and up to 3/8" plate, just varying my travel speed. Sheet metal I use 16 volts and 200 IPM. The Mill finish on tube and sheet metal can sometimes be quite a pain to burn through to get proper penetration!! You grind that back to clean metal and weld that joint again with the same settings and you'll have a much nicer looking and better penetrating weld! Keep up the good work!!!

I have a Hobart 187. 5/50 were the settings using solid .030 wire and 75/25 gas. So slow it down ... will try that. Next project is making a rack for my Grass Catcher, that hangs off the back of my 42" lawn tractor. Going to be making a bracket that mimics the back of the tractor. Idea is in the head, so still thinking about it.

Thanks for the feed back, much appreciated. :D
 

jetson145

New member
Joined
Apr 30, 2014
Messages
1
Coffee table from 3/4" square tubing and 3/4 x 1" angle "ripped" to 3/4 x 3/4 on the bandsaw. Tig and mig welded and lots of finishing!
 

Attachments

  • image.jpg
    image.jpg
    147.7 KB · Views: 292

youngnstudly

Well-known member
Joined
Apr 20, 2007
Messages
79
Location
The "Whine" country, CA
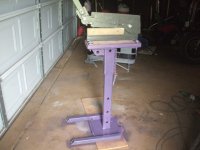
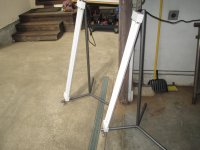
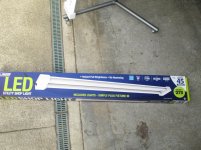
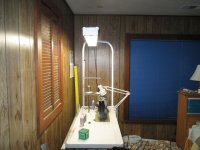
We've been really trying to cut back on the PG&E while getting more off the grid/portable, and having 7 or 8 (96" long) fluorescent light fixtures wired together in the garage isn't a good way to save on electricity, so I whipped up a few light fixture stands from 1" EMT conduit, some flange nuts, and some cheap HF castors. The light fixtures are from Costco (LED for $36 each :cool:). I'm trying to decide on how to go about making a cage to protect the bulbs from getting damaged.

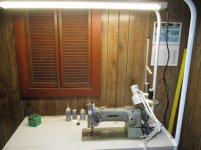
I thought the Costco fixtures were such a good deal, I went back the next day and got another fixture for above my sewing machine. Of course I had to fab up another light fixture rack from the remaining conduit to mount it to, but the tubing notcher and welder were already out and waiting to be used. Luckily my portable Nomad welding table came in handy for more than just welding. ;) I don't know how I would have painted that light rack otherwise. Getting it laid out on the floor, then level, square, and straight during welding was hard enough! :willy_nil

Andy
 

Attachments

  • IMG_3614.jpg
    IMG_3614.jpg
    145.6 KB · Views: 279
  • IMG_3615.jpg
    IMG_3615.jpg
    147.3 KB · Views: 266
  • IMG_3609.jpg
    IMG_3609.jpg
    145.4 KB · Views: 309
  • IMG_3612.jpg
    IMG_3612.jpg
    142.9 KB · Views: 264
  • IMG_3616.jpg
    IMG_3616.jpg
    141.2 KB · Views: 297
To avoid these ads, REGISTER NOW!

nine4gmc

Well-known member
Joined
Mar 24, 2012
Messages
14,357
Location
Dallas
How do you like the LED over your sewing table and what kind of sewing do you do? I do auto upholstery and have use a standard fluorescent to cut down on shadowing.
 

youngnstudly

Well-known member
Joined
Apr 20, 2007
Messages
79
Location
The "Whine" country, CA
How do you like the LED over your sewing table and what kind of sewing do you do? I do auto upholstery and have use a standard fluorescent to cut down on shadowing.

I just painted the light rack for the sewing machine yesterday, so I'll probably mount it and the light to the sewing table tomorrow and get back to you with the results. I don't want it gassing out in my bedroom where the sewing machine is kept. I already held it over the sewing table (just to get an idea of what it will look like), and I was impressed with the amount of light it puts out.

I'm just a hobbyist that enjoys doing auto upholstery and household/shop sewing projects in my spare time. I'm not a "pro" by any means, but then again I don't consider myself to be a pro at anything I do, even if I have credentials that say otherwise. It's just a fun (quiet, grease/dirt/fire-free :eek: ) hobby for me that isn't terribly demanding. I can work on a project a little at a time and still accomplish something in the long run. :thumbup:

Andy
 

youngnstudly

Well-known member
Joined
Apr 20, 2007
Messages
79
Location
The "Whine" country, CA
Okay, I got the light rack and fixture mounted to the sewing table and ready to use. I think there is more than enough light for the general area, but the swivel based light will still be needed when sewing. Don't ask me how, but I managed to get the light rack within 3/8" of being level over the entire length of the light fixture. That would be some of my more accurate work right there! :D

Of course I was pissed that the light cord was 5" short of plugging into the wall socket, hence the 15' of extension cord that is passing through my dog's bed on the floor. I'll have to figure a more permanent solution out there so the dog doesn't have direct access to a power cord (I'm thinking of a power strip mounted low on the sewing table). Sorry to be off topic. :eek: Back to welding talk.

Andy
 

Attachments

  • IMG_3619.jpg
    IMG_3619.jpg
    140.3 KB · Views: 248
  • IMG_3620.jpg
    IMG_3620.jpg
    138.6 KB · Views: 236
  • IMG_3621.jpg
    IMG_3621.jpg
    141 KB · Views: 245

xyster101

Well-known member
Joined
Jul 3, 2013
Messages
640
Location
Upstate NY
Wife wanted to learn to weld. After a 3 min crash course on the thing she was ready. I did the cutting and grinding, she clamped and welded. This is on my mig Holbart 145. She even welded little spoons and did not melt them. I made one also.

Ruploadfromtaptalk1435631407289.jpguploadfromtaptalk1435631438782.jpguploadfromtaptalk1435631466919.jpg
 

BD1

Well-known member
Joined
Mar 18, 2007
Messages
4,602
Location
north side
Wife wanted to learn to weld. After a 3 min crash course on the thing she was ready. I did the cutting and grinding, she clamped and welded. This is on my mig Holbart 145. She even welded little spoons and did not melt them. I made one also.

Ruploadfromtaptalk1435631407289.jpguploadfromtaptalk1435631438782.jpguploadfromtaptalk1435631466919.jpg

Nice job !! Now you can buy her a larger machine ! :D

Those rotary hoe wheels make great flowers. :beer:
 

Fender1325

Well-known member
Joined
Dec 30, 2014
Messages
1,309
I didnt make the cement tops, he already had them and requested some steel tables with shelves and hangers. I did however for a short while work somewhere that made cement counter tops. Its a matter of building a mold (we used greased malamene) and having the correct cement recipe. Not terribly hard but Im certain would take trial and error.
 

robert_dean

Member
Joined
Apr 4, 2015
Messages
15
Location
Saginaw,MI
I have a Hobart 187. 5/50 were the settings using solid .030 wire and 75/25 gas. So slow it down ... will try that. Next project is making a rack for my Grass Catcher, that hangs off the back of my 42" lawn tractor. Going to be making a bracket that mimics the back of the tractor. Idea is in the head, so still thinking about it.

Thanks for the feed back, much appreciated. :D

Anytime!

Hardest thing to learn when welding is how to "read" the weld puddle and make your adjustments. There are many ways to achieve the effects you're after, as they're all subtle changes at this point. No right or wrong, other than not practicing. I had a welding instructor tell me years ago that welding is two things - muscle memory and being able to see the puddle(good eye sight/glasses etc.). He said you will start loose your "muscle memory"/technique after only 10 days, quicker if you weld infrequently to begin with.

Check out Jody at weldingtipsandtricks.com on Youtube, GREAT VIDEOS!! He does an amazing job of relating to the viewer and providing great arc shots. It will be the best time you'll spend on the internet everyday - expect for being here of course!!

Good luck!!
 

jimgood

Well-known member
Joined
Aug 4, 2014
Messages
2,394
Location
Marshall, VA
Hard to see the welds in this but I threw this together in an attempt to keep snakes out of our dryer vent. The backstory is here if you want to know about it. It's easily removable and I'll be able to check it frequently for lint buildup as my work area is adjacent to it (because I know the entire internet says "Don't put a screen over your dryer vent!"). I wanted a finer mesh but this was all I could find locally. I'll probably make another one after I track some down. In the meantime, this will keep the big snakes out.

View media item 51692
 
Last edited:

rtull32

Well-known member
Joined
Feb 14, 2015
Messages
63
It will keep the big ones out.

Frankly, this is more for my wife's peace of mind, if you know what I mean.
Looks like a well thought out plan to me. If it doesn't work you have an excuse to get back out in the garage, and in the meantime she is happy and you get to walk around all macho after she thanks you!
 

shawnspeed

Well-known member
Joined
Sep 11, 2009
Messages
326
The beginnings of an Earls fork front end for a side hack..
 

Attachments

  • image.jpg
    image.jpg
    128 KB · Views: 194

Yarz

Well-known member
Joined
Sep 11, 2013
Messages
121
Location
Tarentum PA
Did a little welding and a little bending to make this CB mount in my Jeep. The plan is to one day include a switch panel up there as well
https://scontent-iad3-1.**.fbcdn.net/hphotos-xap1/v/t1.0-9/11168487_742735929690_6403516378031076278_n.jpg?oh=ab1f8a7ac7286b611b4d52c0ad66f84e&oe=5619C3C9
 
To avoid these ads, REGISTER NOW!
Top Bottom