Briggs
Well-known member
You need to start a thread for this.
Sent from my SM-G920V using Tapatalk
I did. I have more pics in my garage "showoff" thread. Thanks for the interest.

You need to start a thread for this.
Sent from my SM-G920V using Tapatalk


finished up my stand. its ready to roll

That is a funny place for a deer to take a nap.
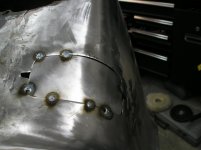
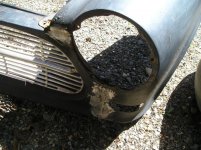
Wondering if my patch just warped or I didn't fit it well to begin with? The edges ended up slightly smaller than I hoped for, but while holding it in place seemed to fit well for/aft. Should I have tacked one each side before adding more in the lower areas or did I just not catch how badly it fit before welding. I get you can only guess at this point. Copper backing will have to be used and maybe lower heat a notch?
A skim coat of mud will no doubt happen but want the next side to come out better.
Thoughts?
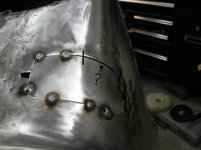
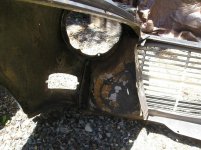
I also see the dreaded blowthrough, meaning you've got too much heat going in. Trust me, it's a dance I'm still doing to avoid when I'm doing sheet metal. It's one reason I'm practicing TIG right now and will be doing some more coupons in an hour or so to learn how to use it right for the materials I'm working with.

Don't mud over it!
What is it your patching?
I've seen a lot of those era Volvo's turned into really nice looking machines , are you planning on doing the same ?
Some mild mods, but mostly stock. added some pics on my shop build.
(keeping from cluttering the welding thread)
Don't mud over it!...You may be able to build up the welds in that area and eventually fill it....
What is it your patching?..
New cars come rolling out the factory with filler on them.
Sent from my LG-D801 using Tapatalk
While not an expert, I would cut out the current repair panel an start over.I had stopped tacking at this point to get an expert opinion.
Do I risk making a mess with the hammer and dolly or just mud over it and move on? Want to learn as I am showing my boy how (or how not) to do this.
click on pic, for best view!
I don't work in an auto factory, but I stayed at a holiday Inn last night. LolI work in an auto factory and I can honestly say that this is not true. They will always get the panel smoothed back out
You'll never get it straight without filler!..

Tons of metal shapers get their sheet metal paint ready with no filler. Heck there are some examples of it right on this board.You'll never get it straight without filler! That said, you don't want to layer it on or fill gaps/holes with it.
Yeah, it may come out looking great, until it starts cracking and crumbling under that sweet paint job! Lol
New cars come rolling out the factory with filler on them.
Sent from my LG-D801 using Tapatalk
I don't work in an auto factory, but I stayed at a holiday Inn last night. Lol
There's no way, in my mind, that they could get perfectly straight panels without some filler before spraying paint.
I've read that many times, maybe that was the case back when? Still would not be surprised if they still do it today.
Sent from my LG-D801 using Tapatalk
Patch appears to be a bit too small for the opening. Yes, tacking it on all sides would have helped prevent the lifting and pulling as it shrinks.
Actually the tacking on all sides of a patch that is too small for the opening does exactly what was shown, pulls it to the outside of the hole as the weld dot shrinks which pulls it down in a high crown area like that shown. The correct way to prevent this (besides the patch fitting a bit better) is to tack in the same direction and forget what you've heard about skipping around. Start the top seam from the inside (for example) and work the tacks toward the outside, aligning the panels as you go. Start the bottom seam and work it the same direction, aligning the panels as you go. Now if the patch is too short it results in a gap along the outside vertical seam, not the patch pulling downward.
I also see the dreaded blowthrough, meaning you've got too much heat going in. Trust me, it's a dance I'm still doing to avoid when I'm doing sheet metal. It's one reason I'm practicing TIG right now and will be doing some more coupons in an hour or so to learn how to use it right for the materials I'm working with.
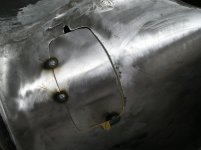
Without seeing the back side of the welds, I'd say that you have a few real nice ones there, and a few that blew likely due to excessive gap in the panel. IMO, increase the wire feed slightly and leave the heat alone. If weld dots start to appear too large, control that with less weld duration. But full penetration welds, first and foremost.
Yes maybe too hot? I try and find that sweet spot, doesn't always happen.
Lets see those coupons!
Don't mud over it!
You may be able to build up the welds in that area and eventually fill it. PITA, though with that gap.
Take your time and let it cool, spread your tacks out, as it looks like you have been.
Check wire speed and heat settings for blow through.
Patch panel should be tightest possible fit or as close to as you can get.
Sent from my LG-D801 using Tapatalk
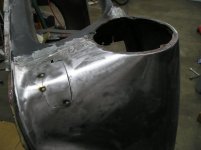
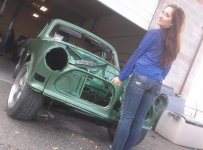
As you can see its already got the fenders welded to the nose, bought it that way. It'll get mud but I'm striving for as little as possible after all the welding is complete. I never meant now (just to be clear)
A little filler never hurt anyone, but you'd be surprised how a bit more attention to fit/trimming of the patch will help in limiting the filler needed..
What is it your patching?
The car in my avatar is a 66 Volvo Amazon. Me and my boy are adding custom turn signals to a one piece front end so I (we) are filling the old factory holes.
Thanks all for the ideas!