Been working on a few projects lately first off is is quick tach hydraulic thumb and buckets for my case cx50b mini hoe. Not complete yet.

You are using an out of date browser. It may not display this or other websites correctly.
You should upgrade or use an alternative browser.
You should upgrade or use an alternative browser.
Show us your welding projects
- Thread starter neonnblack
- Start date
![20160923_212028[1].jpg](/forum/data/attachments/552/552288-d08c99049db683d8e356f7eca45b7715.jpg)
![20160923_212047[1].jpg](/forum/data/attachments/552/552321-0dd2cf395ace66f2300d8ef3d79c16c7.jpg)
![20161214_211035[1].jpg](/forum/data/attachments/552/552367-e8ac002988f5e590584a489f9a017644.jpg)
![20161214_211039[1].jpg](/forum/data/attachments/552/552413-416902041a9697a35c95c6d29d183ddf.jpg)
I am also working on a pull type tile plow.
Attachments
-
![20170207_181514[1].jpg](/forum/data/attachments/552/552772-fa6364b4faae5bee9f8fb00a38f9e277.jpg) 20170207_181514[1].jpg138.9 KB · Views: 321
20170207_181514[1].jpg138.9 KB · Views: 321 -
![20170207_181507[1].jpg](/forum/data/attachments/552/552728-26bc540660697b4bc86013a5310b1fbb.jpg) 20170207_181507[1].jpg144.8 KB · Views: 338
20170207_181507[1].jpg144.8 KB · Views: 338 -
![20170202_203038[1].jpg](/forum/data/attachments/552/552690-4a5945f2588df8b4eb5043dfcafa518e.jpg) 20170202_203038[1].jpg139.9 KB · Views: 329
20170202_203038[1].jpg139.9 KB · Views: 329 -
![20170202_203023[1].jpg](/forum/data/attachments/552/552640-0551f0222d95ccee2f23cdcb9cad2430.jpg) 20170202_203023[1].jpg140.8 KB · Views: 318
20170202_203023[1].jpg140.8 KB · Views: 318 -
![20170124_195447[1].jpg](/forum/data/attachments/552/552600-f93ba99895240c4936b7edef3965f32e.jpg) 20170124_195447[1].jpg140.2 KB · Views: 311
20170124_195447[1].jpg140.2 KB · Views: 311 -
![20170124_195438[1].jpg](/forum/data/attachments/552/552559-10a93fea0fc92e8dd8f1c0df07826984.jpg) 20170124_195438[1].jpg144.7 KB · Views: 307
20170124_195438[1].jpg144.7 KB · Views: 307 -
![20170124_195434[1].jpg](/forum/data/attachments/552/552542-e25939e18f9ac723b6b1f3df3c24b3c8.jpg) 20170124_195434[1].jpg143.4 KB · Views: 344
20170124_195434[1].jpg143.4 KB · Views: 344
Last edited:
![20170331_194840[1].jpg](/forum/data/attachments/552/552939-14c6d5bf6a32e152656ee62fd64a6b0a.jpg)
![20170208_205159[1].jpg](/forum/data/attachments/552/552902-8d8d4d1b9be33a89eb775f52f6063b4f.jpg)
![20170208_174051[1].jpg](/forum/data/attachments/552/552858-e7331cdb2d6c5e3906b7bf9ebfb0ca17.jpg)
![20170331_194943[1].jpg](/forum/data/attachments/553/553051-dd0a2f55d57fa0f1cd1a6784517dbd98.jpg)
Crusarius
Well-known member
How thick is the steel on the bucket? How did you form it. I have a friend that wants me to build him a ditching bucket.
I really like your idea for attaching the thumb. I was going to make a thumb that bolted to the arm.
I really like your idea for attaching the thumb. I was going to make a thumb that bolted to the arm.
The buckets I made for my mini are 1/4" AR400F for the skin, 3/8" T1 on the sides and 1" x 8" 1055 single bevel cutting edge. All profiles were cut on a plasma table and formed with press brake and plate roller.
Don't forget to taper the buckets front to back so material comes out easier.
Don't forget to taper the buckets front to back so material comes out easier.
pepi
Well-known member
The buckets I made for my mini are 1/4" AR400F for the skin, 3/8" T1 on the sides and 1" x 8" 1055 single bevel cutting edge. All profiles were cut on a plasma table and formed with press brake and plate roller.
Don't forget to taper the buckets front to back so material comes out easier.
JDN,
That's what I call a Monster garage .......

Greg
I am also working on a pull type tile plow.
You gotta do a build thread on you plow. That's our next project after making quick couplers and making and modifying buckets for our 5 excavators.
Whiskeybadger
Member
- Joined
- Jun 25, 2014
- Messages
- 15


Zen Welder
Member
Wish I could but signed a confidentiality agreement at work. But some cool projects on this thread!
larry4406
Well-known member
JDN - the size of that plow is insane! Nice job on the fab! How and for what is that used?
The plow is used to install drainage tile 3-5' below the surface of farm land to remove excess water. I modeled mine after a soilmax gold digger with a few modifications. It is a fairly large project weighing roughly 9500#, the most difficult part is handling the large pieces without a bridge crane or other large equipment.
I have six of these portable work stands that I purchased from Harbor Freight over the years. When I'm not using them and they are stored they always seem to be in the way. I saw on a YouTube video posted by Defender Chassis where he had them hung over a doorway for storage purposes. Seems like a lot of wasted space over a door so I looked at that location. Unfortunately, the door was wider than the stands and the ceiling was not high enough to keep them from impeding access through the door. So I ended up hanging on some vacant space on the wall that I could reach.

This is the portable work stand in question.

The racks are pretty simple only comprised of four pieces of steel.

All jigged up and ready for welding. I used this as an opportunity to practice my TIG skills.

I didn't get any pictures of them welded up in all their bare steel glory. I sent them out to be powder coated white so they would blend in with the wall when they are not being used.

I have six stands so I made two sets. Each set will hold three stands. I was concerned that if I placed them all on a single rack they would stick too far out from the wall.

I pre-drilled the holes in the wall. I used 1/4 x 2.5" lag bolts to attach them to the studs.

Here they are attached to the wall.

In use. The other rack is hidden behind my paint booth.
Let me know if you have any questions.
Britt
zmotorsports
ALLIANCE MEMBER
I have six of these portable work stands that I purchased from Harbor Freight over the years. When I'm not using them and they are stored they always seem to be in the way. I saw on a YouTube video posted by Defender Chassis where he had them hung over a doorway for storage purposes. Seems like a lot of wasted space over a door so I looked at that location. Unfortunately, the door was wider than the stands and the ceiling was not high enough to keep them from impeding access through the door. So I ended up hanging on some vacant space on the wall that I could reach.
This is the portable work stand in question.
The racks are pretty simple only comprised of four pieces of steel.
All jigged up and ready for welding. I used this as an opportunity to practice my TIG skills.
I didn't get any pictures of them welded up in all their bare steel glory. I sent them out to be powder coated white so they would blend in with the wall when they are not being used.
I have six stands so I made two sets. Each set will hold three stands. I was concerned that if I placed them all on a single rack they would stick too far out from the wall.
I pre-drilled the holes in the wall. I used 1/4 x 2.5" lag bolts to attach them to the studs.
Here they are attached to the wall.
In use. The other rack is hidden behind my paint booth.
Let me know if you have any questions.
Britt
Turned out nice. I did something similar in my last shop and will more than likely do the same in my new one in the storage bay. I only have 2 to contend with though.
Great job.
Mike.
chipdog4
Well-known member
Finished this up over the weekend. Got it sandblasted and I think I'll spray it with bedliner. Will be secured with U bolts.
1.25" angle iron for the frame, almost 8 feet of expanded metal and 1/4" round stock to top the expanded metal. Only had to buy the 1/4" round stock.
I was still getting used to my new welder so the welds aren't the greatest.


Goes on the front rack of my father's Honda Rancher to hold stuff.
(This picture is from 7 or 8 years ago when it was new.)

1.25" angle iron for the frame, almost 8 feet of expanded metal and 1/4" round stock to top the expanded metal. Only had to buy the 1/4" round stock.
I was still getting used to my new welder so the welds aren't the greatest.
Goes on the front rack of my father's Honda Rancher to hold stuff.
(This picture is from 7 or 8 years ago when it was new.)
Last edited:
Partsguy57
Banned
- Joined
- Jan 19, 2016
- Messages
- 456
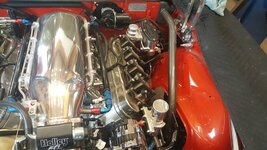
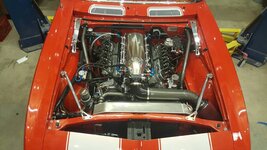
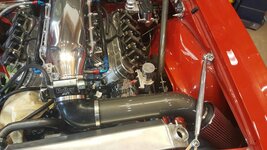
Finished up the air intake, upper radiator hose, down tubes, and brackets to mount my catch cans. ( painted parts the dark charcoal metallic) built the air intake and upper hose out of stainless and was going to polish but decided I had enough " Brite stuff" and painted them along with the down tubes. Bent the down tubes with my tubing bender, built the air intake and radiator hose out of several pieces to get the angles I needed and tig welded it all up. Painted all single stage urethane, was not happy with a bit of orange peel ( the engine compartment has been cut and buffed) sprayed 4 coats of clear over the single stage metallic paint and then cut and buffed to match the rest of the car. ( you can't cut and buff a single stage metallic paint with messing up the metallic)


Sent from my SM-G920R4 using Tapatalk
Sent from my SM-G920R4 using Tapatalk
Attachments
-
 0b49feaad69f89fa6b84a43965a2bbae.jpg153.5 KB · Views: 3
 -
 84403469349ff28d0b743abf8348b190.jpg140.4 KB · Views: 2
 -
 135256dd222576c636b7e42038d3fc27.jpg147.9 KB · Views: 2
 -
 f9a9a43a23ea9a124e465448db79cdd6.jpg175 KB · Views: 1
 -
 74f549cc4cdeb556fd09c809a79f6dbd.jpg140.4 KB · Views: 2
 -
 630a815bdebfdddaa17ac0244d53896b.jpg164.3 KB · Views: 16
Last edited:
Partsguy57
Banned
- Joined
- Jan 19, 2016
- Messages
- 456
Lol its all good, now that you have your cart time for a new project! Bigger better and your skills will grow. I'm self taught, the more you play the better you will get.NIce! I can't post my ****** lil welding cart build after that though, gonna have to wait....
Sent from my SM-G920R4 using Tapatalk
banjopete
Well-known member
I'll play, I have a craptastic rustbucket car project on the go and some panels I'm replacing are NLA so I have to imagine what they looked like to begin with.
Starting from this:


with patches all over the place:


and many more to get to this point here now where I'm ready to put it back on the car

lots of work for one small piece, and probably a $40 part if I could buy it... oh well fun learning
Starting from this:


with patches all over the place:


and many more to get to this point here now where I'm ready to put it back on the car

lots of work for one small piece, and probably a $40 part if I could buy it... oh well fun learning
jinjaninja
Well-known member
- Joined
- Nov 1, 2011
- Messages
- 149
Great fun just doing it but mate ") well played
well played
Sent from my HTC 2PS6200 using Tapatalk
well played Sent from my HTC 2PS6200 using Tapatalk
machine_punk
Well-known member
Grinder Tree
Needed a place to store grinders. Wanted to be able to move them to the project and keep them handy to use. Had an old office chair, which was the donor for the rolling base. Had a bunch of old bed-frame angle iron.
I went a little different direction with the hooks to hold spare grinding disks. Used 5/8-11 bolts (approximately 15mm diameter with a 2.5mm pitch), which were 2" long (50mm). This is the same thread as the arbor on 4.5" (115mm) grinders. I made a few wing nuts, using 5/8-11 nuts and 1" (25mm) sections of 3/8" (9.5mm) steel rod--to prevent discs which don't have a built-in hub from falling off, when I move the stand around.
I left the vertical bar long, because I plan to add other fabrication tools to this rolling stand: pneumatic die grinders, a few hammers, roofing squares, clamps, and possibly a cordless drill and impact driver. It will be a "one stop shop" for fabrication tools that I can roll right to wherever I am working.
Kev
Attachments


Last edited:
mike528
Well-known member


Should have it mounted and finish up the wiring tomorrow.
RivennHewn
Well-known member
Kev,
Loving the grinder tree! May have to pilfer that.
Loving the grinder tree! May have to pilfer that.

machine_punk
Well-known member
mike528: nice bumper. I like the way it matches the general shape of the truck, the cutouts for the lights, and the hitch receiver.
I think I would have cut the "Move" in reverse, so the person in front of you sees it correctly in his or her rear-view mirror.
I think I would have cut the "Move" in reverse, so the person in front of you sees it correctly in his or her rear-view mirror.
dun
Member
Howdy,
This latest project could be functional, but I prefer to think of it as art. Now, this weld may not pass an x-ray test, but it's plenty strong. In fact, I was able to remove the squaring magnet and the vertical piece stood up all by itself! (Before the rod stuck and melted.)
.jpg")
Truth of the matter is, I got two 1/2" long beads going at 125 amps on my 120v Lincoln AC-180. That was out of about ten breaker flips. So I switched a wire in the back and went and got a length of 8 ga cord and some adapters so I could plug into the clothes dryer outlet which is two 30 amp breakers locked together for 240v.
But at 240v the breaker didn't trip but for some reason unknown to me, the welder was way underpowered. I could not get an arc hardly at all with 1/8" 6011 or 6013. With 3/32" 6013 and the welder turned up to its maximum of 180 amps I could get a really weak arc that just barely sizzled and lit up, with no penetration at all.
So, I have two questions should anyone be willing and able to help the foolish. The first question is, "does anyone know why I have such less power with the welder running on 240v as opposed to 120v?"
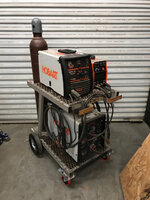
Here's a picture of my welder:
.jpg")
So anyway, all I could figure is that the guy I traded with for this thing must have pretty much used up all its get-up-and-go when he built his trailer, so I ordered a new Lincoln AC/DC 225/125 Arc Welder.
My new welder will arrive in a day or three but after ordering it (instead of before), I looked at the manual for it. The manual says it needs a 240v circuit with 50 amp slow trip breakers. I only have a 30 amp breaker.
My next question is, "Should I open the box of my new welder?" I don't know if anyone else has successfully run one of these on a 30 amp circuit or not. I would like to run 1/8" 6011, 6013, and 7018 with it, and don't know if a 30 amp circuit will do that.
Thanks for listenin', enjoy the art sculpture!
-- Dunn
This latest project could be functional, but I prefer to think of it as art. Now, this weld may not pass an x-ray test, but it's plenty strong. In fact, I was able to remove the squaring magnet and the vertical piece stood up all by itself! (Before the rod stuck and melted.)
Truth of the matter is, I got two 1/2" long beads going at 125 amps on my 120v Lincoln AC-180. That was out of about ten breaker flips. So I switched a wire in the back and went and got a length of 8 ga cord and some adapters so I could plug into the clothes dryer outlet which is two 30 amp breakers locked together for 240v.
But at 240v the breaker didn't trip but for some reason unknown to me, the welder was way underpowered. I could not get an arc hardly at all with 1/8" 6011 or 6013. With 3/32" 6013 and the welder turned up to its maximum of 180 amps I could get a really weak arc that just barely sizzled and lit up, with no penetration at all.
So, I have two questions should anyone be willing and able to help the foolish. The first question is, "does anyone know why I have such less power with the welder running on 240v as opposed to 120v?"
Here's a picture of my welder:
So anyway, all I could figure is that the guy I traded with for this thing must have pretty much used up all its get-up-and-go when he built his trailer, so I ordered a new Lincoln AC/DC 225/125 Arc Welder.
My new welder will arrive in a day or three but after ordering it (instead of before), I looked at the manual for it. The manual says it needs a 240v circuit with 50 amp slow trip breakers. I only have a 30 amp breaker.
My next question is, "Should I open the box of my new welder?" I don't know if anyone else has successfully run one of these on a 30 amp circuit or not. I would like to run 1/8" 6011, 6013, and 7018 with it, and don't know if a 30 amp circuit will do that.
Thanks for listenin', enjoy the art sculpture!
-- Dunn
Last edited:
sberry
Banned
If this is a dedicated circuit and the cable is number 10 or larger you can change the breaker. I know its a popular idea to try every electrode there is but 1/8 6011 and 7018 in 3/32 and 1/8 and forget the 6013 if it was me. While it does have milder penetration than 11 it needs higher current, same as the 18.
You should find someone to help you a bit with the wiring, get the correct receptacle for it, 6-50-R. The new machine you purchased is very good. I have several other units but it is still my go to shop stick machine.
You should find someone to help you a bit with the wiring, get the correct receptacle for it, 6-50-R. The new machine you purchased is very good. I have several other units but it is still my go to shop stick machine.
Attachments

Last edited:
mike528
Well-known member
mike528: nice bumper. I like the way it matches the general shape of the truck, the cutouts for the lights, and the hitch receiver.
I think I would have cut the "Move" in reverse, so the person in front of you sees it correctly in his or her rear-view mirror.
So would I but that's the way it came in the kit from move bumpers. They CNC cut and bend everything for you and you weld and finish it yourself.
Got it on and finished up today.

dun
Member
Thanks, sberry! I am installing a hookup for the new welder. I really appreciate your telling me it's a good shop stick welder, 'cause that's what I'm after and this one surely isn't the sleekest with the newest electronics. I feel better now
Farrier
Well-known member
Been working on a few projects lately first off is is quick tach hydraulic thumb and buckets for my case cx50b mini hoe. Not complete yet.
What material did you use for the pins?
zmotorsports
ALLIANCE MEMBER
Re: Grinder Tree
Great job on the grinder rack.
Mike.
Needed a place to store grinders. Wanted to be able to move them to the project and keep them handy to use. Had an old office chair, which was the donor for the rolling base. Had a bunch of old bed-frame angle iron.
I went a little different direction with the hooks to hold spare grinding disks. Used 5/8-11 bolts (approximately 15mm diameter with a 2.5mm pitch), which were 2" long (50mm). This is the same thread as the arbor on 4.5" (115mm) grinders. I made a few wing nuts, using 5/8-11 nuts and 1" (25mm) sections of 3/8" (9.5mm) steel rod--to prevent discs which don't have a built-in hub from falling off, when I move the stand around.
I left the vertical bar long, because I plan to add other fabrication tools to this rolling stand: pneumatic die grinders, a few hammers, roofing squares, clamps, and possibly a cordless drill and impact driver. It will be a "one stop shop" for fabrication tools that I can roll right to wherever I am working.
Kev
Great job on the grinder rack.
Mike.
zmotorsports
ALLIANCE MEMBER
So would I but that's the way it came in the kit from move bumpers. They CNC cut and bend everything for you and you weld and finish it yourself.
Got it on and finished up today.
Bumper turned out great. Nice job.
Mike.
What material did you use for the pins?
1144 stress relieved
Farrier
Well-known member
1144 stress relieved
Thanks for info. Are you turning your own or are you buying them prefabbed?
Superbec
Well-known member

fourjeepin
Well-known member
Re: Grinder Tree
Wow, that is a lot of grinders. I like your homemade wing nuts. I've done the same thing.
Needed a place to store grinders. Wanted to be able to move them to the project and keep them handy to use. Had an old office chair, which was the donor for the rolling base. Had a bunch of old bed-frame angle iron.
I went a little different direction with the hooks to hold spare grinding disks. Used 5/8-11 bolts (approximately 15mm diameter with a 2.5mm pitch), which were 2" long (50mm). This is the same thread as the arbor on 4.5" (115mm) grinders. I made a few wing nuts, using 5/8-11 nuts and 1" (25mm) sections of 3/8" (9.5mm) steel rod--to prevent discs which don't have a built-in hub from falling off, when I move the stand around.
I left the vertical bar long, because I plan to add other fabrication tools to this rolling stand: pneumatic die grinders, a few hammers, roofing squares, clamps, and possibly a cordless drill and impact driver. It will be a "one stop shop" for fabrication tools that I can roll right to wherever I am working.
Kev
Wow, that is a lot of grinders. I like your homemade wing nuts. I've done the same thing.
OCD
Well-known member
I'm so over my head ...
That's how I learn too!! Looks good so far!! What is it?
Superbec
Well-known member
That's how I learn too!! Looks good so far!! What is it?
thanks, it's my first ever motorcycle gas tank, probably going to scrap it
also my first sheet metal adventure , I only have an english wheel one shrinker a sandbag and 3 hammers .
tslabaugh
Well-known member
Read this whole thread and there are some awesome projects on here. Inspired me to post up some of my work. Haven't been welding for long, using a Miller 211.
First, a 16 gallon Reef tank stand.


Then an end table I made of the top of my head.


I always find the 2" receiver hitch receivers on the side of the road and figured I'd put one on the car hauler for the winch.


It stood up to the test when pulling this lethargic old Metro up on there...

First, a 16 gallon Reef tank stand.
Then an end table I made of the top of my head.
I always find the 2" receiver hitch receivers on the side of the road and figured I'd put one on the car hauler for the winch.
It stood up to the test when pulling this lethargic old Metro up on there...
stsmytherie
Well-known member
Finished a welding cart I've been working on for way too long.

Had to shim one caster due to a not entirely squared up frame. Big shims are due to the caster being used to locate the bottom shelf.


While waiting for dry weather to paint, had the crazy idea of trying to engine turn the sheet metal shelves, just to see how it would work.


Painted and ready to roll.


Had to shim one caster due to a not entirely squared up frame. Big shims are due to the caster being used to locate the bottom shelf.
While waiting for dry weather to paint, had the crazy idea of trying to engine turn the sheet metal shelves, just to see how it would work.
Painted and ready to roll.