
Griff93
Well-known member
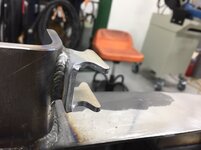
Here's the empty welding tags.
 2018-03-30_02-30-42 by Griffin93, on Flickr
We also made some full ones.
 2018-03-30_02-31-03 by Griffin93, on Flickr
2018-03-30_02-30-42 by Griffin93, on FlickrWe also made some full ones.
2018-03-30_02-31-03 by Griffin93, on Flickr


") Mike
Mike No really, I welded it! If it's on the internet, it's got to be true....


.jpg")
.jpg")
.jpg")