To avoid these ads, REGISTER NOW!

Show us your welding projects

Krang

Well-known member
Joined
Oct 22, 2018
Messages
185
Location
Hawaii
Krang,
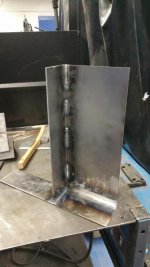
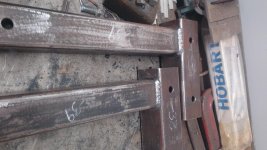
Those brackets look very beefy.
Any installed pics?


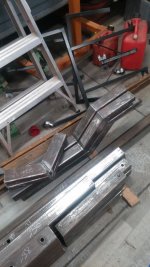
After I finished them I came across a floating shelf system idea for containers... I may end up not using them right away.

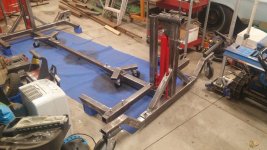
I have about 100’ of 1x1 square tube I could use for this style, right now it’s very appealing because of the small framing footprint.

994ceab6d99d1464a6739c64f58e0188.jpg


Sent from my iPhone using Garage Journal
 

Attachments

  • 994ceab6d99d1464a6739c64f58e0188.jpg
    994ceab6d99d1464a6739c64f58e0188.jpg
    311 KB · Views: 8
To avoid these ads, REGISTER NOW!

FishingMan

Well-known member
Joined
Feb 18, 2015
Messages
272
Location
PA
On the silverware art are you guys tig welding? If so what filler rod and size and what amps? Nice work guys.
 

sqznby

Well-known member
Joined
Oct 26, 2013
Messages
981
Location
Coastal NC
FishingMan,

Looks like the majority mig weld them.

Pretty much all of the silverware art I've seen has been mig welded.
 

BD1

Well-known member
Joined
Mar 18, 2007
Messages
4,602
Location
north side
I started tig welding by fusion only , filler only if needed.
Switched to MIG which is much easier. The quick instant pull of the trigger is the way to go.
Stick welding for a beginner is gonna be tough. With stick there's lots of spatter.
MIG with 75/25 is really clean. Tig is clean but slow. See what works for you.
A separate lightweight ground makes it easy. I use a battery charger clamp and 10 gauge stranded. The clamp can be used to hold the piece that's gonna be welded.
Goodwill is my place to buy. Ten cents each is hard to pass up.
 

FishingMan

Well-known member
Joined
Feb 18, 2015
Messages
272
Location
PA
Thanks guys. Now to find a bunch of silverware. Good winter project. Post some more pics of stuff made of silverware and horse shoes.
 

Brent T

Well-known member
Joined
Sep 29, 2018
Messages
459
Location
Arizona, USA
On the silverware art are you guys tig welding? If so what filler rod and size and what amps? Nice work guys.

I don't have a TIG setup so I bought stainless wire for my MIG and turned it way down. I'm still experimenting with settings. My last few pieces are looking much better than when I started.
 

fordkid88

Well-known member
Joined
Nov 10, 2013
Messages
680

Working on a new welding table. On top of it is my sidewinder frame and next to it is my project truck. Those are my welding projects.
 

ndr1968

Well-known member
Joined
Apr 18, 2012
Messages
207
Location
Oklahoma
Thanks guys. Now to find a bunch of silverware. Good winter project. Post some more pics of stuff made of silverware and horse shoes.

Most of us are using MIG.

It's something to do to relieve boredom and also, they make swell gifts for friends and family. Heck, I've even given them to strangers who come to the door and asked about them (I have a "garden" of them right next to the front door).

One piece of advice. Like the posts that got this whole discussion started make yourself a good heavy third hand. with a little weight pressing down on things you will find that you can balance a coin on it's edge long enough to get a tack down. Also, it will help to transfer a better ground to the object to be welded.
 

zmotorsports

ALLIANCE MEMBER
Joined
Oct 20, 2009
Messages
21,327
Location
Northern Utah
A few welds from last night's welding project.

I cut the original track bar bracket off of my ProRock 44 housing and installed my new Artec Industries raised track bar bracket in preparation for installing my hydraulic assist steering ram.
41eb2ff206d557dd143919bdd1935fc3.jpg

I also added some skids under my lower control arm mounts.
eb1c061d1f16b9550cd0cf059eaf2217.jpg

4e0833f2dade6daaf71cbc2a1198b49c.jpg

46889058ff8c0e62bdcaa4f1d22b8b1c.jpg

5b29827d157e0f92498370aa57ffd7f1.jpg

4ba5ed3accefffb565f3115bb471239b.jpg

15144f96a154dad9005ed2dbb8cd4fa7.jpg
 

Attachments

  • 46889058ff8c0e62bdcaa4f1d22b8b1c.jpg
    46889058ff8c0e62bdcaa4f1d22b8b1c.jpg
    126.3 KB · Views: 2
  • 15144f96a154dad9005ed2dbb8cd4fa7.jpg
    15144f96a154dad9005ed2dbb8cd4fa7.jpg
    112.9 KB · Views: 0
  • 5b29827d157e0f92498370aa57ffd7f1.jpg
    5b29827d157e0f92498370aa57ffd7f1.jpg
    116.2 KB · Views: 0
  • 4e0833f2dade6daaf71cbc2a1198b49c.jpg
    4e0833f2dade6daaf71cbc2a1198b49c.jpg
    127.5 KB · Views: 0
  • eb1c061d1f16b9550cd0cf059eaf2217.jpg
    eb1c061d1f16b9550cd0cf059eaf2217.jpg
    130.9 KB · Views: 0
  • 41eb2ff206d557dd143919bdd1935fc3.jpg
    41eb2ff206d557dd143919bdd1935fc3.jpg
    115.1 KB · Views: 0
  • 4ba5ed3accefffb565f3115bb471239b.jpg
    4ba5ed3accefffb565f3115bb471239b.jpg
    104.1 KB · Views: 0

LXCam

ALLIANCE MEMBER
Joined
Apr 23, 2013
Messages
19,090
Location
AZ

Working on a new welding table. On top of it is my sidewinder frame and next to it is my project truck. Those are my welding projects.

Now that's fricking too cool bud. How are you accommodating the adjustment. Threaded rod that protrudes somewhere or did you use a right/left hand coupler of some kind. Also it looks like you got a solid foot of adjustment, how much do you actually have? :beer:

Bracket for mounting a motor controller on my horizontal compressor. TIG welds.

Bill

You're coming right along bill, congratulations. :thumbup:

A few welds from last night's welding project.

I cut the original track bar bracket off of my ProRock 44 housing and installed my new Artec Industries raised track bar bracket in preparation for installing my hydraulic assist steering ram.
41eb2ff206d557dd143919bdd1935fc3.jpg

I also added some skids under my lower control arm mounts.
eb1c061d1f16b9550cd0cf059eaf2217.jpg

And once again absolutely stunning welds that will never be seen again. :bowdown:
 

Attachments

  • 41eb2ff206d557dd143919bdd1935fc3.jpg
    41eb2ff206d557dd143919bdd1935fc3.jpg
    115.1 KB · Views: 0
  • eb1c061d1f16b9550cd0cf059eaf2217.jpg
    eb1c061d1f16b9550cd0cf059eaf2217.jpg
    130.9 KB · Views: 1

thejimmy

Well-known member
Joined
Dec 5, 2016
Messages
165
Location
Clearwater FL.
A few welds from last night's welding project.

I cut the original track bar bracket off of my ProRock 44 housing and installed my new Artec Industries raised track bar bracket in preparation for installing my hydraulic assist steering ram.
Those look very good Mike, what make and model MIG do you use?
 

sberry

Banned
Joined
Jun 18, 2005
Messages
35,747
Location
Brethren, Michigan
Everyone has a bit different style. Pic 2 I stop in the ,idle and change the machine to try to get the spatter down. 1 and 3 on dirty scrap. Testing a Hobart 210 back in the day. 4,,, a size larger wire would make it a bit easier.
 

Attachments

  • hobart wire 3.JPG
    hobart wire 3.JPG
    47 KB · Views: 188
  • tube 2.jpg
    tube 2.jpg
    151.1 KB · Views: 192
  • Hobart single pass.JPG
    Hobart single pass.JPG
    61.9 KB · Views: 180
  • Hob set test.JPG
    Hob set test.JPG
    79.7 KB · Views: 188
Last edited:

fordkid88

Well-known member
Joined
Nov 10, 2013
Messages
680
Now that's fricking too cool bud. How are you accommodating the adjustment. Threaded rod that protrudes somewhere or did you use a right/left hand coupler of some kind. Also it looks like you got a solid foot of adjustment, how much do you actually have? :beer:

The adjustment comes from two trailer jacks with a top mount handle. I took the handle off and mounted a v series hub to each one and tig welded a 12 tooth 41 chain gear to it. One of them has a grade 8 1/2" bolt welded to the hub.I still need to do the chain tensioners and the slats for the top.

Ill get measurements when i get home.

I get just under 10in of travel.
 
Last edited:

zmotorsports

ALLIANCE MEMBER
Joined
Oct 20, 2009
Messages
21,327
Location
Northern Utah
Everyone has a bit different style.

Agreed. Your weld is not much different than your signature. You will develop your own unique signature weld after a while. Everyone's is different. I can set a machine up in our shop at work and lay a weld down and then hand the gun to a co-worker with the exact same settings and explain the technique I used and they won't look anything alike.

Bottom line is to work on making a sound weld first before trying to add your own flare or twist to it.
 

XJSuperman

Well-known member
Joined
Jan 26, 2018
Messages
3,086
Location
Central Iowa
I worked in a fab shop though college and we always knew who welded what just by looking at the product. If there was an issue, it was sent back to the shop and whoever welded it had to fix it or build another. You could also tell how inebriated one guy was by the appearance of his welds. (He was a functional alcoholic until a couple years ago) Not enough and he shook too much, too much and he was dangerous as you might expect.
 
To avoid these ads, REGISTER NOW!

mineallmine

Well-known member
Joined
May 22, 2014
Messages
100
Location
Ontario, Canada
I finally got around to doing some welding this month. Wanted a rotisserie for auto restoration and wasn't really happy with the options around me and a nice one would set me back my first born in shipping so I decided to build my own.

Found a few designs I liked online and took what I liked from each and made my own. Here it is so far.

I don't have a tig and my 240V mig is many hours away right now so I decided to use stick to get a nice solid and deep weld. Took a bit but my welds are starting to look decent again (been years since I used stick and have never been a pro, mostly self taught with a few pointers from my father when I was younger)

Pretty happy with how it's progressing. Getting close to done. A few more welds and then disassembly for paint

Excuse the state of the shop. Was doing some cleanup and most stuff got thrown in the shop. After the rotisserie is done taking a couple days to do a full purge/clean/organize to get it back in shape
 

Attachments

  • rotisserie 14.jpg
    rotisserie 14.jpg
    151.9 KB · Views: 304
  • rotisserie 15.jpg
    rotisserie 15.jpg
    151.5 KB · Views: 299
  • rotisserie 5.jpg
    rotisserie 5.jpg
    67.3 KB · Views: 273
  • rotisserie 6.jpg
    rotisserie 6.jpg
    148.2 KB · Views: 290
  • Rotisserie 16.jpg
    Rotisserie 16.jpg
    76.8 KB · Views: 319
  • rotisserie 4.jpg
    rotisserie 4.jpg
    83.3 KB · Views: 280
  • Rotisserie 3.jpg
    Rotisserie 3.jpg
    88.2 KB · Views: 312

larry4406

Well-known member
Joined
Jan 27, 2006
Messages
19,062
Location
Northern Virginia
I finally got around to doing some welding this month. Wanted a rotisserie for auto restoration and wasn't really happy with the options around me and a nice one would set me back my first born in shipping so I decided to build my own.

Found a few designs I liked online and took what I liked from each and made my own. Here it is so far.

I don't have a tig and my 240V mig is many hours away right now so I decided to use stick to get a nice solid and deep weld. Took a bit but my welds are starting to look decent again (been years since I used stick and have never been a pro, mostly self taught with a few pointers from my father when I was younger)

Pretty happy with how it's progressing. Getting close to done. A few more welds and then disassembly for paint

Excuse the state of the shop. Was doing some cleanup and most stuff got thrown in the shop. After the rotisserie is done taking a couple days to do a full purge/clean/organize to get it back in shape

Very nice! On your arbor lock spring pin, add a welded tab such that it can engage with the handle on the pin in the retracted position and keep it retracted. I have similar pin lock setup on both arbors. By having the pin locked in the retracted position, you can walk away from the arbor to rotate the car.

Edit - I added some pictures to show what I did on mine. Its build is somewhere in this thread.

Edit - Post 1295 to this thread is where I posted more pictures of my rotisserie. I think we both based ours on similar designs.
 

Attachments

  • Freewheel.jpg
    Freewheel.jpg
    103.5 KB · Views: 187
  • Locked.jpg
    Locked.jpg
    107.6 KB · Views: 206
Last edited:

LXCam

ALLIANCE MEMBER
Joined
Apr 23, 2013
Messages
19,090
Location
AZ
Mineallmine, great job on the rotisserie. I really need one to finish up my kids 69 bird project. But two things stop me. One I'm too lazy to build it and two, I only need it for this single project and don't want to deal with storing it after we're finished.

And since you've done such a fine job on yours............mind if I break it in for ya?? :p

The adjustment comes from two trailer jacks with a top mount handle. I took the handle off and mounted a v series hub to each one and tig welded a 12 tooth 41 chain gear to it. One of them has a grade 8 1/2" bolt welded to the hub.I still need to do the chain tensioners and the slats for the top.

Ill get measurements when i get home.

I get just under 10in of travel.

Trailer jacks, that's a hell of an idea. Good job FK :thumbup:
 
Last edited:

fordkid88

Well-known member
Joined
Nov 10, 2013
Messages
680
Mineallmine, great job on the rotisserie. I really need one to finish up my kids 69 bird project. But two things stop me. One I'm too lazy to build it and two, I only need it for this single project and don't want to deal with storing it after we're finished.

And since you've done such a fine job on yours............mind if I break it in for ya?? :p


Trailer jacks, that's a hell of an idea. Good job FK :thumbup:

Thanks. I toyed with a few different ideas and this was cheap and easy.
 

mineallmine

Well-known member
Joined
May 22, 2014
Messages
100
Location
Ontario, Canada
Very nice! On your arbor lock spring pin, add a welded tab such that it can engage with the handle on the pin in the retracted position and keep it retracted. I have similar pin lock setup on both arbors. By having the pin locked in the retracted position, you can walk away from the arbor to rotate the car.

Edit - I added some pictures to show what I did on mine. Its build is somewhere in this thread.

Great idea. I was toying with ideas on how to lock the pins to allow for one man operation. Easier than always having to count on someone to be around to reposition body.

Going to do Up some sketches and break out the plasma cutter. Thinking of a hook style so pin can't slip off...nothing big...just enough detent to allow the pin to rest in. I'll update when I get further along.

Thanks for all the compliments, it's been a fair bit of work but worth it. Happy with the results though.

Been using plans I purchased a while ago on line. Had them for a while, just took a while to get started. Changing a few things to make it mine and improve on a couple things in design I wasn't totally Happy with.
 

larry4406

Well-known member
Joined
Jan 27, 2006
Messages
19,062
Location
Northern Virginia
....Thinking of a hook style so pin can't slip off...nothing big...just enough detent to allow the pin to rest in. I'll update when I get further along.....

When I built mine, I thought about creating a curve/indented area (detent pocket) in the angle piece's edge to hold the pin's handle in the detent while retracted. Honestly, the spring has enough force that it holds it in place while retracted thus I never proceeded with that idea.
 

Bellaireroad

Well-known member
Joined
Mar 22, 2013
Messages
636
Location
Fort Worth
I finally got around to doing some welding this month. Wanted a rotisserie for auto restoration and wasn't really happy with the options around me and a nice one would set me back my first born in shipping so I decided to build my own.


Found a few designs I liked online and took what I liked from each and made my own. Here it is so far.


I don't have a tig and my 240V mig is many hours away right now so I decided to use stick to get a nice solid and deep weld. Took a bit but my welds are starting to look decent again (been years since I used stick and have never been a pro, mostly self taught with a few pointers from my father when I was younger)


Pretty happy with how it's progressing. Getting close to done. A few more welds and then disassembly for paint


Excuse the state of the shop. Was doing some cleanup and most stuff got thrown in the shop. After the rotisserie is done taking a couple days to do a full purge/clean/organize to get it back in shape


Great job...this is on my to do list...where did you buy the plans?


Sent from my iPhone using Tapatalk Pro
 

shortykorte

Well-known member
Joined
Sep 1, 2014
Messages
8,034
Location
Tallahassee, Fl
Just a novice project. The Christmas light timer came with a plastic spike that goes in the ground. Since I’m placing it on porch I needed a base. Scraps from scrap bin and some hammertone paint. cdc81a7be257e8feb8db193b66622a43.jpg580e7f22b0880b352ed64ec4ace1fc4b.jpg


Sent from my iPhone using The Garage Journal mobile app
 

Attachments

  • cdc81a7be257e8feb8db193b66622a43.jpg
    cdc81a7be257e8feb8db193b66622a43.jpg
    318.3 KB · Views: 3
  • 580e7f22b0880b352ed64ec4ace1fc4b.jpg
    580e7f22b0880b352ed64ec4ace1fc4b.jpg
    459.8 KB · Views: 3

mr_magicfingers

Well-known member
Joined
Apr 22, 2013
Messages
70
Location
Devon, UK
Last week, at welding class, there was not much steel other than 10mm plate to practice with and I wanted to do something othe r than stick heavy plates together. A rummage through the scrap bin gave me the bits to make this, the first useful thing I’ve welded together. The welds look rough as small welds happen very fast and it was quite a big machine with 0.8mm wire and I probably should have turned it down further but you have start somewhere. It’ll be a useful tool as I continue learning to weld.

msa24tg
 
Last edited:

Krang

Well-known member
Joined
Oct 22, 2018
Messages
185
Location
Hawaii
Welded up all the bases and tops for 20’ of workbench that I’m building. I wish so much that I had something flat that I could clamp down to. That’s going to be the next project. Had to build these mostly on saw-horses shimmed to level:

521abc73881122ee9ca1969373201468.jpg

For assembling the legs I decided to put them on this stainless steel restaurant prep table. It’s not flat, but since I’m building it on the side it won’t matter, just need to square up all the legs:

103808a15187e8e8d2e950595e6bbcc8.jpg

Did this whole build with a new toy, Hobart 140, works like a charm so far! I need to go slower than I’m used to, never used a MiG that wasn’t 220v, but it works great for what it is. I’m using MiG process with C25, .030 wire.

0e9d541be14985cdda2c3a57701f7116.jpg


Sent from my iPhone using Garage Journal
 

Attachments

  • 0e9d541be14985cdda2c3a57701f7116.jpg
    0e9d541be14985cdda2c3a57701f7116.jpg
    243.9 KB · Views: 1
  • 103808a15187e8e8d2e950595e6bbcc8.jpg
    103808a15187e8e8d2e950595e6bbcc8.jpg
    200.9 KB · Views: 0
  • 521abc73881122ee9ca1969373201468.jpg
    521abc73881122ee9ca1969373201468.jpg
    259.6 KB · Views: 3

Riggerson

Active member
Joined
Dec 8, 2018
Messages
44
Location
Atlanta
Grill table for my smoker. Made from cutoffs and other salvaged materials. I did purchase the butcher block. All joints were TIG welded. It's slow but it's relaxing and nice not having to worry about sparks in a crowded shop.

20180805_105634.jpg
 

z-edition 006

Well-known member
Joined
Aug 27, 2011
Messages
237
Location
Norway
Just started to make a tig torch holder.
 

Attachments

  • 7E85D829-09BE-415D-94F9-7A99BA56BDA3.jpg
    7E85D829-09BE-415D-94F9-7A99BA56BDA3.jpg
    155.8 KB · Views: 207
  • 9F8F1275-B1B2-45E8-A03A-C2D2D5F3EC49.jpg
    9F8F1275-B1B2-45E8-A03A-C2D2D5F3EC49.jpg
    156.2 KB · Views: 200

Bigblue&Goldie

Well-known member
Joined
Mar 12, 2009
Messages
10,667
Location
AZ
Grill table for my smoker. Made from cutoffs and other salvaged materials. I did purchase the butcher block. All joints were TIG welded. It's slow but it's relaxing and nice not having to worry about sparks in a crowded shop.

20180805_105634.jpg

Nice job, that looks like a great setup!
 

z-edition 006

Well-known member
Joined
Aug 27, 2011
Messages
237
Location
Norway
Cool! I've been meaning to make one of those for the past couple years :beer:

Just go for it. I got mine done today. Very happy with it.
 

Attachments

  • 2EA054C9-653F-4AA9-88B4-E0A4D2FB21A5.jpg
    2EA054C9-653F-4AA9-88B4-E0A4D2FB21A5.jpg
    148 KB · Views: 458
  • D5D18D00-310F-4A22-ADFA-F35B88D39701.jpg
    D5D18D00-310F-4A22-ADFA-F35B88D39701.jpg
    147.5 KB · Views: 414
  • FB3BB3EC-8DA6-46D4-8A8F-0FBC5831AACC.jpg
    FB3BB3EC-8DA6-46D4-8A8F-0FBC5831AACC.jpg
    129.7 KB · Views: 481
To avoid these ads, REGISTER NOW!
Top Bottom