To avoid these ads, REGISTER NOW!

Show us your welding projects

zmotorsports

ALLIANCE MEMBER
Joined
Oct 20, 2009
Messages
21,333
Location
Northern Utah
:thumbup: yeah, I did the pre-load as well, still a slight deflection, but I also added a Hi-Lift, and fuel cans and my spindle was set further out on the bumper.

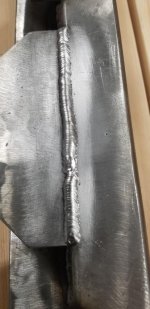
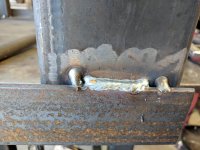
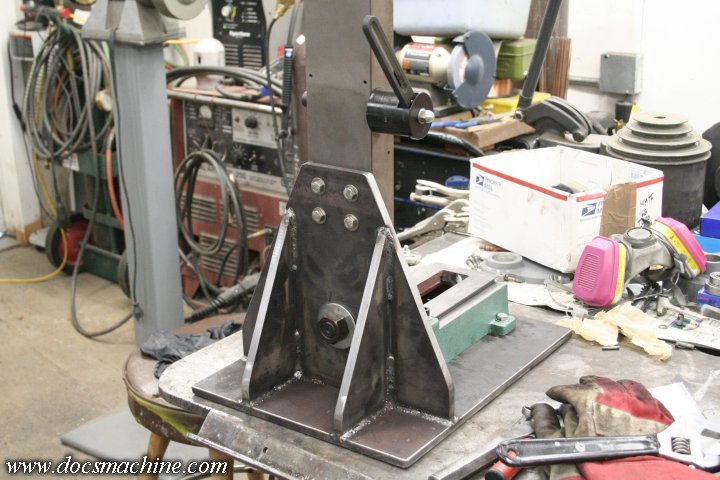
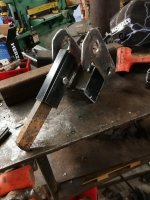
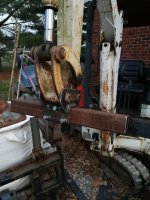
interesting home made pivot;

syBgoW.jpg

Thought about something like that many years ago but don't care for the looks as much as the spindle and tapered bearings. I think the spindle and tapered bearing housing provide a cleaner overall appearance.
 
To avoid these ads, REGISTER NOW!
Joined
Jun 30, 2011
Messages
1,080
Location
AZ
Thought about something like that many years ago but don't care for the looks as much as the spindle and tapered bearings. I think the spindle and tapered bearing housing provide a cleaner overall appearance.

I agree, spindle swivels is much cleaner looking, and if you're not overloading the bar, minimal if any deflection. The DIY version is uglier, but does offer some horizontal deflection adjustment if needed.
 

LXCam

ALLIANCE MEMBER
Joined
Apr 23, 2013
Messages
19,091
Location
AZ
Here's how I dealt with the deflection issue. I set up my pivot with the top fixed and the bottom slotted and bolted with a star washer so it could be adjusted. I luv the bearing set up Mike did but I went with a bronze bushing instead.


IMG_7601.jpg

IMG_7613.jpg

IMG_7612.jpg

IMG_7693.jpg

IMG_7694.jpg
 

fordkid88

Well-known member
Joined
Nov 10, 2013
Messages
680
Gotta handful of hockey pucks to drill and epoxy and a coat or 5 of polyurethane to do to the top and shes good to go.


mra243

Member
Joined
Jan 3, 2019
Messages
9
Location
Central Utah
Lots of amazing welding and project ideas in this thread!

I haven't done any welding since high school in the late '80's, and only arc welding back then. I picked up a Hobart 140 mig welder last weekend and just started playing with it. Any feedback/pointers on my first couple of welds would be appreciated. I am currently using flux core wire, but should be getting a tank of gas to play with next week.

After switching over to the gas setup and a bit of practice I think I'm getting better!
 

Attachments

  • 20190325_200020.jpg
    20190325_200020.jpg
    71.1 KB · Views: 231

ScottsGT

Well-known member
Joined
Jan 1, 2014
Messages
4,883
Location
Lake Wateree, SC
Hard to tell from the pic, but how's the penetration? Looks pretty, but it's gotta hold! Bead looks high, like not much penetration, but then again, 1) It's a photo I'm looking at and 2) I'm no pro at this to critique.
Life is much better with gas, isn't it?!
 

fordkid88

Well-known member
Joined
Nov 10, 2013
Messages
680
Coated the top, did the puck feet, moved it into position and made a riser for the little lathes tool box. Need to paint the riser yet.


bmxdad

Well-known member
Joined
Feb 18, 2014
Messages
2,539
Location
Puyallup, WA
Started my mill stand ... so far so good. Going to have a 2'x3' oil pan as a tray to catch chips and coolant. Casters are rated at 250lbs each, so they should be OK. Not welding them in, but bolting to a plate. Jack screws will be inboard to level stand and stop wheels from getting a flat spot. Getting metal wheels for next project. Last picture give an idea of shape. Will be adding some 1x2 bracing and a shelf off of that to hold tooling, for now. Later I'll have a coolant system setup.
 

Attachments

  • IMG_20190328_175602.jpg
    IMG_20190328_175602.jpg
    150.8 KB · Views: 242
  • IMG_20190328_180603.jpg
    IMG_20190328_180603.jpg
    101.2 KB · Views: 250
  • IMG_20190328_180829.jpg
    IMG_20190328_180829.jpg
    103.9 KB · Views: 234
  • IMG_20190328_180051.jpg
    IMG_20190328_180051.jpg
    148.4 KB · Views: 229
  • IMG_20190328_174505 - Copy.jpg
    IMG_20190328_174505 - Copy.jpg
    154.5 KB · Views: 230
  • IMG_20190328_174434.jpg
    IMG_20190328_174434.jpg
    131.8 KB · Views: 218
Last edited:

pdubss

Well-known member
Joined
Mar 16, 2013
Messages
72
I'm fortunate to live near an Eastwood retail store. I took the intermediate welding class today. The project was a kindling splitter. It was my second time welding (the 1st being the beginner class). Welding isn't easy. After I got home I spent about an hr with a grinder and 40 grit flapdisk. It looks much better now, lol. 9cc960294af7bafcad89fe914596e484.jpg

Sent from my SM-G930P using Tapatalk
 

Attachments

  • 9cc960294af7bafcad89fe914596e484.jpg
    9cc960294af7bafcad89fe914596e484.jpg
    82 KB · Views: 7

fordkid88

Well-known member
Joined
Nov 10, 2013
Messages
680
I'm fortunate to live near an Eastwood retail store. I took the intermediate welding class today. The project was a kindling splitter. It was my second time welding (the 1st being the beginner class). Welding isn't easy. After I got home I spent about an hr with a grinder and 40 grit flapdisk. It looks much better now, lol. 9cc960294af7bafcad89fe914596e484.jpg

Sent from my SM-G930P using Tapatalk

Practice practice practice. Weld **** for no reason. Just weld and in time you wont need to grind unless your going for a certain look or style
 

bmxdad

Well-known member
Joined
Feb 18, 2014
Messages
2,539
Location
Puyallup, WA
Mill stand on it's feet. Need some bracing on top for the mill. Oil pan is to keep the chips off the floor.
 

Attachments

  • IMG_20190330_202831.jpg
    IMG_20190330_202831.jpg
    147.8 KB · Views: 154
  • IMG_20190330_202805.jpg
    IMG_20190330_202805.jpg
    150.7 KB · Views: 140
  • IMG_20190330_164342.jpg
    IMG_20190330_164342.jpg
    145.1 KB · Views: 136

DocsMachine

Well-known member
Joined
Sep 16, 2006
Messages
1,848
How about machining and welding? Sort of. :D

Helping a buddy with a CNC conversion of a typical Grizzly mini-mill. He ended up with an older model that has a big pivot at the base of the column, which makes for a really weak and "springy" mill, and poor surface finishes.

G8689-77.jpg


There's a kit available that converts these things to a solid column, but that costs $500. For a little over $70 in steel and a fair days' work, I made this instead:

G8689-92.jpg


It's all half-inch hot-rolled, and just the brace and baseplate weighs almost sixty pounds. (About two thirds of what the whole mill weighs. :D )

We haven't gotten the mill back together yet, but it sure feels a lot more rigid. :)

If anyone's interested, I have a better write-up of the whole CNC conversion, including building the brace, in my Projects Pages.

Doc.
 
Last edited:

f150skidoo

Well-known member
Joined
Dec 29, 2012
Messages
1,206
Location
Ontario, Canada
This weekend I did'nt end up welding anything, but I did cut my first parts on my new CNC plasma table. First part is 3/8" plate that came right off the table with basically no dross. Next is tray for a laptop/ tablet that goes on a forklift, I still have to make the mounting bracket. It amazes me how fast and accurate I can make things now and how well the Hypertherm 45XP will cut it.
 

Attachments

  • IMG_0327.jpg
    IMG_0327.jpg
    58.1 KB · Views: 148
  • IMG_0328.jpg
    IMG_0328.jpg
    137.6 KB · Views: 148
  • IMG_0321.jpg
    IMG_0321.jpg
    138.4 KB · Views: 158
  • IMG_0323.jpg
    IMG_0323.jpg
    69.5 KB · Views: 164

GLTHFJ60

Well-known member
Joined
Oct 31, 2013
Messages
821
Location
Durham, NC
This weekend I did'nt end up welding anything, but I did cut my first parts on my new CNC plasma table. First part is 3/8" plate that came right off the table with basically no dross. Next is tray for a laptop/ tablet that goes on a forklift, I still have to make the mounting bracket. It amazes me how fast and accurate I can make things now and how well the Hypertherm 45XP will cut it.

Which table did you get?
 

f150skidoo

Well-known member
Joined
Dec 29, 2012
Messages
1,206
Location
Ontario, Canada
My cousin asked me to make him a lawn mower blade sharpener based of another design. All parts were CNC cut out of 1/4” plate. IMG_0330.jpgIMG_0331.jpgIMG_0332.jpg


Sent from my iPhone using Tapatalk
 

zmotorsports

ALLIANCE MEMBER
Joined
Oct 20, 2009
Messages
21,333
Location
Northern Utah
My cousin asked me to make him a lawn mower blade sharpener based of another design. All parts were CNC cut out of 1/4” plate.
Sent from my iPhone using Tapatalk

Nice job on the sharpening fixture.

I noticed in the background that you also have a LeGesse square. I love mine and use it a lot.
 
To avoid these ads, REGISTER NOW!

bimmer1980

Well-known member
Joined
Feb 5, 2009
Messages
2,104
Location
York, PA
I needed a way to dig up the garden this year.... Allowed me to use the excavator!

I used 3-1/2" tube and 1/4" plate for the main mount. 3" tube slides in. Then four of the digger teeth are attached to pieces of 3-1/2" tube. I welded on 1-1/2 x 2-1/2 tube steel for the digger teeth to pocket into. The digger teeth are from my scarifier attachment for the skid steer.

My 9 yo nephew got to participate in this project, so that was a bonus. His first time seeing welding and grinding.

About 20 to 30 minutes of digging and the garden was loosened up and turned over.
 

Attachments

  • IMG_20190331_171801.jpg
    IMG_20190331_171801.jpg
    154.1 KB · Views: 336
  • IMG_20190331_165314.jpg
    IMG_20190331_165314.jpg
    149.1 KB · Views: 348
  • IMG_20190330_192243.jpg
    IMG_20190330_192243.jpg
    100.2 KB · Views: 322
  • IMG_20190330_193223.jpg
    IMG_20190330_193223.jpg
    114.3 KB · Views: 317
  • IMG_20190330_172804.jpg
    IMG_20190330_172804.jpg
    92 KB · Views: 309
  • IMG_20190330_172206.jpg
    IMG_20190330_172206.jpg
    150.4 KB · Views: 325

kkroger

Well-known member
Joined
Apr 21, 2013
Messages
1,143
Alright Latest project... Was approached by a PMC Instructor who runs a "Credible Opfor" for training military and police... they had a requirement for a gun post to mount a 12.7mm DSHK Machinegun. Granted for the Training pad they use an Oxy/fuel system for the "Bang" but they needed this to mount in a Toyota T-100 and a Russian GAZ... at any rate he provided the top fitting, I designed and made the rest... First is the 3D Cad, then prototype and some stages of assembly...


sqznby

Well-known member
Joined
Oct 26, 2013
Messages
981
Location
Coastal NC
Found some scrap 1/4" diamond plate, made a few of these, a couple of different sizes. This was one I haven't seen done before with a filled bottom, not completely full. I'm working on a smaller one that will have a completely full of bronze.

P-1.jpg

P-2.jpg

P-3.jpg

P-4.jpg

P-5.jpg
 

akdiesel

Well-known member
Joined
Aug 8, 2008
Messages
2,617
Location
Wasilla, AK
Found some scrap 1/4" diamond plate, made a few of these, a couple of different sizes. This was one I haven't seen done before with a filled bottom, not completely full. I'm working on a smaller one that will have a completely full of bronze.

P-5.jpg

As small as it is, it still shows talent. Wish I could tig or mig that well.
 

sqznby

Well-known member
Joined
Oct 26, 2013
Messages
981
Location
Coastal NC
As small as it is, it still shows talent. Wish I could tig or mig that well.

Thank you:thumbup:
That particular one was 3" I have a few smaller roughly 1 5/8" ones I'll be fiddling with this week. Fun to play with especially with the silicon bronze.
 

f150skidoo

Well-known member
Joined
Dec 29, 2012
Messages
1,206
Location
Ontario, Canada
I’m building a hydraulic fence post sharpener for my buddy’s who owns a fencing company. So I need to make sure theirs lots of guards on it and I decided to cut a warning into a part of the structure which will be at eye level of the operator.IMG_0345.jpg


Sent from my iPhone using Tapatalk
 

Firstram

Well-known member
Joined
May 16, 2017
Messages
1,390
Thank you:thumbup:
That particular one was 3" I have a few smaller roughly 1 5/8" ones I'll be fiddling with this week. Fun to play with especially with the silicon bronze.


I didn't know you could tig aluminum with silicon bronze. I'm looking forward to trying it out, any pointers on settings/technique would be appreciated.
 

sqznby

Well-known member
Joined
Oct 26, 2013
Messages
981
Location
Coastal NC
I didn't know you could tig aluminum with silicon bronze. I'm looking forward to trying it out, any pointers on settings/technique would be appreciated.

I think he used steel diamond plate, you can see mill scale where it was cleaned for the weld.

Yes you can see mill scale, that's steel. I'll try to keep up with the class from now on!

Haha, you're doing a fine job:beer:

I have some 1/4" aluminum, may see what happens haha. I'll post up when I do. Should be interesting.
 

Duker

Well-known member
Joined
Sep 25, 2010
Messages
10,861
Location
Livingston, TX
Not my welding project technically but my son’s... a forge with rolling base. I was just the advisor on this project... [emoji4]

88cdc7e3371f6f9cecd1148df40f4540.jpg

2a700babfcccd075fc7bb47f60b6dc94.jpg


Sent from my iPhone using Tapatalk Pro
 

Attachments

  • 88cdc7e3371f6f9cecd1148df40f4540.jpg
    88cdc7e3371f6f9cecd1148df40f4540.jpg
    680.2 KB · Views: 5
  • 2a700babfcccd075fc7bb47f60b6dc94.jpg
    2a700babfcccd075fc7bb47f60b6dc94.jpg
    678.3 KB · Views: 5

Steve from Socal

Well-known member
Joined
Jan 27, 2009
Messages
3,491
Location
Hutchinson Ks.
I am building a ramp door for my new to me trailer. Roughly 10' high 8' wide there will be a passage door in the bottom.

Steve
 

Attachments

  • 20190414_144649.jpg
    20190414_144649.jpg
    85.8 KB · Views: 182

Griff93

Well-known member
Joined
Jul 25, 2009
Messages
1,121
Location
Huntsville, AL
Someone gave me a nice older 4 lb hammer head the other day. I needed another shop hammer so I bored a hole in the head so I could fit a piece of tubing through for a handle. I took another larger piece and knurled it for a handgrip.

2019-04-14_09-51-43 by Griffin93, on Flickr
 

Mike W.

Well-known member
Joined
Sep 30, 2015
Messages
178
Someone gave me a nice older 4 lb hammer head the other day. I needed another shop hammer so I bored a hole in the head so I could fit a piece of tubing through for a handle. I took another larger piece and knurled it for a handgrip.


2019-04-14_09-51-43 by Griffin93, on Flickr
I've had one similar, pipe handle would spin in my hand when I hit something. May want to squish the handle some and make it obround

Sent from my Moto Z (2) using Tapatalk
 

Old Man Roger

Well-known member
Joined
Apr 6, 2017
Messages
17,432
Location
Palm Coast Florida
Found some scrap 1/4" diamond plate, made a few of these, a couple of different sizes. This was one I haven't seen done before with a filled bottom, not completely full. I'm working on a smaller one that will have a completely full of bronze.

P-1.jpg

P-2.jpg

P-3.jpg

P-4.jpg

P-5.jpg
Was this just done for practice? Or is there a use for these?
 

shortykorte

Well-known member
Joined
Sep 1, 2014
Messages
8,034
Location
Tallahassee, Fl
To avoid these ads, REGISTER NOW!
Top Bottom