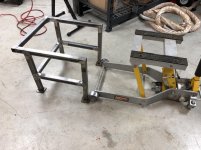
I took up welding this year as I near the half century mark. This was my first ever welding project: a motorcycle stand custom-sized to my Harley. I felt it was a touch ambitious considering the cost of machine I put on it. However, it’s rock solid. No twisting, rocking. The odd design of down tubes is to accommodate my bike jack.

You are using an out of date browser. It may not display this or other websites correctly.
You should upgrade or use an alternative browser.
You should upgrade or use an alternative browser.
Show us your welding projects
- Thread starter neonnblack
- Start date


txvwnut
Well-known member
Very nice.
sweetk30
Well-known member
Deadsquiggles
Well-known member
Something is wrong, the Hobart should have been dead on and as good arc as the 211.
It wasn’t an issue with the arc. But the infinite voltage control was definitely an improvement. There was quite a few times that 4 was too cold and 5 was too hot with the 190 for example. Plus now I have the Autoset and dual voltage. Plus I kinda settled when I bought the 190 anyway cause I really wanted the 211, I just didn’t want to spend that much money.
larry4406
Well-known member
I took up welding this year as I near the half century mark. This was my first ever welding project: a motorcycle stand custom-sized to my Harley. I felt it was a touch ambitious considering the cost of machine I put on it. However, it’s rock solid. No twisting, rocking. The odd design of down tubes is to accommodate my bike jack.
Nice stand.
How do you get the bike on it?
Very nice.
Thank you.
x2.

Seriously awesome first ever welding project DrReid
Thank you. I enjoyed the sense of accomplishment, and moreover the utility of getting the bike off the ground for wrenching and detailing.
Nice stand.
How do you get the bike on it?
Thank you. I lift the bike on a bike jack to just over the maximum height of the stand (16"), slide the stand under the bike's bottom rails and around the jack (opposite to the jack handle side), lower the bike onto the stand, then roll the jack away.
The attached picture shows the relationship between jack and stand at an earlier stage when I realized a fundamental design mistake: I constructed the stand so that it spanned the maximum length of bike frame rails (front-back), but the stand legs still weren't wide enough to allow ingress and clearance of jack wheels.
 My kludge of a workaround is now evident in the doubling-widening of the final stand legs.
Attachments
Bob Heine
ALLIANCE MEMBER
DrReid, I refer to those as design enhancements.My kludge of a workaround is now evident in the doubling-widening of the final stand legs.
Monza Harry
Well-known member
DrReid, I refer to those as design enhancements.
Yeah, yeah that's what happened, I had an epiphany after I was almost finished! Of course I'm guessing as that has never happened to me, ever! And if you buy that load of &#$+ boy do I have a deal for you! Let me list my mistakes, every single action, and descion I ever made. Harry
DrReid, I refer to those as design enhancements.
I appreciate the humor, but this is in reality quite close to the mark. In retrospect, even though I goofed, the doubling of legs very likely gives rise to a much more rigid stand. A good comparison is my other bike stand (for my other bike) produced in semi-mass quantity. It bends, twists, and wobbles a little with a bike on it, but it has never failed. My franken-stand won't budge. At. All.
C91x
Well-known member
C91x
That is a fine example of fatherhood and the coolest trike ever.
What a grand memory for your boy.
I can feel the joy for all.
Royce
Thanks Royce
Cool project! I noticed in your signature that you mention an F1 with Lexus IFS. Do you have a project thread for that?
Its been sitting idle for 4+ years. I had the chassis just about completed and then had to moved so been without a shop but I'm just about done with my new one so hopefully I can push it back in soon. I attached a few pics.
Attachments


Thank you.
Thank you. I lift the bike on a bike jack to just over the maximum height of the stand (16"), slide the stand under the bike's bottom rails and around the jack (opposite to the jack handle side), lower the bike onto the stand, then roll the jack away.
The attached picture shows the relationship between jack and stand at an earlier stage when I realized a fundamental design mistake: I constructed the stand so that it spanned the maximum length of bike frame rails (front-back), but the stand legs still weren't wide enough to allow ingress and clearance of jack wheels.
Great work-around there

Last edited:
Nice!
I may steal this. Did you harden the edge at all?
I did not harden the edge
Sent from my iPhone using Tapatalk
I’ve been thinking of ideas to build one of these. I just don’t feel like spending $100+ on a cast one. Can you share some detail on what you did for the cutting edge? I was thinking of using an old axe head I have.
Thanks,
Andrew
Sent from my iPhone using Garage Journal
I just ground an edge into some 1/4” flat bar I had kicking around.
Don’t know how long it will hold up but works good so far
Sent from my iPhone using Tapatalk
I did not harden the edge
Sent from my iPhone using Tapatalk
I'm thinking a piece of leaf spring would make a good cutting edge.
Maybe clamped in place rather than welded as the heat might anneal it.
jmo,
sberry
Banned
The great thing about steel, can fix the fuggups.
sweetk30
Well-known member

alpinewhite
Well-known member
The attached picture shows the relationship between jack and stand at an earlier stage when I realized a fundamental design mistake: I constructed the stand so that it spanned the maximum length of bike frame rails (front-back), but the stand legs still weren't wide enough to allow ingress and clearance of jack wheels.

Why didn't you just cut the two rear horizontal pieces and lengthened them by a few inches?
EDIT: Never mind. I just read this portion "I constructed the stand so that it spanned the maximum length of bike frame rails (front-back)"
duncan_m
New member
A rolling tool storage cabinet I made for my daughter (Apprentice Diesel Mechanic). Blue boxes on top were purchased.


Last edited:
Made a few 5gal bucket holders .
Too cool!
Sent from my iPad using Tapatalk
quadrcr87
Well-known member
A rolling tool storage cabinet I made for my daughter (Apprentice Diesel Mechanic). Blue boxes on top were purchased
That turned out great and it should serve your daughter well for many years. Can you share some details on the build?
Deadsquiggles
Well-known member
Not really a project but more of my practice piece. Just two I beam pieces I welded together when I first got my Hobart. Today I went out and got some quality time with my new Miller 211. Messed with the settings and ran a bunch of beads. Also had a piece of 1.5” angle iron that I’ve had for 6 months and never touched. Figured I’d practice with that two. I know I’m out of practice cause I couldn’t keep my speed right while doing my typical cursive E’s. Also practiced a bunch of weave passes since that’s not something I’ve ever had to do. At my previous job, it was always stringers with a cap. I learned that I **** at weaving uphill but do pretty decent going downhill. To me, it also looks like some of my passes were a little cold, but maybe I’m just stupid. Don’t judge the appearance of the welds though. Pretty much reteaching myself after having not welded professionally in 6 years. “A grinder and paint make me the welder I ain’t.”
Attachments


Cue
Well-known member


senlow
Well-known member
Cue, the outrigger on your arbor press stand is a great idea. Well executed!
ez-duzit
Well-known member
That outrigger is a tripper.
Cue
Well-known member
Cue, the outrigger on your arbor press stand is a great idea. Well executed!
Thanks.

That outrigger is a tripper.
You can see in the first picture that it slides back in under the base so it is not sticking out when not in use.
Thanks.
You can see in the first picture that it slides back in under the base so it is not sticking out when not in use.
Nice job on the build [emoji481] but I have to agree with ez.... still a tripper none the less.
Sent from my iPad using Tapatalk
Nice stand! That's a serious arbor press. What do you use it for, mainly?Finished up a stand I made for my arbor press I recently restored. Everything has to have wheels in my shop and its pretty stable with just the locking casters, but the extendable arm makes it even more solid if needed.
Cue
Well-known member
Nice stand! That's a serious arbor press. What do you use it for, mainly?
Pressing things.
Easier to broach a keyway on it than my 50 ton press, just like to have options


ez-duzit
Well-known member
O--nice job.


larry4406
Well-known member
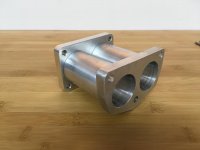
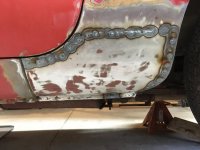
Gerald - nice jobs on the rust repair and the FI manifold project!
Gerald - nice jobs on the rust repair and the FI manifold project!
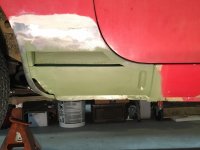
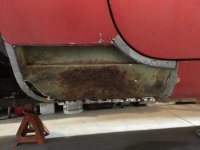
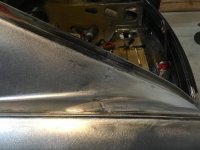
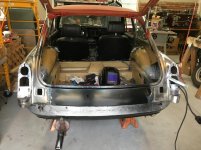
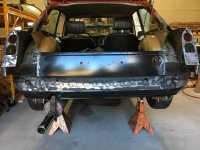
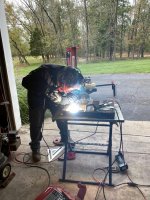
Thanks, it was the beginnings of what ended up being a much larger project than I anticipated. Whole rear of the car was sculpted out of bondo, "cave and pave". And that was separating from the rusted metal behind. So it was all cut out and new sheetmetal welded in.
Attachments


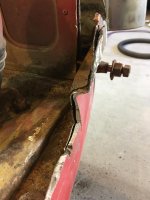
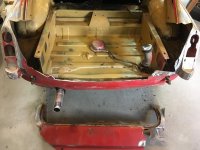

Fortunately most of the panels are available in reproduction on the original tooling.
Attachments


harley jim
Well-known member
Gerald that was a mess, glad you put new panels in it looks good now.
Sent from my SM-A102U using The Garage Journal mobile app
Sent from my SM-A102U using The Garage Journal mobile app
larry4406
Well-known member
Gerald - I think you are holding out and owe us a build thread!
I wish my 71 Barracuda vert were making similar progress...
I wish my 71 Barracuda vert were making similar progress...
MrSurly
Well-known member
Gerald - I think you are holding out and owe us a build thread!
I wish my 71 Barracuda vert were making similar progress...
Amen! (And my ‘63 Dart vert as well)
Sent from my iPhone using Tapatalk
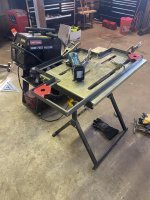
Been lurking on this thread and finally have something to add! I have a Craftsman 110 mig w/ .030 wire and a Lincoln tombstone my welds are getting better, but I need help with the expanded metal.
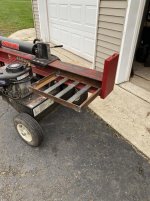
Fabb’d up a log catch for my splitter.
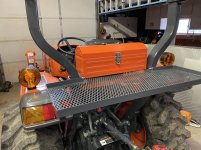
Fabb’d up a back rack and mounted a larger toolbox on my tractor.
Fabb’d up a log catch for my splitter.
Fabb’d up a back rack and mounted a larger toolbox on my tractor.
Attachments
-
 7BA2F7F2-D615-4709-9EEA-462C1978E987.jpg148.6 KB · Views: 192
 -
 A6342221-48EA-4AC6-8A4F-AF62CE2E4698.jpg147.3 KB · Views: 195
 -
 5067CBFC-AADB-4EDF-B342-EEB9264EA366.jpg147.3 KB · Views: 182
 -
 89C3E7CD-FFD2-4D8F-9FDF-D6ED03BDD9EB.jpg134.7 KB · Views: 189
 -
 107E2F19-408F-4662-ABB9-50ADFCCAB089.jpg145.6 KB · Views: 187
 -
 6259C081-D1F0-482D-A0A0-BDFF23D444F3.jpg156.6 KB · Views: 225
Bodj Built
Well-known member
Been lurking on this thread and finally have something to add! I have a Craftsman 110 mig w/ .030 wire and a Lincoln tombstone my welds are getting better, but I need help with the expanded metal.
Fabb’d up a log catch for my splitter.
Fabb’d up a back rack and mounted a larger toolbox on my tractor.
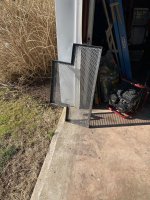
Expanded metal can be a pain if you're not doing it right. First, make sure you have the expanded metal clamped tightly to whatever you're welding it to. Any gaps will cause it to burn away. Next, start your arc on the metal frame (angle iron in your case), about a quarter of an inch away from the expanded metal. Once a puddle is established, quickly drag it over onto the expanded metal and then release the trigger. It doesn't take much heat to fully burn into the expanded metal, so most of the weld effort is going into the frame. Basically do this 'tacking' method every few inches.