To avoid these ads, REGISTER NOW!

Show us your welding projects

To avoid these ads, REGISTER NOW!

Bodj Built

Well-known member
Joined
Feb 3, 2016
Messages
1,165
Location
Moorpark, CA
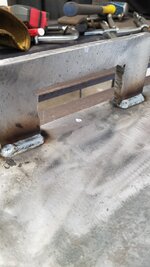
Figured it was time to replace the aging gate going back to the shop. And for the OCD people when you see it I wasn’t happy about it either when I saw it.7F2289EE-A4C1-4169-B81C-0B182293062C.jpeg380BCAE0-7261-4AC3-93F4-52CCB9FA8D6E.jpegFC0EE549-6BAA-488E-8980-204DF0524048.jpeg

Cut the brackets off the small gate and rotate 180* and the diagonals will end up in the correct places
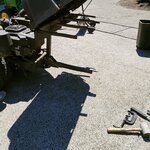
 

dcg9381

Well-known member
Joined
Jun 20, 2018
Messages
11,640
Location
Austin, TX
Probably the "biggest" welding project I've taken on in a while solo, was welding up steel columns and deck rails. Texas UV beats the **** out of decks here. We do have LVLs and wooden joists, but the columns are steel, rails are steel, and deck itself it TREX. That's "pig wire" from tractor supply between the rails. The connectors for the steel columns to LVL I had custom made by https://www.cuttingedgemetals.com/,


1665162787200.png
 

PCustoms

Well-known member
Joined
Jul 23, 2011
Messages
22,392
Location
VT
My oldest brother cut all the fingers on one hand off in a go kart chain.

They reattached them, but still...
When I was a kid, someone a few towns over got her hair caught....gruesome.
 
Last edited:

silentpoet

Well-known member
Joined
Apr 21, 2011
Messages
795
I continue to push my skills to the limit. Stick welding razor blades. Kinda ugly but not bad.
 

Attachments

  • 46505700-DD2D-424C-9CFB-67860A098C85.jpeg
    46505700-DD2D-424C-9CFB-67860A098C85.jpeg
    497.5 KB · Views: 190
  • 7E6FABC0-FD75-4167-982C-A89F9C99F237.jpeg
    7E6FABC0-FD75-4167-982C-A89F9C99F237.jpeg
    423.1 KB · Views: 179

kaymccampbell

Well-known member
Joined
Feb 27, 2015
Messages
29,451
Location
Upstate New York
The new chimney cap, after it's much delayed installation. It doesn't look big, but it's about 4x5 feet, and the lightest parts are made of 1/8th steel. It was built in the shop, on the lift, disassembled, stored under the deck for over 3 years, used as a toy and bathroom by the woodchuck, dragged out, rust ground off it, repainted, dragged up ladders, then reassembled.
IMG_20221012_162530.jpg
 

kaymccampbell

Well-known member
Joined
Feb 27, 2015
Messages
29,451
Location
Upstate New York
Sometimes, It takes me a while too. Beautiful place you have there, Kay.

Looks good Kay, sometimes you need to season the steel before you install it. Lol!
Thanks. The reason it's so delayed is that I'm deathly afraid of hitting the ground and surviving. My balance is none too good anymore, nor is my strength, but it's the best it's been in a decade, so had to get it done.
 

PhantomEB

Well-known member
Joined
Feb 6, 2006
Messages
6,697
Location
Medicine Hat, AB, Canuckistan
Replaced my neighbor’s front porch railings. 2” x4” x 14 gauge top rails, floating baluster frames are 1-1/2” 16 gauge square tube and the balusters are 3/4” 16 gauge square tube. They didn’t want a round handrail. Told them I am going to weld one up anyway- they can add it if and when they sell the house.
This was the final welding project of the year up at the cabin; brought the 211 and 80/20 bottle back down to the Valley for the winter.
Found a local place up there to do the powder coating. They did a great job.

92A0238D-9817-4914-92FA-87DBBED5EA00.jpeg
D6CB2E4B-4939-49CA-A921-38F88ACA5488.jpeg
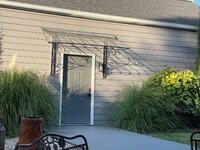
Very nice work, your neighbor don’t know how lucky they are!
 
To avoid these ads, REGISTER NOW!

sanddan

Well-known member
Joined
Jul 7, 2005
Messages
708
Location
Oregon
I made this from scrap in the shop. Machined the bullet end out of cold rolled and tig welded to left over 1.5” roll cage tubing. It makes a hole in the ground that a mole trap is put in, I lost the one that came with the trap. I plan on making a rev 1 version with a more pointy version so it will go in easier. 126D0046-EBC6-4A05-8D7B-5B3382FB00DA.jpegD26AE342-2348-4F35-8CA8-20AFC21685AE.jpeg
 

ekuhn

Well-known member
Joined
Jun 7, 2010
Messages
223
Location
08873
Didn't take any pictures of my welds or finish, but...

Simple yet effective. It was a pain in the *** to jack the mower up to get enough space to change out the blades and scrape the deck. I tried ramps, car jack, trailer gate, nothing was ever convenient. I saw this on another mower and it seemed like I could make it work. $40 later on the jack... I fab'd it up this past weekend. I probably should have rotated the mount slightly, so it was 100% vertical in the full extended position, but its all welded up now, and with the deck all the way up I can easily get under there.

IMG_8441.JPEG

IMG_8444.JPEG
 

WoodsTruck

Well-known member
Joined
Jan 12, 2013
Messages
1,020
I actually think the "lean" of the jack would make it more stable as the slack should be biased to one side with pressure on it. If the jack was completely vertical when extended, the mower may have some movement forward and backward unless the contact tires were chocked fully. I don't picture enough weight from the mower being an issue on the jack.

I'm sure you intended it that way.
 

Old Man Roger

Well-known member
Joined
Apr 6, 2017
Messages
17,439
Location
Palm Coast Florida
Didn't take any pictures of my welds or finish, but...

Simple yet effective. It was a pain in the *** to jack the mower up to get enough space to change out the blades and scrape the deck. I tried ramps, car jack, trailer gate, nothing was ever convenient. I saw this on another mower and it seemed like I could make it work. $40 later on the jack... I fab'd it up this past weekend. I probably should have rotated the mount slightly, so it was 100% vertical in the full extended position, but its all welded up now, and with the deck all the way up I can easily get under there.

IMG_8441.JPEG

IMG_8444.JPEG
To be honest this scares the hell out of me. I feel like if you had to really put a lot of force on a nut or bolt it might slide right off that block.
 

csp

Well-known member
Joined
Mar 23, 2010
Messages
5,719
Location
Franktown, CO
I’d take the jack handle off and weld a nut on that’s the same size as the blade nut/bolt head, just so it’s faster and the handle isn’t there flopping around
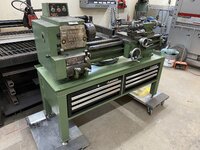
Flopping around when? You can pull a pin and remove the entire jack when it's not in use lifting the mower. Only the stub piece that it slides onto is permanently mounted to the mower.
 

Cap'n Coldeye

Well-known member
Joined
May 23, 2016
Messages
46
Location
Western Washington
In the theme of tractor mods here is a few...

The first is some weights I made to help the aerator work better. The aerator is designed for concrete blocks that were not working very well, they did not provide the weight for deep plugs in the lawn and they would fall off. The scrap 3/4" plate helped get the weigh up. With 4 of them its about 250+/- lbs.

Cheers
 

Attachments

  • 20191005_151913.jpg
    20191005_151913.jpg
    536.7 KB · Views: 146
  • 20191005_153218.jpg
    20191005_153218.jpg
    1.2 MB · Views: 133
  • 20200120_201514.jpg
    20200120_201514.jpg
    774.9 KB · Views: 152

y'sguy

Well-known member
Joined
May 1, 2010
Messages
1,309
Location
Tulsa, Oklahoma
Well, this project sat around for months during all the heatwave but I wasn't about to try to install it during that time! But, the weather finally cooled off and I had a chance to concentrate on it. Going to replace the flashing I installed with a heavier gauge that won't hopefully be as wrinkled and obnoxious. Other than that I'm happy with the way it turned out and I was able to manage all the installation solo.
 

Attachments

  • IMG_1448.jpg
    IMG_1448.jpg
    1 MB · Views: 200

mark-NJ

Well-known member
Joined
Apr 1, 2019
Messages
769
Location
new jersey
Some of you guys have showed some amazing projects; this, by contrast, doesn't even come close.

That said, this is my recent welding project.

For the better part of the last decade, this has been my shop stool. It's a broken office chair with some welded C-channel to gain height, topped with a piece of plywood, some old (now dead) foam, and a scrap of fabric from the original office chair. It's not comfortable, it's not adjustable, it offers no back support, and it doesn't roll worth a damn.

IMG-1983.jpg


This ad for a Viper stool popped up on my FB feed, and it pulled me in big time! I like the design, adjustability, back support. I like everything about it. https://www.vyperindustrial.com/collections/vyper-chairs/products/elevated-steel-max

SM-ACME-NEW_1_5607d594-ee38-4363-8558-91478bf3e1ba.jpg

I do not, however, like the price.

In a previous thread here: https://www.garagejournal.com/forum/threads/vintage-machinists-stool-needs-help.499063/ I resurrected an old machinist's stool with an Acme rod for adjustability. That got me thinking: what IS this fancy Viper stool, anyway? It's nothing more than 1.) good casters, 2.) a strong base, 3.) an Acme rod, and 4.) some sort of "bar stool" top. I can buy & make all of that!

So I got some 1" square tube, some good casters, and I ordered a replacement stool top from a restaurant supply house. The 1"-5 Acme stuff was from McMaster.

Some cutting, some TIG work, some Rustoleum red paint....and I have a stool that will last a lifetime!

IMG-1985.jpg

There's not much to it: I cut the square tube to 60 degree angles & welded into a hexagram. Welded on some 1/4" pads for wheel mounts. I calculated the angles for the three supports, cut them to length and coped them to nest to a piece of 1" blackpipe (the ID of which will let a 1" acme rod pass through. ) Welded some nuts to the blackpipe. Not shown is the bottom of the seat: I just took some plate steel, drilled holes to align with the seat's threaded insert points, welded on a nut, screwed in the rod. While checking it for square alignment, I TIG'd the rod into the nut.

The only adjustability is by turning the seat (the Viper has a quick-release), but I didn't see that as a big deal or something that I had to incorporate. And why six casters? I don't know...why not 6? :) It rolls smoothly, and it's comfortable.

Total cost was $53 for the square tube, $80 for the casters (good casters aren't cheap and cheap casters aren't good), $45 for the seat, and about $30 for the Acme stuff. So for about $200, I'm all set!

That's my story & I'm sticking to it!
 
Last edited:

f150skidoo

Well-known member
Joined
Dec 29, 2012
Messages
1,206
Location
Ontario, Canada
I bought this old 10"x36" bench top lathe many months ago and it came with a chintzy homemade angle iron stand that a despised. So I threw the old one in the scrap pile and made a new one with built in tool storage had paint mixed up to match the 1980 Taiwanese lathe. I'm also going to fabricate up a rear splash guard sometime over Christmas.
 

Attachments

  • IMG_1435.jpg
    IMG_1435.jpg
    976.8 KB · Views: 178
  • IMG_1436.jpg
    IMG_1436.jpg
    920.8 KB · Views: 194

zmotorsports

ALLIANCE MEMBER
Joined
Oct 20, 2009
Messages
21,344
Location
Northern Utah
Very nice stand. I keep telling myself I am going to build one for my PM1340GT Taiwanese lathe when I get time and incorporate a toolbox into it, but I can't seem to find the time.
 

larry4406

Well-known member
Joined
Jan 27, 2006
Messages
19,073
Location
Northern Virginia
I bought this old 10"x36" bench top lathe many months ago and it came with a chintzy homemade angle iron stand that a despised. So I threw the old one in the scrap pile and made a new one with built in tool storage had paint mixed up to match the 1980 Taiwanese lathe. I'm also going to fabricate up a rear splash guard sometime over Christmas.
Very nice stand!

Any pictures of the build?

I like the integrated drip pan on the top and the storage.
 

silentpoet

Well-known member
Joined
Apr 21, 2011
Messages
795
.009 inch thick razor blades. Stick welding. I guess I long arced at the end trying to keep the arc lit. This material is not very forgiving of mistakes, which is why it is fun.
 

Attachments

  • CE0DE995-09B2-452A-AF21-9337866A9480.jpeg
    CE0DE995-09B2-452A-AF21-9337866A9480.jpeg
    603.3 KB · Views: 96
  • 641C9EDA-BCBB-40C1-8EE7-D5AA0301B4D5.jpeg
    641C9EDA-BCBB-40C1-8EE7-D5AA0301B4D5.jpeg
    557.5 KB · Views: 81

TimeWarpF100

Well-known member
Joined
Aug 21, 2010
Messages
6,784
Location
not here
This project I did a full late model F150 chassis swap so I would have full electronics as in new truck including dash and working Anti roll, anti skid, full abs, trailer sway control, TPMS, PATS, Satellite Radio, Cruise etc. Since it was intercooled TT I wanted to add fog lights and remove license plate pocket to smooth it then cut in hole to match the intercooler. Chopped up a few bumpers then used laser to find where fog lights would look best. Made the pockets keeping the factory adjustability. Bumper was then to be chromed so it had to be decent fitment.

Not quite finished here as had to add/remove material around lights prior to chroming. ALso fill the extra holes. I did hidden mounting so no bolts would show

I also used TIG to weld around inside circumference to round the corners. just because
002.JPG003 (5).JPG003.JPG004 (4).JPG004 (5).JPG008.JPG009 (5).JPG009.JPG010.JPG015 (2).JPG
 
To avoid these ads, REGISTER NOW!
Top Bottom