
You are using an out of date browser. It may not display this or other websites correctly.
You should upgrade or use an alternative browser.
You should upgrade or use an alternative browser.
Show your Millers Falls tools!
- Thread starter bonneyman
- Start date


Beerhippie
Well-known member
d42jeep
Well-known member
Here are a couple pictures of the area in question. I’m not sure that there is anything to stop the blade from twisting when tightening. I guess you twist the blade straight after it’s adequately tensioned then tighten the knurled nut against the frame to keep it straight.
-Don

 .
.
-Don
.RTM
Well-known member
I suspect, once you clean the threads a bit, and the surface where the nut meets the frame, it may thread easy enough to reduce twisting. On my coping saws, I need to hold the handle to prevent twisting as the tension goes up.Here are a couple pictures of the area in question. I’m not sure that there is anything to stop the blade from twisting when tightening. I guess you twist the blade straight after it’s adequately tensioned then tighten the knurled nut against the frame to keep it straight.
-Don
.
Last edited:
Beerhippie
Well-known member
Thanks for the pic, @d42jeep ! With that, and finding the right indexed washer, I can fab that part.
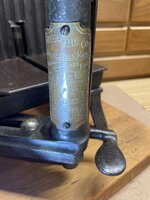
@RTM : The threaded tensioner shaft has a groove cut in it:

With the crimp in the indexed washer and the dimples in the "socket" {making up terminology as I go), the tensioner and blade won't rotate and can be set to four different positions, corresponding to similar indecies at the other end of the blade.
The rosewood handle really came to life with some BLO:

Before:

No stain, just thinned BLO.
Now off to look for an indexed washer that will fit....
@RTM : The threaded tensioner shaft has a groove cut in it:
With the crimp in the indexed washer and the dimples in the "socket" {making up terminology as I go), the tensioner and blade won't rotate and can be set to four different positions, corresponding to similar indecies at the other end of the blade.
The rosewood handle really came to life with some BLO:
Before:
No stain, just thinned BLO.
Now off to look for an indexed washer that will fit....
d42jeep
Well-known member
I took it apart today for a closer look. It’s basically a thick flat washer with two notches pressed into it. If mine was missing I would find an appropriate flat washer, set it on a wooden block, find a nice dull cold chisel and a BF hammer and create the notches. 


-Don
-Don
Beerhippie
Well-known member
Does your tensioner screw (again, making up names) not have the indexing groove like mine? I expected the washer to have a key to fit the groove. Uh, keyway....
The nut, BTW, has a concave end on it to retain the end of the blade. The other end--as you'll find when you take the blade off--has a notch cut in it so you have to tilt the blade to remove it. I guess they were really worried about the blade escaping. Because... runaway hacksaw blades....
The nut, BTW, has a concave end on it to retain the end of the blade. The other end--as you'll find when you take the blade off--has a notch cut in it so you have to tilt the blade to remove it. I guess they were really worried about the blade escaping. Because... runaway hacksaw blades....
Beerhippie
Well-known member
Looking again, I think I can see a burr where the key of the washer on yours sheared off.
d42jeep
Well-known member
It has the indexing groove and you could certainly be right about a missing key. It had a hard life before I found it. One could weld on a little bead to the washer to act as the key. It’s probably not that important to the operation of the saw. Once the knurled nut is tightened there isn’t any tendency for the blade to move.
-Don
-Don
Last edited:
Beerhippie
Well-known member
It's pretty easy to tighten the blade enough just by holding onto the end of the blade while tightening the handle. I think a brass washer with the divots would do just fine.
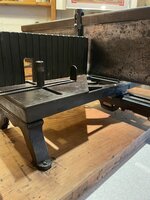
I used the saw for the first time yesterday, with the blade that came on it. I had to rip a hard plastic tube in half down the middle for about four inches, then cut a couple of brackets from aluminum stock. Worked like a charm and the strange (to me) grip is very comfortable and controllable.
It's been assigned a place of honor in the shop:

Not just stuck in that dark corner with the rest of the hacksaws.
I used the saw for the first time yesterday, with the blade that came on it. I had to rip a hard plastic tube in half down the middle for about four inches, then cut a couple of brackets from aluminum stock. Worked like a charm and the strange (to me) grip is very comfortable and controllable.
It's been assigned a place of honor in the shop:
Not just stuck in that dark corner with the rest of the hacksaws.
Beerhippie
Well-known member
Hardware stores are all closed today, so I dug through my box of Assorted Weird Washers (TM) and found this:

Kinda thin, but should be a good proof-of-concept.
I first used a mini-die grinder to remove one of the flats, then, as Don suggested, I used a dull cold chisel and a block of wood to put the dimples in it, after using a center-finder to mark it. That left me with a taco shell, so I played around with a vise some and came up with this:

It works, but is very thin and flimsy. When the hardware stores reopen on Tuesday, I can look for a thicker keyed washer.

Kinda thin, but should be a good proof-of-concept.
I first used a mini-die grinder to remove one of the flats, then, as Don suggested, I used a dull cold chisel and a block of wood to put the dimples in it, after using a center-finder to mark it. That left me with a taco shell, so I played around with a vise some and came up with this:
It works, but is very thin and flimsy. When the hardware stores reopen on Tuesday, I can look for a thicker keyed washer.
Beerhippie
Well-known member
As I have nothing else to do today--I finished my chores this AM--and the county is full of tens of thousands (I kid you not) of tourons, I took my proof-of-concept model and made the real thing!
I did a LOT of searching for an internal tab washer in 3/8" ID. No luck whatsoever. Not even McMaster Carr wants to sell me 100 of them.
So I made my own. Going with Don's idea above, I found a 3/8" ID heavy galvy washer, soaked it in phos acid for a while to remove the zinc, put it on a copper plate and hit in one spot on the inside with the MIG welder, set to mid hot, slow feed. The gave me a tab. I then heated it to red hot to anneal it.
I did the same trick with the dull cold chisel as before, but instead of a wood block, I opened the jaws of one of my vices about 1/8" and used that as a die. Of course, this still resulted in a bit of a "taco shell" shape, but my DP vise has a slot in the jaws, so I put my two "peens" into the slot and tightened it down, flattening the washer nicely while preserving the two peens.
I figured I'd need to use a small file to make the weldment "tab" square, but it worked just fine the way it was.
I then heated it red-hot again and quenched it in used motor oil to both re-harden it and give it a nice, black finish.


The blade no longer tries to twist when I tighten it, and the saw is much closer to stock. I see that Don's washer has some knurling on the edge (coining?), but that just ain't going to happen unless I get really bored.
I did a LOT of searching for an internal tab washer in 3/8" ID. No luck whatsoever. Not even McMaster Carr wants to sell me 100 of them.
So I made my own. Going with Don's idea above, I found a 3/8" ID heavy galvy washer, soaked it in phos acid for a while to remove the zinc, put it on a copper plate and hit in one spot on the inside with the MIG welder, set to mid hot, slow feed. The gave me a tab. I then heated it to red hot to anneal it.
I did the same trick with the dull cold chisel as before, but instead of a wood block, I opened the jaws of one of my vices about 1/8" and used that as a die. Of course, this still resulted in a bit of a "taco shell" shape, but my DP vise has a slot in the jaws, so I put my two "peens" into the slot and tightened it down, flattening the washer nicely while preserving the two peens.
I figured I'd need to use a small file to make the weldment "tab" square, but it worked just fine the way it was.
I then heated it red-hot again and quenched it in used motor oil to both re-harden it and give it a nice, black finish.
The blade no longer tries to twist when I tighten it, and the saw is much closer to stock. I see that Don's washer has some knurling on the edge (coining?), but that just ain't going to happen unless I get really bored.
bmwrd0
Well-known member
I watched a video of an old English gunsmith talk about his tools, and he said he always used a straight grip hacksaw, like yours Timm. Said that no matter how you angled the blade or the angle of cut you took, the grip was always the same.
I thought that was a good reason.
I thought that was a good reason.
RTM
Well-known member
I tried a straight grip dovetail saw, could not stand the ergonomics. I realized for me to make it work, I needed the work around hip height, else I could not saw straight.he always used a straight grip hacksaw, like yours Timm. Said that no matter how you angled the blade or the angle of cut you took, the grip was always the same.
bmwrd0
Well-known member
So, around my shoulder height?
Beerhippie
Well-known member
I'm finding I prefer this grip:

But that's left-handed so I can use my camera.
Obviously wouldn't work with a backsaw.
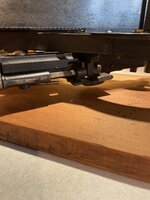
With a throat of only 3 1/2", you ain't hoggin' through big stock with this saw. The blade that's on it--and has been for decades--is 18tpi, so meant for fairly fine work. Still nice and sharp.
But that's left-handed so I can use my camera.
Obviously wouldn't work with a backsaw.
With a throat of only 3 1/2", you ain't hoggin' through big stock with this saw. The blade that's on it--and has been for decades--is 18tpi, so meant for fairly fine work. Still nice and sharp.
Last edited:

Eric Brown
ALLIANCE MEMBER
- Joined
- Jun 14, 2024
- Messages
- 678
Started working on a interesting Millers Fall No. 99 Breast Drill. First thing that caught my eye was the bronze gear. Figured someone dropped it and a patternmaker cast a bronze copy. However, as I've started working on it, I found a lot of other problems. This drill has seen a lot of abuse and incorrect repairs. Trying to fix it is a challenge. First, the gear, while it looks good and the teeth are well made, the hole for the main pivot is oversized letting the gear wobble. I will ream it out a little and stick in some bushings. Next I noticed a large gap down next to the chuck revealing the bearings. They were very exposed. Left this for later. So then figuring out the gear change selector and how to remove it. (A pin going through the middle). Removed the pin (it was bent), and then the gears came out. Took the gear section apart so I could see how it works. Clever. The gear section everything looked ok. The shaft that goes through it though is another matter. Speculating, but it looks like someone had removed this and lost all the bearings. So they used what was on hand, which were larger. These larger bearings moved the shaft further out of the gear section, so they drilled a new hole. I have new bearings on order. The bearing raceway was also loose and will probably do something to tighten it up (JB Weld?) Started the process of cleaning and polishing the frame. Looking better, but still have a ways to go. Will post pictures after nickel plating done. Anybody interested in progress pictures?
Picture below: Godell 477, Millers Falls 99, Millers Falls 12


Picture below: Godell 477, Millers Falls 99, Millers Falls 12
RTM
Well-known member
In its own thread would be my ¢¢, keep the story together and reading well. Looks like quite a challenge.Anybody interested in progress pictures?
Eric Brown
ALLIANCE MEMBER
- Joined
- Jun 14, 2024
- Messages
- 678
Still waiting for some tools to finish these breast drills. So, in the meantime, I am working on a M-F 97. I agree with others that this is a beast. Weights about eight pounds. Here are before and after pictures. The after represents cleaned and polished, but not yet nickel plated.Started working on a interesting Millers Fall No. 99 Breast Drill. First thing that caught my eye was the bronze gear. Figured someone dropped it and a patternmaker cast a bronze copy. However, as I've started working on it, I found a lot of other problems. This drill has seen a lot of abuse and incorrect repairs. Trying to fix it is a challenge. First, the gear, while it looks good and the teeth are well made, the hole for the main pivot is oversized letting the gear wobble. I will ream it out a little and stick in some bushings. Next I noticed a large gap down next to the chuck revealing the bearings. They were very exposed. Left this for later. So then figuring out the gear change selector and how to remove it. (A pin going through the middle). Removed the pin (it was bent), and then the gears came out. Took the gear section apart so I could see how it works. Clever. The gear section everything looked ok. The shaft that goes through it though is another matter. Speculating, but it looks like someone had removed this and lost all the bearings. So they used what was on hand, which were larger. These larger bearings moved the shaft further out of the gear section, so they drilled a new hole. I have new bearings on order. The bearing raceway was also loose and will probably do something to tighten it up (JB Weld?) Started the process of cleaning and polishing the frame. Looking better, but still have a ways to go. Will post pictures after nickel plating done. Anybody interested in progress pictures?
Picture below: Godell 477, Millers Falls 99, Millers Falls 12


Last edited:
Eric Brown
ALLIANCE MEMBER
- Joined
- Jun 14, 2024
- Messages
- 678
Here are updated pictures. Nickel plated and painted. Walnut handles. Almost done. Have a few little details to take care of.Still waiting for some tools to finish these breast drills. So, in the meantime, I am working on a M-F 97. I agree with others that this is a beast. Weights about eight pounds. Here are before and after pictures. The after represents cleaned and polished, but not yet nickel plated.


btrnuthatch
Well-known member


RTM
Well-known member
Close, an EconomyMy quick look notes this as a Langdon. It's in decent shape. No saw and no need so I'll put it in the classifieds.

Millers Falls Hand Tool & Precision Tools: Form No. H-161C : Millers Falls Co. : Free Download, Borrow, and Streaming : Internet Archive
72 p., illus., 22.7 cm, trade catalog
archive.org
Millers Falls/Langdon Acme mitre box. I have the patent # for 8-6-1895 (544092). Looking for the patent #s for 10-23-1906 & 9-28-1909. This is for sale in the classifieds. +/- 100 yrs. old.
Attachments
RTM
Well-known member
Here is your 3rd one, found it here
The 2nd one isn't here or on DATAMP, and random searching for patents on Miter Box, or Saw, on that date turns up nothing right now. Maybe later inspiration will strike
US Patent: 935,375 - Miter-Box
US patent 935,375 Miter-Box was issued to John A. Leland of Montague, MA. It was granted on 09/28/1909.
www.datamp.org
The 2nd one isn't here or on DATAMP, and random searching for patents on Miter Box, or Saw, on that date turns up nothing right now. Maybe later inspiration will strike
RTM
Well-known member
Hmm, this may be it, looks like it has escaped Vintage Machinery and is not in DATAMP. @Mark Stansbury are you covering historian at VM?
Looks like several of Parsons' work are in there
Looks like several of Parsons' work are in there
Google Patents
Search and read the full text of patents from around the world with Google Patents, and find prior art in our index of non-patent literature.
patents.google.com
What a fantastic restoration! Regarding the nickel plating, what kind of preparation is needed and was it difficult to locate someone who does this?Here are updated pictures. Nickel plated and painted. Walnut handles. Almost done. Have a few little details to take care of.
four.cycle
Well-known member
RTM
Well-known member
Do you mind if DATAMP uses your photos to update the lists for those patents?Millers Falls/Langdon Acme mitre box. I have the patent # for 8-6-1895 (544092). Looking for the patent #s for 10-23-1906 & 9-28-1909. This is for sale in the classifieds. +/- 100 yrs. old.
Eric Brown
ALLIANCE MEMBER
- Joined
- Jun 14, 2024
- Messages
- 678
Thank you. I do the plating myself. Basically, the tool needs to be cleaned up, smoothed out, polished, plated, and then polished again. The parts are typically plated individually, but smaller parts are grouped together. The plating takes about an hour. It's everything else that takes a lot of time. The honest truth is that I am not likely to get paid for all the labor involved. I do it for the joy of preserving tools. I do not buy the collector quality tools, instead look for rusty or damaged to fix. For instance I am working on four Yankee 1555 breast drills and need to replace all eight of the wood handles.What a fantastic restoration! Regarding the nickel plating, what kind of preparation is needed and was it difficult to locate someone who does this?
No. That would be fineDo you mind if DATAMP uses your photos to update the lists for those patents?


Eric Brown
ALLIANCE MEMBER
- Joined
- Jun 14, 2024
- Messages
- 678
I have one too. Like you, I really like it. Found an auxiliary fence that might interest you.My Millers falls skew block plane I use for the boats we build. It’s great little plane and being it’s skew will not tear out as much with figured Mahogany
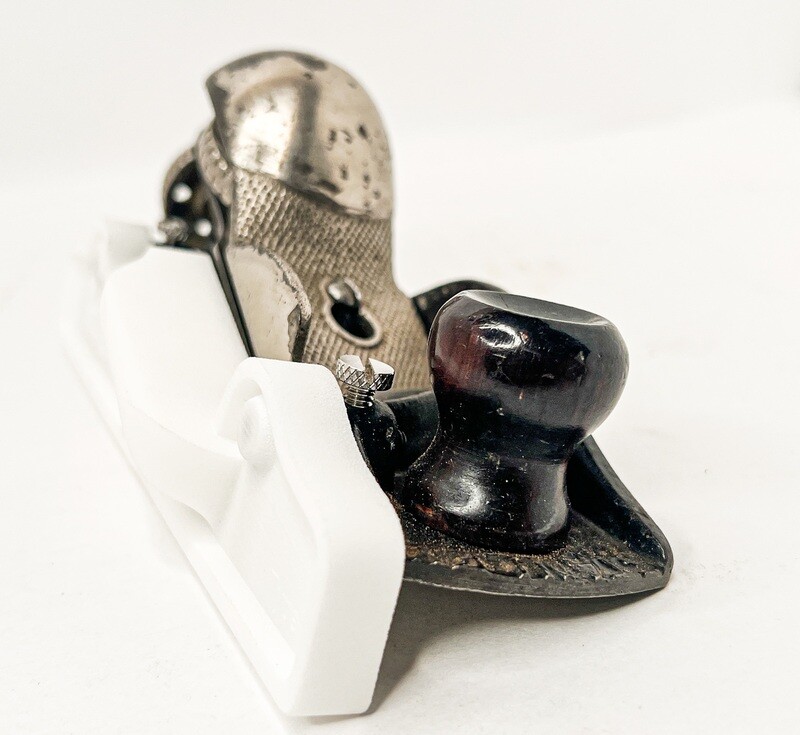
Extended Side Fence for a Stanley 140 Plane | Miller Falls 07 Side Plate Replacement
The team at Woodyah has come up with a revolutionary extended Stanley 140 side plate turning it into an edge plane. Made in the USA out of a strong and durable 3d printed nylon. Tools Made by Woodworkers for Woodworkers.
woodyah.com
@Eric Brown thank you for the link . I also own and use a lie Nielsen skew that has the fence. It’s a bit beefier then the falls but work both planes . I have been looking for an original one for the millers fall but may buy one of the 3d printed ones and cast one up in the shop out of brass. I did buy some brass to machine one out but casting it sounds like a lot more fun


Beerhippie
Well-known member
A new-to-me hacksaw:


GaryM909
Well-known member
I only have three Millers Falls tools. One is a 12” square I bought in 1978 and a couple things with handles. I have no idea what they are used for.
Attachments


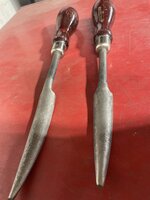
Beerhippie
Well-known member
Babbitt scrapers?
Eric Brown
ALLIANCE MEMBER
- Joined
- Jun 14, 2024
- Messages
- 678
More specifically babbitt bearing scrapers. For those that don't know, they used to cast bearings in place around the shafts. They would then use these types of tools to clean up the outer housings. When the bearings get worn, they then remove the babbitt and melt it down to pour new bearings. Very good recycling. Mostly lost skill today.Babbitt scrapers?