To avoid these ads, REGISTER NOW!

slate tiles

billconner

Well-known member
Joined
Jul 20, 2021
Messages
6,996
Location
Thousand Islands NYS
I know there's at least one tile pro here but a lot of experience as well. Fireplace insert surround - 16 x 16 slate tiles - basically a "one tile" perimeter around insert trim. Bottom row is less than 16". Well adhered and fastened 1/4" cement board (Hardie) and using premixed thinset.

I'd like to **** tiles or very small space and not grout. Will that work? What will my problems be? I just don't know if the tile depends on grout and gravity to stay in place or if thinset on cement board will hold it.

Thanks in advance.
 
To avoid these ads, REGISTER NOW!

rlitman

Well-known member
Joined
Oct 18, 2010
Messages
24,748
Location
Long Island
Grout is needed to seal the gaps, and to account for imperfections. The thinset holds the tile.
Real slate tile (like all natural stone) will be cut at the factory, and the fit along the edges and at the corners will depend a lot on the precision of the factory cuts. I wouldn't count on being able to do a tight fit.
 
OP
B

billconner

Well-known member
Joined
Jul 20, 2021
Messages
6,996
Location
Thousand Islands NYS
Laying out on floor it appears very straight and square. I think no grout would look better and wall around fireplace is not a water issue. Definitely real guaged slate.
 

Toolfool

Well-known member
Joined
Aug 22, 2011
Messages
4,991
Location
Columbus, Ohio
Real slate is usually not perfect. For your application you can get away without grouting with tight joints. You can use tile wedges to account for small variations in the slate. Trowel thinset on your backerboard as you go, then back butter the slate. If you DO grout, seal the slate first.
 

mike93lx

ALLIANCE MEMBER
Joined
Dec 9, 2013
Messages
38,398
Location
Richmond, VA
Grout isn't waterproof anyway.

Getting them set perfectly flush with no gaps would be very tough. Large format tiles use leveling tools, generally, which require gaps.

Can you get a custom cut slab instead of using pieces?
 
OP
B

billconner

Well-known member
Joined
Jul 20, 2021
Messages
6,996
Location
Thousand Islands NYS
Grout isn't waterproof anyway.

Getting them set perfectly flush with no gaps would be very tough. Large format tiles use leveling tools, generally, which require gaps.

Can you get a custom cut slab instead of using pieces?
I don't think we'd mind the "unlevelness" but we'll see. I assume laid on floor will same.

Custom slab is too thick per insert mfg - projects too far. 3/4 " max allowed and ~40 x 60 slab would be more

I'm sure It could but bought tile already and it was inexpensive. I don't mind a thin unsanded grout line but I may have to have one removable for access to wiring. Another thread.
 

CraigStu

Well-known member
Joined
May 22, 2014
Messages
4,076
Location
Blacksburg, Va
You can definitely give it a shot. Install the tile doing your best to get tight joints. Look at it for a few weeks. If you don't like the look, go w/ unsanded grout. That works best for thin joints. There are a whole range of colors available so you can get a real close match to the slate or go for a contrast.
 

Jinks

Well-known member
Joined
Aug 28, 2012
Messages
2,885
Location
Daytona Beach
A little over 10 years ago, just back from a trip to Italy, I paved a patio & front porch in real slate. I liked the "natural" look after our time in Italy.

The first things I found out were that no two tiles were the exact same size, or the exact same thickness. Laying a "smooth" floor was not possible, but it didn't matter because I got that "natural" look.

This winter I just finished replacing both with tile. Natural slate splinters & chips up. Probably not badly around a fireplace, but I don't have any idea how heat will effect it. Check the thickness & size of each piece, & if it looks good post some pictures.
 

CraigStu

Well-known member
Joined
May 22, 2014
Messages
4,076
Location
Blacksburg, Va
I have never used slate but I just did a standard backsplash w/ the usual off white ceramic tile. One thing I found out when cutting out for outlets was that those tiles sand just fine on my belt sander. I wonder if slate does also. If it does you could help get a closer fit by sanding some of the edges so they are straighter.
 

Renegade1LI

Well-known member
Joined
Mar 11, 2018
Messages
5,046
Location
long island ny
I have never used slate but I just did a standard backsplash w/ the usual off white ceramic tile. One thing I found out when cutting out for outlets was that those tiles sand just fine on my belt sander. I wonder if slate does also. If it does you could help get a closer fit by sanding some of the edges so they are straighter.
I have a bathroom we did with 12” slate tiles, tight grout lines and used a matching unsanded grout, looks fine. I did some border pieces along the tub apron by cutting the tile in half and putting an angle cut on top. I then polished that edge using a belt sander to achieve a satin finish, so yes they cut and polish fine. A wet saw and good blade is key to making cuts as the slate is very soft, i did true up a few tiles as they’re not all perfect. As mentioned seal all tiles before installing and it takes a little fitting to get flat as all the tiles vary in thickness.
 
OP
B

billconner

Well-known member
Joined
Jul 20, 2021
Messages
6,996
Location
Thousand Islands NYS
I don't mind the uneveness - not all same thickness - in fireplace surround.

Glad to know wet saw will cut. Probably need a new blade :(

Thanks again for tips
 
OP
B

billconner

Well-known member
Joined
Jul 20, 2021
Messages
6,996
Location
Thousand Islands NYS
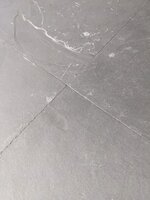
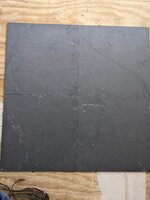
photo of slate tiles. They seem pretty square and even.

Sorry - reducing image size.
 

Attachments

  • PXL_20220320_132115174_copy_768x1024.jpg
    PXL_20220320_132115174_copy_768x1024.jpg
    200.4 KB · Views: 96
  • PXL_20220320_132044993_copy_768x1024.jpg
    PXL_20220320_132044993_copy_768x1024.jpg
    194.2 KB · Views: 94

Renegade1LI

Well-known member
Joined
Mar 11, 2018
Messages
5,046
Location
long island ny
I don't mind the uneveness - not all same thickness - in fireplace surround.

Glad to know wet saw will cut. Probably need a new blade :(

Thanks again for tips
Just takes a little more time with natural stone, a good eye as you want it to look good. Also when you lay out your tiles try to match them up in thickness, i love working with slate tiles, they’re all a little different but they look great.
 

yeldogt

Well-known member
Joined
Jan 2, 2012
Messages
18,184
You don't need grout ... I have done it both ways. Whatever you think will look the best

Mostly with a matching very thin grout line w/ tiles. I think it's a bit more finished looking. If I have the three sections cut to fit --- no grout
 

e015475

Well-known member
Joined
Jul 24, 2012
Messages
647
Location
Show Low and Mesa Arizona
The slate tile I'm familiar with is cut around the perimeter with a saw and fits together nicely, but the thickness is all over the place since it is split along its natural grain.

I remember siting down with a dial calipers and measuring the thickest edge of the slate and writing it with a Sharpie along the edge, then picking and choosing tile as I laid them to get them as even as I could. I started with graded slate tiles too.

I think it would be hard to lay them evenly without a grout line since the Thinset is so uneven under the tile due to thickness variations and it needs some place to squish out. You might think about a thin grout line about the same color as the tile if you want that 'monolith' look. Seems like I buttered both the tile and the floor as I laid them.

FWIW the slate in the house did fine, but on the walk up to the house they took pipe from the AZ sun. I'd experience some grout loss I'd have to touch up every few years and the slate would shed a large flake once in a while. I never sealed it.
 
OP
B

billconner

Well-known member
Joined
Jul 20, 2021
Messages
6,996
Location
Thousand Islands NYS
Inside wall so not abused at all. I do worry about thinset squeeze out. I might try one just back buttered and stay an inch away from edges. They are 15 3/4 inch square.
 

Toolfool

Well-known member
Joined
Aug 22, 2011
Messages
4,991
Location
Columbus, Ohio
Inside wall so not abused at all. I do worry about thinset squeeze out. I might try one just back buttered and stay an inch away from edges. They are 15 3/4 inch square.
Use a 3/8" square notched trowel to spread thinset on the wall. Back-buttered for walls only needs to be a thin layer with the flat edge of your trowel ( I use a margin trowel ) to create a better bond. Shouldn't be much squeeze-out.
BTW, 35 years and thousands of sf of tile, I've never used pre-mixed t-set or grout.
 
OP
B

billconner

Well-known member
Joined
Jul 20, 2021
Messages
6,996
Location
Thousand Islands NYS
I had planned to use premix thinset, both to adhere cement board (in addition to screws and high temp silicon on metal area) as well as tiles. Gravity is of course working against me, unlike a floor. Not new to tile - several bathrooms, floors, and kitchen backsplashes - counter to ceiling - but never slate and never larger than 6x6.
 
To avoid these ads, REGISTER NOW!

mike93lx

ALLIANCE MEMBER
Joined
Dec 9, 2013
Messages
38,398
Location
Richmond, VA
Probably good choice but Lowe's is 25 miles and local building supply is a 1/4 mile. :(
Custom building products (at HD) has an equivalent large format and stone mortar as well. Maybe your supplier has a different brand, but they probably have something very similar.

I don't know if it is a good gauge, but I tend to buy based on what the label says it is designed for
 

Renegade1LI

Well-known member
Joined
Mar 11, 2018
Messages
5,046
Location
long island ny
This one from hd is for lft & a darker gray, try to stay an inch in all around with the thin set try to minimize squeeze out. For what you are doing less is better, after you install one tile, peel it back to check your adhesion, you only need 80% on dry walls.
 
OP
B

billconner

Well-known member
Joined
Jul 20, 2021
Messages
6,996
Location
Thousand Islands NYS
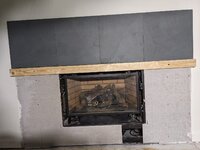
First row up (top row for spacing and alignment). How long before I remove "shelf" supporting it?

I've been collecting a series of pix from pre-demo to completion - one or two after this - and will post later.
 

Attachments

  • PXL_20220331_145233623.jpg
    PXL_20220331_145233623.jpg
    272.2 KB · Views: 67

Toolfool

Well-known member
Joined
Aug 22, 2011
Messages
4,991
Location
Columbus, Ohio
First row up (top row for spacing and alignment). How long before I remove "shelf" supporting it?

I've been collecting a series of pix from pre-demo to completion - one or two after this - and will post later.
Good start. Thinset should be cured enough after 12 hours to move on, just don't stress the tiles before 24 hours.
 

dcg9381

Well-known member
Joined
Jun 20, 2018
Messages
11,985
Location
Austin, TX
Grout isn't waterproof anyway.

Then you've never used epoxy grout. I highly recommend it. It's also much easier to maintain.

I have two baths that were done in slate (not my choice). The slate is cut very precisely in terms of size, but what varies a LOT is the depth of the slate, so it's hard to get them lined up without having "depth gaps" at the corners/edges. When I say "hard" -- I mean impossible. Grout lines help with those differences, but you're not going to get a flat surface like you would with ceramic tile.

Our slate has stayed put over cement board (and I believe a wire mesh) just fine.

I coated it polyurea, it's held up well...
 

duneslider

Well-known member
Joined
Jan 20, 2013
Messages
2,297
Location
Riverton, Utah
Back in the day doing production houses I would bang out 4-5 surrounds a day. I would tile the top row in all 4-5 houses then swing back to number one pull the board and set the rest of it, then bounce down the row and knock them all out, and swing back down to number one and grout it up.

That slate and cement board will pull the moisture out fast and those tiles won't go anywhere after an hour or two. Waiting until the next day is always good practice.

I am not sure what you have going on with the cement board though, looks like you are over lapping one of the sides of the fireplace and the bottom where the vent and controls are?
 
OP
B

billconner

Well-known member
Joined
Jul 20, 2021
Messages
6,996
Location
Thousand Islands NYS
Thank you.

Tiles felt firm after two hours but waiting a day Removable tile for access lower right. Thinking metal clip but magnets, Velcro, or other being considered.

I did dampen slate and cement board with sponge before thunder. I thought drying s little slower was good.
 
OP
B

billconner

Well-known member
Joined
Jul 20, 2021
Messages
6,996
Location
Thousand Islands NYS
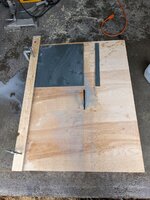
OK - start to finish. One detail showing thinset and high temp silicon to secure 1/4" cement board. Another showing increasing table of tile saw for these 16 x 16 tiles.

Thanks to all who helped! Made it easier and better.
 

Attachments

  • 1.jpg
    1.jpg
    154.1 KB · Views: 29
  • 2.jpg
    2.jpg
    215.8 KB · Views: 21
  • 3.jpg
    3.jpg
    137.6 KB · Views: 21
  • 5.jpg
    5.jpg
    141.1 KB · Views: 21
  • 4.jpg
    4.jpg
    288.6 KB · Views: 22
  • 6.jpg
    6.jpg
    416 KB · Views: 23
  • 7.jpg
    7.jpg
    138.3 KB · Views: 23
  • 8.jpg
    8.jpg
    115.4 KB · Views: 31
  • 9.jpg
    9.jpg
    92.3 KB · Views: 37
OP
B

billconner

Well-known member
Joined
Jul 20, 2021
Messages
6,996
Location
Thousand Islands NYS
Thank you. These tiles were very accurately cut and guaged and fit well with no grout. I did get upper right a tiny bit off but looks fine. Very pleased with ourcome.
 

Francis743Cuevas

New member
Joined
Aug 16, 2022
Messages
3
Hi, this is an issue that I've been trying to avoid for years, myself, although I've managed to get some pretty good results. The problem I've encountered, in my own installations, is the extent to which the cement board will warp from the heat of the wood-burning fireplace. The tiles are set on a bed of mortar, and that mortar is spread on the cement board (which is laid directly over wood, as you've noted); once the mortar heats up a bit, it moves away from the wood, as the wood expands with the heat and the mortar does not, and eventually, the mortar and the tile get loose. So, I set the tile very tightly, and I use a lot of adhesive, but in the end, I still have to use some grout to fill in the gaps. The mortar is set with a float, and it helps to keep the mortar flat, but it still moves a little, and in the end, you can see it in the grout. My best advice -- don't set the tiles on the cement board, but on a bed of mortar, and use a flat-edged piece of wood to spread it on the cement board, so that you can work for the board as little as possible. I hope this helps; if it doesn't, keep trying different things, and post again if you get stuck!
 
To avoid these ads, REGISTER NOW!
Top Bottom