To avoid these ads, REGISTER NOW!

Small Nutserts for Plastic or Alternative?

thr3squared

Well-known member
Joined
Oct 4, 2018
Messages
391
Location
CA
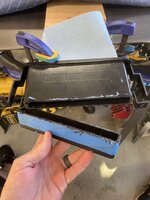
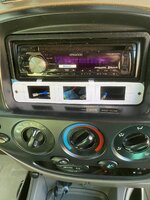
I am making a switch panel for my truck that will mount under an aftermarket head unit. The mounting hardware will be one M4 screw on either side.

The kicker- the mounting surface is plastic and I only have 0.47” (wide) of surface to work with for the nutserts (or similar) and most I’ve seen need a 1/2” or more. The main reason I wanted to use a nutsert was to make the panel removeable without dismantling the dash if I had a wiring issue.

Any other ideas or suggestions? I thought about epoxying hex nyloc nuts behind the dash instead of an insert. That would hold the screw tight and eliminate the need for a lock washer.

Cheers!
 

Attachments

  • 3A2372B1-3C1A-417F-B2BF-2F56C52F3383.jpeg
    3A2372B1-3C1A-417F-B2BF-2F56C52F3383.jpeg
    406.3 KB · Views: 54
  • 6A1B313D-1B38-4284-8AC2-94538F68D3D5.jpeg
    6A1B313D-1B38-4284-8AC2-94538F68D3D5.jpeg
    382 KB · Views: 54
To avoid these ads, REGISTER NOW!
OP
T

thr3squared

Well-known member
Joined
Oct 4, 2018
Messages
391
Location
CA
I haven’t seen those before, pretty cool application.
I’m not sure if the thickness of the plastic will be sufficient for those but I’ll check - my guess is it’s pretty thin.
 

mike93lx

ALLIANCE MEMBER
Joined
Dec 9, 2013
Messages
37,916
Location
Richmond, VA
How often do you need to be able to remove this? If rare, you could just pull out the dash kit and that would allow you to glue the panel in place, greatly simplifying this install
 

Jeff Ivers

Well-known member
Joined
Apr 9, 2010
Messages
2,567
Location
Oklahoma
I would not use nylocks. The gripping force (resistance) on them can transfer to the material they are glued to and break the plastic. Why not use automotive panel nuts (not sure of correct name) - the type where a nut is afixed to a u-shaped piece of metal that slides over the panel and when the bolt is tightened the u-shape clamps the panel?
 
OP
T

thr3squared

Well-known member
Joined
Oct 4, 2018
Messages
391
Location
CA
I would not use nylocks. The gripping force (resistance) on them can transfer to the material they are glued to and break the plastic. Why not use automotive panel nuts (not sure of correct name) - the type where a nut is afixed to a u-shaped piece of metal that slides over the panel and when the bolt is tightened the u-shape clamps the panel?

Are these the style you're referring to?

 
OP
T

thr3squared

Well-known member
Joined
Oct 4, 2018
Messages
391
Location
CA
How often do you need to be able to remove this? If rare, you could just pull out the dash kit and that would allow you to glue the panel in place, greatly simplifying this install

Ideally not that often. I'm only using two of the three switch holes (ill have a blank-off for the third), so if I want to add another I will need access.
The backs of the switches wont be exposed even if I remove the dash kit because there sitting in a little pocket (like for your cell phone or whatever) under the head unit.
 

kerrynzl

Well-known member
Joined
Nov 8, 2013
Messages
5,054
Location
Tauranga, New Zealand
I am making a switch panel for my truck that will mount under an aftermarket head unit. The mounting hardware will be one M4 screw on either side.

The kicker- the mounting surface is plastic and I only have 0.47” (wide) of surface to work with for the nutserts (or similar) and most I’ve seen need a 1/2” or more. The main reason I wanted to use a nutsert was to make the panel removeable without dismantling the dash if I had a wiring issue.

Any other ideas or suggestions? I thought about epoxying hex nyloc nuts behind the dash instead of an insert. That would hold the screw tight and eliminate the need for a lock washer.

Cheers!
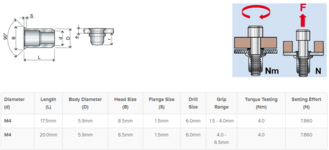
Use metric countersunk nutserts
4mm is only 8.5mm across the flange.

nutsert cs.PNG

nutsert cs...PNG
 
To avoid these ads, REGISTER NOW!

mike93lx

ALLIANCE MEMBER
Joined
Dec 9, 2013
Messages
37,916
Location
Richmond, VA
Ideally not that often. I'm only using two of the three switch holes (ill have a blank-off for the third), so if I want to add another I will need access.
The backs of the switches wont be exposed even if I remove the dash kit because there sitting in a little pocket (like for your cell phone or whatever) under the head unit.
You could just cut away the back of the pocket.

I do this all the time. Think through an elaborate solution to a problem because it's fun and interesting then end up choosing the simple path. Just throwing the idea out there
 

MP&C

Well-known member
Joined
Oct 21, 2009
Messages
4,405
Location
Leonardtown, MD
A press nut from the back side would be less likely to want to pull through the plastic. These are made for plastic.

Nuts, M4 x 0.7 mm Thread


WoodsTruck

Well-known member
Joined
Jan 12, 2013
Messages
1,026
For his thin plastic application, would heat be the better way to set these press in nuts to keep from cracking the plastic?
 

Jeff Ivers

Well-known member
Joined
Apr 9, 2010
Messages
2,567
Location
Oklahoma
Are these the style you're referring to?

That is one of several variations I have seen. Some work with sheet metal screws instead of bolts.
 

kerrynzl

Well-known member
Joined
Nov 8, 2013
Messages
5,054
Location
Tauranga, New Zealand
I'd look into using heat set plastic inserts if the head unit adapter has the thickness. https://www.mcmaster.com/94459A150/

You can melt them in with a soldering iron with a standard tip. They sell special installation tips too that fit the minor diameter of the thread but I never forked over the $20 for one.

Thanks for that link. [I've never heard of these until now]

I just looked at this video of these. This would be the winner here

 
OP
T

thr3squared

Well-known member
Joined
Oct 4, 2018
Messages
391
Location
CA
A press nut from the back side would be less likely to want to pull through the plastic. These are made for plastic.

Nuts, M4 x 0.7 mm Thread


These get pressed in from the back side of the panel correct? That installation tool is $$$ wow. I may be able to get access to an arbor press...could I use a small C-clamp to press it in?
 
OP
T

thr3squared

Well-known member
Joined
Oct 4, 2018
Messages
391
Location
CA
You could just cut away the back of the pocket.

I do this all the time. Think through an elaborate solution to a problem because it's fun and interesting then end up choosing the simple path. Just throwing the idea out there
I am VERY guilty of over complicating a simple job just because I'm trying to be creative haha. And you are right, once the panel is in place there is no need for the "pocket" any longer.
 

cmandp

Well-known member
Joined
Dec 22, 2011
Messages
1,287
Location
New Jersey
These get pressed in from the back side of the panel correct? That installation tool is $$$ wow. I may be able to get access to an arbor press...could I use a small C-clamp to press it in?

Yes, from the back side of the panel in your case. You always want self-clinching nuts being pulled into the material when you tighten the mating fastener.

No you don't need the special hand press. Yes you can use other methods to install them. I usually end up using a bench vise with some aluminum to keep from marring the work. An arbor press would be great if you have one or access.

I've not used the soft material version MP&C linked to but that seems like the least amount of work. Drill the correct sized hole and press the nut in.
 
OP
T

thr3squared

Well-known member
Joined
Oct 4, 2018
Messages
391
Location
CA
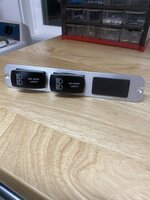
After much research and measuring I finally had to go back to my original plan of epoxying a nyloc behind the dash kit.

I experimented with rivnuts I had on hand and without a washer for backing (for which there was no room) it deformed the plastic. The plastic wasn’t thick enough for a PEM from the back side. And so it went. I’m sure there are other specialty fasteners out there that I didn’t find, but for now I’m happy with the result.

Now onto the pictures!

1C47646F-CE17-45FA-BEC8-76A318163392.jpeg

I did countersink a couple of the prototypes but ultimately went with button head hardware.

00B469E8-3843-495F-819C-DFA05558FB56.jpeg

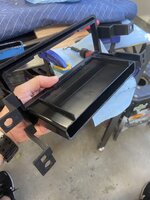
Cut the dash pocket for better wiring access


87AFE98E-65E2-4117-8D42-15E9EA602EAA.jpeg

Nuts epoxied in place

6C381A8A-DF66-4B1B-A914-70817E40EB47.jpeg

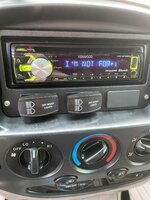
Mounted and done.

EB9FE574-8D51-4111-BA0C-D520D8A58400.jpeg
 

Attachments

  • AF8535A7-95AD-490D-B1D3-5BE266C59C7E.jpeg
    AF8535A7-95AD-490D-B1D3-5BE266C59C7E.jpeg
    732.6 KB · Views: 13
To avoid these ads, REGISTER NOW!
Top Bottom