To avoid these ads, REGISTER NOW!

Snap-On KR421 Restore

thehorse13

Well-known member
Joined
Mar 15, 2015
Messages
3,481
Location
Jefferson County, WV
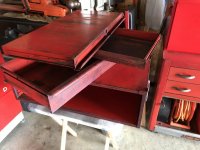
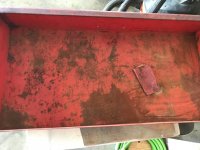
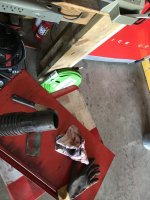
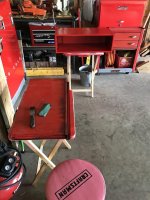
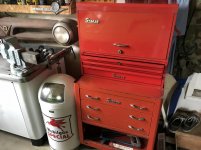
Some of you might recognize this 1958 KR421 middle box from the toolbox thread. For those who haven't seen it, I picked this up for 12 bucks at a sale.

It's time to get this gem back into service.

Someone spray bombed it with blue paint and tried to break into the box using a pry bar. After some acetone wiping and some metal hammering, we are back to being level again.

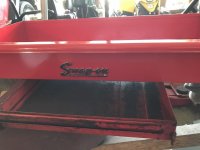
I cleaned the Snap-On badge and placed it to the side for the finishing touch after the long road of stripping, straightening and painting takes place.

Here's where we begin.
 

Attachments

  • IMG_0251.jpg
    IMG_0251.jpg
    111.2 KB · Views: 187
  • IMG_0287.jpg
    IMG_0287.jpg
    122.6 KB · Views: 139
  • IMG_0286.jpg
    IMG_0286.jpg
    106.8 KB · Views: 131
  • IMG_0300.jpg
    IMG_0300.jpg
    151.4 KB · Views: 135
Last edited:
To avoid these ads, REGISTER NOW!

Alienbaby17

Well-known member
Joined
Jan 27, 2014
Messages
338
Location
Minnesota
Nice score!

So much eye candy in that first photo, Alemite bench, F100 grille, vintage Snap-On...all good stuff!
 
OP
T

thehorse13

Well-known member
Joined
Mar 15, 2015
Messages
3,481
Location
Jefferson County, WV
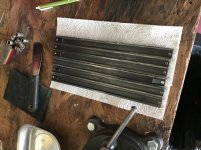
After removing what felt like 10 pounds of filthy grease from the slides, this is what I'm left with. The tan residue looks and feels like wood putty that hardened 50 years ago. A date with the wire wheel has been set to get them cleaned properly.

As for the box, after wiping away the blue spray paint and layers of grime, I'm left with exactly what I expected. A worn out old Snap-On finish. No worries though. Soon everything will be shiny red and new again.
 

Attachments

  • IMG_0301.jpg
    IMG_0301.jpg
    154.6 KB · Views: 124
  • IMG_0302.jpg
    IMG_0302.jpg
    134.1 KB · Views: 133

Shelbylex

Well-known member
Joined
Jan 20, 2018
Messages
3,132
Location
MA
I love the restoration threads. The horse13, please give us all the details about sanding, prepping and painting!
 
OP
T

thehorse13

Well-known member
Joined
Mar 15, 2015
Messages
3,481
Location
Jefferson County, WV

Shelbylex

Well-known member
Joined
Jan 20, 2018
Messages
3,132
Location
MA
thankyou, thehorse13. I use these threads to learn as nobody around me is into tools and tool boxes.
Great work on Alemite! Were you ever able to complete the set? If not, I will keep my eyes opened and hopefully will stumble upon one of them for you.
 
OP
T

thehorse13

Well-known member
Joined
Mar 15, 2015
Messages
3,481
Location
Jefferson County, WV
I had minimal time to fool around in the shop today but I did manage to get the slides cleaned up. I also managed to get one of the drawers started on the paint stripping process. If I burn through Mrs. Horsey's list of things to do this weekend, I hope to get all 3 drawers down to bare metal.
 

Attachments

  • IMG_0303.jpg
    IMG_0303.jpg
    152.3 KB · Views: 80
OP
T

thehorse13

Well-known member
Joined
Mar 15, 2015
Messages
3,481
Location
Jefferson County, WV
Getting the paint off of a late 1950s Snap-On box is no small task. The paint quality back in the day was far better and it takes quite a bit of elbow grease for removal.

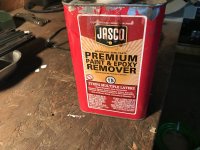
I've found that Jasco stripper works pretty well at a reasonable price. I'm sure there are more expensive and/or better strippers out there but this is what I use.

You can see the results of leaving Jasco on this drawer for about 5 minutes. Once I get all of the paint off with this gel stripper, I will move to the wire wheel and hand sanding.
 

Attachments

  • IMG_0305.jpg
    IMG_0305.jpg
    153.1 KB · Views: 63
  • IMG_0304.jpg
    IMG_0304.jpg
    146.8 KB · Views: 79
OP
T

thehorse13

Well-known member
Joined
Mar 15, 2015
Messages
3,481
Location
Jefferson County, WV
As I noted earlier, 1950s paint is a lot tougher than modern stuff. I rolled out my buffet of grinding and sanding wheels to get down to business. I did not use the HF sand blaster or the electric grinder seen on my mobil restoration cart. My little Monarch bench vise was just along for the ride this time.

After bringing drawer #1 down to bare metal and fixing a few minor metal bends over the weekend, I was able to prime, sand and shoot the drawer today. I'm letting the drawer bake in the sun this afternoon before bringing it back into the shop for the night. It will require a second coat tomorrow.
 

Attachments

  • IMG_0306.jpg
    IMG_0306.jpg
    148.7 KB · Views: 84
  • IMG_0308.jpg
    IMG_0308.jpg
    153.3 KB · Views: 84
Last edited:
OP
T

thehorse13

Well-known member
Joined
Mar 15, 2015
Messages
3,481
Location
Jefferson County, WV
The large bottom drawer had a lot of pitted metal under the rust. When I run into this issue, I always hand sand the surface so that I can apply pressure to the problem areas. Notice that I have a free slice of sandpaper and no block. This is on purpose so that I can feel what's happening to the metal as I go along.

Here is a teaser pic of the same drawer. Things are coming along nicely but I have to address a few areas, especially the seems. You can see that paint needs to be evenly removed from the back drawer seem if you look closely. This drawer also needs a second coat of paint.
 

Attachments

  • IMG_0317.jpg
    IMG_0317.jpg
    97.3 KB · Views: 103
  • IMG_0315.jpg
    IMG_0315.jpg
    144.9 KB · Views: 88

up a creek

Well-known member
Joined
May 1, 2018
Messages
73
Location
Thunder Valley
Looking good! I see you have a few other boxes to the side of some of the pictures. Did you also refinish those? I have an older snap on carry box it is Army Green with some rusting. I would like to paint it White with a Pearl finish over the top. Keep up the great work. BTW, that price you paid is Outstanding!
 
OP
T

thehorse13

Well-known member
Joined
Mar 15, 2015
Messages
3,481
Location
Jefferson County, WV
Looking good! I see you have a few other boxes to the side of some of the pictures. Did you also refinish those? I have an older snap on carry box it is Army Green with some rusting. I would like to paint it White with a Pearl finish over the top. Keep up the great work. BTW, that price you paid is Outstanding!

Some were redone while others were just given a really good cleaning. It is a fine line between well worn patina and a ragged out old tool box. :)
 

up a creek

Well-known member
Joined
May 1, 2018
Messages
73
Location
Thunder Valley
Some were redone while others were just given a really good cleaning. It is a fine line between well worn patina and a ragged out old tool box. :)


I like all the box styles you have pictures of. I will be looking forward to the final product when you are done. Thanks
 
To avoid these ads, REGISTER NOW!
OP
T

thehorse13

Well-known member
Joined
Mar 15, 2015
Messages
3,481
Location
Jefferson County, WV
Horse, are you spray bombing these with Rustoleum Sunrise Red?

Unfortunately, I do not have the ability to setup a paint booth in my garage right now so I'm forced to use spray paint. That said, if you practice long enough, you can lay down a finish extremely close to what someone can do with an air gun. The most critical part of painting is the surface prep work. 95% of the time, this step is done wrong and the spray bomb finish highlights the errors.

I'm using the 2X Rustoleum paint in cherry red. It will look great when I'm done and I will even shoot the box with clear coat when I'm satisfied with the finish.
 
Last edited:

Lookin4'67Galaxieconv

Well-known member
Joined
Jul 2, 2008
Messages
16,638
Location
Atlanta, GA
Unfortunately, I do not have the ability to setup a paint booth in my garage right now so I'm forced to use spray paint. That said, if you practice long enough, you can lay down a finish extremely close to what someone can do with an air gun. The most critical part of painting is the surface prep work. 95% of the time, this step is done wrong and the spray bomb finish highlights the errors.

Agreed on all counts. :thumbup:

What kind of clear coat do you use?
 
OP
T

thehorse13

Well-known member
Joined
Mar 15, 2015
Messages
3,481
Location
Jefferson County, WV
When you're trying to sand decades worth of filth off of an old toolbox, you're going to find that your sandpaper is going to clog up with material. I've watched people throw away perfectly good supplies because they didn't do one simple thing; turn on the shop-vac.

If your sandpaper looks like the piece in the picture, just hit it with your shop-vac for 3 seconds and you're ready to get back to sanding.

Now that we've gotten in one small shop tip, you can see that things are moving right along. If all goes well, I will be clearing everything by the weekend and assembling the box by early next week.

So far I have two drawers and the box sprayed with a base coat. Once I get the final drawer done, I will move on to second coats, clear coats and wet sanding.
 

Attachments

  • IMG_0318.jpg
    IMG_0318.jpg
    94.3 KB · Views: 58
  • IMG_0319.jpg
    IMG_0319.jpg
    103 KB · Views: 56
  • IMG_0320.jpg
    IMG_0320.jpg
    89.7 KB · Views: 57
  • IMG_0321.jpg
    IMG_0321.jpg
    102.6 KB · Views: 59
  • IMG_0322.jpg
    IMG_0322.jpg
    113.9 KB · Views: 58

up a creek

Well-known member
Joined
May 1, 2018
Messages
73
Location
Thunder Valley
Amazing job you have done so far! That was a great tip as well. Works when sanding wood as well. On your wet sanding, do you spray clear then sand, and then buff it out, or do you wet sand before the clear?
 
OP
T

thehorse13

Well-known member
Joined
Mar 15, 2015
Messages
3,481
Location
Jefferson County, WV
Amazing job you have done so far! That was a great tip as well. Works when sanding wood as well. On your wet sanding, do you spray clear then sand, and then buff it out, or do you wet sand before the clear?

If I'm looking for a showroom shine, I sand the base coat, thoroughly clean the surface, clear, then sand again. You'll be blinded by the shine when the sun hits it. 2000 grit is what I use on the final sanding.
 
OP
T

thehorse13

Well-known member
Joined
Mar 15, 2015
Messages
3,481
Location
Jefferson County, WV
Today is test fit day. I check slides to see if they need tweaking, drawer fit, etc. Considering where I started, I'd say this little box looks much happier.

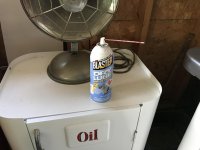
While I'm thinking about it, I like to use blaster dry lube on tool box drawer slides. I use this particular lubricant because of the amount of dust that's in the air around here. If I used any wet lube, I would be changing it every year or so.

Because this is a spring drawer, the top drawer will stick out about half inch when the box is unlocked. I don't have a key so I will either get one made or simply disconnect the two springs in the back of the box. Either way, we're certainly making progress.
 

Attachments

  • IMG_0325.jpg
    IMG_0325.jpg
    109.3 KB · Views: 63
  • IMG_0326.jpg
    IMG_0326.jpg
    133.1 KB · Views: 82
  • IMG_0251.jpg
    IMG_0251.jpg
    111.2 KB · Views: 66
OP
T

thehorse13

Well-known member
Joined
Mar 15, 2015
Messages
3,481
Location
Jefferson County, WV
lol. Yea, it will look brand new off the Snap-On truck in 1958 after clear coat and wet sanding.

That said, Mrs. Horsey had to go and rain on my parade. She said it will look brand new sandwiched between two boxes that look used...dammit. I hate to admit when she is right (which is always) but maybe I should leave it as is so that it looks more like the other two boxes. I guess I could drop it in place just to see how it looks.
 

up a creek

Well-known member
Joined
May 1, 2018
Messages
73
Location
Thunder Valley
Very nice work! Turned out great thus far. Maybe you finish the other ones to look as new or leave it like it is, either way it looks amazing!
 
OP
T

thehorse13

Well-known member
Joined
Mar 15, 2015
Messages
3,481
Location
Jefferson County, WV
Well folks, we're at the end of the road. After test fitting the middle box, it looks perfect the way it is. My bottom box spent the first half of its life on a boat dock in southern Florida so the paint has faded a bit. Even so, I'm completely satisfied with my 1957/58 Snap-On stack.

One last item was added to the middle box. Wally World drawer liners. I like these because they are less than five bucks and look identical to the Duck brand toolbox drawer liners.

So let's add up the invoices here. $12 dollars on the box, $12 dollars on 3 cans of paint, $4 on drawer liners and probably a few bucks in shop materials. Let's call it 30 bucks total spend. I don't think I can complain.

On to the next project... :)
 

Attachments

  • IMG_0327.jpg
    IMG_0327.jpg
    151 KB · Views: 47
  • IMG_0328.jpg
    IMG_0328.jpg
    155 KB · Views: 47
  • IMG_0331.jpg
    IMG_0331.jpg
    146.9 KB · Views: 72

up a creek

Well-known member
Joined
May 1, 2018
Messages
73
Location
Thunder Valley
Well folks, we're at the end of the road. After test fitting the middle box, it looks perfect the way it is. My bottom box spent the first half of its life on a boat dock in southern Florida so the paint has faded a bit. Even so, I'm completely satisfied with my 1957/58 Snap-On stack.


One last item was added to the middle box. Wally World drawer liners. I like these because they are less than five bucks and look identical to the Duck brand toolbox drawer liners.


So let's add up the invoices here. $12 dollars on the box, $12 dollars on 3 cans of paint, $4 on drawer liners and probably a few bucks in shop materials. Let's call it 30 bucks total spend. I don't think I can complain.


On to the next project... :)


Very nice job on the box, and definitely can’t beat the price.
 

Shelbylex

Well-known member
Joined
Jan 20, 2018
Messages
3,132
Location
MA
thehorse13, what an amazing job!!!

I really like your Snap On 352 bottom box. I wonder if this is going to be your next project to match the color of the upper boxes...
 
OP
T

thehorse13

Well-known member
Joined
Mar 15, 2015
Messages
3,481
Location
Jefferson County, WV
thehorse13, what an amazing job!!!

I really like your Snap On 352 bottom box. I wonder if this is going to be your next project to match the color of the upper boxes...

Nah. I am going to leave the 352 alone. As far as I'm concerned, the late 50s Snap-On stack is complete. All I have to do now is beat Twertsy to the flea markets so that I can fill it with awesome finds. :)
 

Lookin4'67Galaxieconv

Well-known member
Joined
Jul 2, 2008
Messages
16,638
Location
Atlanta, GA
Very nice, Horse. I have that same Snap On roller box I picked up last year. Mine isn't in nearly as good a shape. Planning a restore on it sometime this year.
 

Attachments

  • 20170812_185415.jpg
    20170812_185415.jpg
    148.4 KB · Views: 44
To avoid these ads, REGISTER NOW!
Top Bottom