
You are using an out of date browser. It may not display this or other websites correctly.
You should upgrade or use an alternative browser.
You should upgrade or use an alternative browser.
SoCal Sawdust
- Thread starter sfanale
- Start date


ricketycricket
Well-known member
Can't believe it has been so quiet on your thread lately. Looking forward to seeing how you set everything up!
nicholam77
Well-known member
Exciting!! Can't wait to see it set up. Forgive my ignorance but what was the reason for the upgrade? Power? Looked like your old setup was already pretty nice.
Question for you on your dust collection, awhile back you mentioned venting outside. How does this work? I see you have 2 stage so probably not much dust goes outside but I am wondering two things. How loud is it from the outside? And what does the outlet on the outside of the building look like? Just wondering if there is any measure against bugs (like wasps building a nest) or something like that.
Venting outside would be appealing to me but I live in close proximity to (non-frat boy) neighbors that I don't want to irritate too much. But I need a semi-compact solution and it would be great to not have a bag/filter taking up room, as well as not recirculate the air.
It's over my head, but the solar project looks very nice. I'd love to have solar one day.
Exciting!! Can't wait to see it set up. Forgive my ignorance but what was the reason for the upgrade? Power? Looked like your old setup was already pretty nice.
The old setup was good enough, but decidedly consumer level. So a bit under powered for what I would like. Also the Incra fence system created some issues for me. Mainly, it prevented the saw from tipping to 45degrees due to the back hung motor colliding with the back rail of the fence system. That started to become a real hinderance to my future plans. Finally, the router lift was ok, but I didn’t love the design. It was hard to lift up and down, so I wanted to replace that. Given I could sell it all as a package for practically what I spent... seemed like the best route.
Question for you on your dust collection, awhile back you mentioned venting outside. How does this work? I see you have 2 stage so probably not much dust goes outside but I am wondering two things. How loud is it from the outside? And what does the outlet on the outside of the building look like? Just wondering if there is any measure against bugs (like wasps building a nest) or something like that.
Venting outside would be appealing to me but I live in close proximity to (non-frat boy) neighbors that I don't want to irritate too much. But I need a semi-compact solution and it would be great to not have a bag/filter taking up room, as well as not recirculate the air.
I just created a little opening framed into my siding. I put a mesh screen under the siding and a little flashing over it. It’s in no way perfect nor really too waterproof. My thinking was it barely rains here and this is about as waterproof as the rest of my house so...meh. The mesh was about the finest I could find at my local HD that didn’t seem like it would inhibit airflow. I go by this spot in the side yard a few times a week, always peeking to see what’s happening there, and so far so good. No issues or pests. Though SoCal isn’t know for much other than termites anyway...


It does make some noise. It’s plenty audible, but fine for the day. I don’t typically run it much past 9pm just to stay polite to the neighbors I do like. I suppose it depends on your neighbors right? Doesn’t matter how loud the sound, if you’re not on good terms, a pin dropping would bother them. I’m lucky in that I don’t care much about how my direct (frat boy) neighbors feel. Past their house, the noise is pretty minimal as their little smoking den absorbs most of the noise.
It's over my head, but the solar project looks very nice. I'd love to have solar one day.
I love it. Few YouTube videos and you’d be surprised how much you can do. Knowing I had to get a permit and pass inspections oddly gave me a boost of confidence because it was like having someone else check my work.
Sent from my iPhone using Garage Journal
Attachments


Last edited:
Unfortunately my last post was lost with the forum backup so I’ll try to recreate it...
I got the saw all setup:

Not a terrible process but I definitely have some notes. First impressions: I’d say this is a great saw and excellent value.
The good:
Some of the not so great:
Overall, where it counts, Grizzly nailed it with this saw. For something in the $1k price range, I am super pleased so far. My old saw was good too, but decidedly a hobbyist saw. I would call this saw “prosumer” or like “entry level professional”. The fence locks down straight and solid, and 2HP is enough for my garage use, right now I am very excited. You can tell where Grizzly had to made compromises to produce a machine at this price point, but the corners they cut are cosmetic, or things I can easily fix/change. Where it mattered, they got it right.
Sent from my iPhone using Garage Journal
I got the saw all setup:
Not a terrible process but I definitely have some notes. First impressions: I’d say this is a great saw and excellent value.
The good:
- most important is how parallel is the blade to the miter slots and fence. Out of the box it was so parallel I thought my dial indicator was wrong. I used a digital dial indicator jig that rides in the miter slot and [supposedly] reads to half thousandths. I ran it back and fourth on the fence and it read basically zero—perfectly parallel. Understandably, I didn’t believe that, so I got out another analog dial indicator and it read less than 1/1000. So damn... mine arrived quite literally as parallel as you could imagine something being. I like my fence to open out a hair, so I made the back of the fence about 1/1000 wider than the front. This helps stop burning and to a small extent kickbacks.
- I tested the blade parallelism with the miter slot and it was 1/1000 or less within parallel. I checked two blades just to be sure and it was damn perfect. I didn’t bother to adjust that because I don’t think the mechanism reliably allows me to adjust by the 1/1000 so I figured I would make it worse if I tried.
- I didn’t run a dial indicator on the shaft holding the blade, but visually it looked very steady. I can’t feel a fraction of wobble in the bearing so... good enough for me!
- I really like the fence. I got used to extruded aluminum with my incra fence and I am happy to still have it here. Leaves lots of options for tslot accessories when I get there.
Some of the not so great:
- dust collection is marginal. The major problem I think is that the fit of all the body panels is not great, there are HUGE vent openings in the motor housing, and the cast iron table top does not form a seal against the cabinet top flange. Like... no seal at all...
Here are some pictures...
Openings around panels:

Motor vents:

Daylight pouring through the top of the cabinet:

I think I can pretty easily solve the leaks, but I’m not sure if I should plug the motor housing vents... obviously my gut says no, but if I leave them open, they really hamstring dust collection. However, since I don’t have overarm dust collection, it’s always going to be marginal regardless. Therefore I plan to plug up everything else, and live with the vents open for a while.
- fit and finish are not perfect, but only really effect cosmetics. There were some marks on the branding stickers, and the open panel gaps. Those things really don’t bother me.
- the dials for blade height and angle are cast aluminum, so they have some weight. However, they have a plastic lock down knob, and just a bit more slop than I would like.
- making adjustments to the blade angle stops is honestly a huge pain, but I don’t rely on the hard stops to set 90 and 45... so this doesn’t bother me at all.
- the power switch has a short lead cable from the motor to the switch which really limits mounting locations. It’s too short to mount where I want it, so I’ll have to modify this in the future to extend the cables to get the switch over to the right of the saw where I like it. Also the main plug lead is pretty short, so I’ll likely extend that at the same time.
- the grizzly “bear crawl” mobile base I purchased is total garbage. It’s poorly made, a cosmetic mess, and wobbles sooooo much when “locked down” it doesn’t serve the purpose it is intended for. Further, when it wobbles, it falls down from the locked position which is a HUGE safety risk for a saw. I’m working with grizzly on a refund for that POS.
Overall, where it counts, Grizzly nailed it with this saw. For something in the $1k price range, I am super pleased so far. My old saw was good too, but decidedly a hobbyist saw. I would call this saw “prosumer” or like “entry level professional”. The fence locks down straight and solid, and 2HP is enough for my garage use, right now I am very excited. You can tell where Grizzly had to made compromises to produce a machine at this price point, but the corners they cut are cosmetic, or things I can easily fix/change. Where it mattered, they got it right.
Sent from my iPhone using Garage Journal
Attachments


Last edited:
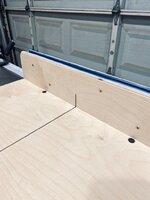
Since I got the saw setup, I was ready to jump into making some small improvements. The easiest think to start with was making adjustment to the fence to increase the rip capacity. Since the front fence guide rail is based on a custom extrusion with a tslot to mount it, all I had to do was slide it right:

In that photo you can see how the back support rail overhangs the wing and the front rail is now setback. The back rail needs to be cut unfortunately, but this tiny modification got me out to 36.5” rip. I can move the front fence rail further further right and get the goal of 48”, but I need to make a new back support rail, so that will wait.
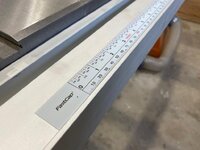
Next I changed the measuring tape to this much nicer FastCap version;


The stock grizzly only had whole inches labeled. This fancy FastCap is not only easier to read, but has nice incremental inch fractions easily labeled. Also it has MM which I sometimes enjoy also! The tape was like 16’ and only used about 40”. Nice thing is it’s reversible front and back (left and right), so I’ll use the left handed backside when I build out my miter station.
Sent from my iPhone using Garage Journal
In that photo you can see how the back support rail overhangs the wing and the front rail is now setback. The back rail needs to be cut unfortunately, but this tiny modification got me out to 36.5” rip. I can move the front fence rail further further right and get the goal of 48”, but I need to make a new back support rail, so that will wait.
Next I changed the measuring tape to this much nicer FastCap version;
The stock grizzly only had whole inches labeled. This fancy FastCap is not only easier to read, but has nice incremental inch fractions easily labeled. Also it has MM which I sometimes enjoy also! The tape was like 16’ and only used about 40”. Nice thing is it’s reversible front and back (left and right), so I’ll use the left handed backside when I build out my miter station.
Sent from my iPhone using Garage Journal
Attachments


Last edited:
And just to round this out... I obviously had to make something with the saw. The first project I jumped into was a new wooden toy for my kiddo’s collection.
It’s called a wobble board and it’s basically just a bent lamination to form something like a rainbow. I used to make custom longboards back in the day, so whipping up a bending form was like second nature for me. I used a bunch of scrap and some spare 2x4” to create an arc with the radius that seemed right. Then I sliced up a sheet of 1/8” Baltic birch into 12” x 5’ sections. In testing the form, I found such extreme bending on even just two sheets was a bit tricky, so I took two passes. Here is the first two sheets clamped up:

And the second two:

Can’t hate the lovely lamination you get from Baltic:

Since I am temporarily without a router table, I had to hand round all the edges, but back when I made longboards... I didn’t have a router table either, so really felt like a blast from the past. In the end it comes out looking pretty basic, but my kid loved it:


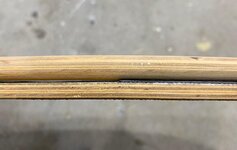
With such a simple form, you get super clean, even layers. I used total boat epoxy and it worked wonderfully— you can just see the fine line of epoxy between the 4x layers of Baltic birch:


Sent from my iPhone using Garage Journal
It’s called a wobble board and it’s basically just a bent lamination to form something like a rainbow. I used to make custom longboards back in the day, so whipping up a bending form was like second nature for me. I used a bunch of scrap and some spare 2x4” to create an arc with the radius that seemed right. Then I sliced up a sheet of 1/8” Baltic birch into 12” x 5’ sections. In testing the form, I found such extreme bending on even just two sheets was a bit tricky, so I took two passes. Here is the first two sheets clamped up:
And the second two:
Can’t hate the lovely lamination you get from Baltic:
Since I am temporarily without a router table, I had to hand round all the edges, but back when I made longboards... I didn’t have a router table either, so really felt like a blast from the past. In the end it comes out looking pretty basic, but my kid loved it:
With such a simple form, you get super clean, even layers. I used total boat epoxy and it worked wonderfully— you can just see the fine line of epoxy between the 4x layers of Baltic birch:
Sent from my iPhone using Garage Journal
Attachments
-
 3aec79db6c4bc83633a26ca34d5932b3.jpg81.5 KB · Views: 0
 -
 221df8cccaa682f72f34720810d3713b.jpg136.6 KB · Views: 0
 -
 8f9c60f37e5a32c5386a2928966851df.jpg157.5 KB · Views: 0
 -
 dc8c8a8f4c0e41b5e2837041ded9692d.jpg85.4 KB · Views: 0
 -
 01e7d7d7751cd442f7ee4d35b2c98353.jpg91.7 KB · Views: 0
 -
 c26346cae158d6c5ec5e8a4f59173643.jpg42.5 KB · Views: 0
 -
 ac7ace049913218de117e7baf4bc4b1d.jpg79.4 KB · Views: 0
 -
 82f7148539872c905b07e7b1416559b0.jpg123.4 KB · Views: 0
Last edited:
nicholam77
Well-known member
The new saw looks awesome!
The fast cap scale is the most readable imperial scale I've ever come across. Which is great for me because I **** at reading imperial.
The wobble board is really cool. When you do the laminations, how thick are the sheets of plywood, and do you have to wet them or anything or just bend and clamp? Is there a reason to use epoxy vs wood glue? I really like the simple aesthetic of all the kids stuff you've made.
Got any pics of your custom longboards you've made? Just curious. I went to college in CA and used to ride a longboard everywhere...
The wobble board is really cool. When you do the laminations, how thick are the sheets of plywood, and do you have to wet them or anything or just bend and clamp? Is there a reason to use epoxy vs wood glue? I really like the simple aesthetic of all the kids stuff you've made.
I used 1/8” thick Baltic birch because the bend is so extreme. I originally thought I could bend all 4 sheets up in one pass since I used to do two 1/4” sheets of BB for skateboards. The 1/8" sheet is super flexible, but the amount of bend in my form is just too much for 4x at once... I tried.
I attempted to “cheat” using wood glue, but I always did skateboards with epoxy. I should have known better, but I still attempted the first set with titebond 2, thinking it had enough open time. By the time I had spread the first layer... I could tell the glue was setting up, so I stopped to only clamp up the first two sheets in the form.
Second shot, I used epoxy since it’s less viscous and has a longer open time. I spread two layers with epoxy and clamped it all together with the two sheets already laminated in the first attempt. It was a much smoother process so I definitely suggest epoxy for layups. I use TotalBoat with the fast setting hardener. That gives you an official 12 minutes of open time in SoCal heat, but it can go a bit longer honestly. If you needed more I think the slow hardener is listed as 20 min, but again, it can go longer—particularly in the cold. I also use the ratio measured 5:1 pump heads for the bottles so it’s a pretty painless process. One pump from each bottle, mix for 2minutes in a Dixie cup, and go.
So long story, short: for a simple glueup, wood glue is fine and plenty strong. But if you will be crunched for time, use epoxy. I even use epoxy for panel glueups just so I can take my time with the clamps.
Sent from my iPhone using Garage Journal
Last edited:
Got any pics of your custom longboards you've made? Just curious. I went to college in CA and used to ride a longboard everywhere...
I have a couple blanks still in my garage for sentimental reasons. This one was a senior project for me, laying up my same boards but with fiberglass to make them thinner:


Here you can see the surface texture of the fiberglass:

This was very similar to how surfboards are made, only I used wood in the middle instead of foam. By laying two sheets of fiber on the top and bottom, I could make the board half as thick but still very strong. It flexes more than a traditional wood board, so it’s a different/fun experience for sure. Kind of feels like a snowboard.
Overtime I would revise the shape, so here is a slightly smaller wood one I still have:

Thickness compared—wood on top, fiber on bottom.

As I would ride these to class everyday, I would draw on them to think how I wanted to revise the shape. I have big feet, so wider middle section. Need more pop from the kick tail, make that bend more pronounced. Don’t want the board to drag when held by the top truck, cut it shorter... I just kept iterating designs over the years. At the time, penny boards weren’t a thing, and the style was BIG 4’ Sector 9 boards, so I was making something I couldn’t get on the market. I used to paint them custom for people, and sell them to kids on campus. It wasn’t really a business venture, but it was fun to sell a few and cover costs.
Sent from my iPhone using Garage Journal
Attachments
-
 d70d67278cb8fbdd35b496406ab3d570.jpg123.9 KB · Views: 0
 -
 7f46ed68c712ee2dbd86738b09f3a6f8.jpg57.3 KB · Views: 0
 -
 5f828850cbb26347549727d2209e3094.jpg133.9 KB · Views: 0
 -
 27cd708831c141c1fb3cdee7d2eb4e77.jpg111.9 KB · Views: 0
 -
 689d3bb3438ab8285e8359cb670f803a.jpg129.7 KB · Views: 0
 -
 b8c1158f3e5448876aa7c2cd28de80f8.jpg165.5 KB · Views: 0
Last edited:
I’ve not disappeared, just keeping super busy actually making things in the shop. Most recently, a little desk for Lady SoCal so she can work at home a bit easier during quarantine. It was supposed to be an easy project...
I milled up a long grain butcher block from 2x4’s:

The glue up went kinda sideways, and the panel bowed a little... aka I finally had an excuse to use this giant plane I got on Craigslist like 10 years ago:

My first attempt at cutting chamfers around the edge went a little goofy too:

Basically everything that could go wrong, did. I finally got it all flattish and edged up right:


It’s always the simple ones that catch you up right?
Sent from my iPhone using Garage Journal
I milled up a long grain butcher block from 2x4’s:
The glue up went kinda sideways, and the panel bowed a little... aka I finally had an excuse to use this giant plane I got on Craigslist like 10 years ago:
My first attempt at cutting chamfers around the edge went a little goofy too:
Basically everything that could go wrong, did. I finally got it all flattish and edged up right:
It’s always the simple ones that catch you up right?
Sent from my iPhone using Garage Journal
Attachments
-
 d57d52526ee6613981ef8cb05173e164.jpg112.7 KB · Views: 0
 -
 455c043c1d28c526866728d7f7fd4d8b.jpg121.4 KB · Views: 0
 -
 3295a4cd86d4e85b427e056b1206db1f.jpg73.6 KB · Views: 0
 -
 f03c9a1eafb50688375a4a95d8cf7960.jpg128 KB · Views: 0
 -
 d8d806e99d81d2511066850118ece601.jpg120.9 KB · Views: 0
 -
 871a332d40fbc3440ffc0dd579f4bf84.jpg113.1 KB · Views: 0
Last edited:
Next I decided to start something a little different. For 2020, one of my goals was to really push myself. Advance my skills woodworking, actually finally learn to weld, and even learn completely new things. Specifically video editing... I figured the best way to push myself there was to just commit on a project and try it, so I built a lamp:


The lamp is cool, but it’s was just sort of the “thing” to give me something to practice filming...and then I started a YouTube channel where I hope to keep this going:
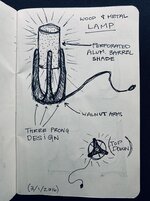
Definitely a fun experience and taught me just how I long a way I have to go to be at the level I want to be. Figured the best way to keep growing is another challenge, so I started a second lamp. Here are my preliminary sketch up designs:

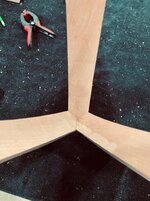
I chose the one on the right. The real trick for this design will be the center three-way joint, because it basically has to be perfect or it will make the whole thing look sloppy. It won’t be easy to get right, but The build is underway:
I attempted to make a router template:

But I should have known trying to route 1.75” of cherry, even with a brand new beautiful Whiteside spiral template bit, is not so easy... even though I had roughed it out on the bandsaw to within 1/8” of the lines, honestly it scared the **** out of me and once I was faced with the task of using my hands near it, it seemed dangerous. Instead I did all the shaping “manually” with the bandsaw and sanders, leaving me with these beauties:

After a bit of struggle and one custom sled for the new table saw, I got this beautiful seam:

I know I’m a little light on “action” photos, but that’s because I’m saving it for the video") . I can however leave you with this picture of the best tiny shop assistant:
. I can however leave you with this picture of the best tiny shop assistant:

Sent from my iPhone using Garage Journal
The lamp is cool, but it’s was just sort of the “thing” to give me something to practice filming...and then I started a YouTube channel where I hope to keep this going:
Definitely a fun experience and taught me just how I long a way I have to go to be at the level I want to be. Figured the best way to keep growing is another challenge, so I started a second lamp. Here are my preliminary sketch up designs:
I chose the one on the right. The real trick for this design will be the center three-way joint, because it basically has to be perfect or it will make the whole thing look sloppy. It won’t be easy to get right, but The build is underway:
I attempted to make a router template:
But I should have known trying to route 1.75” of cherry, even with a brand new beautiful Whiteside spiral template bit, is not so easy... even though I had roughed it out on the bandsaw to within 1/8” of the lines, honestly it scared the **** out of me and once I was faced with the task of using my hands near it, it seemed dangerous. Instead I did all the shaping “manually” with the bandsaw and sanders, leaving me with these beauties:
After a bit of struggle and one custom sled for the new table saw, I got this beautiful seam:
I know I’m a little light on “action” photos, but that’s because I’m saving it for the video
. I can however leave you with this picture of the best tiny shop assistant:Sent from my iPhone using Garage Journal
Attachments
-
 12cf73e91f74d8b25ed1e92a363c84aa.jpg124.8 KB · Views: 1
 -
 299487c5fdf916af85b25fbc428265e5.jpg97.3 KB · Views: 0
 -
 484a756140154af8618b83e0f43df840.jpg123.4 KB · Views: 0
 -
 32bcae0a4b2e5acfbe38d2707a5d66b5.jpg122.1 KB · Views: 0
 -
 eb816a34c5d4e09928a39d5c0381c0e3.jpg61.5 KB · Views: 0
 -
 06982a0d7e2fa2d0fde97c11053bfa5b.jpg70.5 KB · Views: 0
 -
 0013e5ad1007107129bd9e1f566134b2.jpg72.5 KB · Views: 0
Last edited:
WunTon
Well-known member
Awesome work! I subscribed and gave you a thumbs up to help with your youtube journey.
WunTon
Well-known member
Thanks! #7 investor!
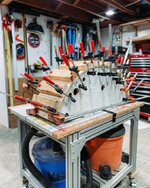
No problem! I meant to ask before and forgot how do you like the Rockler bar clamps? They seem to be the best priced option for what they do especially when they put them on sale so often but I'm not sure if that comes with any sacrifice. I have seen a lot of youtubers use them but no one ever talks about them.
No problem! I meant to ask before and forgot how do you like the Rockler bar clamps? They seem to be the best priced option for what they do especially when they put them on sale so often but I'm not sure if that comes with any sacrifice. I have seen a lot of youtubers use them but no one ever talks about them.
I actually love them with a few caveats.
- they don't have huge depth in terms of the jaws (only maybe 2"), so they seem best suited to thinner panel glue ups. Bessey cabinet clamps are more like 4-5" I think.
- I am finding they have a higher tendency to allow panels to bow if you over clamp. Bessey cabinet clamps seem to have less movement just based on the design, so they do seem to keep glue ups more straight/flat.
otherwise, they are so much lighter I really prefer them. I always wait until they have the sales then buy a couple.
Last edited:
wasfast
Well-known member
The photo of the shop assistant, complete with ear muffs, is awesome.
nicholam77
Well-known member
All the projects are looking great! I am particularly excited to see the progress on the second lamp, I really like the design.
Re: the youtube video, you did an amazing job for a first crack at it. (You can take my opinion with a grain of salt, but I am a professional editor, went to film school, the whole 9 yards haha). You clearly know your way around a camera, also evident in the photos in this thread. I was easily able to follow along with what you were building, and all of the close ups and shallow depth of field really focus the viewer and help tell the story. Super happy to see some longer shots in there, too. Especially for woodworking videos I think it's calming and relaxing to see the process instead of a bunch of flashy rapid cuts to keep the attention of the Snapchat generation. So kudos.
If you're open to any constructive criticism, my only two suggestions would actually pertain to the sound (which is half of the edit!). First is, 9.5 min is a very long time for one track of music. Music can be really challenging to find if you're abiding by licensing restrictions etc, but I think at that length of video, a couple of tracks could help shape the story and phrasing a bit, and add some interest. Secondly, you could try letting some of the natural sounds / tool sounds bleed through more. Both for power tools and hand tools. Obviously don't wanna be one of those videos where you have the volume turned up for narration and then your ears bleed in the next scene when the table saw gets fired up. But as long as it's mixed well, I think hearing more of the tools in action would help underline the craft and add some aural interest. And to that end, in future videos if you do use several pieces of music, they don't have to be back-to-back, or throughout the whole video. Sometimes creating some natural sound "breaks" in-between, maybe in a transitional moment in the project, can be nice. In the end... it all comes down to what feels right.
Just to reiterate I enjoyed the video a lot and it's already on par with a lot of the woodworking content I watch on youtube!
All the projects are looking great! I am particularly excited to see the progress on the second lamp, I really like the design.
Just to reiterate I enjoyed the video a lot and it's already on par with a lot of the woodworking content I watch on youtube!
Thanks! 100% agree about the music/audio side. I come from the photography realm, so aperture... sure. That’s easy hahaha.
I honestly had no idea where to go with the audio side of things. I just looped the same song, and poorly at that. I’m planning to focus a bit more there with this next one and mix things up. Definitely appreciate the feedback and I will take all your suggestions to heart as I start this next edit.
Sent from my iPhone using Garage Journal
Last edited:
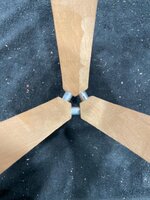
Lamp is progressing. Most finicky miters I have ever attempted. If you think a perfect 45 is tough, this 3-way joint is insanity. I made a sort of goofy tenoning jig to get the mating faces right in my last post. I did another shop jig to get this miter together:

It took hours. Soooooo difficult to get 6 faces to meet even as close as that picture. I realized despite my best effort, it still wasn’t perfect and would look crappy if I left it. So my solution was to separate the faces with a gap that would let me hide the sub-mm differences and allow me to hide them with distance. Pushed together, looks like ****. Seperated by a little gap, GLORIOUS. Plus, I think pulling some aluminum down into the base balances the design aesthetically speaking so its not so distinctly different top and bottom.
I mocked up some aluminum dowels and drilled holes with a small forsner bit. AGAIN, I made a little jig for my drill press to help me drill 12 holes accurately:

Then of course... a three way joint is impossible—literally. It can’t be just pushed together. I had to load one face of each leg with dowels, then incrementally bring the faces together by pushing/wiggling the pieces. It’s basically juggling, but 1mm of play at a time it eventually worked and all the dowels were seated well:


Tell me that isn't effing glorious.
Sent from my iPhone using Garage Journal
It took hours. Soooooo difficult to get 6 faces to meet even as close as that picture. I realized despite my best effort, it still wasn’t perfect and would look crappy if I left it. So my solution was to separate the faces with a gap that would let me hide the sub-mm differences and allow me to hide them with distance. Pushed together, looks like ****. Seperated by a little gap, GLORIOUS. Plus, I think pulling some aluminum down into the base balances the design aesthetically speaking so its not so distinctly different top and bottom.
I mocked up some aluminum dowels and drilled holes with a small forsner bit. AGAIN, I made a little jig for my drill press to help me drill 12 holes accurately:
Then of course... a three way joint is impossible—literally. It can’t be just pushed together. I had to load one face of each leg with dowels, then incrementally bring the faces together by pushing/wiggling the pieces. It’s basically juggling, but 1mm of play at a time it eventually worked and all the dowels were seated well:
Tell me that isn't effing glorious.
Sent from my iPhone using Garage Journal
Attachments


Last edited:
Bob Heine
ALLIANCE MEMBER
And then I thought "Those dowels will look great all polished up!"
Tell me that isn't effing glorious.
That is glorious. I was hoping for a table lamp update. The shape reminds me of the Modulines that my parents had when I was growing up. When I was scrolling down and saw the photo with the dowels my first thought was "how is he going to assemble that?" I came across a similar situation without realizing that it was geometrically difficult, until I painted myself into that corner. I found that it was easiest to wiggle and slide them together if you started by putting the dowels in both sides of a piece, and the other set of dowels between the remaining two. The three parts seemed to squeeze together easier than if I started with each having a set of dowels like you show. Hopefully you won't be needing to test this
That is glorious. I was hoping for a table lamp update. The shape reminds me of the Modulines that my parents had when I was growing up.
I had to google modulines. Modeline lamps turned up a ton of amazing results. I had never heard of those, but I love them. Amazing, I redesigned and old design accidentally. Now I have lots of new inspiration.
Sent from my iPhone using Garage Journal
I'm glad you were able to find them. Sorry about the typo: I was looking up cabinet companies for someone earlier in the day so I had the other spelling in my head. As soon as I can figure out how to make (or find) the shades which are sort of a plasticized woven twine, I'll make a set of table lamps for our house.
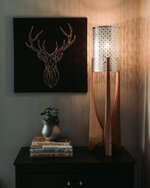
I finished up the new lamp build:


I also found this little sketch of my original idea from 2016:

Working on the video now, then it’s going to be a shop house project next.
Sent from my iPhone using Garage Journal
I also found this little sketch of my original idea from 2016:
Working on the video now, then it’s going to be a shop house project next.
Sent from my iPhone using Garage Journal
Attachments
-
 8ee848546751dba5fca31acdad4cb2e8.jpg48.6 KB · Views: 1
 -
 318d51036a29433d0cfa13a1af73a6c4.jpg51.2 KB · Views: 0
 -
 02ccb76e6edef3c2bbaa3f6954a9797f.jpg61.5 KB · Views: 0
 -
 021992765a009d7c6f7fa5eb2745abf8.jpg113 KB · Views: 0
 -
 802b02f7b45d89700d2ef375af68cd55.jpg49.8 KB · Views: 0
 -
 6e30c258caaef6498e1a8fe0c6bbf416.jpg49.2 KB · Views: 0
 -
 f4cc6870ca71e6b0ce92165ae16d5a84.jpg51.5 KB · Views: 0
Last edited:
Finished up the video and posted it this morning:
https://youtu.be/RxZv6VbFrjg
Go check it out!
Sent from my iPhone using Garage Journal
https://youtu.be/RxZv6VbFrjg
Go check it out!
Sent from my iPhone using Garage Journal
Hello! Been busy working on my third video— ready to post that soon hopefully. For now, here’s the pre assembly parts:

And the finished lamp:


Super simple design, but keeping it clean and seamless took a little bit of searching for parts. I found a tiny USB powered zigbee RGB LED controller that I could easily fit into the wooden base. That let me connect the lamp to my WiFi and control it from an app like Philips Hue. Pretty neat.
I’ve also been working on some other projects I just have been delaying for a long time.
Finally made my cross cut sled:


I attempted the 5 cut method discussed everywhere on YouTube. For me, it was more like the 50 cut method, but I was able to eventually get it to 0.005” square. Not at clean as the 0.001” the internet told me was possible, but I hope that’s good enough:

Seems square enough for me. I tried a few different squares and it seemed damned good. Something about government work or whatever.
Sent from my iPhone using Garage Journal
And the finished lamp:
Super simple design, but keeping it clean and seamless took a little bit of searching for parts. I found a tiny USB powered zigbee RGB LED controller that I could easily fit into the wooden base. That let me connect the lamp to my WiFi and control it from an app like Philips Hue. Pretty neat.
I’ve also been working on some other projects I just have been delaying for a long time.
Finally made my cross cut sled:
I attempted the 5 cut method discussed everywhere on YouTube. For me, it was more like the 50 cut method, but I was able to eventually get it to 0.005” square. Not at clean as the 0.001” the internet told me was possible, but I hope that’s good enough:
Seems square enough for me. I tried a few different squares and it seemed damned good. Something about government work or whatever.
Sent from my iPhone using Garage Journal
Attachments
-
 48d27c2c4c331044f564bc07450d98e0.jpg90.7 KB · Views: 0
 -
 0618cfb0992fbd7d7cc6be1e9f23fd51.jpg67.1 KB · Views: 0
 -
 4815ea21c5fa1b34d74e8bf550273401.jpg264.3 KB · Views: 0
 -
 c3a14a1bd645332fec60952e68477d5f.jpg45.9 KB · Views: 0
 -
 0e1de686a5a3b1f867d2bd5486d633d7.jpg68.7 KB · Views: 0
 -
 342f3e077ee472b841874bd15759df1d.jpg105.2 KB · Views: 0
 -
 de6167993799e33909d19b99fc6bb01d.jpg72 KB · Views: 0
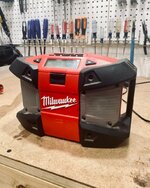
I also tackled this long standing project. This Milwaukee radio has been sitting idle in my garage for about two years now:

Generally, it was a cool little radio because it used my m12 batteries and had an optional 12v power adapter. I also had an aux input port which worked since I usually stream music or podcasts. However, once Apple got rid of the 1/8” audio jack... sort of made it worthless to me.
With the rise of arduino and all these tiny development boards, I figured I could hack something together... just never got around to it. Then a couple weeks ago, I found a tiny little board that does everything I need: 12v input, bluetooth receiver, and 1/8” aux-out... all on the same board ready to go. No hacking required (hard to tell, but the board is tiny—about 1.5” x 1”.):

Annnnnndddd it’s only $12 on amazon! So, I cracked that little radio open and tapped the 12v pins on their built in power board:


Then I drilled a little hole and passed my two wires through to the front iphone pocket:

Popped a battery in, and it worked like a charm. Boom, that easy, now it’s a Bluetooth radio!
I’ve always hated that this radio doesn’t charge the Milwaukee batteries when it’s plugged in. However, I noticed the same board company (drok) also makes tiny little charge controllers, so now I am thinking I can probably hack that into the radio as well... yay a new project!
Sent from my iPhone using Garage Journal
Generally, it was a cool little radio because it used my m12 batteries and had an optional 12v power adapter. I also had an aux input port which worked since I usually stream music or podcasts. However, once Apple got rid of the 1/8” audio jack... sort of made it worthless to me.
With the rise of arduino and all these tiny development boards, I figured I could hack something together... just never got around to it. Then a couple weeks ago, I found a tiny little board that does everything I need: 12v input, bluetooth receiver, and 1/8” aux-out... all on the same board ready to go. No hacking required (hard to tell, but the board is tiny—about 1.5” x 1”.):
Annnnnndddd it’s only $12 on amazon! So, I cracked that little radio open and tapped the 12v pins on their built in power board:
Then I drilled a little hole and passed my two wires through to the front iphone pocket:
Popped a battery in, and it worked like a charm. Boom, that easy, now it’s a Bluetooth radio!
I’ve always hated that this radio doesn’t charge the Milwaukee batteries when it’s plugged in. However, I noticed the same board company (drok) also makes tiny little charge controllers, so now I am thinking I can probably hack that into the radio as well... yay a new project!
Sent from my iPhone using Garage Journal
Attachments


I also tackled this long standing project. This Milwaukee radio has been sitting idle in my garage for about two years now:
Generally, it was a cool little radio because it used my m12 batteries and had an optional 12v power adapter. I also had an aux input port which worked since I usually stream music or podcasts. However, once Apple got rid of the 1/8” audio jack... sort of made it worthless to me.
With the rise of arduino and all these tiny development boards, I figured I could hack something together... just never got around to it. Then a couple weeks ago, I found a tiny little board that does everything I need: 12v input, bluetooth receiver, and 1/8” aux-out... all on the same board ready to go. No hacking required (hard to tell, but the board is tiny—about 1.5” x 1”.):
Annnnnndddd it’s only $12 on amazon! So, I cracked that little radio open and tapped the 12v pins on their built in power board:
Then I drilled a little hole and passed my two wires through to the front iphone pocket:
Popped a battery in, and it worked like a charm. Boom, that easy, now it’s a Bluetooth radio!
I’ve always hated that this radio doesn’t charge the Milwaukee batteries when it’s plugged in. However, I noticed the same board company (drok) also makes tiny little charge controllers, so now I am thinking I can probably hack that into the radio as well... yay a new project!
Sent from my iPhone using Garage Journal


Now that is cool. Got me thinking [emoji848]
Sent from my iPhone using Garage Journal
Attachments


Now that is cool. Got me thinking [emoji848]
Sent from my iPhone using Garage Journal
Let me help your thinking there:
Bluetooth Board, DROK Audio Receiver Bluetooth Module DC 5V-24V 12v Portable Wireless Electronics Stereo Music Receive Circuit Chip with Micro USB Port for Headphone Speaker Home Sound System DIY https://www.amazon.com/dp/B07P94Z9XR/?tag=atomicindus08-20
Sent from my iPhone using Garage Journal
Dan in Pasadena
Well-known member
Guess I've got "Old-Dude-Itis". I wouldn't have the slightest idea what that board would do, how to install it or what it's purpose is.
When I was younger I'm sure I would have looked into it and figured it out even though I was never into electronics. Now? Just don't care but glad there are those that do.
When I was younger I'm sure I would have looked into it and figured it out even though I was never into electronics. Now? Just don't care but glad there are those that do.
Guess I've got "Old-Dude-Itis". I wouldn't have the slightest idea what that board would do, how to install it or what it's purpose is.
When I was younger I'm sure I would have looked into it and figured it out even though I was never into electronics. Now? Just don't care but glad there are those that do.
HA! It lets me listen to the music I want.
I really like that lamp! That gives me a good idea for a pair of lamps to flank either side of my TV.
Having just built my sled and squaring it over the weekend using the five cut method, the process/math is fresh in my head. When you say you're only getting it to within 0.005", is that the actual measured difference between the top and bottom of your fifth cut strip, or is that 0.020" divided by four?
Remember, that measurement on the fifth cut strip is multiplied because of the previous four cuts, so you'd need to divide by four to get your actual measurement. If you are getting 0.005" on your test strip, you're actually only off by 0.00125". Which, depending on the length of your test piece, is probably really good (and interestingly enough, exactly what I was able to achieve on my sled over an 8.625" cut).
If you are still getting a 0.020"/4=0.005" difference on your fifth cut strip, you need to make sure you are also taking into account your strip length vs. fence length to calculate the needed adjustment. In my case, after my first adjustment, was still measuring 0.009" out of square, but when I ran the math, I needed to adjust my fence by 0.014" and was able to get a very nice end result.
The actual William Ng video is long by YT standards, but it is the best explanation of his method. I've seen other YTers try to summarize the method in their own, shorter videos, but found that some of them gloss over (or leave out) important details, or don't really have a grasp of the actual process and are just getting lucky.
...I attempted the 5 cut method discussed everywhere on YouTube. For me, it was more like the 50 cut method, but I was able to eventually get it to 0.005” square. Not at clean as the 0.001” the internet told me was possible, but I hope that’s good enough...
Having just built my sled and squaring it over the weekend using the five cut method, the process/math is fresh in my head. When you say you're only getting it to within 0.005", is that the actual measured difference between the top and bottom of your fifth cut strip, or is that 0.020" divided by four?
Remember, that measurement on the fifth cut strip is multiplied because of the previous four cuts, so you'd need to divide by four to get your actual measurement. If you are getting 0.005" on your test strip, you're actually only off by 0.00125". Which, depending on the length of your test piece, is probably really good (and interestingly enough, exactly what I was able to achieve on my sled over an 8.625" cut).
If you are still getting a 0.020"/4=0.005" difference on your fifth cut strip, you need to make sure you are also taking into account your strip length vs. fence length to calculate the needed adjustment. In my case, after my first adjustment, was still measuring 0.009" out of square, but when I ran the math, I needed to adjust my fence by 0.014" and was able to get a very nice end result.
The actual William Ng video is long by YT standards, but it is the best explanation of his method. I've seen other YTers try to summarize the method in their own, shorter videos, but found that some of them gloss over (or leave out) important details, or don't really have a grasp of the actual process and are just getting lucky.
nicholam77
Well-known member
Nice updates!
Mind sharing the zigbee rgb led controller you used?
The crosscut sled looks super clean. I lol'd at the "50 cut method".
Nice work on hacking the Milwaukee radio!
Btw the tripod lamp turned out great.
Mind sharing the zigbee rgb led controller you used?
The crosscut sled looks super clean. I lol'd at the "50 cut method".
Nice work on hacking the Milwaukee radio!
Btw the tripod lamp turned out great.
I really like that lamp! That gives me a good idea for a pair of lamps to flank either side of my TV.
Having just built my sled and squaring it over the weekend using the five cut method, the process/math is fresh in my head. When you say you're only getting it to within 0.005", is that the actual measured difference between the top and bottom of your fifth cut strip, or is that 0.020" divided by four?
Remember, that measurement on the fifth cut strip is multiplied because of the previous four cuts, so you'd need to divide by four to get your actual measurement. If you are getting 0.005" on your test strip, you're actually only off by 0.00125". Which, depending on the length of your test piece, is probably really good (and interestingly enough, exactly what I was able to achieve on my sled over an 8.625" cut).
If you are still getting a 0.020"/4=0.005" difference on your fifth cut strip, you need to make sure you are also taking into account your strip length vs. fence length to calculate the needed adjustment. In my case, after my first adjustment, was still measuring 0.009" out of square, but when I ran the math, I needed to adjust my fence by 0.014" and was able to get a very nice end result.
The actual William Ng video is long by YT standards, but it is the best explanation of his method. I've seen other YTers try to summarize the method in their own, shorter videos, but found that some of them gloss over (or leave out) important details, or don't really have a grasp of the actual process and are just getting lucky.
Yes, your point is well taken. I was referring to the amount I needed to adjust the fence forward or back to achieve "perfect square", NOT the difference in thickness of my fifth cut/4. If I look at the 5th cut/4... I am off by 0.00125" over 7.5" of cut. Given my depth of cut on the sled is only about 20" max, I would be off by ~0.003" over the full length of cut.
Nice updates!
Mind sharing the zigbee rgb led controller you used?
The crosscut sled looks super clean. I lol'd at the "50 cut method".
Nice work on hacking the Milwaukee radio!
Btw the tripod lamp turned out great.
Sure can! Here are all the parts I purchased on amazon to make it:
- https://www.amazon.com/gp/product/B0838VYGP5/?tag=atomicindus08-20
- https://www.amazon.com/gp/product/B07WG6WH7H/?tag=atomicindus08-20
- https://www.amazon.com/gp/product/B07HHKBGW8/?tag=atomicindus08-20
- https://www.amazon.com/gp/product/B087CM8ZJQ/?tag=atomicindus08-20
I only needed the home hub because I didn't have one already. Honestly, that one isn't great... I would spend the extra money on the Phillips Hue. I used the USB extension as a really simple way to put a 10' cord on it. Alternatively, you could solder in a power wire if you cut off the USB side of the zigbee and tap into the right USB lines (5v+ and GRD).
The extrusion is SUPER cheap, like under 1/16" thick and a bit fragile. They come in 1M lengths--I cut it down to about 24". You'll see when I post my video, how my attachment scheme might not be sufficient for the full 1M.