To avoid these ads, REGISTER NOW!

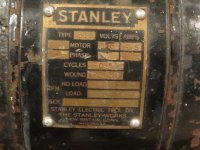
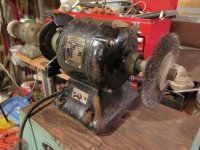
Stanley 586

paulmc

Member
Joined
May 27, 2014
Messages
7
Location
Durham, UK
Hi All,

This is a brilliant site and exactly what I've been looking for.

I've acquired a Stanley type 586 bench grinder from my ailing & aging father in law. He was a well known electrical bodger and was not adverse to using ordinary household glue to 'fix' motors and casings.

With that in mind I thought I'd best give the grinder a whole refurb and breath new life into it.

At the moment I've dismantled most of the arms and casings but I can't get the inner wheel flanges off. At least I now know they're not threaded on but at the same time I'm reluctant to impart any force onto it.

If anyone's interested I'll post photo's as I go.

WP_20140525_012_zpsae5ef50c.jpg


WP_20140525_013_zps45b40a23.jpg


WP_20140525_008_zps1b64a662.jpg
 
Last edited:
To avoid these ads, REGISTER NOW!

Mohawk Dave

Well-known member
Joined
Oct 7, 2012
Messages
5,068
Location
SoCal
That's an awesome grinder! What are the handles on the L and R?

As far as pulling it apart, first clean it super good so you can see what's going on, then soak with PB or acetone/atf....don't rush it b/c if you break it, well....

Others will chime in with more know how.
 
OP
P

paulmc

Member
Joined
May 27, 2014
Messages
7
Location
Durham, UK
Thanks guys, I hope to do it justice. my Father-in-law was a tooling engineer. He made up a really horrible plate steel sheet pyramid base for it which I removed straight away. If I can get the grinder into decent shape then I might look for a new pedestal for it.

With regards to age: There's another thread on here about a Stanley grinder which is a model 677. A 1956 catalog page shows the Model which would most probably date it fairly accurately. If the 'Type' numbers are sequential then I'm guessing that mine is a few generations before that one - perhaps mid to late 40's?

The 'handles' are the eye guard support posts - which I have. The glass/Perspex is a bit cloudy/scratched.
 
Last edited:
OP
P

paulmc

Member
Joined
May 27, 2014
Messages
7
Location
Durham, UK
PART II: The puller

So, I splashed out and bought a puller to get the inner flange wheels off.

I was VERY wary of using the front rims of the wheels as the anchor points but I couldn't get in behind it.

Anyway, after many 1/8th turns and checks for any signs of stress, the wheel finally gave way.

There is a woodruff key holding each inner wheel in place which also needs to be removed before the motor casings can be removed.

I was hoping to replace the tired looking wiring but those wires which leave the casing body and go to the switch are actually wound round the coil and can't be replaced.

Suspicious wiring..
WP_20140525_003_zps711ecf58.jpg


The Puller is attached..
DSC00563_zpse19102d1.jpg


It gives!!!
DSC00566_zps76fef5f2.jpg


Last inch needed a bit of improv..
DSC00568_zps8f4ccec3.jpg


Ta Da!!
DSC00569_zpse9d4d228.jpg


Now the wheel guards can be removed..(again with a bit of a struggle)
DSC00571_zpse45573d1.jpg


Once the casing bolts were removed, one side of the casing came off but the other side remained firmly stuck. The motor winding slid of the core.
DSC00573_zps5be11a3a.jpg


After due consideration and a bit of gentle persuasion the other side also came off. There was some sort of spring loaded electrical mechanism to remove from the casing before it was free to remove.

Note that in one end casing (left in the picture below) the bearing was firmly clipped into the case while on the right case the bearing is still attached to the bar. There is a groove in the right casing where a circlip should be but I doubt it has ever been there.
DSC00574_zps0ca8d0e3.jpg


Now all of the casings are free, it's time to get them cleaned up, sprayed and reverse the process above.

no problem there then..
 
Last edited:

WWIIjeep

Well-known member
Joined
May 30, 2012
Messages
1,240
Location
Arizona
With regards to age: There's another thread on here about a Stanley grinder which is a model 677. A 1956 catalog page shows the Model which would most probably date it fairly accurately. If the 'Type' numbers are sequential then I'm guessing that mine is a few generations before that one - perhaps mid to late 40's?

That other thread is probably my post.

Your grinder dates from the early to mid 1940s, no later than 1945.

In 1946, Stanley changed their model numbering system. Your No. 586 became a No. 286. Same grinder, different number. An earlier version of the No. 586 from the 1930s is different than yours. Same number, different grinder.

So much for there being any consistency in the Stanley model numbering system.

The No. 677 dates from 1946 to 1958. It's predecessor was the No. 667, which dates from the mid to late 1930s through 1945. Superficially, the 667 and 677 look very similar, but there are numerous relatively minor differences internally, and in the style of the tool rest supports and the eye guards.


Anyway, after many 1/8th turns and checks for any signs of stress, the wheel finally gave way.

There is a woodruff key holding each inner wheel in place which also needs to be removed before the motor casings can be removed.

The inner flanges on Stanley grinders of that era are notoriously hard to remove, as you found out.


There was some sort of spring loaded electrical mechanism to remove from the casing before it was free to remove.

You mean the centrifugal starting switch? Be very careful with the contact arms. If they get bent, the switch can fail to close or open. The former can cause the motor not to start. The latter can cause irreplaceable magic smoke to be released, similar to the magic smoke Lucas used in British automobile wiring harnesses. ;)
 
OP
P

paulmc

Member
Joined
May 27, 2014
Messages
7
Location
Durham, UK
Many thanks for the comments and information WWIIJeep and yes it was your thread which actually drew me to the site.

Re: The centrifugal starting switch. I could see it was some sort of centrifugal mechanism but couldn't work out why it appeared to be breaking a circuit rather than making one. Anyway, I decided not to think about it any more and the problem went away. The switch is in good order. The springs and hinges are all free moving.

My only two issues now (apart from putting the whole thing back together again) are:
do I get a new bearing circlip?
do I get new bearings even thought the originals appear well greased and run sweet.
do I drill off the Stanley nameplate before cleaning the casing; or leave it in situ?

I'm also going to need some new rubber feet to replace the knackered ones you can see on the wiring photo above. If anyone knows where I can source these then please let me know.
 
Last edited:
To avoid these ads, REGISTER NOW!

WWIIjeep

Well-known member
Joined
May 30, 2012
Messages
1,240
Location
Arizona
Many thanks for the comments and information WWIIJeep and yes it was your thread which actually drew me to the site.

Re: The centrifugal starting switch. I could see it was some sort of centrifugal mechanism but couldn't work out why it appeared to be breaking a circuit rather than making one. Anyway, I decided not to think about it any more and the problem went away. The switch is in good order. The springs and hinges are all free moving.

LOL (laughing at the part I put in bold)

The contacts on that switch automatically close when the motor slows down and stops, completing the circuit for the auxiliary or starting winding. Upon the next application of power, current flows through the starting winding, helping the motor to spin up to speed. At approximately 75% of full speed, centrifugal force moves the spring-loaded device on the rotor shaft and pushes against the switch to open the contacts, thus removing the starting winding from the circuit. From that point on, the motor continues to run only on the main winding, at a full speed of approximately 2850 RPM (assuming you have European 50 HZ power).

The starting winding is only intended to be powered while the motor is starting. If the centrifugal switch fails to operate, keeping current in the starting winding beyond the space of a few seconds, the starting winding will overheat and release the magic smoke.

You may be able to hear the centrifugal device move as the motor spins up, and you should definitely be able to hear it move again when the power is turned off, after the motor has slowed down, not long before it stops completely.

I hope that explanation makes sense. On the other hand, sometimes it's better not to think about it. :lol:


My only two issues now (apart from putting the whole thing back together again) are:
do I get a new bearing circlip?
do I get new bearings even thought the originals appear well greased and run sweet.
do I drill off the Stanley nameplate before cleaning the casing; or leave it in situ?

That's three issues not two, ;) but no matter.

Assuming you mean a clip for the side where you said one was missing and perhaps was never installed, you shouldn't need it as long as there is one on the other side, and as long as the motor shaft doesn't slide back and forth without it.

You may have trouble sourcing replacement bearings for that motor, especially since you're not in the US. Stanley changed bearing sizes in those grinders along the way, so it may or may not be an issue. For the style that is now obsolete, there is a close replacement, but you'll have to make a couple of spacers, since the replacements are not as wide as the original.

For the time-being, if the bearings are still good, I'd just put them back in.

I'd suggest leaving the nameplate in place and masking around it if you're going to repaint the grinder.


I'm also going to need some new rubber feet to replace the knackered ones you can see on the wiring photo above. If anyone knows where I can source these then please let me know.

Those feet are standard hardware store items in the US. Are they not something commonly used in the UK?

In any case, try to find ones made of relatively resilient rubber. The ones made of hard rubber or plastic tend to let the grinder "walk" across the workbench in use.
 
OP
P

paulmc

Member
Joined
May 27, 2014
Messages
7
Location
Durham, UK
I hope that explanation makes sense. On the other hand, sometimes it's better not to think about it. :lol:

It does indeed make sense - thanks.


That's three issues not two, ;) but no matter.

D'oh. I went back and added another issue to the list. If I could only afford to employ a proof reader then this sort of thing wouldn't happen.


Assuming you mean a clip for the side where you said one was missing and perhaps was never installed, you shouldn't need it as long as there is one on the other side, and as long as the motor shaft doesn't slide back and forth without it.

You may have trouble sourcing replacement bearings for that motor, especially since you're not in the US. Stanley changed bearing sizes in those grinders along the way, so it may or may not be an issue. For the style that is now obsolete, there is a close replacement, but you'll have to make a couple of spacers, since the replacements are not as wide as the original.

For the time-being, if the bearings are still good, I'd just put them back in.
Champion. I shall leave well alone then.


I'd suggest leaving the nameplate in place and masking around it if you're going to repaint the grinder.
I was leaning towards doing it that way - thanks.


Those feet are standard hardware store items in the US. Are they not something commonly used in the UK?

In any case, try to find ones made of relatively resilient rubber. The ones made of hard rubber or plastic tend to let the grinder "walk" across the workbench in use.

They may well be standard items - I've just never had a need to look for them. Point noted about the softness of the rubber.

Once again, many thanks for the comments.
 
OP
P

paulmc

Member
Joined
May 27, 2014
Messages
7
Location
Durham, UK
Progress is being made..

Nuts and bolts go from being gnarly and rusted to..erm.. gnarly and clean..
DSCF3827_zps1b8fc528.jpg


Casings have been blasted and painted....
DSCF3828_zps4452ab28.jpg


I've bought a new switch and power cable exit gland. Still having trouble finding the exact rubber feet I need but I'm sure they're out there somewhere.

After I've finished cleaning the remaining nuts and bolts then the re-assembly can begin.
 

beltdrive

Well-known member
Joined
Jan 17, 2015
Messages
111
Location
Smithfield, RI
I bought this Stanley 586 at a garage sale for 5 bucks. What an old war horse! Runs great! It came with no wheels and missing one guard, so I turned it into a wire brush grinder, with one softer brush and one more course...great for cleaning up parts, tools, etc. It was all dirty and cob-webby...I just cleaned it up a little...thought of refurbing it completely...but it looks so good in its antique natural state that for now I am just going to use it as it is. I did put new rubber feet on the bottom.
 

Attachments

  • IMG_1645.jpg
    IMG_1645.jpg
    151.4 KB · Views: 56
  • IMG_1646.jpg
    IMG_1646.jpg
    145.7 KB · Views: 52
  • IMG_1647.jpg
    IMG_1647.jpg
    149.9 KB · Views: 52
OP
P

paulmc

Member
Joined
May 27, 2014
Messages
7
Location
Durham, UK
Mine is still running fine. I did try to post a full write-up of the restoration process but it failed to submit and I hadn't Copied the text before it was lost.

Your grinder looks the same as mine (as it would/should) but my disk cowlings? are shaped to duct the the debris towards the rear of the unit.

It's good to see there are now at least two fot these units still working.
 
To avoid these ads, REGISTER NOW!
Top Bottom