xtremek
Well-known member
$400? But that being said, I'd still have to pass.
And Kev, 4 nests, or were there more?
And Kev, 4 nests, or were there more?

$400? But that being said, I'd still have to pass.

 1 by Dan Haas, on Flickr
 2 by Dan Haas, on Flickr
 3 by Dan Haas, on Flickr
 4 by Dan Haas, on Flickr
 5 by Dan Haas, on Flickr
 6 by Dan Haas, on Flickr
 7 by Dan Haas, on Flickr
 8 by Dan Haas, on Flickr
 9 by Dan Haas, on Flickr
 10 by Dan Haas, on Flickr
 11 by Dan Haas, on Flickr
 12 by Dan Haas, on Flickr
 13 by Dan Haas, on Flickr
DUDE!! That's pretty good job in my book. You move faster than I do.
Congrats! It looks goooood!
Every time I have wished for a spot welder, it would not fit where I want to use it anyway.
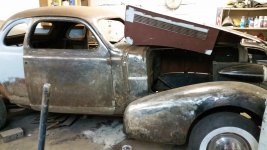
I eyeballed the car I was grinding on last winter in the garage for something to do this weekend, but heaved a great sigh and tore into my rusty old AWD that needs work before the snow gets too deep. I really had to push myself to do it, wife asked why I was grumpy Sunday morning, that was the reason....
I love thew look of that car it is going to be beautiful! Keep going!

Quite a few close ups of the interior and dash. Might be helpful:
https://madison.craigslist.org/cto/d/1938-buick-special-runs-and/6762833725.html
 20181201_143525 by Dan Haas, on Flickr
 20181209_111203 by Dan Haas, on Flickr
 20181209_113143 by Dan Haas, on Flickr
 20181209_112820 by Dan Haas, on Flickr
 20181209_121508 by Dan Haas, on Flickr
NIce work!!
Looks good.

I really hope you enjoy doing that kind of work, that fender is quite the marathon. I enjoy seeing it, as all I have been doing lately is DD repairs.
I will say the rear disk rebuild on the awd was worth it, the old rust bucket stops on a dime again.
 20181208_114325 by Dan Haas, on Flickr
 20181208_130413 by Dan Haas, on Flickr
 20181208_130831 by Dan Haas, on Flickr
Stooge I realize it's winter , but did it mean putting the Buick on ice .
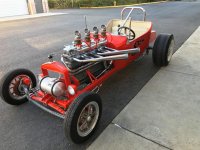
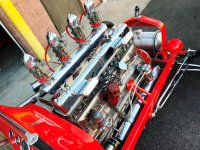
Those four little beauties look really nice standing there.
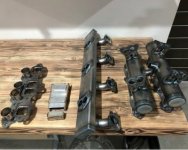
Carbs and intake look great. Any plans for some sort of balance tube to tie the intake together? Mike
not quite, just taking it slow! Started physical therapy in January for a sciatica issue that i had been ignoring all year and finally caught up with me
Luckily ive been starting to have more good days than bad lately and have been getting some stuff done, floor is "done", maybe a little more grinding/cleaning, cleaning the final surface rust off the inner roof, then seam sealer on the floor and can spray the whole interior, minus the dash which im thinking i might have hydrographic dipped along with the inner window garnishings in a wood look, like how it wouldve been from the factory...or just spray them all a solid color?
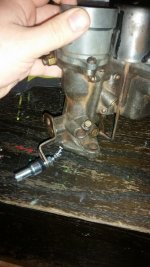
Also have been working on figuring how i'll tie together the throttle and choke linkages, fuel line/distribution. Parts are coming in, and more on order and some changes being made to the carb/intake set up.
BajaScout, thankyou for the info on the piriformis treatment, that is just what I have been seeking for years.
Russ.
Addiction became as much a problem as pain.
Pain destroyed my relationship with my previous wife and my two children and none of us has every been able to reconnect since.
Sorry, it was not my intention to kill your thread with my comments, but to express my thanks for any offerings that could make life easier pain wise.
Maybe also help others...
 )
) 20180805_123940 by Dan Haas, on Flickr
 20180729_163535 by Dan Haas, on Flickr
 20190216_090548 by Dan Haas, on Flickr
 20190216_103227 by Dan Haas, on Flickr
 20190216_133558 by Dan Haas, on Flickr
 20190216_140055 by Dan Haas, on Flickr
 20190216_140131 by Dan Haas, on Flickr
 20190126_152629 by Dan Haas, on Flickr
 20190126_152654 by Dan Haas, on Flickr
 20190215_202221 by Dan Haas, on Flickr
 20190106_132312 by Dan Haas, on Flickr
 20180704_202052 by Dan Haas, on Flickr
 20190106_132041 by Dan Haas, on Flickr
 20190106_132029 by Dan Haas, on Flickr
 20180804_195802 by Dan Haas, on Flickr
 Screenshot_2018-12-19-16-17-43 by Dan Haas, on Flickr
20181208_130413 by Dan Haas, on Flickr
Screenshot_2018-12-19-16-17-43 by Dan Haas, on Flickr
20181208_130413 by Dan Haas, on Flickr