xtremek
Well-known member
Hope you find the clutch fork soon. It'd be cool to see the driveline in the chassis.
Last edited:


Sometimes you're the hammer, .....
Remind me again why I like old cars?
 20200502_150237 by Dan Haas, on Flickr
 20200502_150226 by Dan Haas, on Flickr
 20200502_132335 by Dan Haas, on Flickr
 2020-05-05_07-31-16 by Dan Haas, on Flickr
 20200503_174041 by Dan Haas, on Flickr
 Screenshot_20200505-073857_Gallery by Dan Haas, on Flickr
 Screenshot_20200505-073917_Gallery by Dan Haas, on Flickr
 2020-05-05_07-03-56 by Dan Haas, on Flickr
 20200504_114955 by Dan Haas, on Flickr
 20200502_151638 by Dan Haas, on Flickr
 20200502_145102 by Dan Haas, on Flickr
 20200502_145249 by Dan Haas, on Flickr
If you had a brake, could you form a down lip on the back and an up lip on the front, long "Z" so to speak for rigidity and simplicity?
Loving the progress.
Progress on the truck, cool. I think I'll make similar progress on the F-150 tonight, get it up in the air so I can work on it tomorrow night.
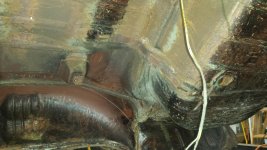
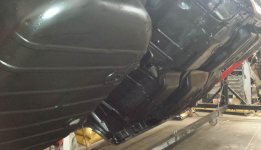
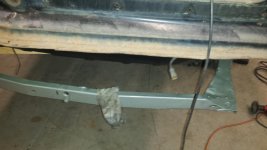
Wow, 1/8" gas tank straps. And they turned out beautifully. Factory ones are barely more than sheet metal these days.
You have definitely been the hammer. Welp, back to being a nail.
 ) and I forgot how thick it is. I wanted it a little on the thick side since its going to be bolting in and I didn't want to have to worry about it too much, but I definitely could have gone a little thinner. Better to be overkill though, especially for holding in a gas tank. ordered a bag of 3/8-16 weldnuts for the rear crossmember, i needed 2 and got 50, but for such a common size, they'll be good to have on hand, so i might try and get that done tonight, or atleast this weekend so i can say that atleast something is done. Planning on ordering the new rear engine mounts next week, theyre a little spendy, ($360ish) and I don't want to get into the habit of constantly throwing money at that car, just a little at a time so it hurts less
Are you going to put a remote battery connection so this doesn't become an issue again. Put a hook up like they do for wreckers using Anderson connectors. Pull one set of clamp ends off of a set jumper cables and put on the Anderson's. I'm going to do that to the F-150, the Ugly Beast (dump truck), and the Big Beast('52 COE).
 20150919_124746 by Dan Haas, on Flickr
 20150919_124740 by Dan Haas, on Flickr
 2020-05-07_12-49-25 by Dan Haas, on Flickr) i wish i could say i was getting alot done, but its alot of waiting on parts, putting some money aside for for some expensive parts and a few surprise expensive parts, ( like the surprise rear engine mounts that i thought i had but only had part of it, for $400!) and those are all holding up putting the rear suspension back together, (waiting on the specific 1937 bump stops to fit the axle bracket) and the motor mounts are holding up putting the engine in place, and setting up the fuel and brake lines, starting the exhaust and getting the body back on to finish sheet metal work and start bodywork.
  20200510_135601 by Dan Haas, on Flickr
 20200510_134310 by Dan Haas, on Flickr
 20200510_141317 by Dan Haas, on Flickr
 20200510_141323 by Dan Haas, on Flickr
 20200519_175330 by Dan Haas, on Flickr
 20200519_190744 by Dan Haas, on Flickr
 20200523_124729 by Dan Haas, on Flickr
 20200516_132827 by Dan Haas, on Flickr
 20200516_132847 by Dan Haas, on Flickr
 20200516_132855 by Dan Haas, on Flickr
 20200521_193450 by Dan Haas, on Flickr
 20200521_195130 by Dan Haas, on Flickr
 20200523_135944 by Dan Haas, on Flickr
 20200614_122535 by Dan Haas, on Flickr
 20200607_105237 by Dan Haas, on Flickr
 20200522_115809 by Dan Haas, on Flickr
 20200522_120744 by Dan Haas, on Flickr
 20200522_140625 by Dan Haas, on Flickr
 20200614_170958 by Dan Haas, on Flickr
 20200614_180011 by Dan Haas, on Flickr
 20200614_175814 by Dan Haas, on Flickr
 20200614_172247 by Dan Haas, on Flickr
 20200614_180000 by Dan Haas, on Flickr
 2020-06-15_07-46-07 by Dan Haas, on Flickr
 2020-06-15_07-46-49 by Dan Haas, on Flickr
 2020-06-15_07-41-31 by Dan Haas, on Flickr
 20200606_171822 by Dan Haas, on Flickr
 20200606_171835 by Dan Haas, on Flickr
 20200610_054622 by Dan Haas, on Flickr
 20200523_174852 by Dan Haas, on Flickr
")
 1 by Dan Haas, on Flickr
 3 by Dan Haas, on Flickr
 4 by Dan Haas, on Flickr
 5 by Dan Haas, on Flickr
 7 by Dan Haas, on Flickr
 8 by Dan Haas, on Flickr
 9 by Dan Haas, on Flickr
 10 by Dan Haas, on Flickr
 13 by Dan Haas, on Flickr
 14 by Dan Haas, on Flickr
 16 by Dan Haas, on Flickr
 17 by Dan Haas, on Flickr
 18 by Dan Haas, on Flickr
 15 by Dan Haas, on Flickr
Hmmm, why is my frame to engine ratio so different?
id guess it could be related to this comparison picture from the day i brought the engine home and its sitting next to a 327 sbc . Good progress on the chassis, sometimes just letting things become a shelf for other parts, really ***** the wind out of the sails motivation wise! "eugh, before i can even start doing something, i gotta clean all this **** off of it first!" 2020-08-03_08-16-02 by Dan Haas, on Flickr
 20200801_150650 by Dan Haas, on Flickr
 Screenshot_20200801-171351_Gallery by Dan Haas, on Flickr
 Screenshot_20200801-171335_Gallery by Dan Haas, on Flickr
 20200801_201243 by Dan Haas, on Flickr
 20200802_071806 by Dan Haas, on Flickr
 2020-08-03_08-10-36 by Dan Haas, on Flickr
Love the picture frame!
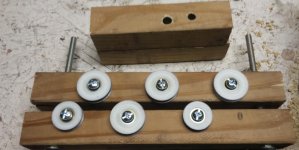
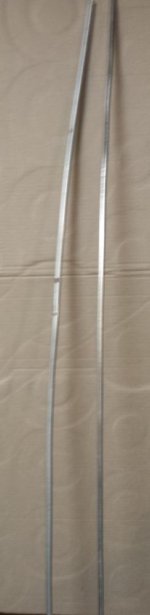
Finished making the tubing straightener and tried it out. The return line is great.
I knew the larger fuel line wouldn't turn out too well as the rollers were barely able to hold it. So I tried the hole in a wood block trick, still kinda meh.
The wavy parts going through the block get hot! I also about pulled a chest muscle pushing and yanking.
Straightening brake lines are going to be a breeze with this thing
I couldn't see welding either. New glasses without transition. Totally amazing difference
 ), finally decided to just try and make something that seemed like it would flow with minimal turbulence, (and look cool) and came up with this. a bunch of 1.5" tubing, a cut down megaphone made for a nice transition to a main tube, and a box of assorted bends to come up with something.
 1 by Dan Haas, on Flickr
 2 by Dan Haas, on Flickr
 3 by Dan Haas, on Flickr
 4 by Dan Haas, on Flickr
 5 by Dan Haas, on Flickr
 6 by Dan Haas, on Flickr
 7 by Dan Haas, on Flickr
 8 by Dan Haas, on Flickr
 9 by Dan Haas, on Flickr
 10 by Dan Haas, on Flickr
 20200828_142254 by Dan Haas, on Flickr
 20200828_193108 by Dan Haas, on Flickr
 20200118_120431 by Dan Haas, on Flickr
 20200118_171903 by Dan Haas, on Flickr
 20200821_112153 by Dan Haas, on Flickr
 20200821_110725 by Dan Haas, on Flickr
 20200413_192008 by Dan Haas, on Flickr
 20200821_113411 by Dan Haas, on Flickr
 20200821_160800 by Dan Haas, on Flickr
 20200828_141547 by Dan Haas, on Flickr
 20200828_142145 by Dan Haas, on Flickr
 20200827_191306 by Dan Haas, on Flickr
 20200815_160944 by Dan Haas, on Flickr
 20200908_203932 by Dan Haas, on Flickr
 20200908_204013 by Dan Haas, on Flickr
 20200908_203952 by Dan Haas, on Flickr
 20200908_195937 by Dan Haas, on Flickr
 20200908_200550 by Dan Haas, on Flickr
 20200908_203357 by Dan Haas, on Flickr
 20200908_204125 by Dan Haas, on Flickr
 20200906_103816 by Dan Haas, on Flickr
 20200823_153844 by Dan Haas, on Flickr
 20200823_153835 by Dan Haas, on Flickr
 20200906_135831 by Dan Haas, on Flickr
 20200913_104124 by Dan Haas, on Flickr
 20200913_115335 by Dan Haas, on Flickr
 20200913_134500 by Dan Haas, on Flickr
 20200913_161157 by Dan Haas, on Flickr
 20200913_160808 by Dan Haas, on Flickr