To avoid these ads, REGISTER NOW!

Surface Prep for repainting with rattlecan spray paint

Masako

Member
Joined
Nov 24, 2018
Messages
5
Location
Bay Area, California
Can't seem to find a good isolated thread on this. Sorry if this is already talked to death.
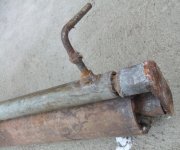
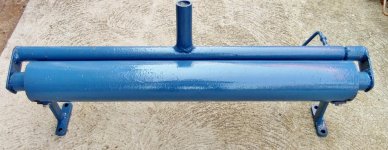
What am I doing wrong? I can peel off the paint with my fingernail on both metal surfaces.

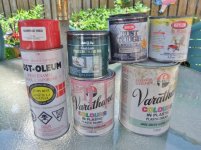
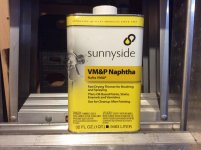
After wire wheeling everything, sanded with 400 grit. Degreased with Krud Kutter and wiped off with clean blue shop towel. Rustoleum Self Etch Primer on both, Rustoleum Gloss Protective Enamel for a red c clamp, Duplicolor Engine Enamel w Ceramic Ford Black on a combination square.

More sanding between coats? The paint peels straight off from the metal surface so the etching primer doesn't seem to be sticking very well either.

Do I need to spray a final clear coat? If so, what brand has been the best in your experience?

Just joined the forum so I can't post an image. Sorry......Looking forward to sharing images of my projects in the future!
 
To avoid these ads, REGISTER NOW!

Stuart in MN

Well-known member
Joined
Sep 8, 2005
Messages
23,075
Location
Minneapolis
There was some discussion recently about Rustoleum paint fails - I think the gist of it was you have to wait quite a while before applying top coats, but I don't recall the details. If someone else doesn't chime in with an answer, use the search feature in the bar at the top of the page to see if you can find that discussion.
 

lilredex

Well-known member
Joined
Apr 29, 2006
Messages
5,956
Location
Toronto
Usually when paint peels off of bare metal you can point to inadequate surface preparation. Try it again on something else and eliminate that wipe down and primer. Have never had a problem with Rustoleum finish paints.

If you start an album, we can see your pictures.

PS...Welcome to the forum.
 

FlaGman

Well-known member
Joined
Aug 4, 2018
Messages
430
Location
Western North Carolina
I would normally prep with a somewhat coarser sandpaper than 400 grit, more like 180 so the paint has more of a mechanical bite. I have always cleaned with a solvent like denatured alcohol, xylene or lacquer thinner rather than Krud Kutter, which I think is water based.
 

Kevin54

MEMBER EMERITUS
Joined
Jan 12, 2005
Messages
29,341
Location
Urbana, Ohio
Don't use Krud Kutter. Once everything is sanded, wipe down with some fast dry enamel thinner, tack off, prime, paint. Just make sure the metal is up to a comfortable 70+ degrees. Cold metal....you're screwed.
 

OccupantRJ

Well-known member
Joined
May 15, 2009
Messages
11,019
Location
Eastern North Carolina
I paint small items a LOT. Best I have found is to beadblast, blow it off with compressed air, and paint without primer. Barring this, I sand with 40 grit using an orbital sander on something like a cabinet, cutting to bare steel, wipe with naphtha, then prime and paint, scuffing the primer with purple Scotchbrite pad. A power wire brush removes paint, but burnishes the surface, reducing the bite. Try hand sanding with 100 grit next time, after the wire brush. In cool weather use a hair dryer to heat up small parts before painting.
 
Last edited:
OP
M

Masako

Member
Joined
Nov 24, 2018
Messages
5
Location
Bay Area, California
Right. Duh. I went and checked out another thread on posting pics.

Thanks for all of your helpful suggestions. It's been raining out the past 2 days which NEVER happens where I live. Of course it rains right when I'm ready to paint....

I'll try out the suggested method other than Krud Kutter to prep the surface. Grittier sandpaper, denatured alcohol (etc), and don't paint on a cold surface. Heating it up a little is such a good idea.
 

Attachments

  • flakingpaint.jpg
    flakingpaint.jpg
    117.7 KB · Views: 86

CJM8515

Well-known member
Joined
Mar 8, 2014
Messages
9,292
Location
NJ
Id go to lowes and buy thier spraypaint. Rustoleum only works if the metal is 70f or better and you wait a LONG time for it to dry.
 

Farmer J.

Well-known member
Joined
Sep 18, 2016
Messages
1,995
Location
UK, Cornwall/Hertfordshire.
After the surface preparation and degreasing it's good to warm the surface to be painted. As the thinner used to degrease the surface evaporates it cools the surface, attracting moisture condensation. (everything around here gets moisture condensing on it it seems..!)
Some good advice on this web site, and the paint this guy sells is way better than rustoleom too.
https://paintman.co.uk/methods-of-use/surface-preparation-techniques/
 

tym

Well-known member
Joined
Mar 5, 2016
Messages
2,430
Location
MA
An old-timer introduced me to Prep-All for degreasing surfaces prior to painting. Have to say it works pretty darn well. Have used it to prep metal for painting with rattle can, POR-15, you name it. Haven't had a failure yet.
 
OP
M

Masako

Member
Joined
Nov 24, 2018
Messages
5
Location
Bay Area, California
An old-timer introduced me to Prep-All for degreasing surfaces prior to painting. Have to say it works pretty darn well. Have used it to prep metal for painting with rattle can, POR-15, you name it. Haven't had a failure yet.


I looked into Prep-All and sounds like a great product. Unfortunately, I can’t get it being in California. I’ll try and use acetone to clean the metal surfaces. I’ve also learned that rattle can paint can take weeks to cure!
 

Wanna Ride

Well-known member
Joined
Jul 28, 2010
Messages
2,790
I know a lot of guys are going to cringe when I say this, but I’ve had the best results with the cheapest rattle cans. I buy the generic stuff from WalMart (in the blue cans), and it works really well. Whenever I tried using name brand rattle cans, I always had adhesion or finish issues.

Keep in mind, I’m not rebuilding antiques, just putting paint on various things I’ve built in the shop, for my use. I don’t know what that stuff is, but it works pretty darn good. When I’m ready to paint, I wipe it down with alcohol, shoot some primer so I don’t have any bare metal, and spray on a few light coats of color as needed for consistent coverage. Of course, I knock off any surface rust and scale first. End results are actually pretty good, but keep in mind, these aren’t car fenders either.
 
To avoid these ads, REGISTER NOW!

OccupantRJ

Well-known member
Joined
May 15, 2009
Messages
11,019
Location
Eastern North Carolina
I know a lot of guys are going to cringe when I say this, but I’ve had the best results with the cheapest rattle cans. I buy the generic stuff from WalMart (in the blue cans), and it works really well. Whenever I tried using name brand rattle cans, I always had adhesion or finish issues.

Keep in mind, I’m not rebuilding antiques, just putting paint on various things I’ve built in the shop, for my use. I don’t know what that stuff is, but it works pretty darn good. When I’m ready to paint, I wipe it down with alcohol, shoot some primer so I don’t have any bare metal, and spray on a few light coats of color as needed for consistent coverage. Of course, I knock off any surface rust and scale first. End results are actually pretty good, but keep in mind, these aren’t car fenders either.

I also started out using Roses 99 cent paint and it did very well. I recently bought some of the paint you describe and it was like painting with a diluted product. I had tried some before but it seemed better than recently. Not knocking what works for you, just my observation. My son had the same experience.

In spray bombs (rattle can before the internet) I get good painting using both Krylon and Rustoleum. I have no issues with either, and don’t see why other people claim they do. After painting I hang small items outside in the sun to dry even in cooler weather. I guess the ultraviolet rays along with the heat speeds things up.
 

Farmer J.

Well-known member
Joined
Sep 18, 2016
Messages
1,995
Location
UK, Cornwall/Hertfordshire.
Yea, if you find something that works well for you, go with it..
Last time I bought some rustoleum it was like painting with tinted laquer, useless waste of time, what a mess! Yes, I did stir it well before using it. Had to strip it off and do it over again..
When I mentioned this to 'Paintman' he had a laugh and said "Well, some of those DIY paints just don't have much pigment in the mix".
Apart from this, I try and be mindful of the advice any professional always seems to give about painting anything, and that is that the more effort you put in to the preparation the better the potential result!
 

OccupantRJ

Well-known member
Joined
May 15, 2009
Messages
11,019
Location
Eastern North Carolina
This was painted with Rustoleum rattle can last week. Sanded to bare metal, wiped with a rag, primer, then scuff with scotch brite, and paint. The doors are wood, so have a few dings in them. Ok for a shop microwave stand. Used one can of paint that had the 25% extra. It was exactly the right amount needed.
 

Attachments

  • 547953B6-88E4-4F9D-A619-0751B0AEC42A.jpg
    547953B6-88E4-4F9D-A619-0751B0AEC42A.jpg
    104.7 KB · Views: 35

lilredex

Well-known member
Joined
Apr 29, 2006
Messages
5,956
Location
Toronto
Another project done with Sunrise Red. Was sanded lightly to feather edge the wear and then sprayed.

Have found some of the best rattle can paint comes from Princess Auto, lots of body to it.
 

Attachments

  • KRA 109  1A.jpg
    KRA 109 1A.jpg
    126.1 KB · Views: 33
  • KRA 109  1C.jpg
    KRA 109 1C.jpg
    137.2 KB · Views: 34
  • Paint.jpg
    Paint.jpg
    134.3 KB · Views: 32

glend123

Well-known member
Joined
Mar 3, 2014
Messages
279
Location
SE Wisconsin
I like to sand with 120 grit or so, clean with alcohol, sandblast, clean with alcohol again, very light coat of primer, light coats of top coat. must be dry and warm.
 
OP
M

Masako

Member
Joined
Nov 24, 2018
Messages
5
Location
Bay Area, California
Wiping with alcohol, denatured alcohol, acetone for metal surface prep? What does everyone prefer? Great pics! Please post more of your rattle can results and take some yummy close ups.
 

Farmer J.

Well-known member
Joined
Sep 18, 2016
Messages
1,995
Location
UK, Cornwall/Hertfordshire.
This was painted with Rustoleum rattle can last week. Sanded to bare metal, wiped with a rag, primer, then scuff with scotch brite, and paint. The doors are wood, so have a few dings in them. Ok for a shop microwave stand. Used one can of paint that had the 25% extra. It was exactly the right amount needed.

Wow, that looks nice. The Rustoleum worked well for you!
 

pwgfalcon

Member
Joined
Dec 4, 2012
Messages
6
I am located in the Northbay so same weather as OP.

I always use ACETONE just prior to paint. I keep the rattle can at least overnight in the house to keep it warm and shake it like I've got nothing else to do. In cold weather, the work warms up in the house as well.

I have had good results with Rust-Oleum and Krylon but I am particularly fond of PlastiKote by Valspar. The T-10 Machinery Gray is the best match to the blue gray found on older Delta machines. I generally don't prime.
 

Maui

Well-known member
Joined
Sep 16, 2012
Messages
2,863
Location
Upstate NY
This is my first official vise restoration, and it was painted with Rustoleum rattle can paint:

https://www.garagejournal.com/forum/showthread.php?t=392284&highlight=Maui+5163

Just before painting I wiped the surface down with Naptha. It evaporates quickly and preps the surface for accepting paint. I’ve since painted about a dozen vises and many other pieces of equipment using the same exact procedure and have never experienced an adhesion problem. And I have applied Rustoleum paint at temperatures as low as 44F. To my amazement, it worked well even at that temperature.

Maui
 

Attachments

  • 4D16B135-BD63-4743-82CB-033B665A376F.jpg
    4D16B135-BD63-4743-82CB-033B665A376F.jpg
    147.9 KB · Views: 20

lilredex

Well-known member
Joined
Apr 29, 2006
Messages
5,956
Location
Toronto
A couple more projects.

A sheet metal roller. I got tired of looking at that rusty hulk, so one day I cleaned it up a bit and painted it with Tremclad dark blue (same family as Rust- oleum), much the same colour you find on Record vises. Minimal preparation was done, just a quick once over with #80 sandpaper then paint with a brush.

https://www.tscstores.com/TREMCLAD-RUST-PAINT-DARK-BLUE-378L-P6263.aspx

The other, a dust pan. There is some peeling on the handle, probably because it is galvanized. The rest, on the body is due to wear and tear.

The sheet metal roller is for making uniform curves on projects, rather than "kink bending" on a brake as the method I so often see used. Even Mr. Pete did that on a lathe belt guard he was making.
 

Attachments

  • Sheet Metal Roller 1B.jpg
    Sheet Metal Roller 1B.jpg
    148.1 KB · Views: 13
  • Sheet Metal Roller 1A.jpg
    Sheet Metal Roller 1A.jpg
    146.4 KB · Views: 14
  • Sheet Metal Roller 2A.jpg
    Sheet Metal Roller 2A.jpg
    147.8 KB · Views: 13
  • Sheet Metal Roller 2B.jpg
    Sheet Metal Roller 2B.jpg
    145.5 KB · Views: 14
  • Dust Pan and Broom 1B.jpg
    Dust Pan and Broom 1B.jpg
    89.2 KB · Views: 13

OccupantRJ

Well-known member
Joined
May 15, 2009
Messages
11,019
Location
Eastern North Carolina
As far as surface prep, another couple of tools that I use a lot are carbide insert paint scrapers. I cabinet blast any small objects I can, but on larger pieces like castings I often scrape down to the metal before any other prep.

I have a large portable blasting setup, but sometimes I am not in the mood to use that with all that it involves. Neighbors, dust, wet weather, etc sometimes cause me to just break out the scrapers. Some assemblies also take a lot of work to keep grit out of bearings and other moving parts, so the scrapers get used. The scrapers are made by Warner. The round one is not as easy to find. It is model 10015 on Amazon. The triangle scraper is carried by Lowe’s, Home Depot, etc.

I often scrape on a project about 30 minutes at a time, as I always have several projects in progress. This keeps it from being so tiring or boring, but it gets it done. Note several disassembled Bridgeport mills spread out in the shop, for example.

Here is a Rotex turret punch that I am currently working on that punches 1/8” through 2” diameter holes in sheet metal. The rotating head parts will get cleaned and prepped with power wire brush or scotchbrite pads. After scraping is complete on the casting it will get a combination of power wire brushing and power sanding before rattle can primer. The finish coat can be done using either rattle can or gun depending on the weather at the time.
 

Attachments

  • BD514745-BEC0-40D7-8E03-32DB047C22A9.jpg
    BD514745-BEC0-40D7-8E03-32DB047C22A9.jpg
    144.1 KB · Views: 20
  • 463DCB6B-9ED2-42DC-8AB1-2377F3B7E2F0.jpg
    463DCB6B-9ED2-42DC-8AB1-2377F3B7E2F0.jpg
    149.8 KB · Views: 20
  • 82711889-B5C5-47EC-A1B9-FC0318CD0E35.jpeg
    82711889-B5C5-47EC-A1B9-FC0318CD0E35.jpeg
    35.2 KB · Views: 13
  • 02721189-87A0-4DB1-89A0-8AD8F3E97B62.jpeg
    02721189-87A0-4DB1-89A0-8AD8F3E97B62.jpeg
    25 KB · Views: 15
Last edited:
To avoid these ads, REGISTER NOW!
Top Bottom