To avoid these ads, REGISTER NOW!

t&g ceiling - **** joints

billconner

Well-known member
Joined
Jul 20, 2021
Messages
6,971
Location
Thousand Islands NYS
Should I bevel ends at but joints or cut square? I'll have quite a few joints.

If I square cut, what is simplest thing I might but on top of joint? Interested in appearance but more interested in sealing against bees and wasps, which I know were previously a problem. Lots of paper wasp nests and mud dauber nests above previous vinyl ceiling, to which someone had applied a lot of silicone caulk. Of course bevel cut doesn't stop insects.
 
To avoid these ads, REGISTER NOW!

WisJim

Well-known member
Joined
Dec 20, 2010
Messages
2,296
Location
Menomonie, WI
Where is this ceiling that you are concerned with insect nests? How wide of t&g? When I did a ceiling with t&g I got prefinished car siding at Menards and it had t&g ends which was great. Would a poly vapor barrier work behind the boards to keep out insects?
 

PCustoms

Well-known member
Joined
Jul 23, 2011
Messages
23,355
Location
VT
I did a 45 bevel and I believe glue (definitely latex caulk) on the interior.
 

finn

Well-known member
Joined
Mar 27, 2005
Messages
16,339
Location
The UP, God's country
My Great Room has a tongue and groove white cedar ceiling with **** joints. We put it up about thirty years ago, with a plastic vapor barrier over unlaced fiberglass batts.

No bugs.

My cousin did his, but he used four edge t&g (edge matched is the term that comes to mind). Probable seals better, and looks a little better, but I imagine he had a lot more waste.
 
OP
B

billconner

Well-known member
Joined
Jul 20, 2021
Messages
6,971
Location
Thousand Islands NYS
This is an open porch ceiling, thus bees and wasps. It's 1x6 edge and center bead t&g, but not end matched. (I did an interior ceiling with a prefinished t&g, and it was end matched. but this is less than a third the price per foot, albeit I had to finish it.) Glue or caulk would seem to cause more problems with clear - spar varnish - finish.

Decided to square cut ends. Have to on mitered sections for wrap around portion. Thinking I might put the Zip tape on top of joints for bugs. I think unless I could keep poly tight agInst t&g, insects would still get into gaps between poly and pine.

Thank you for the thoughts!
 

micromind

Well-known member
Joined
Sep 24, 2023
Messages
3,088
Location
Fernley, Nevada, about 30 miles east of Reno.
I've put up quite a bit of T&G, never beveled the joints.

If it's indoors, it's a good idea to acclimate it to the room for a few days before putting it up. Just stack it somewhere in the room it is to the installed in and the **** joints will stay tight.

Also, I don't put the **** joints on joists, just random wherever they fall.
 
OP
B

billconner

Well-known member
Joined
Jul 20, 2021
Messages
6,971
Location
Thousand Islands NYS
Related, it's a wrap around porch, so ceiling changes direction. The deck was easy because it's 5/4 x 6 that's spaced, so you can continually adjust to keep them aligned.

I had hoped to do one side complete before doing next. Figured I'd screw a temporary "stop" board to but the mitered ends against and keep them aligned.

Just looking for experience.
 

PCustoms

Well-known member
Joined
Jul 23, 2011
Messages
23,355
Location
VT
Boards don't shrink in length, they move across the width
I used to believe that too


*Earlier today you mentioned autocorrect. I typed that exactly as you see it, read it and when I posted it changed to "I used to help that too". WTF
 

mike93lx

ALLIANCE MEMBER
Joined
Dec 9, 2013
Messages
37,847
Location
Richmond, VA
I used to believe that too


*Earlier today you mentioned autocorrect. I typed that exactly as you see it, read it and when I posted it changed to "I used to help that too". WTF
I still believe it.

At least not on wood that would be used for an application like this
 

PCustoms

Well-known member
Joined
Jul 23, 2011
Messages
23,355
Location
VT
Wood changes very little in length - 0.1% - but that's extreme.

Think whatever you want.

I'll take a pic of my deck boards tomorrow, I guarantee there was no gap when I screwed them down last year. This spring, 1/8" gaps.


My boards are all 12' so practically, less than an 1/8", probably not 1/16".
Is that acceptable to you? Then OK
 

PCustoms

Well-known member
Joined
Jul 23, 2011
Messages
23,355
Location
VT
the ends are aligned by the T& G already in the board. the biscuit will have no bearing on that/ not saying it's a bad idea, but it's a lot of work that won't gain anything in my opinion
It will prevent any cupping between the two boards and gives additional glue area.

Should only take seconds on the jointer is setup.
 

no704

Well-known member
Joined
Apr 27, 2016
Messages
5,229
Just spitballing here. No Experience at all. But I would try hot glue. Stays playable and should provide a good seal.
 

Hank11

Well-known member
Joined
Aug 19, 2019
Messages
1,158
Location
Tennessee
I wonder if there’s not a router bit that would cut a joint like a tongue and groove on the ends of your boards? Like hardwood flooring. Even better than a biscuit. Of course sets like this are available, but I wonder if there’s not one that would let you use one bit to make some sort of a closed joint.
 

Boostingaz

Well-known member
Joined
May 21, 2018
Messages
3,699
Location
Indiana
I wonder if there’s not a router bit that would cut a joint like a tongue and groove on the ends of your boards? Like hardwood flooring. Even better than a biscuit. Of course sets like this are available, but I wonder if there’s not one that would let you use one bit to make some sort of a closed joint.

They sell premade t&g boards like that.
 
To avoid these ads, REGISTER NOW!

MushCreek

Well-known member
Joined
Jan 14, 2015
Messages
9,814
Location
Upstate South Carolina
I did **** joints on the ceiling of our open porch. No gaps big enough for a bug to get through, unless it's a really tiny bug. An open deck is a much harsher environment because of the rain, snow, and sun. The ceiling shouldn't be exposed to all that. BTW- I pre-finished my boards before I put them up. Staining and varnishing overhead is a pain. I used a very light stain to bring out the grain, and did a coat of satin UV resistant polyurethane. Pine will darken considerably over time.
 
OP
B

billconner

Well-known member
Joined
Jul 20, 2021
Messages
6,971
Location
Thousand Islands NYS
way overthinking in this thread. I doubt 1% of installs has more than a **** joint on board ends. Well seasoned and acclimatized wood won't shrink or expand much in length. there's lots more places for little bugs to hide besides ends of T&G ceilings :)
it's not the ends, that's just a passage, building nests in the porch "attic".
 
OP
B

billconner

Well-known member
Joined
Jul 20, 2021
Messages
6,971
Location
Thousand Islands NYS
Think whatever you want.

I'll take a pic of my deck boards tomorrow, I guarantee there was no gap when I screwed them down last year. This spring, 1/8" gaps.


Is that acceptable to you? Then OK
I would expect a deck board - exposed to rain and sun and snow - to expand and contract the max. The 0.1% was based on 22% to under 10% moisture content iirc. And 1/8" is in that ball park for a 12' board. I don't expect my spare varnished ceiling to ever get near 22%, probably staying under 10 to 12%. It's also never as illuminated as a deck.
 
OP
B

billconner

Well-known member
Joined
Jul 20, 2021
Messages
6,971
Location
Thousand Islands NYS
BTW- I pre-finished my boards before I put them up. Staining and varnishing overhead is a pain. I used a very light stain to bring out the grain, and did a coat of satin UV resistant polyurethane.
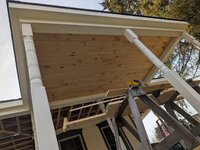
Me too - spare varnish, no stain. 1coat on top, 2 with sanding on bottom.
 

Attachments

  • PXL_20251012_135112189_copy_1020x768.jpg
    PXL_20251012_135112189_copy_1020x768.jpg
    308.9 KB · Views: 68

Boostingaz

Well-known member
Joined
May 21, 2018
Messages
3,699
Location
Indiana
Me too - spare varnish, no stain. 1coat on top, 2 with sanding on bottom.

Similar enough product. Looks like you got the beadboard groove rather than the V groove. But this is in my basement. Random **** joints, no special or extra treatment, just **** joints.

2bc532da-55d4-4052-b384-709002de0bf6-1_all_13100.jpg
2bc532da-55d4-4052-b384-709002de0bf6-1_all_13102.jpg
 

Boostingaz

Well-known member
Joined
May 21, 2018
Messages
3,699
Location
Indiana
No suggestions or tips for the mitered section?

My suggestion if possible would be just don't do it. I kept the same direction throughout the whole ceiling that way I was able to keep all the t&g locked together nicely and didn't have any big seams to deal with.

2bc532da-55d4-4052-b384-709002de0bf6-1_all_14129.jpg
2bc532da-55d4-4052-b384-709002de0bf6-1_all_14128.jpg
2bc532da-55d4-4052-b384-709002de0bf6-1_all_13979.jpg
 

Stuart in MN

Well-known member
Joined
Sep 8, 2005
Messages
23,156
Location
Minneapolis
My personal experience with putting up T&G on my back porch ceiling is gaps between **** ends are minimal, over the last 35 or 40 years it's been up there. The biggest challenge was getting a perfectly square cut on the **** end, even with a decent miter saw you have to be careful to get the board lined up right.
 

Codyboy

Well-known member
Joined
Jan 31, 2019
Messages
1,700
Location
S.E. TEXAS
My suggestion if possible would be just don't do it. I kept the same direction throughout the whole ceiling that way I was able to keep all the t&g locked together nicely and didn't have any big seams to deal with.

2bc532da-55d4-4052-b384-709002de0bf6-1_all_14129.jpg
2bc532da-55d4-4052-b384-709002de0bf6-1_all_14128.jpg
2bc532da-55d4-4052-b384-709002de0bf6-1_all_13979.jpg
Yes , no miters to change direction.
If the OP did want to change direction then **** joint it like you would for a wood floor.
 
OP
B

billconner

Well-known member
Joined
Jul 20, 2021
Messages
6,971
Location
Thousand Islands NYS
I understand wanting to avoid the mitre by design, but feel it would look wrong based on existing floor. You can see floor and ceiling framing directly above. Both "legs" of porch extend about 11' along side of house. I guess worst case is a "batten" on the joint. Baddy enough I have a canless wafer light planned to be on the mitre.

Without a better method, I'll tack a board on one side, cut ends at 45 after tuning mitre say, and **** ends to board. I thought about hanging them long and then a fence and saw cut but seems more problems.
 

Attachments

  • PXL_20251016_135205401_copy_1020x768.jpg
    PXL_20251016_135205401_copy_1020x768.jpg
    274.5 KB · Views: 25
  • PXL_20251016_135200108_copy_1020x768.jpg
    PXL_20251016_135200108_copy_1020x768.jpg
    240.2 KB · Views: 55

BobnCO

Well-known member
Joined
Apr 2, 2023
Messages
211
Splice joint / tapered ends landing on framing is the professional method (usually glued but not always). **** joints will always look like your hack nephew or brother-in-law did it to a carpenter! YMMV
 
OP
B

billconner

Well-known member
Joined
Jul 20, 2021
Messages
6,971
Location
Thousand Islands NYS
Splice joint / tapered ends landing on framing is the professional method (usually glued but not always). **** joints will always look like your hack nephew or brother-in-law did it to a carpenter! YMMV
I won't disagree with the splice, but a lot of sources specifically say joints not on joists. They want them to float. The end matched I put in a room, the manufacturer was very clear not to joint on joists.

I look out the window at what I've installed for far and can't see **** joints. If I stand under it and look up I can find them. Like a strip wood floor, there are joints.

How would a professional make the mitre joints look their best?
 

Stuart in MN

Well-known member
Joined
Sep 8, 2005
Messages
23,156
Location
Minneapolis
I understand wanting to avoid the mitre by design, but feel it would look wrong based on existing floor. You can see floor and ceiling framing directly above. Both "legs" of porch extend about 11' along side of house. I guess worst case is a "batten" on the joint. Baddy enough I have a canless wafer light planned to be on the mitre.

Without a better method, I'll tack a board on one side, cut ends at 45 after tuning mitre say, and **** ends to board. I thought about hanging them long and then a fence and saw cut but seems more problems.
On porch ceilings that wrap around the corner of the house, I've seen it done where the boards all have square cut ends, and they're 'woven' together. The first row has one board butted up against the side of the other board, then the next row has the two boards butted together the opposite way, and so on. It's a little hard to describe, if you sketch it out on paper it may make more sense.

It's kind of like a herringbone pattern, I guess.
 
Last edited:
OP
B

billconner

Well-known member
Joined
Jul 20, 2021
Messages
6,971
Location
Thousand Islands NYS
I understand and believe that's exactly what I suggested earlier in this thread or maybe another. I'm going to look at it further, again, and see what's available to end match a few ends. Chamfer of course also. I'll look for router bits today.
 
To avoid these ads, REGISTER NOW!
Top Bottom