To avoid these ads, REGISTER NOW!

Texas 24 x 33 3-car makeover

BigBronco

Active member
Joined
Aug 17, 2013
Messages
44
Location
Houston, TX
Been reading GJ for a long time now. Did a previous small makeover but this is a little more intricate. I have a few photos tracking the progress I have had over the past week.

Last year, my wife and I moved into a new home. The previous car had a slight oversized 2 car that we had remodeled. Here is a little before and after of the first one:

6.jpg


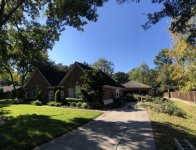
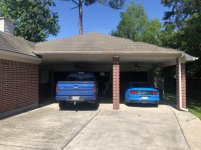
The new house, has a little more property (little more than half an acre) and came with a 3-car garage with a car cover on the front.

01.jpg


One thing as this remodel was going to get underway was removal of the 3x large pines I have at the house. One 100+ ft pine is DIRECTLY behind the garage. The one near the front of the driveway is also destroying the concrete for the roots.

Better shot of the old truck and wife's car under the port de coche

1.jpg


Over time, I would like to extend further into the backyard as I can stretch the structure another 30' or so without any compromise to the yard.

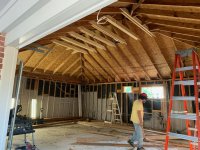
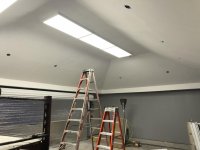
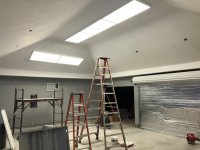
So the goals with Rev. 1 of the build are as follows.

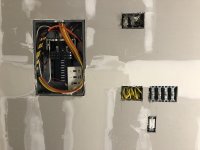
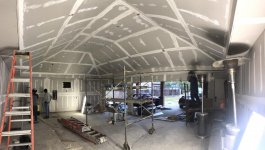
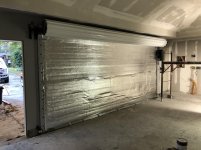
1. Insulate and get some climate control
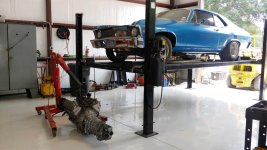
2. Get enough room to add a storage lift and 2-post
3. Party? :beer:
 

Attachments

  • 6.jpg
    6.jpg
    95.3 KB · Views: 141
  • 01.jpg
    01.jpg
    155.2 KB · Views: 121
  • 1.jpg
    1.jpg
    151.2 KB · Views: 119
Last edited:
To avoid these ads, REGISTER NOW!

Moosefire

Well-known member
Joined
Oct 26, 2018
Messages
754
Location
Detroit
Can you enclose the car cover area to enlarge the garage space that way?

Sent from my SM-N960U using Tapatalk
 
OP
B

BigBronco

Active member
Joined
Aug 17, 2013
Messages
44
Location
Houston, TX
Can you enclose the car cover area to enlarge the garage space that way?

Sent from my SM-N960U using Tapatalk

We talked about that but honestly, I have enjoyed having that car cover WAY MORE than I ever thought I would. Plus it adds as the breezeway to my backyard and I do not want to stuff that up more. I have probably 50 or so feet behind my garage directly so if I need to move back, I can do that later.

In all honesty, I bet I am building a house 10 years from now and hoping these new additions allow me to reach that time point with ease.
 
OP
B

BigBronco

Active member
Joined
Aug 17, 2013
Messages
44
Location
Houston, TX
As for the current plan, this is what I had drawn up in my head:

First off, here is the base layout of the original garage. The original owners had a couple things different from the original drawing, but this is pretty close.

2.jpg


I did some checks (I am an engineer by trade) and worked some ideas out with my friend (licensed architect) to confirm how I can remove the joists to improve ceiling height. I worked with a family friend who constructs custom homes and worked a plan to remove the joists and "divider" wall in the garage. After getting the plan together, I made a model of what I would like the garage to look like. Have my paint choice and model below that I created.

8.jpg


7.jpg


Obviously, I like blue.... but the grey is a little darker than the color swatch shows.

In regards to the steel cabinets, I am not sure if I am running NewAge or Saber or doing a set of toolboxes with a row of cabinets above, but it will look something of the sort.

For decor, I have some stuff I have been working on. My father and grandfather are big into cars. When my grandfather passed, I ended up getting all of his Hot Rod and Motor Trend Magazines from 1954 - 1980. It has been fun finding all the old ads and articles. My wife and I may salvage some out of the few magazines in real rough shape and frame the ads for the garage. A small sample of what I am working with below:

9.jpg


10.jpg


11.jpg
 

Attachments

  • 11.jpg
    11.jpg
    143.9 KB · Views: 55
  • 10.jpg
    10.jpg
    156 KB · Views: 58
  • 9.jpg
    9.jpg
    159.9 KB · Views: 60
  • 7.jpg
    7.jpg
    98.5 KB · Views: 82
  • 8.jpg
    8.jpg
    45.7 KB · Views: 60
  • 2.jpg
    2.jpg
    115.4 KB · Views: 66
Last edited:
OP
B

BigBronco

Active member
Joined
Aug 17, 2013
Messages
44
Location
Houston, TX
The work begins.... unloading the garage.

So with the work starting to shape up, I had a few big things to get going with the demo. I have a ton of old cabinets, a dividing wall between the single and double bay, and a **** show of electrical wires. Naturally, the panel is on the furthest wall away from the house, so all of the home run wires just run right across the top of the joists and into the attic space of the breezeway into the house.

Here are a couple interior shots of the garage prior:

3.jpg


After I had taken this photo, I was preparing my Nova for it's LS + T-56 swap. I am fortunate some good friends of mine have a nice 50' x 50' shop in their backyard and they are literally 1 mile from my doorstep. I moved my Nova to their place and have been working on it after work and on weekends. Fire up is coming soon :D.

12.jpg


13.jpg


My other issue is that I am mental and picked up a shell of a 1969 sportsroof Mustang. It is a legit Mach 1, I have the vin, marti report, etc if anyone has interest to see it. Anyways, that is now in the way and sitting under my patio cover area next to my wifes 1968 Firebird.

16.jpg


In the evening, I got to work with my wife and we demoed all the cabinets and removed all of the equipment out of the garage.

4.jpg
 

Attachments

  • 4.jpg
    4.jpg
    147.6 KB · Views: 74
  • 16.jpg
    16.jpg
    148.6 KB · Views: 79
  • 13.jpg
    13.jpg
    156.2 KB · Views: 74
  • 12.jpg
    12.jpg
    150.8 KB · Views: 86
  • 3.jpg
    3.jpg
    149.6 KB · Views: 89
Last edited:
OP
B

BigBronco

Active member
Joined
Aug 17, 2013
Messages
44
Location
Houston, TX
Construction Starts:

My father helps run a commercial/residential electric company. He has worked with all kinds of teams for small and large build outs. For me, he has good connections on craftsmen that can help me get this job done.

I must say, the guys move FAST. I was in the garage drilling holes and preparing for all of the electrical to be relocated. We pulled all the runs from the box, added a second panel and moved all electrical to the front of the garage where the port de corche is or around the back of the garage. We had some challenges, as I have a lot of pool equipment and other items. It results in me having a lot of switches in my garage, but I don't mind.

With electrical out of the way, the framers started their work adding structural support and wind blocks to the rafters.

17.jpg


Soon, insulation started going up and preparations for rock being installed were underway.

19.jpg


I have done my fair share of installing sheetrock and I will tell you, I cannot tape and float for the life of me. The pros that do it day in and day out are always worth the money for speed, quality and the final look. It has been cold in Texas lately and I had no garage doors so the crew brought some propane heaters to help with getting the mud to dry.

21.jpg


Here is a look at the wiring of the panels. Not completed but getting there:

20.jpg


23.jpg


As you can see, I have a large 240 LG window unit. Not my preference but was given to me by my Dad as he had one laying around. It is an 18,000 BTU unit for cooling and heat. It should do the job fine, but I have no issues covering it up later and changing to a mini-split if it does not perform like I would want it to. Will never complain with FREE though! :)

During the time that was happening in the garage, I had my three pine trees removed. Looking forward to not having a TON of pine needles everywhere or the risk of the tree behind the garage crashing through house...

18.jpg
 

Attachments

  • 23.jpg
    23.jpg
    104.9 KB · Views: 71
  • 20.jpg
    20.jpg
    95.7 KB · Views: 76
  • 21.jpg
    21.jpg
    146.4 KB · Views: 87
  • 19.jpg
    19.jpg
    78.9 KB · Views: 80
  • 17.jpg
    17.jpg
    156.7 KB · Views: 90
  • 18.jpg
    18.jpg
    149.2 KB · Views: 78
Last edited:
OP
B

BigBronco

Active member
Joined
Aug 17, 2013
Messages
44
Location
Houston, TX
Where we are on the journey as of today:

Currently, the mud/float is drying. I am patiently waiting to get a little more time to dry before throwing the paint on the walls. I tested the gray on the wall where the garage doors will be hung and turned out pretty good.

24.jpg


:bowdown:

Yesterday, the roll-up garage doors were brought to be installed but one was manufactured too thin, so another door is being ordered and will be delivered next week.

With that being said, they turned out awesome. My door sizes are 16x7 and 9x7. I only plan on the 16' door being powered as the single-car slot is more for storage and whatnot. That will be easy to roll up manually when I need to pull a car out from that side.

25.jpg


26.jpg


The liftmaster is very quiet. There is a little bit of noise in the background bt you will get the point. Had my wife do the honors of opening the door for the first time to check it's operation :lol_hitti


Last night, I was able to get all of the devices installed. 220 service for the air compressor, the AC unit, check the drops for the two lifts. Also installed all of the switches and plugs.

I also got all of my LED panels. These bad boys are going to be BRIGHT. I have the ceiling wired up on three switches as LED's don't play too well with dimmers.

One switch is a horseshoe that will light three walls up. The second switch is the ceiling directly at the top/center of the garage. The third switch will be the two lights for the single-car bay in the garage.

22.jpg


For painting and testing purposes, only one LED setup was installed in the garage. Needless to say, I may need sunglasses in here when it is all said and done! :shocking: :pimpflash

29.jpg
 

Attachments

  • 24.jpg
    24.jpg
    139.6 KB · Views: 81
  • 25.jpg
    25.jpg
    150.9 KB · Views: 78
  • 26.jpg
    26.jpg
    149.5 KB · Views: 77
  • 29.jpg
    29.jpg
    152.3 KB · Views: 74
  • 22.jpg
    22.jpg
    127.2 KB · Views: 76
Last edited:
OP
B

BigBronco

Active member
Joined
Aug 17, 2013
Messages
44
Location
Houston, TX
Anyways, that catches everyone up to the present day. I wanted to get this thread going to have a place to give better updates and how the cars progress too.

My wife and I have our 1 year anniversary soon (Dec 1) and we are taking a trip to Iceland for a week.

If this thread does not get updated, it is because I have turned into a block of ice and will be discovered by Pauly Shore in the movie Encino Man! LMAO.

Hope to have more pictures soon next week as I throw some paint on, finish the lights, add the second garage door and clean the area up. House has been a disaster as of late.
 

ovscrider

Well-known member
Joined
Oct 1, 2008
Messages
2,347
Location
NH
not seeing pictures if your at work may be corporate security protocols, I do not see images on many forums at the office but they are fine at home./
 
OP
B

BigBronco

Active member
Joined
Aug 17, 2013
Messages
44
Location
Houston, TX
not seeing pictures if your at work may be corporate security protocols, I do not see images on many forums at the office but they are fine at home./

Thanks for the heads up. They work for me but I am just using my imgur account and the BBcode information for hosting/posting pics.

I just uploaded each with the attachments as well for those that can not see the hosted photos. All my photos would do is allow people to click them to expand each photo for fine nitpicking at my substandard work HA.
 

TX4runner

Well-known member
Joined
Mar 9, 2014
Messages
307
Location
Houston, TX
Looking forward to more updates from a fellow Houstonian. I don't see pictures inline with the message but as attachments at the bottom of your posts.
 

dubber

Well-known member
Joined
Dec 31, 2012
Messages
5,326
Location
Canada's Capital
Congrats. Such a sweet layout i've always enjoyed the idea of having. nice sized garage with a large front cover for additional cars.
 
OP
B

BigBronco

Active member
Joined
Aug 17, 2013
Messages
44
Location
Houston, TX
Congrats. Such a sweet layout i've always enjoyed the idea of having. nice sized garage with a large front cover for additional cars.

Thanks! Just read up on garagejournal having issues with imgur so when I get time later, I will rehost my pictures elsewhere.

Ready to be working with my own lifts instead of on my back with jackstands! :thumbup:
 
OP
B

BigBronco

Active member
Joined
Aug 17, 2013
Messages
44
Location
Houston, TX
Got a little more progress today. Been re-hanging lights and needed to get some more hardware.

I had spent the past few days out of town for work and my wife was nice enough to help get a LOT of painting done.

30.jpg


31.jpg


2nd Coat on the walls here:

33.jpg


32.jpg


Next big items is the 2nd door getting delivered and installed tomorrow. I have also pulled the trigger to get my floors coated as well.


I have also re-hosted all of the photos and hopefully those work now as well.
 

Attachments

  • 30.jpg
    30.jpg
    94.8 KB · Views: 49
  • 31.jpg
    31.jpg
    81.7 KB · Views: 50
  • 33.jpg
    33.jpg
    98.9 KB · Views: 51
  • 32.jpg
    32.jpg
    127.5 KB · Views: 53
To avoid these ads, REGISTER NOW!
OP
B

BigBronco

Active member
Joined
Aug 17, 2013
Messages
44
Location
Houston, TX
That ceiling is awesome! Are you going to wiring in a new plug for the liftmaster?

Thanks. I have a dedicated plug right above the liftmaster that it is plugged into now.

I also have my 2x 220 drops in the ceiling for the lifts. Will use conduit and hard wire those up.
 

rjacobs

Well-known member
Joined
Jul 24, 2015
Messages
3,882
Location
Dallas, TX
No prob.

The lights are Eaton Metalux FPanel LEDs. They are dimmable which is nice and I’ll have 13 of them up there. Ha

geebus... 13... you will need a welding mask on to walk in there.

Im thinking 6 of those(2 in each bay) will light up my 3 car garage pretty well...


Are you using the surface mount kits? And 4000k or 5000k? Im partial to the white color that 5000k puts out.
 
Last edited:
OP
B

BigBronco

Active member
Joined
Aug 17, 2013
Messages
44
Location
Houston, TX
geebus... 13... you will need a welding mask on to walk in there.

Im thinking 6 of those(2 in each bay) will light up my 3 car garage pretty well...


Are you using the surface mount kits? And 4000k or 5000k? Im partial to the white color that 5000k puts out.

Yea, it is a little overkill but with two cars in the air, the light may be blotched. I also have the lights on three circuits so I can actually have quite a few of them off depending on the work I am doing.

What you see are the surface mounts. They are nice although the first box I opened with the mounting kit did not have hardware in it.

These lights are the 4000k series.
 

rjacobs

Well-known member
Joined
Jul 24, 2015
Messages
3,882
Location
Dallas, TX
Yea, it is a little overkill but with two cars in the air, the light may be blotched. I also have the lights on three circuits so I can actually have quite a few of them off depending on the work I am doing.

What you see are the surface mounts. They are nice although the first box I opened with the mounting kit did not have hardware in it.

These lights are the 4000k series.

Thanks for the info.

My local Elliot Electric has these for cheaper than anywhere else so at least I know I have a local source for them.
 
OP
B

BigBronco

Active member
Joined
Aug 17, 2013
Messages
44
Location
Houston, TX
Electrical work has been completed. Only items remaining is final wiring of lifts once they are installed.

34.jpg


Flake on order with flooring epoxy. Planning to get this done while I am gone on Vacation next week.

35.jpg
 

davo727

Well-known member
Joined
Jun 17, 2012
Messages
1,660
Very nice ! I like the Nova, I had a 72 way back when. I like the Firebird too, and I swear a 69 Mach 1 in my opinion is the most beautiful american car ever built.
 
OP
B

BigBronco

Active member
Joined
Aug 17, 2013
Messages
44
Location
Houston, TX
This looks amazing!

Thanks man! Just trying to move along with getting stuff done in there.

Very nice ! I like the Nova, I had a 72 way back when. I like the Firebird too, and I swear a 69 Mach 1 in my opinion is the most beautiful american car ever built.

Awesome. I was always a large Chevy II fan but not so much the later years. This 72 just kind of fell in my lap and I started going down the rabbit hole with it. Finally coming along and should be firing it up soon.

Loving the progress pictures! Thanks for sharing!!

Thanks! Uploading a few picture updates as I just got back from Iceland. Also had the floors done when I was gone.
 
OP
B

BigBronco

Active member
Joined
Aug 17, 2013
Messages
44
Location
Houston, TX
So, the past week I was out in Iceland. What a sight. I would highly suggest anyone to go check it out.

Couple photos from there.

Northern Lights!

fVXmczy.jpg


Ice Cave at the Glacier Vatnajokoll

1IRaYH4.jpg


During the time I was gone, my parents were able to check in on my house as I was having the floors coated. (Please don't bash me on the quality of the photos lol)

Basecoat done!

NegwW5y.jpg


A couple of coats with clear/specs completed.

jZZEYff.jpg


Overall, I am pretty pumped up. Ordered cabinets, and some other items for the garage. Hope to get them in a week or so. Time to start putting items back into the garage now. :)
 

amkluttz

Well-known member
Joined
Sep 8, 2014
Messages
279
Location
Concord, NC
I may have missed this buy why the raised concrete around the back and left side of the garage?


The place looks amazing, keep up the good work.
 
OP
B

BigBronco

Active member
Joined
Aug 17, 2013
Messages
44
Location
Houston, TX
I may have missed this buy why the raised concrete around the back and left side of the garage?


The place looks amazing, keep up the good work.

It is something a lot of garages in Texas have. It is an elevated portion for workbenches and other equipment while the lower portion are the "bays" for the cars. Raise portion I believe are to help prevent items getting wet if flooded here in Texas. Every house I have lived in has had these on the garage.

I thought about getting it removed/re-pouring them but overall it was not worth the time and effort for this build.
 

Ronin22

Well-known member
Joined
Oct 2, 2018
Messages
478
Location
BA
This looks like you could have surgery performed in there. I really like where this is going!
 
OP
B

BigBronco

Active member
Joined
Aug 17, 2013
Messages
44
Location
Houston, TX
Thanks! Got some cabinets on order and some more shelves. Going to start throwing stuff back in there this weekend.
 
OP
B

BigBronco

Active member
Joined
Aug 17, 2013
Messages
44
Location
Houston, TX
Nice looking build! what cabinets did you order?

Funny enough, Home Depot had a killer deal on their heavy gauge husky cabinets (all black with anodized black handles)

I got a few components this weekend and will be installing/hanging the wall cabinets this week. I need to pick up the air compressor (currently at my brothers) and get that moved over.

Things are moving along. Hopefully, in the next month or so, I will order the lifts.
 
To avoid these ads, REGISTER NOW!
Top Bottom