To avoid these ads, REGISTER NOW!

Between 265 & 485 SQ/FT The 12-Gauge Garage

Workspaces sized between 265 and 485 squarefeet.

theoldwizard1

Well-known member
Joined
Feb 22, 2011
Messages
43,169
Location
SE MI
Re: Teardrop Camper -- Structural Thoughts

But a wooden frame doesn't seem to have much strength on its own. The one in this picture could be pushed over pretty easily. Wood flexes and has limited strength to hold onto fasteners.
Certainly wood is not as strong, especially at connections (Lap joints are better; more surface area for glue. You would have to use dovetail joints and then all the support pieces should be hardwood.)

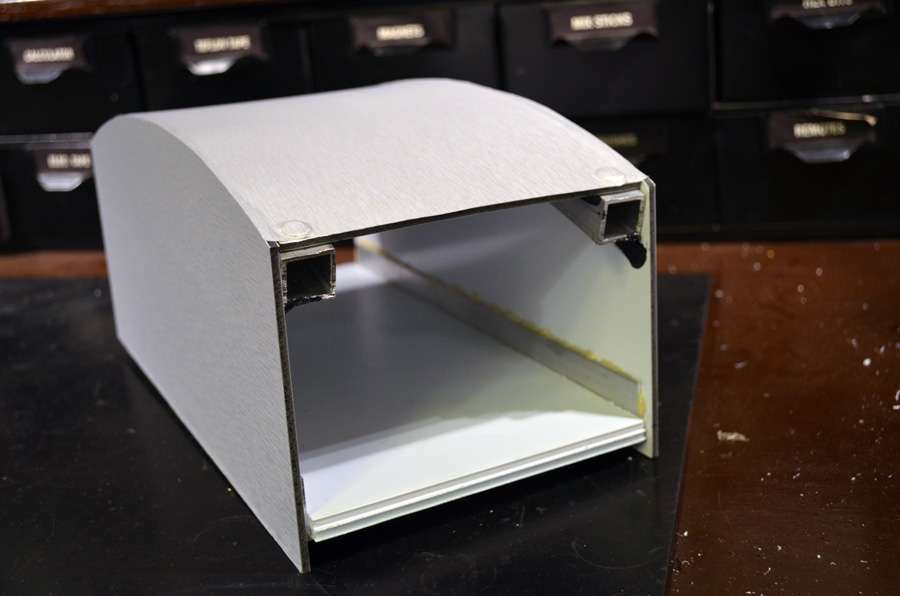
Look at pic #2. No TRIANGULATION ! Either sides to side or front to back ! A little push on the side puts the front wall in shear. Yes, the sheet of interior and exterior plywood help (a lot) if they are glued and nailed/screwed to all supports. Still those 90° corners for the structure are going to rely on the glue/nails of the panels to prevent them from moving.

I can strengthen the wall-to-roof seam with square tubing and I can strengthen the wall-to-floor seam with square tubing. But does one of those offer more benefit than the other? I know angle-stock is less resistance to shear than square tubing, but with the wrap-around-and-down front wall (from the roof) providing lateral strength, combines with shear-type walls fore and aft, would square tubing at the seams be doing any appreciable amount of work?
Angle is more resistant to shear load than square ? Really ?

If the whole panel is made up of square "boxes" then with out a "skin" bonded to each side, I can not understand how one would be better. The shear load of a horizontal member would be picked up a the joint with the vertical member. If that joint flexes, it will act as a moment arm on the connection of the vertical member to the bottom plate. Triangulating these corners make a huge difference. (Think gusset plates in a race car.)

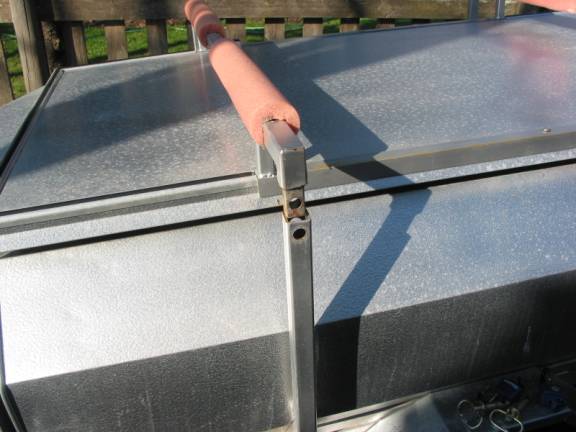
Also, if you are using square tubing, you can "notch" the tubes together. I can't find a picture, but you sort of make a fish mouth on the intersecting tubes and then weld. All edges are fully connected. (Production shops would never do this; too "fussy".)

Thanks. I'm looking around. Finding 5x10 sheets of any of these composite/laminate/structured materials is the trick. I've got sources now for aluminum composite panels and corrugated plastic. But I'm also looking into other options.
You can make your own structural panel, by building a frame out of square tubing, with appropriate triangulation (bigger triangles are better than smaller ones), attaching your finish material to one side, bonding it to the frame. Then spray glue and fit pre-cut rigid foam panels. More spay glue on the outside of the foam, your choice of adhesive to the structural tube and apply the pre-cut out skin. THIS IS BASICALLY HOW ALL RV SIDE PANELS ARE MADE. Many are using 1" square tubing.

And I've already done a bunch of testing with about a dozen different adhesives, including (for structural bonds) the 3M VHB tapes, Dow 995, and 3M ScotchWeld structural epoxy adhesives. I think flexibility is important, considering the vibration the thing will be subject to.
Well, my suggestion will be very rigid in shear

As I continue with this project, I hope to learn enough about Sketchup to be able to post illustrations of what I'm planning ...
Good luck ! Never had drafting (background in EE and CompSci), but I have educated myself in a lot of mechanical/structural engineering. With Sketchup, you have to think 3D ALL THE TIME. Simple drawings take me a long time, but I as usually quite proud of the out come !:D


Last comment. The wall bottom plates need to attach to a metal part of the frame. PERIOD.
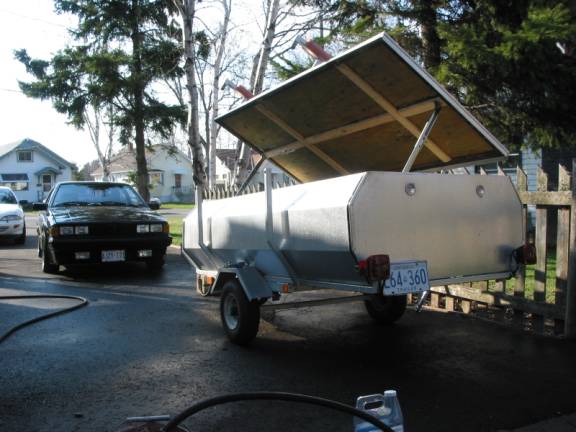
 

Attachments

  • Capture.JPG
    Capture.JPG
    49.1 KB · Views: 98
To avoid these ads, REGISTER NOW!
OP
J

Jack Olsen

Super Moderator
Staff member
Joined
Mar 22, 2009
Messages
6,678
Location
Los Angeles
Re: Teardrop Camper -- Structural Thoughts

Thanks, guys.

Moonrise, I'm not knocking wood as a construction material. It's a proven way to build these things. I'm just planning on doing it without wood -- partly to see how that could best be done.

And I recognize the benefits of fiberglass. It just happens to be a process I don't like doing very much. But there are many of these things out there made with it, and (again), it's tried and true.

theoldwizard1, I wasn't clear enough about angle stock vs square tubing. I mean as a way to make a perpendicular joint between a floor and wall. With the aluminum composite panels, I plan on joining the main walls to the roof (which itself becomes the fore and aft walls) with adhesive, using either L-shaped stock or square tubing for those perpendicular juncture points. It seems apparent that a section of square tubing is harder to flatten than L-shaped angle stock of the same thickness.

But that speaks to one of my core questions. If we think about the basic teardrop shape of two flat walls and a floor/fore/roof/aft ribbon running around it, then it seems that the tube-like shape of that floor/fore/roof/aft panel would make the box itself fairly resistant to lateral forces trying to collapse it. The big forces acting on a teardrop would be asymmetrical blows on one wheel or the other from the pavement, putting a lot of force on one side of the box and causing a lateral or twisting motion. Or so I'm assuming.

When I look at these two images, then those are the assumptions that jump to mind.

oWMeUY.jpg


Without the floor/fore/roof/aft panel, the two long walls would be very easy to knock over. But with that panel in place (as in the first image), it's like a tube -- which I believe is fairly good at resisting those lateral forces. The interior walls in the second image provide some amount of lateral strength as well, I think.

So given that basic structure, would it make a significant difference whether I use L-shaped stock where the walls meet the floor/fore/roof/aft panel or if I use square tubing there? The adhesive is going to be very strong, but do I need additional strength in the way square tubing would provide it, or would that be inconsequential?

Again, I really appreciate the input. This stuff is not my area of expertise at all, and even the gut reactions of guys who know better are a lot of help.
 
Last edited:

MoonRise

Well-known member
Joined
Nov 5, 2010
Messages
4,029
Location
NJ
Re: Teardrop Camper -- Structural Thoughts

The angle iron corner reinforcement may be 'strong enough'.

The hollow square tube is 'stronger'. Also heavier (approximately 2x for the same 'size' and thickness/gauge metal) and takes up some more interior space. (but you could tuck wiring inside the hollow tube, attach interior things to it and not blow through the skin to the outside unless you really-really used too long of a fastener, etc).

You have the tube roller, so that gives you a way to roll/bend the tube to your desired curve. Angle iron can be 'rolled', but you need different dies/supports and even then it can sometimes tend to warp in a different plane than the bend plane.

So for you and what I 'know' of your tools and talents (your patio arch cover, etc), I'd probably say use the hollow tube and move on.

Yes, the side panels could bend/move without some sort of framework and/or the 'roof' skin. But a thin 'skin' roof loaded from the side panels might wrinkle or buckle. So those side-to-side partitions/walls are what is mostly making the structure 'stronger' side-to-side. By a lot.

And regarding the floor and a frame support underneath it, I'd say a great big YES have a frame under the floor panel(s). Again, it is possible to make a floor 'skin' that is strong enough, but putting some sort of 'frame' underneath the floor gives much more support and you don't then have as much 'oil-canning' effect going on.

(yes, I have been accused of 'overbuilding' things. More than once. :D )

Oh, if you are thinking of doing aluminum skinned panels as your 'skin' of the trailer, I'd really-really suggest doing the frame tubes in aluminum as well (use aluminum or stainless steel fasteners too, no plain steel against aluminum!). That way you have similar metals in contact and minimize galvanic corrosion issues (remember, rust/corrosion never sleeps). Caulk all the joints/seams as you are doing the assembly (face to face lap seal with the sealant/caulk versus trying to just run a bead of sealant/caulk right on the joint seam) or have your adhesive possibly double as the 'sealant' (check the adhesive specs first) and thus minimize and reduce chances of water infiltration. IMHO.
 

kerrynzl

Well-known member
Joined
Nov 8, 2013
Messages
5,054
Location
Tauranga, New Zealand
Re: Teardrop Camper -- Structural Thoughts

Jack,

everybody is over thinking this.

With the correct composite panel you will not need any diagonal braces.
The only weakness is cutouts like doors or windows that need framing

Using tubing as corner frames is a good way to run wiring [and to double skin the inside ]

With tubing you can use countersunk pop rivets to hold the panels until the adhesive cures [ unless you have a large clamp collection ]
The rivets wont show on the inside, and you cap the panels with angle on the outside to hide them later.

you can buy Aluminium Composite Sign board in the LA area up to 2m wide which will give you 1 piece sides.

http://www.aluminium-composite-panel.cn/products.htm?id=1

This Aluminium Composite Sign board can be put through a ring roller to get the roof profile.

Don't use 3M VHB , there is a Bostik product [Simson ISR 70-03] that is better.
and a flexible glue is advisable because it has better bonding properties.

The stiffness comes from the composite panels not the glue.
 

bigdav160

Well-known member
Joined
Apr 14, 2007
Messages
2,027
Location
Deep in the heart of Texas
Re: Teardrop Camper -- Structural Thoughts

With very little knowledge on the panels you plan to use, I only have one comment.

The floor at the door area takes a beating. You're likely to want the frame or reinforcements in that area.
 

404

Well-known member
Joined
Aug 23, 2014
Messages
3,463
Location
Mass
Re: Teardrop Camper -- Structural Thoughts

Huge elementary mistake.

Use a frame, like virtually all trailer builders do.

Frames went away on most cars. Why have a frame on a trailer that weighs less than a car and has no braking or drive forces.
 

ambenz

Well-known member
Joined
Dec 12, 2010
Messages
4,236
Location
NW Chicago Suburbs
Re: Teardrop Camper -- Structural Thoughts

I'd like to build my own mini camper too.
I like the idea of plastics, foam, and fiberglass sandwiched to form a shell.
Use to own a Aerolite 22 footer ultralite camper and I could tow it with a 3.8L Astro van, with both unit fully loaded.
We later found out it cost just as much to stay in a hotel and we didn't have to set up or clean....sold the camper....LOL!
Have fun...
 

404

Well-known member
Joined
Aug 23, 2014
Messages
3,463
Location
Mass
Re: Teardrop Camper -- Structural Thoughts

I'd like to build my own mini camper too.
I like the idea of plastics, foam, and fiberglass sandwiched to form a shell.
Use to own a Aerolite 22 footer ultralite camper and I could tow it with a 3.8L Astro van, with both unit fully loaded.
We later found out it cost just as much to stay in a hotel and we didn't have to set up or clean....sold the camper....LOL!
Have fun...

Why is the cost the same? So confused.:thumbup:
 

jjkrjh

Well-known member
Joined
May 3, 2008
Messages
610
Location
Ohio
Re: Teardrop Camper -- Structural Thoughts

Another thing to think about is the expansion and contraction of the panels in the sun and cold. I have an open trailer that has a box that is 2ft wide 3ft tall and the width of the trailer on the front. Full doors on both sides. The box is covered with aluminum. The panels fit perfect when cold. As the sun hits it the panel, it will bow a 1/4 to 3/8 of an inch between the mounting bolts that are a foot apart. It has a steel frame with the aluminum bolted to it.

I would think that if the frame and panels were of similar materials this wouldn't be an issue.

Just something to keep in mind.
 

coby65

Well-known member
Joined
Feb 17, 2011
Messages
321
Location
Monterey Bay area
Re: Teardrop Camper -- Structural Thoughts

Jack just wanted to report in after dragging the trailer with the axle less suspension around in the mountains on smooth roads (rare in CA), crappy roads ( I5/I80 to Truckee) , construction pavement ( I5/I80 to Truckee, dirt/gravel roads, and rocky roads.
Also high side, front and side winds with two kayaks on top
Pulled like a dream in all conditions. No sway in side winds. No bouncing off the ground when you hit a bridge or overpass.
Watched the trailer to see if it would Jump around at 65 mph when changing surfaces in construction zones and it did not.
Wife drove for three hours back and said she has to keep looking back to see if the trailer is there.
Did not weight it but I think maybe 1000-1200lbs loaded.
 

Attachments

  • image.jpg
    image.jpg
    151 KB · Views: 211

kerrynzl

Well-known member
Joined
Nov 8, 2013
Messages
5,054
Location
Tauranga, New Zealand
Re: Teardrop Camper -- Structural Thoughts

Another thing to think about is the expansion and contraction of the panels in the sun and cold. I have an open trailer that has a box that is 2ft wide 3ft tall and the width of the trailer on the front. Full doors on both sides. The box is covered with aluminum. The panels fit perfect when cold. As the sun hits it the panel, it will bow a 1/4 to 3/8 of an inch between the mounting bolts that are a foot apart. It has a steel frame with the aluminum bolted to it.

I would think that if the frame and panels were of similar materials this wouldn't be an issue.

Just something to keep in mind.

That is easy to prevent if it was built properly.
Aluminium panels are easy to get arrow straight.
 

theoldwizard1

Well-known member
Joined
Feb 22, 2011
Messages
43,169
Location
SE MI
Re: Teardrop Camper -- Structural Thoughts

theoldwizard1, I wasn't clear enough about angle stock vs square tubing. I mean as a way to make a perpendicular joint between a floor and wall. With the aluminum composite panels, I plan on joining the main walls to the roof (which itself becomes the fore and aft walls) with adhesive, using either L-shaped stock or square tubing for those perpendicular juncture points. It seems apparent that a section of square tubing is harder to flatten than L-shaped angle stock of the same thickness.
I would use square tubing, maybe 1.5x1.5 ?

As I said before, cut hardwood stock to fir snugly inside the floor rails. Then you can through bolt to the frame without working about crushing the tube.

The top tube will be a pain. You will have to cut multiple little pie sections out of the sides of the tube to form the roof curve. I would weld the tube back together for maximum strength.


You are basically making a monocoque structure so the joint at the roof and floor are critical. Good adhesive and screws (into the bottom where there is wood) or blind rivets (along the top) are inperative.
 
OP
J

Jack Olsen

Super Moderator
Staff member
Joined
Mar 22, 2009
Messages
6,678
Location
Los Angeles
Re: Teardrop Camper -- Structural Thoughts

Thanks, guys!

The angle iron corner reinforcement may be 'strong enough'.

The hollow square tube is 'stronger'. Also heavier (approximately 2x for the same 'size' and thickness/gauge metal) and takes up some more interior space. (but you could tuck wiring inside the hollow tube, attach interior things to it and not blow through the skin to the outside unless you really-really used too long of a fastener, etc).

You have the tube roller, so that gives you a way to roll/bend the tube to your desired curve. Angle iron can be 'rolled', but you need different dies/supports and even then it can sometimes tend to warp in a different plane than the bend plane.

So for you and what I 'know' of your tools and talents (your patio arch cover, etc), I'd probably say use the hollow tube and move on.
It's true that I'd have to buy/make different dies to bend L-stock. And there is something to be said for running wires through the steel tubing. The only downside to square tubing is weight and that it nudges me toward slightly thicker walls (with 1" instead of 1/2" insulation (but then, that's better insulation).

Square tubing is the current front-runner.

Yes, the side panels could bend/move without some sort of framework and/or the 'roof' skin. But a thin 'skin' roof loaded from the side panels might wrinkle or buckle. So those side-to-side partitions/walls are what is mostly making the structure 'stronger' side-to-side. By a lot.

True. But the skin is composite panel, which is surprisingly rigid -- especially once it's curved. But your post has me thinking of adding an x-shaped brace to the largest interior side-to-side wall. Like a roll cage.

And regarding the floor and a frame support underneath it, I'd say a great big YES have a frame under the floor panel(s). Again, it is possible to make a floor 'skin' that is strong enough, but putting some sort of 'frame' underneath the floor gives much more support and you don't then have as much 'oil-canning' effect going on.

(yes, I have been accused of 'overbuilding' things. More than once. :D )

I'm thinking about adding a second floor, about 4" below the first -- for storage. I think some framing makes sense now -- and if it's a double-decker thing, it'll be even stronger.

I'll use steel down below, since it will resist cracking better. Of course, it'll have to be protected from moisture.

Oh, if you are thinking of doing aluminum skinned panels as your 'skin' of the trailer, I'd really-really suggest doing the frame tubes in aluminum as well (use aluminum or stainless steel fasteners too, no plain steel against aluminum!). That way you have similar metals in contact and minimize galvanic corrosion issues (remember, rust/corrosion never sleeps). Caulk all the joints/seams as you are doing the assembly (face to face lap seal with the sealant/caulk versus trying to just run a bead of sealant/caulk right on the joint seam) or have your adhesive possibly double as the 'sealant' (check the adhesive specs first) and thus minimize and reduce chances of water infiltration. IMHO.

That's my current plan. Aluminum square tubing up above. I'm going to use a combination of VHB tape, Dow 995 structural adhesive/sealant, and also 3M Scotch-Weld structural adhesive (and rivets) at the key juncture points.

Jack, everybody is over thinking this.

With the correct composite panel you will not need any diagonal braces.
The only weakness is cutouts like doors or windows that need framing

Using tubing as corner frames is a good way to run wiring [and to double skin the inside ]

With tubing you can use countersunk pop rivets to hold the panels until the adhesive cures [ unless you have a large clamp collection ]
The rivets wont show on the inside, and you cap the panels with angle on the outside to hide them later.

you can buy Aluminum Composite Sign board in the LA area up to 2m wide which will give you 1 piece sides.

http://www.aluminium-composite-panel.cn/products.htm?id=1

This Aluminum Composite Sign board can be put through a ring roller to get the roof profile.

Don't use 3M VHB , there is a Bostik product [Simson ISR 70-03] that is better.
and a flexible glue is advisable because it has better bonding properties.

The stiffness comes from the composite panels not the glue.

I'm looking into building my own roll bender for this, using steel pipe or stiffened PVC pipe. I was able to bend the stuff simply rolling it back and forth on a length of PVC pipe for a test model I made. But I'm hoping I can get a compound bend close to the shape of the profile with some patience and three rollers. We'll see how that goes.

This is the sample box. I bent 1" aluminum tubing for the roof juncture, and also used aluminum rivets at each end to prevent any kind of zipper-type failure. I used angle stock below with two layers of corrugated plastic. I will probably change that to square tubing.

But this thing is so strong I could jump up and down on it all day long.

cPYWDa.jpg


yWM6ys.jpg


With very little knowledge on the panels you plan to use, I only have one comment.

The floor at the door area takes a beating. You're likely to want the frame or reinforcements in that area.

That's actually very helpful. Thanks!

Another thing to think about is the expansion and contraction of the panels in the sun and cold. I have an open trailer that has a box that is 2ft wide 3ft tall and the width of the trailer on the front. Full doors on both sides. The box is covered with aluminum. The panels fit perfect when cold. As the sun hits it the panel, it will bow a 1/4 to 3/8 of an inch between the mounting bolts that are a foot apart. It has a steel frame with the aluminum bolted to it.

I would think that if the frame and panels were of similar materials this wouldn't be an issue.

Just something to keep in mind.

I've got two panel samples I made (aluminum composite panel/foam insulation/corrugated plastic) in the freezer right now. I'm going to cycle them from 0°F to 200°F a few times, and see if there's any change in the angle they sit at when they're set on their side. I also hope it will show me if there's going to be a problem with the adhesives I'm using.

Jack just wanted to report in after dragging the trailer with the axle less suspension around in the mountains on smooth roads (rare in CA), crappy roads ( I5/I80 to Truckee) , construction pavement ( I5/I80 to Truckee, dirt/gravel roads, and rocky roads.
Also high side, front and side winds with two kayaks on top
Pulled like a dream in all conditions. No sway in side winds. No bouncing off the ground when you hit a bridge or overpass.
Watched the trailer to see if it would Jump around at 65 mph when changing surfaces in construction zones and it did not.
Wife drove for three hours back and said she has to keep looking back to see if the trailer is there.
Did not weight it but I think maybe 1000-1200lbs loaded.

That's good to know. It looks like it's got plenty of tongue weight (relative to its overall weight), which should make it more stable. I'm hoping that a combination of tongue weight and torsion-type axles will give mine similar manners.

I have seen many versions on the internet from plain to awesome. They look fairy easy and cheap to construct. Good look on the build I will be watching. They have also peeked my interest but alas I really don't fit in them.

Mine will be bigger than the standard 4x4x8 trailer. It will by 5x5x10. But I'm only 5'11", so I should have better luck. :)

I may have missed it above but here's a good forum on tear drop trailers ...
Teardrops n Tiny Travel Trailers - http://www.tnttt.com/

Thanks. I found it a short while ago. Very helpful. I've been subjecting them to my ongoing adhesives/materials tests.

I would use square tubing, maybe 1.5x1.5 ?

As I said before, cut hardwood stock to fir snugly inside the floor rails. Then you can through bolt to the frame without working about crushing the tube.

The top tube will be a pain. You will have to cut multiple little pie sections out of the sides of the tube to form the roof curve. I would weld the tube back together for maximum strength.


You are basically making a monocoque structure so the joint at the roof and floor are critical. Good adhesive and screws (into the bottom where there is wood) or blind rivets (along the top) are inperative.

I'm hoping I can get the complex curve worked out slowly and patiently with my roll bender and one piece of stock. We'll see how many tries it takes. If it doesn't work, I have a TIG welder.

N4ShzX.jpg
 

kellymc

Well-known member
Joined
Feb 26, 2010
Messages
229
Re: Teardrop Camper -- Structural Thoughts

"I'm looking into building my own roll bender for this, using steel pipe or stiffened PVC pipe. I was able to bend the stuff simply rolling it back and forth on a length of PVC pipe for a test model I made. But I'm hoping I can get a compound bend close to the shape of the profile with some patience and three rollers. We'll see how that goes."

Check Swag off road for a bender and bender upgrades for the HF bender

http://www.swagoffroad.com/Tubing-Roller-Dies-Accessories_c_54.html
 

woodrail

Well-known member
Joined
Feb 23, 2012
Messages
2,456
Location
Lorain, Ohio
Re: Teardrop Camper -- Structural Thoughts

What is being describe is very close to the Airstream model "Agosy Minuet"

ARGOSY MINUET STANDARD SPECIFICATIONS
BASIC CONSTRUCTION


• Patented Air Flow contoured shape.
• Single Dura-Torque rubber torsion bar
• Shock absorbers on all wheels.
• 12 volt electric brakes all wheels¬
• 15" truck type extra strength wheels
• Hand riveted monocoque shell.
• Exterior protection: Automotive type alkyd enamel.
• Ribs of stretch-formed structural alloy.
• One piece stretch-formed extruded aluminum window frames riveted to body
• Panoramic front windows using super
• Corrosion proof screens in all windows.
• Awning rail.
• 2 inch aircraft type fiberglass insulation.
• Adjustable no draft aluminum roof vents. .
• Custom steel wheels.
• Laminated aluminum foam floor.

These are specs from 1978.
 
OP
J

Jack Olsen

Super Moderator
Staff member
Joined
Mar 22, 2009
Messages
6,678
Location
Los Angeles
Re: Teardrop Camper -- Structural Thoughts

Check Swag off road for a bender and bender upgrades for the HF bender

http://www.swagoffroad.com/Tubing-Roller-Dies-Accessories_c_54.html

Great minds think alike. Those are Swag dies on my bender -- and I learned from Swag how to modify the thing so it's powered by the HF pipe threader as well.

What is being describe is very close to the Airstream model "Agosy Minuet"

ARGOSY MINUET STANDARD SPECIFICATIONS
BASIC CONSTRUCTION


• Patented Air Flow contoured shape.
• Single Dura-Torque rubber torsion bar
• Shock absorbers on all wheels.
• 12 volt electric brakes all wheels¬
• 15" truck type extra strength wheels
• Hand riveted monocoque shell.
• Exterior protection: Automotive type alkyd enamel.
• Ribs of stretch-formed structural alloy.
• One piece stretch-formed extruded aluminum window frames riveted to body
• Panoramic front windows using super
• Corrosion proof screens in all windows.
• Awning rail.
• 2 inch aircraft type fiberglass insulation.
• Adjustable no draft aluminum roof vents. .
• Custom steel wheels.
• Laminated aluminum foam floor.

These are specs from 1978.

Well, again, great minds think alike. :)
 

PugetDude

ALLIANCE MEMBER
Joined
Mar 13, 2013
Messages
22,398
Location
Superstition Mountains, AZ
Re: Teardrop Camper -- Structural Thoughts

What is being describe is very close to the Airstream model "Agosy Minuet"

ARGOSY MINUET STANDARD SPECIFICATIONS
BASIC CONSTRUCTION


• Patented Air Flow contoured shape.
• Single Dura-Torque rubber torsion bar
• Shock absorbers on all wheels.
• 12 volt electric brakes all wheels¬
• 15" truck type extra strength wheels
• Hand riveted monocoque shell.
• Exterior protection: Automotive type alkyd enamel.
• Ribs of stretch-formed structural alloy.
• One piece stretch-formed extruded aluminum window frames riveted to body
• Panoramic front windows using super
• Corrosion proof screens in all windows.
• Awning rail.
• 2 inch aircraft type fiberglass insulation.
• Adjustable no draft aluminum roof vents. .
• Custom steel wheels.
• Laminated aluminum foam floor.

These are specs from 1978.

I knew you'd be along soon... like a moth to a flame...;)
 
To avoid these ads, REGISTER NOW!

zeke67

Well-known member
Joined
Jun 11, 2010
Messages
272
Location
Houston
Re: Teardrop Camper -- Structural Thoughts

Hi Jack,

After five pages a lot has been said so maybe I'm not adding much, but here's a try (or at least a bump).

Your own post #25 mentions foamies. It was my first thought when you wanted light weight. Using pink 2 inch foam as the entire shell. With various ways to seal it, but canvas and Titebond being common. Post #86 mentions the TNTT site, where there is a LOT of discussion on foamies. Was going to post that for you but it's already been done.

All that said, I think with your skill set and design sense you should try the aluminum curve structure shown in your posts. Do you need it, according to other sites maybe not, but it would be very cool.
 

woodrail

Well-known member
Joined
Feb 23, 2012
Messages
2,456
Location
Lorain, Ohio
Re: Teardrop Camper -- Structural Thoughts

I knew you'd be along soon... like a moth to a flame...;)

You say that like it's a bad thing?

I chime in about campers, other posters add to vise threads. That's what we are here for right?

So who wants to talk about alcoholic midget ****?
 

PugetDude

ALLIANCE MEMBER
Joined
Mar 13, 2013
Messages
22,398
Location
Superstition Mountains, AZ
Re: Teardrop Camper -- Structural Thoughts

You say that like it's a bad thing?

I chime in about campers, other posters add to vise threads. That's what we are here for right?

So who wants to talk about alcoholic midget ****?

Not a bad thing at all... just know how you feel about Airstreams!

No alcoholic midget **** in the 12 gauge garage...:lol:
 

RonB001

Well-known member
Joined
Apr 19, 2014
Messages
72
Location
Burlington, NC
Re: Teardrop Camper -- Structural Thoughts

But a wooden frame doesn't seem to have much strength on its own. The one in this picture could be pushed over pretty easily.

That is true for an open structure like the picture you posted. Once the skin is on the curve, that will add the torsional strength needed.

A UK web site has a great deal of information about teardrops, including structural information and weight distribution: http://www.angib.pwp.blueyonder.co.uk/teardrop/tear00.htm

The nice thing about wood for joining the tops to the sides is that it is very easy to cut or laminate to the curve, and it naturally forms a fair curve when bent (bending either by steam or laminating). Structural epoxy joins wood to wood so strongly that fasteners are just a means of holding the pieces together until the epoxy sets up (fasteners can be replaced by clamps). T88 is a very good structural epoxy for home builders.

Your curve-rolling the square tubing looks like another nice way to go. I prefer the teardrops that are made from ellipses rather than radius-es (radii?). Those will be much more difficult to fabricate by this method than constant-radius curves.

A totally different way to accomplish the side-to-curve connection would be to take the methods used for aluminum airplane fabrication. Zenith Aircraft have a kit plane called the Zodiac. A unique aspect of this plane is that it can also be built from plans. Sample plans are available, which can yield sufficient information to form the curved flanges from flat sheet stock.
 

shortykorte

Well-known member
Joined
Sep 1, 2014
Messages
8,039
Location
Tallahassee, Fl
I've been reading about the torsion box work bench and it seems perfect for your floor. Of course using the composites. This would aid in a minimal trailer frame and give the lower walls more area to adhere to floor and as mentioned, storage. Remember without a good foundation, things seem to collapse.

Looking forward to this build.
 

bigpokie

Well-known member
Joined
May 25, 2013
Messages
438
You should make a replay with your older pic on bottom and a newer one on top. Or just with a newer pic by its self
 

mikeway

Member
Joined
May 10, 2012
Messages
21
RE: TearDrop

Recently followed behind a tear drop for several miles at highway speed. The straight sidewalls produced a pretty good side vortex. Seemed to extend laterally 3-5 feet. Implies stronger aerodynamics than most suppose.

Towed trailers (over 21 years span and many, many miles) that were sprung, or had torsion axles, or used a Mor-Ryde suspension. The Mor-Ryde wins.

I mentor a team that builds robots for FIRST competitions. Find that 80-20 tubing pretty strong with tracks for wiring and reasonable attachment devices.

I'll follow as usual.

Mike
 

Denwood

Well-known member
Joined
Sep 22, 2014
Messages
4,190
Location
Thunder Bay, Ontario, Canada
Jack, I've designed/built three trailers for windsurfing that needed to be light and strong. On the last one I experimented with plywood/laminates using 1" carbon fiber ribbon sandwiched/epoxied into the structure. The trailer box below uses about 200' of the 1" carbon ribbon/strand reinforcing all joints/seams. The trailer does see some fairly high loads, when using it for other purposes..so the carbon/laminate "monocoque" design eventually failed. I'd suggest a welded aluminum frame (I added a steel frame) at least for the base to deal with what can be very high dynamic loads when hitting bumps etc at speed. My trailer now is heavier, but it's been perfect since the redesign 13 yrs or so back. The original carbon reinforced "box" is now clad in aluminum and surrounded with a steel frame so rack loads are transferred to the frame. We have about 50K kms on this trailer.

image002.jpg


image003.jpg


image004.jpg


If I was doing this again, I would definitely start with the frame, and use composites to form the wall panels. I would also ensure that the tongue and frame were integrated into one welded assembly.

I think these guys got it right: http://www.gizmag.com/ecotrek-off-road-camper/29692/pictures#3
 
Last edited:
OP
J

Jack Olsen

Super Moderator
Staff member
Joined
Mar 22, 2009
Messages
6,678
Location
Los Angeles
Thanks! That's very helpful -- and it's a great looking trailer.

I've always wanted to integrate the tongue and the frame, with a triangle being formed by the tongue pieces going back to the axle. But based on your post and some other input I've gotten, I'm going to do more with steel to make a frame around the perimeter. As you say, you've got to distribute those huge spike loads you get from running the thing through a pothole at speed.

I can't see a good reason to have the tongue pieces down below the main frame. It's possible I'm wrong, but I think that triangle should be at the same level as the rectangle frame itself, with the two connected with cross-pieces.
 
Last edited:

Trey T

Well-known member
Joined
Aug 3, 2011
Messages
3,749
Location
Houston, TX
Hey Jack,

Did you ever get permission to share the CMan block grinder sticker/plate design? If so, can you share the file?
 

Denwood

Well-known member
Joined
Sep 22, 2014
Messages
4,190
Location
Thunder Bay, Ontario, Canada
I agree completely. Integrate the tongue into the frame. My trailer started off as a small 4x4, then I added a longer tongue and sub frame. At least 200lbs could be shaved off that trailer by having just one frame integrating the tongue. There's a neat trailer called the Alto Safari that is built from aluminum vacuum bonded to a plastic sandwich material..it's construction was shown on one of the "How it's made" shows on discovery.

http://m.safaricondo.com/en/encaravanes#anchor_page

The upper structure of this was shown being assembled on the show, and I'm pretty sure there was minimal upper framing. The side panels were done as one piece with aluminum both sides over a plastic sandwich/separator material about 1" thick. The entire side sections were vacuum bagged in the show. The entire top of the teardrop raises so you can stand in there. Very nice design.
 
Last edited:
OP
J

Jack Olsen

Super Moderator
Staff member
Joined
Mar 22, 2009
Messages
6,678
Location
Los Angeles
Here's an aside. I've inverted a jigsaw in a vise before to get more precise, 'scroll-saw-like' control of a piece of material for cutting shapes. I've used it mostly for metal, but it's also come in handy for wood.

ob15vV.jpg


Today I got a Rockwell BladeRunner, which is a little table with an inverted jigsaw inside it, with a control arm (sort of like a sewing machine foot) that keeps the material from bucking up and down when the teeth grab at it. It was an impulsive decision, and it's not what I would consider a 'lifetime' tool. But it's pretty easy to operate and store. The selling point for me was less the $90 price tag than it was the fact that it takes the same blade type as my regular jigsaw.

I unboxed it today to see if I could find a place to keep it, and did a quick curved cut on a piece of scrap. It's pretty handy. My main use for it will be aluminum. But it cuts anything a jigsaw can cut, and also comes with a straight-edge (for rips) and a miter gauge (for picture frames or whatever).

Y22N7d.jpg


One nice touch is that little swing-out table edge grabber, which keeps it from vibrating around on the bench.

I even found a place to store it -- on its side:

E5DQSq.jpg
 

Squankum

Well-known member
Joined
Mar 28, 2011
Messages
7,709
Location
Southeast
That is really neat; I'd like the ability to do some kind of controlled ripping.

Does it do seven different cuts, but only one that Ridley Scott has full control of?


.
 

ez-duzit

Well-known member
Joined
Jun 24, 2013
Messages
5,099
Location
Marina del Rey
To cut small curves, like the one shown, I use an older, cast iron, Delta variable speed scroll saw I found on c/l. But before that I made do with a saber saw. I often operate one from the under-side of a sheet so the top doesn't chip out. But a proper table adapter would be very handy. Saber saws lend themselves to attaching their bases to a thin metal plate which itself can be let into a larger table top, if desired.
 

Squankum

Well-known member
Joined
Mar 28, 2011
Messages
7,709
Location
Southeast
Relevant to your interests: the new issue of Car and Driver (Oct. 2015 issue.) Lightning Lap shootout at Virginia International Raceway. The Z06 is fantastic again.

Much discussion of its downforce. I've typed up the relevant bits:

“Carbon-fiber feathers cover the body – not for flying, but to keep the car grounded. Gurney flaps, spoilers, and splitters push the car into the tarmac and make the impossible possible. You can, for example, accelerate through the last half of the Climbing Esses, which eats the speed of lesser cars. In the Z06 you enter at 134.8 mph, and leave going 122.6 mph while cornering at 1.47g’s. That’s a drop of just 12 mph versus the McLaren’s 34 mph speed loss. Imagine tripling the speed most people drive on a freeway on-ramp and you’ll have an idea of what it’s like to drive a Z06 through those esses. Even a supercar like the Lamborghini Hurracan can’t hang with the Vette there; one of us tried it an ended up mowing a Lamborghini-wide fairway through the grass.

With big downforce comes big drag. Even marshalling 650 horsepower, we could only hit 153.5 mph on the long straight. Wind resistance, attributable to and commensurate with the downforce produced, is so extreme that the act of shifting from fourth to fifth eats 1.3 mph. Think about that: The brief lift off the throttle during the shift is a 0.3-g braking event, which is about how much stopping power most drivers use on the street. “


Also, the caption to the graph reads:

"Downforce is a drag, man. The vertical-wheel-position information recorded on our data file reveals speed-sucking downforce at work. As the Z06 accelerates down the Grand West Course’s back straight, the difference between the front- and rear-wheel positions shrinks. In other words, the tall wickerbill-equipped spoiler on the Z06’s tail increases rear tire loading with speed, driving the body closer to the ground. At 145 mph, the rear of the car is more than an inch lower than the Z06’s static height. The spike in rear-height trace at the end of the straight shows the car pitching forward, the result of load transfer during braking."


Also, in the back pages, a quick review of the new Dodge Viper ACR package, which features much air dam, even more wing, and 1700 lbs. of downforce.
 

Attachments

  • candcover.JPG
    candcover.JPG
    105.2 KB · Views: 137
  • graphrideheight.jpg
    graphrideheight.jpg
    145.9 KB · Views: 131
Last edited:
To avoid these ads, REGISTER NOW!
Top Bottom