Having machined 4x8 pieces of MDF in a Shopbot once upon a time, I would wager a guess that your issue with the center dog holes is that the sheet could actually lift up in the middle when being cut. Most users choose an upcut bit to pull the dust out of the hole and this can actually pull the sheet up a bit as well. Even without that though the sheet will twist and warp if you let it, particularly if you are removing a bunch of material. It has internal stresses from manufacturing almost like a piece of tempered glass and the sheet will move as those stresses are relieved. If this happens it will throw the geometry of your shapes off and you'd see it on something low tolerance like a dog hole.
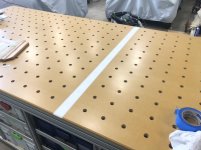
I noticed in the video of the second sheet on the CNC that it appeared to be using hold downs along the outside edge.
If the sheet was lifting there are a few ways to combat that issue. The first is a vacuum table but you can also get creative with carpet tape, a hold down foot on the gantry or toolpathing strategies. I never had access to a vacuum table that large so I would use multiple toolpaths. In this case I would have created 3 toolpaths. The first one would have done a simple plunge cut in the center of one of the holes about 1' on center. Once that was done I would have used a screw through each of those holes into the spoilboard to perfectly secure the piece and prevent it from lifting. The second toolpath would have machined all of the dog holes except those with screws in them. After that was done, before removing the hold down screws, use some fender washers and screws to secure the piece about 1' on center through some of the fully machined dog holes. Then remove the first batch of screws. The final toolpath would machine the dog holes where the first round of screws had been. It's more steps but your workpiece stability is rock solid.
I think this is the most reasonable explanation I've heard. The first CNC guy had a shop bot and used double sided tape, but I wasn't there to see the machining.
The second guy just clamped by the sides. I put my hand on the sheet multiple times during the process and never felt anything amiss, but I'm sure it doesn't take much to do what it did.
To give you guys an idea of costs:
Top 1: Plum Creek MDF sheet = $59. CNC Fee = $160. However, this guy refunded me $60. Total = $159
Top 2: Plum Creek MDF sheet =$59. CNC Fee = $145. Total = $204
Top 3: Double refined MDF sheet = $40 CNC Fee = $210. Total = $250
So... I've got about $600 in the top... which is more than I have in 80/20 for the hole bench. Bummer...