Nolift911
Well-known member
That is fantastic - I was going to ask about the "thingie" for the beam and lifting engines so thanks for that!!


 )
)Just saw this thread is back and i missed a few weeks of updates!!! Please keep them coming !!!!Thanks Geoff289. I'll keep the updates coming as long as people are interested and maybe even if they aren't. lol.
And as a relatively new golfer with very low garage ceilings... I have yet another reason to be jealous!!!
Those engine levelers are great if you're working on something with a 2bbl or 4bbl manifold where the carb is in the middle of the engine.....no help for those of us lifting inline 4's or 6's out.......
Thank you for the updates! I had to look up Salt Guard...
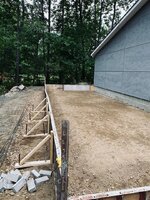
I was wondering just how big this structure was from the first picture, then I saw the guy working the concrete later on.
Do you have a one ton dump truck?
One question I have is from an earlier post way back in '12 about your dock where they have to be removed every winter.
Where do you put them?

 [/URL]
 [/URL]
 [/URL]
 [/URL]
 [/URL]
 [/URL]
 [/URL]
 [/URL]
 [/URL]
 [/URL]


If the 55 is headed to your shop then you'll have enough content to keep us interested for quite awhile!!
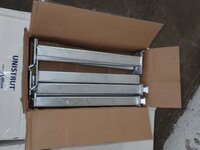
I built these racks out of unistrut to hold metal and wood. The red cabinets below are going to be built in to my work table when I finally get around to building it. They'll be painted Miller blue of course.
When you give us more of the details on the upper garage construction, be sure to touch on how you built the shelf brackets on the unistruts for lumber storage.
The unistrut makes for rugged wall mounted storage racks. I've been trying to recall where I bought the parts and pieces but I think I picked it up at the Home Depot. The vertical unistrut bears on the concrete curb and are lagged to the wall studs with structural screws. I don't know what the weight limit is but I've got them loaded pretty heavily.interesting approach using Unistrut for storage. Are you using the square nut style mounts or something different to hold the horizontal arms? Any guess on weight capacity?
 [/URL]
Did you fabricate the welded attachment of the horizontal piece or were you able to buy those?The unistrut makes for rugged wall mounted storage racks. I've been trying to recall where I bought the parts and pieces but I think I picked it up at the Home Depot. The vertical unistrut bears on the concrete curb and are lagged to the wall studs with structural screws. I don't know what the weight limit is but I've got them loaded pretty heavily.
I'll keep looking for details but hopefully you can source the parts if you are interested.
Did you fabricate the welded attachment of the horizontal piece or were you able to buy those?
 [/URL]
I really like this rack design -- I'm going to look for these parts too. Nice and efficient use of space.I purchased them just the way you see them. There is a bolt on top that pulls the bracket tight and really locks in the bottom. I think the horizontal elements were 18" long or but I cut them down to fit the space better. I'll dig around for my source.
Here's a link to a similar bracket: https://unistrutohio.com/products/p2513-thru-p2516I purchased them just the way you see them. There is a bolt on top that pulls the bracket tight and really locks in the bottom. I think the horizontal elements were 18" long or but I cut them down to fit the space better. I looked around quite a bit and this was all I found
Unistrut P1000 337655
I think they may have been discontinued because I can't find anywhere to buy them. I'm pretty sure I picked them up at the Home Depot but they don;t seem to have them now although there are similar product available.
Who makes the aerosol rack mounted on the wallIt's hard to believe but I made my first post in the Concrete Underground thirteen years ago almost to the day on January 20, 2011. Over the next several years I documented the build of my home in Maine as well as a little bit about our life here. I was amazed at the level of interest and made many friends from all over the world along the way. I stopped posting as construction neared the end because there just didn't seem to be much of interest to what I was doing.
When I recently entered the witness protection program and changed my username to protect my true identity, many of you expressed interest in the current state of things. I had actually been considering some kind of update so here we go.....
First off, we are still not 100% complete and you might be surprised at how much remains undone. I'm sure many of you can relate to having busy lives and annoying financial constraints. Nevertheless I'll catch you up with the state of the Concrete Underground in the hope you find it interesting and frankly because I miss doing it not to mention the interaction with all of you.
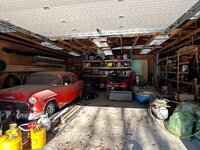
I'll take it area by area and follow up with any interesting construction details that I managed to record. Since this is the Garage Journal, let's start with the shop. This was to be my workshop and I had (have) big plans for this area. Since I used this area extensively during construction, it was filled with tools and equipment early in the process and thus never received the finished walls and floors I originally planned.
The far left corner is a welding area. I nabbed the table years ago and it serves its purpose well. I really like the Miller blue color so I painted the boxes to match.
This adjacent area on the back wall contains the lift pump and battery charging area. I have a little fold down desk in the corner and a whiteboard above to write down things I'm sure to forget within 5 minutes if I don't.
The front corner is used mostly for tool storage.
The opposite corner is mostly material and supplies
I did get the skylight installed over the lift. It's a bit absurd really but it does let in a lot of light in an area with no windows other than those in the OH door. I'll post some pics of how this went together in my next post.
Here's a view from outside
The lift has been worth 100% of the time and cost. The unground design takes up very little space in a relatively compact shop. This pis shows why I needed the extra headroom. Locating the skylight relative to the lift involved a bit of guesswork but every vehicle I've lifted so far fits the opening above.
I also got the 2 ton bridge crane installed and find it to incredibly functional. I use it often to pick things up in one area of the shop and move it to another as well as using it to load items into vehicles. It's obviously great for engine removal and install. If you recall, I installed two extra deep roof beams that the trolleys run on.
I bought the materials to build a sweet rolling steel work table but as you can see, I'm still getting by with saw horses and a sheet of plywood. I'm planning on building my new table once the K20 is out of the shop.
Well that should get us started. I'll start digging up pics and get back to you with more details. As always, happy to answer any questions you might have. Cheers.
It's actually a bunch of individual metal racks I bought off the jungle website screwed to a piece of plywood.Who makes the aerosol rack mounted on the wall
 [/URL]
 [/URL]
 [/URL]
 [/URL]
 [/URL]
 [/URL]
 [/URL]) continues to impress, and I just hope that my upcoming basement and garage slabs can benefit from what you've shared!
Did you consider insulating the slab perimeter in the garage / boat shed? I don't see any below the Stego, just curious if it was considered not necessary, etc.
Thanks to all for your interest. I'm working out a way to organize a tour of the inside of the house. Stay tuned for that. In the meantime I post up a few miscellaneous bits shortly.


Curiosity got the best of me also (since we're close) and I've considered contacting you for a look. But that was when it was a jobsite, a place that I've spent my working life, and one's home is off limits in my mind.I appreciate the apology Kalmar but please don't give it another thought. I'm sure I've inadvertently provided more than enough information to allow someone to track me down if they really wanted to. I don't worry too much about it. The paparazzi gave up a long time ago.
I hope you realize that my comment about changing my name had nothing to do with privacy concerns. I just thought ConCretin was more fitting on several levels.