That's pretty typical for acrylic sheet. If you go on McMaster-Carr and look at their Acrylic sheet selection, you'll see +/-0.059" tolerances on a several of their offerings. Several of the offerings also have asymmetrical tolerances, with more tolerance allocated on the thin side which would be desirable if you need to make sure the panel will slide into a groove.
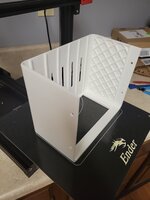
I printed my largest part so far on my Ender-3 Max. Last summer I mounted my old double-din stereo to the cabin ceiling in our boat. 100% functional, but I never fab'd an enclosure for it to make it look finished and to prevent hitting your head on a sharp sheet-metal corner. An hour of modelling and about 24hrs of printing later I now have an enclosure, complete with vent-holes and countersunk screw holes for mounting

I'm happy with how it printed, although I made a couple goofs:
- I added large 0.5" radius edge blends to the outside to make it less painful to bump into, and I didn't realize that while doing so, I moved one edge of the rectangular opening about 1mm back from the face of the enclosure, which created a really long unsupported bridged section when I oriented it for printing. I should have realize I goofed when I saw the brim passes curve under the part as you see in the first image. Doh! Some sagging in that area and a few loose layers, but it's usable.
- I was running black filament before this job and apparently didn't purged it enough because I ended up with one grey streak on the first layer (the primary cosmetic face) about 5" long. The brim passes looked clean, so I guess there was some residue in the nozzle that took a while to move out. A little sanding and some Krylon Fusion and it should be perfectly fine for my needs. Any tips for how long to purge between color changes? Or is it best practice just to change the nozzle to be sure?
Overall still very happy with the quality given that I have done any ustep calibrations whatsoever. Before buying I read about some minor binding in the z-axis leadscrews causing banding, which I noticed early on but faded as I got more hours of runtime. The upper half of this print (where I've never ran the machine before) shows some banding again, so I thing my first area of tuning is going to be to put my dial indicator on the z-axis and see if I can't find where the binding is occurring and try to smooth it out a bit.