Tube forming today. Needed some oval tubing, the closest size to ideal was astronomical to ship, so I decided to make some at as close to "ideal" as I could get.
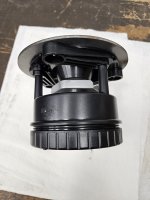
Printed these this afternoon:

2 walls, 50% infill. Built a box with oak scraps to contain them while they were printing.
Clamp the sides, big steel plates top and bottom, and a center stop block to limit travel and support the flats:

The stop block was a bit small on round 1, so I cut a new one a bit bigger, and came up with a very workable oval.

That one pressed a bit crooked because my top steel plate hung up on a 4x4 I had sitting nearby, so it isn't perfect. I'll press the three I need tomorrow. The tools did Crack at the base of the radius on the last oval, but it really doesn't matter because the wood fully supports the blocks. I am printing a new set as I type this anyway.
This is 2-1/4" tubing. The radii of the forming dies are 5/8"
In a past life I was a metalforming tooling designer. I would often do prototypes out of wood/MDF to get bend radii and other things right. The printer is so much easier as I can just export my models as STL files, and I can print whatever dimensions I need. I am not limited to whatever router bits and such are available.


.jpg")