
You are using an out of date browser. It may not display this or other websites correctly.
You should upgrade or use an alternative browser.
You should upgrade or use an alternative browser.
The Everything 3D Printer Thread
- Thread starter BoilermakerFan
- Start date
white91formula
Well-known member
Making Wall Control pegboard tool hangers. Today was vice grip hangers, each holds (2) pair, made one for each of the (3) different adjustment screw diameters.
View media item 108325
View media item 108324
Sent from The Garage Journal mobile app
View media item 108325
View media item 108324
Sent from The Garage Journal mobile app
WoodsTruck
Well-known member
- Joined
- Jan 12, 2013
- Messages
- 1,029
Looking for input on an issue I encountered recently.
I printed up some cradle blocks to support this waterproof box off the tunnel of my sled. It has a keel down the bottom of the block to drop into the groove in the tunnel to help keep it aligned. I am set to print on a raft and then there is support material along side the keel before it reaches the bottom of the block. The problem is the warping on the bottom of the block due to cooling and the support material not being a good heat sink. You can see the bottom of the block is bowed (rocker) but the rest of the print is fine.
Any thoughts on how to keep the block from warping?
Attachments


brawls43
Well-known member
Making Wall Control pegboard tool hangers. Today was vice grip hangers, each holds (2) pair, made one for each of the (3) different adjustment screw diameters.
View media item 108325
View media item 108324
Sent from The Garage Journal mobile app
Those are awesome, I think my wall control needs a couple of those. Would you be willing to share the files?
Cruzan80
Well-known member
What material? Abs behaves very differently than PLA, for example. If ABS, I would look at airflow issues. It needs to be almost completely enclosed, or it warps like that.
Sent from my Phone 2 using The Garage Journal mobile app
Looking for input on an issue I encountered recently.
I printed up some cradle blocks to support this waterproof box off the tunnel of my sled. It has a keel down the bottom of the block to drop into the groove in the tunnel to help keep it aligned. I am set to print on a raft and then there is support material along side the keel before it reaches the bottom of the block. The problem is the warping on the bottom of the block due to cooling and the support material not being a good heat sink. You can see the bottom of the block is bowed (rocker) but the rest of the print is fine.
Any thoughts on how to keep the block from warping?
Sent from my Phone 2 using The Garage Journal mobile app
penright
ALLIANCE MEMBER
Making Wall Control pegboard tool hangers. Today was vice grip hangers, each holds (2) pair, made one for each of the (3) different adjustment screw diameters.
Sent from The Garage Journal mobile app
I like the vise-grip holders, I may have to try that on some of my welding clamps. They may be too much leverage because of how wide they are. The volume is more away from the board, which leaves more surface area.
BTW, the speed square, someone here had a picture where it slid into a slot, kind of like your vise-grips. I will have to try that also for all the same reasons.
Happy to, do you want the .stl or the editable part model? Designed in Fusion360. I only did the center holder, the end caps that hook into the wall are from someone else, i can share the link here or its in my build thread linked signature I believeThose are awesome, I think my wall control needs a couple of those. Would you be willing to share the files?
Sent from The Garage Journal mobile app
white91formula
Well-known member
Looking for input on an issue I encountered recently.
I printed up some cradle blocks to support this waterproof box off the tunnel of my sled. It has a keel down the bottom of the block to drop into the groove in the tunnel to help keep it aligned. I am set to print on a raft and then there is support material along side the keel before it reaches the bottom of the block. The problem is the warping on the bottom of the block due to cooling and the support material not being a good heat sink. You can see the bottom of the block is bowed (rocker) but the rest of the print is fine.
Any thoughts on how to keep the block from warping?
Is this warping on the printer or on the sled ? wasnt very clear. the warping isnt from stress and over constraining it with the bin strapped into it is it ?
what material and print settings ? Are you taking it off the printer/bed before its completely cooled down ?
Outlander
Well-known member
")

Happy to, do you want the .stl or the editable part model? Designed in Fusion360. I only did the center holder, the end caps that hook into the wall are from someone else, i can share the link here or its in my build thread linked signature I believe
Sent from The Garage Journal mobile app
The details on the modular system of parts I found for Wall Control is in the post linked below on my build thread. I really like the fit of the slot hooks, and like the majority of what's done...few tweaks I'm going to make and probably work to make a lot of my own custom "centerpieces" as they're called while using their end brackets for holding the centerpieces.
https://www.garagejournal.com/forum/showpost.php?p=8806501&postcount=85
WoodsTruck
Well-known member
- Joined
- Jan 12, 2013
- Messages
- 1,029
Is this warping on the printer or on the sled ? wasnt very clear. the warping isnt from stress and over constraining it with the bin strapped into it is it ?
what material and print settings ? Are you taking it off the printer/bed before its completely cooled down ?
I'm using PETG filament.
The block comes off the printing bed with the warp built into it. I attribute it to the support layers next to the keel not having enough "anchor" to keep it pulled down flat across the length of the block bottom. Once it is printed, the items come down to room temperature then removed from the print bed and cleaned off the raft.
It could be such that I don't have an enclosure around the printer (Ender-5) controlling the local climate on the print area.
white91formula
Well-known member
I'm using PETG filament.
The block comes off the printing bed with the warp built into it. I attribute it to the support layers next to the keel not having enough "anchor" to keep it pulled down flat across the length of the block bottom. Once it is printed, the items come down to room temperature then removed from the print bed and cleaned off the raft.
It could be such that I don't have an enclosure around the printer (Ender-5) controlling the local climate on the print area.
I have a ender 5, two of them actually and print PETG almost exclusively. I dont have any issues at all. Funny thing is for how PLA is supposed to be to print i cant get good prints with it.
Are you on the stock flexy build plate or glass? Are you doing anything to it to get the prints to stick better ? glue stick ? blue tape ? What temperature are you using for the build plate ?
If you arent getting good bed adhesion then you dont have your bed leveled/ gap set right or need to add some sort of adhesion for the filament.
brawls43
Well-known member
The details on the modular system of parts I found for Wall Control is in the post linked below on my build thread. I really like the fit of the slot hooks, and like the majority of what's done...few tweaks I'm going to make and probably work to make a lot of my own custom "centerpieces" as they're called while using their end brackets for holding the centerpieces.
https://www.garagejournal.com/forum/showpost.php?p=8806501&postcount=85
Thanks for the link! I'll download those and check it out. Definitely want to customize some more mounts for my wall control.
WoodsTruck
Well-known member
- Joined
- Jan 12, 2013
- Messages
- 1,029
I have a ender 5, two of them actually and print PETG almost exclusively. I dont have any issues at all. Funny thing is for how PLA is supposed to be to print i cant get good prints with it.
Are you on the stock flexy build plate or glass? Are you doing anything to it to get the prints to stick better ? glue stick ? blue tape ? What temperature are you using for the build plate ?
If you arent getting good bed adhesion then you dont have your bed leveled/ gap set right or need to add some sort of adhesion for the filament.
The raft sticks to the flexible print surface quite well. It is just on this print job that the keel of the block makes contact with the raft and the remaining area (volume) is filled with support material. The block starts to warp when the bonding ability of the support structure fails and the block warps as it cools. I'm guessing I will need to build an enclosure. Would a light bulb in the bottom of the enclosure do any good for providing ambient temp to help stabilize the environment?
Attachments
lilscorpion
Well-known member
Making Wall Control pegboard tool hangers. Today was vice grip hangers, each holds (2) pair, made one for each of the (3) different adjustment screw diameters.
View media item 108325
View media item 108324
Sent from The Garage Journal mobile app
Those are sweet!
Stuart in MN
Well-known member
This is way outside a home setup, but I thought it was cool...this video is about 3D printing a turbo exhaust header directly out of Inconel.
white91formula
Well-known member
The raft sticks to the flexible print surface quite well. It is just on this print job that the keel of the block makes contact with the raft and the remaining area (volume) is filled with support material. The block starts to warp when the bonding ability of the support structure fails and the block warps as it cools. I'm guessing I will need to build an enclosure. Would a light bulb in the bottom of the enclosure do any good for providing ambient temp to help stabilize the environment?
You shouldn't need a enclosure for petg on that machine. Are you printing that solid 100% infill or like 20 or 50%. If its solid you are going to fight warping. Alot of mass, heat, stress etc. What infill pattern are you using?
Try doing the following.
Flip the part on its side on the print bed, the large flat side that faces out on the sled. Print at 20% infill and try using the concoidal pattern or honeycomb. If it prints flat like that try upping it to 50% infil if you think you need it for strength. If its only locating that box 20% is probably more than strong enough.
Print directly on the bed, no raft. Skirt if youd like for purge. Use a thin layer of elmers glue stick if you need adhesion. Your part is way to big and blocky to need a raft.
Turn off layer cooling for first 3 layers and 50% cooling fan after that. Print slow, 25mm/sec
For PETG, if you need strength leave cooling off the entire time. The print looks better with cooling, but is stronger without. Going above 50% only adds a marginal amount to strength and adds a good bit to print time and material use. For structural parts I normally use 4-5 solid loops for walls And 3 -4 layers for horizontally surfaces.
Those are sweet!
Thanks! Big compliments from the master tool organizer/reorganizer him self! Since we can't post .stl files here, PM me if you want a copy of the "centerpiece" files that the vise grips hang on, the end caps are downloadable from the link in my build thread up above.
lilscorpion
Well-known member
Thanks! Big compliments from the master tool organizer/reorganizer him self! Since we can't post .stl files here, PM me if you want a copy of the "centerpiece" files that the vise grips hang on, the end caps are downloadable from the link in my build thread up above.
Thanks for the offer. Haven’t added a slay wall yet (or finished putting together my 3D Printer). They’re spiked nice looking though and I know where I’d want one so it’s more about time. Too many projects piled up...but I might take you up on that offer at some point.
How much weight do you think they’d hold?
banjopete
Well-known member
I've been using petg for some time and always print inside an enclosure. I've never needed anything more than the bed and extruder to handle the heating. I really like the prints I get, only downside I've seen is stringing.
Here's the last stuff I did, a simple box to contain my emergency stop for my cnc. These things are endlessly useful.


Sent from my SM-G960W using The Garage Journal mobile app
Here's the last stuff I did, a simple box to contain my emergency stop for my cnc. These things are endlessly useful.
Sent from my SM-G960W using The Garage Journal mobile app
Cryptic1911
Well-known member
loganb, you might be able to use one of the free file hosting services to drop some files and post a link here. Something like mega, etc
Thanks! Big compliments from the master tool organizer/reorganizer him self! Since we can't post .stl files here, PM me if you want a copy of the "centerpiece" files that the vise grips hang on, the end caps are downloadable from the link in my build thread up above.
white91formula
Well-known member
white91formula
Well-known member
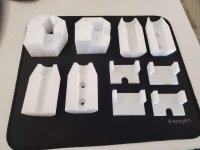
Been wanting to do this for a while now. Stands for my steady rest and follower rest to help store them. They were always on thier side or on top of everything. Now they can stand on thier own neatly.
Attachments


Thanks for the offer. Haven’t added a slay wall yet (or finished putting together my 3D Printer). They’re spiked nice looking though and I know where I’d want one so it’s more about time. Too many projects piled up...but I might take you up on that offer at some point.
How much weight do you think they’d hold?
The failure mode under weight will first be the joint between the "endcaps" and the "centerpieces" as the guy who designed the modular system calls them. Once I get things semi-nailed down, I'll be supergluing the endcaps to the center's to keep things from coming apart. With things glued together I see no reason why with a reasonable number of perimeters and top/bottom layers these won't easily hold 20+ lbs each which for a pegboard/toolwall type system seems like it'll be way more then it needs to.
MushCreek
Well-known member
This is my first visit to this thread. I'm not going to read all 38 pages, so pardon me if these questions have been asked 1000 times already.
Bottom line- What is it going to cost me to get a 3D printer and software? I was just looking at the Folger F5 at around $500 (if you can get one). What programs are you guys running? Software? File type? I have a little CAD experience, mostly SketchUp in recent years, but I've dabbled in AutoCad and SolidWorks. My experience at work was CAD/CAM, doing machine work. How hard is it for a seasoned citizen to get the hang of it? I don't even know what I'd print, but the various tool holders look handy, and simple to draw.
Bottom line- What is it going to cost me to get a 3D printer and software? I was just looking at the Folger F5 at around $500 (if you can get one). What programs are you guys running? Software? File type? I have a little CAD experience, mostly SketchUp in recent years, but I've dabbled in AutoCad and SolidWorks. My experience at work was CAD/CAM, doing machine work. How hard is it for a seasoned citizen to get the hang of it? I don't even know what I'd print, but the various tool holders look handy, and simple to draw.
I run Fusion 360 and Cura. Fusion 360 is a CAD modeling software from Autodesk. Cura is a 'slicer' software that generates the g-code needed to run your printer. Both programs are free for hobby use.
Basically, you model whatever part you want in Fusion 360, save it as a .STL file, and then import that file into Cura to generate the code. Cura has a wide variety of printer configurations included in the software - it's literally as easy as selecting your printer, material, and hitting the "slice" button and saving the code to a USB. You can tweak just about ever print setting you can imagine in Cura, but I've found the factory configuration for my printer to be very reliable. Fusion has recently added a slicer component to the software, but I haven't tested it yet.
Since you already have some CAD experience, you've got a head start. Modeling something in CAD is more about that "aha moment" where you realize everything is just a series of simple shapes combined in three dimensions. The software you use is less important than being able to think about how to model something. Fusion 360 (like any CAD software) does have its nuances, but there are a ton of videos on YouTube that cover every aspect of the software. I have plenty of CAD experience but still find myself looking up 'how-to' videos when I hit a roadblock - its just part of the process.
As far as cost is concerned, if you just want to get your feet wet and print in PLA, a ~$200 Ender 3 is tough to beat. If you want to print in a variety of materials, or want some other features like dual print heads or enclousres, you can spend a lot of money on a high end unit. Ultimately, that has to be your decision based on your needs. Again, there are tons of comparison and review videos on YouTube if you want to get a better idea of what is out there.
The one thing I would advise when it comes to getting your first printer is to get one that requires minimal setup and tweaking. The last thing you want when you buy your brand new printer is to spend a bunch of time assembling and tweaking it before you can print.
Last edited:
This is my first visit to this thread. I'm not going to read all 38 pages, so pardon me if these questions have been asked 1000 times already.
Bottom line- What is it going to cost me to get a 3D printer and software? I was just looking at the Folger F5 at around $500 (if you can get one). What programs are you guys running? Software? File type? I have a little CAD experience, mostly SketchUp in recent years, but I've dabbled in AutoCad and SolidWorks. My experience at work was CAD/CAM, doing machine work. How hard is it for a seasoned citizen to get the hang of it? I don't even know what I'd print, but the various tool holders look handy, and simple to draw.
my 2 cents aligns with becker. There are (2) skillsets/knowledge bases you need to 3d print successfully in my mind:
- CAD
- 3D printing experience
If you have awareness/knowledge of 1 of them to begin with it makes it a much shorter learning curve to be successful and able to make useful to you items. You can print downloaded models from the internet and some are happy, but to really be useful and helpful in most of the GJ's type of endeavors I think the ability to design your own parts for your application is critical to get the full benefit.
For CAD, if you're familiar with SolidWorks and have CAD/CAM background I'd suggest either Fusion360 or SolidWorks for modeling. Fusion has a personal use option that's free but has some annoying quirks that come with that(like very limited file type translations in the personal use license). SolidWorks can be gotten as an Educational use licensee with some various groups/affiliations...I personally just joined EAA so I could get back to SolidWorks as I wasn't loving Fusion360.
For printers, the Ender that was mentioned is a well regarded entry price point machine with a large community following and lots of units out there. It's a pretty low risk, proven machine to find out if you like the process/hobby etc and if it's helpful to you. If so and you want bigger work envelope, more reliable printing, more material choices etc you can then upgrade or add a different machine to the fleet as you learn more about it and what you need for your type of work.
Lots of free models available for download out on the web, most prominent is Thingiverse so if you haven't checked it out go and just browse to see what designs others have done that can help get you started .
Last edited:
Been wanting to do this for a while now. Stands for my steady rest and follower rest to help store them. They were always on thier side or on top of everything. Now they can stand on thier own neatly.
Nice job! I also love the contrast between old and new manufacturing technologies in those pics.
MushCreek
Well-known member
That's great info- thanks! May main concern with printing stuff is that the parts be strong enough. If I make brackets to store my cordless batteries, they need to be strong enough to hold, well, a battery. My experience goes all the way back to the stereo lithography days when we had prototypes printed that were very expensive and as fragile as an egg shell. You had to paint them with epoxy (?) before you dared even touch them. I'm impressed to see functional parts being printed at home. It wasn't long ago that an 'entry-level' 3D printer was $10K, and only businesses owned them.
Yeah, the materials have come a long way since then.That's great info- thanks! May main concern with printing stuff is that the parts be strong enough. If I make brackets to store my cordless batteries, they need to be strong enough to hold, well, a battery. My experience goes all the way back to the stereo lithography days when we had prototypes printed that were very expensive and as fragile as an egg shell. You had to paint them with epoxy (?) before you dared even touch them. I'm impressed to see functional parts being printed at home. It wasn't long ago that an 'entry-level' 3D printer was $10K, and only businesses owned them.
The strength of a printed part can be heavily influenced by a couple things: material used, printer settings and design
The gray plastic hooks screwed to the wood here in this picture are 1/2" thick printed in PETG. I used 4 layers on top and bottom surface, 3 perimeter's and 15% infill...translation....there isn't a ton of material in them and additional could be added for more strength if desired. I just hung my 170 lbs off it by grabbing a hook in each hand for about 10 seconds. No creaks, groans or deflecting felt.
We use 3d printed parts for toolholders at operator workstations in the manufacturing facilities we have and even in those high use, high abuse environments have 0 problems.

Sent from The Garage Journal mobile app
Last edited:
OP
BoilermakerFan
Well-known member
This is my first visit to this thread. I'm not going to read all 38 pages, so pardon me if these questions have been asked 1000 times already.
Bottom line- What is it going to cost me to get a 3D printer and software? I was just looking at the Folger F5 at around $500 (if you can get one). What programs are you guys running? Software? File type? I have a little CAD experience, mostly SketchUp in recent years, but I've dabbled in AutoCad and SolidWorks. My experience at work was CAD/CAM, doing machine work. How hard is it for a seasoned citizen to get the hang of it? I don't even know what I'd print, but the various tool holders look handy, and simple to draw.
I'll reiterate what others have said. For a first printer, I would stick to the companies and models that have the best support. I was going to get a FT F5 and elected not to. My reasons were that the technology is still evolving and the price points continue to drop. I don't feel like FT has done a good job of evolving during this time and their customer service seems lack luster.
I'd go with a Prusa or a Creality 3D product.
white91formula
Well-known member

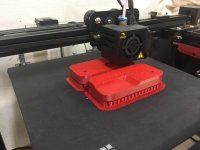
Cut this one close with filament.... but it made it!
To bad it failed my waterproof test. On to the next iteration of the prototype.
Haven't tried making anything water proof yet... this something you need to be water tight permanently or just short term?
Sent from The Garage Journal mobile app
harley jim
Well-known member
I would like to try and print trim parts for my truck projects. Do you think this is doable would a person be able to get a quality looking part or am I on the wrong path.
I have been watching several people that are 3D printing and you seem to be in tune to what you are doing and would like your thought on this before I buy, it could change what I think I need. Thanks, Jim
Sent from my SM-A102U using The Garage Journal mobile app
I have been watching several people that are 3D printing and you seem to be in tune to what you are doing and would like your thought on this before I buy, it could change what I think I need. Thanks, Jim
Sent from my SM-A102U using The Garage Journal mobile app
white91formula
Well-known member
Haven't tried making anything water proof yet... this something you need to be water tight permanently or just short term?
Sent from The Garage Journal mobile app
I actually need it to be oil proof and permanently. Water was my first test so i didnt make a oily mess. Might try coating the inside with a epoxy or resin.
FDM is tough because of the layers/lines.
First one i did was at 20% fill and was a civ. This one was 100% fill amd took several hours to leak. Both in PETG, for its chemical resistance.
Might try again in PLA due to more squish In layers or ib ABS amd try to acetone smooth it.
white91formula
Well-known member
I would like to try and print trim parts for my truck projects. Do you think this is doable would a person be able to get a quality looking part or am I on the wrong path.
I have been watching several people that are 3D printing and you seem to be in tune to what you are doing and would like your thought on this before I buy, it could change what I think I need. Thanks, Jim
Sent from my SM-A102U using The Garage Journal mobile app
I designed and printed new cupholders for my truck. Cut the console on a brand new truck and mounted them. Everyone that sees it says they look great.
Biggest issue you are going to have is size restraints with print bed. If quality isnt perfect you can always sand and paint them.
Stay away from PLA for cars, it will warp deform and melt in summer heat and be brittle in the cold. Stick with petg or abs.
I would like to try and print trim parts for my truck projects. Do you think this is doable would a person be able to get a quality looking part or am I on the wrong path.
I have been watching several people that are 3D printing and you seem to be in tune to what you are doing and would like your thought on this before I buy, it could change what I think I need.
Any pictures or thoughts of what parts you may be thinking of? That could help provide some better insight.
As mentioned, size may be a challenge. A big, commercially available 3d printer work envelope would be 20" x 20", most are in that 12 x 12 range or less. Some new, custom machines are out there for larger capacity but not nearly as common and still a more specialized application. Lots of ways to join parts together(superglue etc), just depends on how they're being finished and where they're being used.
If you have some CAD files of what you're thinking of printing, I'd be open to reviewing and seeing if I could print them on mine and send them your way to give a better idea of what you think before jumping in. PM me if interested
banjopete
Well-known member
@mush creek, many of the printers set up and print very well right off the bat but I tell anyone with an interest in 3d printing that you should expect to need to tinker and problem solve with any machine. If that's not appealing and you don't see a need for continued use of your own you can draft and design your own stuff and have them printed for you as an alternative as well.
Sent from my SM-G960W using The Garage Journal mobile app
Sent from my SM-G960W using The Garage Journal mobile app