To avoid these ads, REGISTER NOW!

The Everything 3D Printer Thread

To avoid these ads, REGISTER NOW!

Keyblazer

Well-known member
Joined
Jul 30, 2009
Messages
1,471
Location
Irvine, CA
Busy little machine...
So far, making storage solutions...
Air tool storage, Battery drill, charger, and battery hangers..

attachment.php


Then Paper Towel roll hanger.

attachment.php
 

Attachments

  • D7334F4A-DEB7-4096-8CE9-BC4367E3C829.jpg
    D7334F4A-DEB7-4096-8CE9-BC4367E3C829.jpg
    94.1 KB · Views: 122
  • 06C1A87E-6097-4A37-B0FB-6A2BB2AA42C3.jpg
    06C1A87E-6097-4A37-B0FB-6A2BB2AA42C3.jpg
    61.3 KB · Views: 105
Last edited:

momobuttons

Well-known member
Joined
Mar 19, 2021
Messages
212
Location
Long Island
I'll be unpacking my new resin printer tonight, Epax X1K. The purpose will be for designing prototypes for our custom jewelry. Traditionally, custom renderings were transferred to a wax model but with 3d printing the process is more streamlined and the resin creates a more robust piece, old wax models were very brittle. Looking forward to learning a new hobby.
 

bczygan

Well-known member
Joined
Nov 4, 2009
Messages
22,002
Location
DETROIT! Arsenal of Scrappers
Bill... with the right software modelling... you can print a girlfriend...

The blue wire thing has to go one of two places... the hot end (where the filament comes out)... or... the bed. My guess... it's the bed... it's a 50/50 shot.

I have 7 printers..............Can I print 7 different girlfriends! And multiples of each?

I'm gonna need a much larger print bed!

Bill
 

PelicanPines

ALLIANCE MEMBER
Joined
Apr 30, 2014
Messages
38,104
Location
New Jersey, USA, Earth, My own reality
Bill, the key to large prints is partitioning the prints into "parts". Various methods can be used to attach the parts together. Like epoxy or even hot glue if the stress is not great between the sections.

You wouldn't print 7 girlfriends... you would print 7 different parts of the ONE girlfriend. If you do it right... you can make "hot swap" or "upgrade" parts for different sections.

Also: You only need to print the "required" parts of the girlfriend... and for ease of use... can be left separated and only used as needed.
 
Last edited:

bczygan

Well-known member
Joined
Nov 4, 2009
Messages
22,002
Location
DETROIT! Arsenal of Scrappers
Bill, the key to large prints is partitioning the prints into "parts". Various methods can be used to attach the parts together. Like epoxy or even hot glue if the stress is not great between the sections.

You wouldn't print 7 girlfriends... you would print 7 different parts of the ONE girlfriend. If you do it right... you can make "hot swap" or "upgrade" parts for different sections.

That's good to know.

I'm going to need to print some "Upgrade" parts for myself!!!

Bill
 

Jim_No_Garage

Well-known member
Joined
Jan 15, 2011
Messages
3,299
Location
Millington NJ
Printed like 10 parts so far.
Air tool wall mounts, pressure washer nozzle storage mount, and Makita battery charger mount

The triangular Makita mount is prone to failure it seems.
It starts at the sharp end,? Which is prone to peeling up, s as NS ether it works and leaves a curled edge...
Orbit rips the print off the bed.

Check your slicers adhesion settings!

You should be using "brim" when you have points like that - I use it all the time. I didn't know this and lost a few prints due to adhesion issues.

Also clean your bed with Isoproyl alcohol between prints. I got a lot of goo off first time it did it.

Jim
 

Darby9

Well-known member
Joined
Jan 18, 2020
Messages
110
Location
San Francisco
Bill... with the right software modelling... you can print a girlfriend...

The blue wire thing has to go one of two places... the hot end (where the filament comes out)... or... the bed. My guess... it's the bed... it's a 50/50 shot.

If you do print a girlfriend, always ask before you connect the blue wire to her hot end where the filament comes out. Start with the bed first.
 

slim01

Member
Joined
Feb 6, 2010
Messages
23
Printed up version 4 of a steering aid for the Can Am and ran it last weekend. This is the 2nd version to actually be tested but 4th design. The 1st version tested worked well but started to delaminate between the solid layers and where the infill began and ended.

This version was modified to look a little less 'block-like' and was sliced to add more vertical layers for additional strength as well as a couple more solid layers top and bottom. Extruder temp was also increased for better layer adhesion and a PLA/Carbon Fibre filament was used this time. The first version used a PLA+ which I think would have been fine with the new slicer settings.

I did not use supports for this one so the first bridging layer does look a little coarse but there are 12 layers so I'm satisfied that the strength will be there.

In the future once I'm happy with the testing I'll use a Nylon/Carbon Fibre filament as the final product. For now I'm not really interested in ABS or ASA filaments but we'll see how the Nylon works out. I'm very conscious of the potential for a catastrophic failure of the part while driving so I try to be in contact with the steering wheel whenever possible.

Short testing video here:

attachment.php


attachment.php


attachment.php


attachment.php


attachment.php


attachment.php


attachment.php
 

Attachments

  • 20210403_101643.jpg
    20210403_101643.jpg
    77.1 KB · Views: 632
  • 20210403_101619.jpg
    20210403_101619.jpg
    151.2 KB · Views: 630
  • 20210403_100605.jpg
    20210403_100605.jpg
    150 KB · Views: 638
  • 20210403_100206.jpg
    20210403_100206.jpg
    150.1 KB · Views: 626
  • 20210403_095907.jpg
    20210403_095907.jpg
    117.6 KB · Views: 633
  • 20210403_095835.jpg
    20210403_095835.jpg
    134.5 KB · Views: 627
  • 20210403_100613.jpg
    20210403_100613.jpg
    147.4 KB · Views: 627

dfiler2

Well-known member
Joined
Dec 15, 2014
Messages
2,858
Location
NW Minnesota
A steering knob, we used to use those on trucks and tractors without power steering. You could break a hand but for the most part I always liked them and never had a problem.

Have been thinking about getting the Creality Pro unit, what filament do people suggest for getting started, any options that should be considered?

Thanks
 

vpd66

Well-known member
Joined
Mar 1, 2010
Messages
709
Location
Central Wisconsin
A steering knob, we used to use those on trucks and tractors without power steering. You could break a hand but for the most part I always liked them and never had a problem.

Have been thinking about getting the Creality Pro unit, what filament do people suggest for getting started, any options that should be considered?

Thanks

Start with PLA. Those machines print PLA very nicely. I've printed 3 different brands of PLA on my printer and they have all worked great. I've recently ventured into PETG filament and at first had some struggles. I did switch PETG brands and it made a huge difference. I don't know if I got a bad roll or if there is just that much difference from brand to brand. Start with PLA and you will get great results right out of the box. Then when you get comfortable with it try another type of filament.
 

Keyblazer

Well-known member
Joined
Jul 30, 2009
Messages
1,471
Location
Irvine, CA
Really wanted some beading dies... like dimple dies but put a stiffening bead around a hole.
Can’t afford $500 for a set so was thinking I could 3D print some.

Got some concentricity errors to fix, but for a first shot, I was happy..

attachment.php


attachment.php


attachment.php
 

Keyblazer

Well-known member
Joined
Jul 30, 2009
Messages
1,471
Location
Irvine, CA
Test time!
These are 1” hole dies.
So drilled a quick 1” hole in some 1mm aluminum sheet.

attachment.php


Pushed the dies thru...

attachment.php


Squished in the vise...

attachment.php


Ima gonna say thats a very fair result... good enough to move forward with some mods!

attachment.php


attachment.php
 

Keyblazer

Well-known member
Joined
Jul 30, 2009
Messages
1,471
Location
Irvine, CA
Thanks.
That was a rough prototype.
I finished the Fusion360 models this morning...

attachment.php


Printing them in Carbon Fiber reinforced pla now.
Playing with other ideas now. Lol

attachment.php
 

Attachments

  • 886A0A55-2BC8-4C34-BE42-B11603A047AE.jpg
    886A0A55-2BC8-4C34-BE42-B11603A047AE.jpg
    122.6 KB · Views: 430
  • A08BB56A-1D0B-43D4-BA1F-41FAE00EF186.jpg
    A08BB56A-1D0B-43D4-BA1F-41FAE00EF186.jpg
    134.7 KB · Views: 428
To avoid these ads, REGISTER NOW!

Keyblazer

Well-known member
Joined
Jul 30, 2009
Messages
1,471
Location
Irvine, CA
I love the dimple dies , are you going to make any oval ones ?

I might.
The problem is that most oval dies, or unusual shape dies I’ve seen are punch and form. By that I mean they punch the hole at the same time.
I guess you would need dual holes to align the upper and lower dies as a minimum.
 

gtae07

Well-known member
Joined
Mar 6, 2015
Messages
2,962
Location
Fayetteville, GA
Anyone have some suggestions for a decent filament dryer? I've been slack on it for the most part but I'm aiming to do some more PETG and I probably ought to do it right...
 

Bodj Built

Well-known member
Joined
Feb 3, 2016
Messages
1,165
Location
Moorpark, CA
I might.
The problem is that most oval dies, or unusual shape dies I’ve seen are punch and form. By that I mean they punch the hole at the same time.
I guess you would need dual holes to align the upper and lower dies as a minimum.

These are the videos the guy above was talking about

I plan on making myself oval and square dies. I can cut the oval/square on the plasma table so I luckily don't have to worry about the punch part
 

Keyblazer

Well-known member
Joined
Jul 30, 2009
Messages
1,471
Location
Irvine, CA
Printed the female and it came out good.
Set the male print off last night and this morning it didn’t look right.
I concur that it looks like one print with this stuff will kill a brass nozzle.
 

Attachments

  • 78E2735D-35E2-4D28-AE18-4C61A9BD2ECB.jpg
    78E2735D-35E2-4D28-AE18-4C61A9BD2ECB.jpg
    89.1 KB · Views: 94
  • 3040CC9A-6CBA-412F-935B-28417E1DA3B9.jpg
    3040CC9A-6CBA-412F-935B-28417E1DA3B9.jpg
    131.2 KB · Views: 96

PelicanPines

ALLIANCE MEMBER
Joined
Apr 30, 2014
Messages
38,104
Location
New Jersey, USA, Earth, My own reality
Anyone have some suggestions for a decent filament dryer? I've been slack on it for the most part but I'm aiming to do some more PETG and I probably ought to do it right...

I got the Sunlu... I am modifying it with a blower in the back to circulate the heat. I also modified it with a temp/humidity sensor. My buddy has a printer "farm" and recommends them. But insists on the blower modification. If you search in YOUTUBE for SUNLU MODIFICATION... you can see the mod I am talking about. The Youtube guy was a bit of a hack... but you get the idea from him.
 

techieman33

Well-known member
Joined
Jun 18, 2018
Messages
1,096
Location
Kansas
Anyone have some suggestions for a decent filament dryer? I've been slack on it for the most part but I'm aiming to do some more PETG and I probably ought to do it right...

Most people recommend just using a food dehydrator. Specifically this one. It's regularly on sale for $40 or less. Fits one roll of filament, and you there are parts on thingiverse to add extra height and fit more rolls. Rollers to feed directly out of it, all kinds of mods available. But any dehydrator that you can fit a spool into would work just as well. And you can also use it as a food dehydrator if your into that.

The Sunlu and 50 other brand names it's listed under is usually gets dinged because it doesn't have a fan and not really a way for the moisture to actually leave the unit. So as someone else said above you'll need to do a fan mod, or look for a different unit with one if you want something dedicated to being a filament dryer.

Most filament takes a few days or more before it really gets saturated, so it should be fine to just run it through a dehydrator and then put it on a regular spool holder while your printing.
 

1320stang

Well-known member
Joined
Dec 28, 2006
Messages
4,563
Location
Edmond, OK
Just picked up a year old Ender 3 Pro with a metal extruder, Capricorn bowden tube and a glass bed as upgrades Sunday. Local guy sells Polymaker so got in touch with him and bought a couple more rolls of PLA. Printed the dog, designed a simple cell phone stand, made some slot covers and printed a extruder knob so far.
 

Keyblazer

Well-known member
Joined
Jul 30, 2009
Messages
1,471
Location
Irvine, CA
Question:
Just got my hardened steel nozzles so I can print with the CF PLA...
Can I use these nozzles for everything or should I switch back to brass for normal prints?
 

txvwnut

Well-known member
Joined
Jan 1, 2015
Messages
7,588
Location
Bedford, Texas
Question:
Just got my hardened steel nozzles so I can print with the CF PLA...
Can I use these nozzles for everything or should I switch back to brass for normal prints?

You can use the hardened nozzles for everything, although I have read where some are switching back to brass when not doing abrasive filament.
 

techieman33

Well-known member
Joined
Jun 18, 2018
Messages
1,096
Location
Kansas
I use the same old kitchen oven I use for powder coating

The problem with kitchen ovens is they aren't always that stable, especially at lower temps. 140* could easily become 200* and ruin your filament. So if you know your oven can be stable at those low temps then go for it. The other downside is power usage. A small toaster oven or dehydrator is going to be a lot more power efficient. Especially in the warmer months when your not only paying to heat more space, but also putting a bigger load on the air conditioner.

Question:
Just got my hardened steel nozzles so I can print with the CF PLA...
Can I use these nozzles for everything or should I switch back to brass for normal prints?

You can. A lot of people prefer to swap back to brass for normal materials though. It has better heat conductivity than the steel nozzles. With steel you usually need to up the temps a little to compensate, which can hurt when your trying to do bridging and steep angles on things.
 

PelicanPines

ALLIANCE MEMBER
Joined
Apr 30, 2014
Messages
38,104
Location
New Jersey, USA, Earth, My own reality
Got my CR-10 V3 printer yesterday... Started assembly today and Bing Bang Boop... bad connector on the cable from the heated bed to the control unit. Its a 5 pin aircraft round connector... (GX16-5)... Pin 4 is clogged with something solid... can't poke it out... can't get around it to "extract" it... I guess I could drill it...... emailed support with pictures...

Let's see what happens.

Worst case... I get my soldering iron out and make up a new end (I don't want to do that).

Best case... Creality sends me a new heat bed with cable (since it's soldered on).
 
Last edited:

ptt49er

Well-known member
Joined
Jun 28, 2018
Messages
301
Location
Rock Hill, SC
Don't forget - McMaster hosts a large quantity of 3D files for the parts they sell. Makes for some quick modeling if you just have to download what you need!
 

APEowner

Well-known member
Joined
Oct 2, 2009
Messages
4,164
Location
Sunny, New Mexico
The problem with kitchen ovens is they aren't always that stable, especially at lower temps. 140* could easily become 200* and ruin your filament. So if you know your oven can be stable at those low temps then go for it. The other downside is power usage. A small toaster oven or dehydrator is going to be a lot more power efficient. Especially in the warmer months when your not only paying to heat more space, but also putting a bigger load on the air conditioner.


True. That's an excellent warning that I shoukd have included. My actual kitchen oven doesn't even go low enough. The one in my shop not only goes low enough but based on the thermocouple I monitored it with it's quite stable at low temps.
 

1320stang

Well-known member
Joined
Dec 28, 2006
Messages
4,563
Location
Edmond, OK
Slowly cracking away at a few prints. Made some rail covers for the printer rails to keep the trash out of them. Made a Z-axis knob for the screw and an extruder knob for the all metal extruder. I printed a Y-axis belt tensioner (yet to install) and will print a X-axis one soon. Planning on getting some 2" foam to build an enclosure to keep the heat and sound in. I'm wondering if I should move the power supply and control board outside the enclosure?

I printed a planetary gear set (4x sized, 100mm across) and left it on the counter at my buddy's Napa store as a fidget toy for customers.
 

Keyblazer

Well-known member
Joined
Jul 30, 2009
Messages
1,471
Location
Irvine, CA
Cmon Stang!
We need pics!

Question for you experienced guys.
What is the strongest infill for compressive strength in Cura?
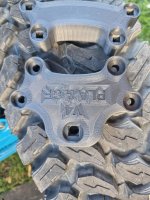
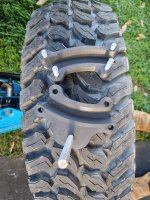
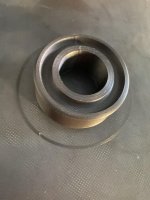
Redoing my beading dies and can’t figure it out from the menu or searches.

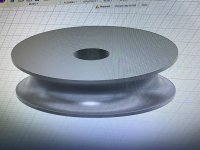
Did my first completely virgin design!
Did it in Fusion 360, and its a Magnet winding spool for a broken Mag Drill that had a broken wire or bad connection...


attachment.php


attachment.php


Magnet spool came out great!
Very happy so far...
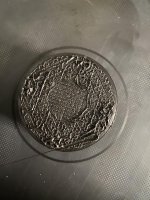
As it printed with the support...
attachment.php


Fettled...

attachment.php


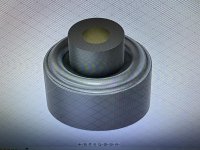
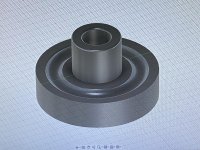
Finished a 5/16 brake line straightening tool!

attachment.php


The contact rollers are 3D printed, and the bearings are standard skateboard.
Here is a pic of all The parts before assembly...

attachment.php
 
Last edited:

Keyblazer

Well-known member
Joined
Jul 30, 2009
Messages
1,471
Location
Irvine, CA
Oops.
Here is my finished male 1” beading die in Fusion360.
Once I have the 1" die set figured out I think I can just use scaling in Cura to make everything from 1/2" to 3" in 1/4 increments!

attachment.php
 

Attachments

  • 6649CA25-C766-4731-9447-22C9ED74C090.jpg
    6649CA25-C766-4731-9447-22C9ED74C090.jpg
    154.3 KB · Views: 409
To avoid these ads, REGISTER NOW!
Top Bottom