To avoid these ads, REGISTER NOW!

The Everything 3D Printer Thread

nicholam77

Well-known member
Joined
Dec 18, 2016
Messages
2,655
Location
Minneapolis, MN
Just ordered the parts for that today. It'll be a couple weeks before I get back to it though.
Mine has been partially done, sitting on the desk for an embarrassingly long time. It should be ready to install Octo onto.... maybe this weekend?

What Pi are you guys using? I just found an in stock Zero 2 W for a good price and it's en route. I've never used Raspberry Pi's before, is there a certain camera you'll be using?
 
To avoid these ads, REGISTER NOW!

nicholam77

Well-known member
Joined
Dec 18, 2016
Messages
2,655
Location
Minneapolis, MN
@slodat yeah the "YouTube authorities" I've watched say it works well. Pi prices are through the roof right now (like $100 or more for a Pi 4?!). The Pi Zero 2 W is supposed to be $15, but pretty much everywhere had it for 3x that or sold out. I lucked out and found one for MSRP, about $22 shipped the other day. I'd share the link but it's now sold out...
 

Bessy

Well-known member
Joined
Dec 18, 2012
Messages
992
Location
Ontario, Canada
I have a 3b+ running on the 5 plus. I bought the raspberry Pi camera, but it's not been installed because I'm just using my webcam from my computer.

On the 3v2 bed tonight, I have pegboard hooks. Surprised that the 15% infill seems decently strong, not that I'm putting a huge amount of weight on them.
 

Attachments

  • 16385015138681939949203167920904.jpg
    16385015138681939949203167920904.jpg
    358.6 KB · Views: 86

cycle61

Well-known member
Joined
Apr 5, 2020
Messages
500
Location
Middle of Oregon
My garage small parts organization basically consists of ziploc bags, cardboard boxes, and a couple of Milwaukee Jobsite Organizer bins. They're cheap and sturdy, but lots of wasted space, they don't fit my cabinets, drawers, or travel tool case in any meaningful way, and other than about $150 in sunk cost I have no commitment to the system. Been looking at the usual suspects, schaller bins, Tanos/Festool compatible storage, etc. Since I seem to have an insidiously growing stack of green boxes, I figure I'd give that system a shot. Waiting for a Systainer 3 M89 organizer, and in the meantime I'm printing some bins (from here: https://www.bkmakes.com/stl-bins) and a drawer insert plate to see how I like the system as a whole.

1638558272317.png
 
Last edited:

Bessy

Well-known member
Joined
Dec 18, 2012
Messages
992
Location
Ontario, Canada
Man now I want a Prusa that much more, but my wife to be (Tomorrow) has said no to any more printers... I agreed and said that I had no need for any more printers. Right now...

I did get some printing done last night (planned to print most of the day yesterday to get through some gifts and such, but life got in the way). My first Christmas print, an ornament, got loaded up around 9:30 or so last night (finished sometime in the middle of the night). I'll probably change colours and make a few more.

Need to print some battery holders for Dad's stocking, some dice, dice box and Nintendo switch Koozies for the future-someday-maybe-brother-in-law, and a phone/watch charging stand for my sister. Not sure exactly what to print for my Mother or Wife-to-be just yet, though cookie cutters may be on the list.
 

Don-F

Well-known member
Joined
Oct 4, 2014
Messages
98
Location
Oregon
I have used my ender3 for making header mockup sections. No one makes them in 1-3/8". My first header turned out just great. I also used it when I made my V belt pulleys. I am glad I did, as 5" aluminum blanks are a lot more expensive than plastic. Once I had the offset worked out right it was simple to make the aluminum pulley on the lathe. https://www.thingiverse.com/thing:4886707

200057792_4202026679817681_18444680498344461_n.jpg
 

Don-F

Well-known member
Joined
Oct 4, 2014
Messages
98
Location
Oregon
I also made an AXA tool holder rack for my Boxford Lathe using 3d printed parts and a cheap aluminum extrusion. I cant take credit for the design, it was originally done for a china lathe on thingiverse, but I remade the mounts and changed a few things to fit my Boxford. Its so handy to not have to rummage through the cabinet when you need another tool. https://www.thingiverse.com/thing:4877281

featured_preview_AXAToolRack.jpg
 

Poolshark314

Well-known member
Joined
Jul 5, 2021
Messages
658
Location
MD
What Pi are you guys using? I just found an in stock Zero 2 W for a good price and it's en route. I've never used Raspberry Pi's before, is there a certain camera you'll be using?
I run OctoPrint on a Pi 3a+. If you want to run on a Pi Zero, and your printer supports Klipper, you could flash Klipper and run Fluidd or similar on the Pi instead of OctoPrint. Fluidd is pretty nice
 

Pressingonward

Well-known member
Joined
Mar 9, 2016
Messages
522
Location
SW WA
I have used my ender3 for making header mockup sections. No one makes them in 1-3/8". My first header turned out just great. I also used it when I made my V belt pulleys. I am glad I did, as 5" aluminum blanks are a lot more expensive than plastic. Once I had the offset worked out right it was simple to make the aluminum pulley on the lathe. https://www.thingiverse.com/thing:4886707

200057792_4202026679817681_18444680498344461_n.jpg
What motor is that? 1200 cc crossflow? Love the old Hondas...happen to have a thread on it?
 

Don-F

Well-known member
Joined
Oct 4, 2014
Messages
98
Location
Oregon
What motor is that? 1200 cc crossflow? Love the old Hondas...happen to have a thread on it?
 

PelicanPines

ALLIANCE MEMBER
Joined
Apr 30, 2014
Messages
38,104
Location
New Jersey, USA, Earth, My own reality
Lots of Raspberry Pi talk... I want to mention:

If you have a filament runout sensor built into your printer. THEY DO NOT work with octoprint. You need to move the wiring to the raspberry Pi for it to work as expected.

Currently rebuilding my CR10 V3 to include a better runout sensor.
 

rlitman

Well-known member
Joined
Oct 18, 2010
Messages
24,576
Location
Long Island
Lots of Raspberry Pi talk... I want to mention:

If you have a filament runout sensor built into your printer. THEY DO NOT work with octoprint. You need to move the wiring to the raspberry Pi for it to work as expected.

Currently rebuilding my CR10 V3 to include a better runout sensor.
I had that issue. I also had an issue with filament breaking at the extruder, and since the runout sensor is always between the extruder and the filament spool, the sensor doesn't even know anything is wrong.

I have since upgraded to a Bigtreetech smart filament sensor that goes inline in the bowden, and that uses a roller inside flipping a switch on and off (like a tachometer) to indicate filament movement. Connect that to a GPIO and couple it with the Smart Filament Sensor plugin, and you're good to go. This will also trigger if you have a clogged nozzle (since filament will stop moving). i.e. it will pause your prints exactly at the moments you need something to pause them.
 

Don-F

Well-known member
Joined
Oct 4, 2014
Messages
98
Location
Oregon
I have since upgraded to a Bigtreetech smart filament sensor....
If you get one be aware that quality control is lacking. I am on my second one. The first one worked for a few hours then would stop intermittently for no reason. I checked it for dirt, tried different settings in Marlin, etc. A month of chasing my problems. Finally one thread mentioned you can modify Marlin to report the counts from the sensor to a terminal in pronterface. I did that an it was all messed up. It would read then not at all, then read about half counts, then back to reading again. I sent it back to amazon and got another. Six months later not one issue, this last one was made OK. The internet forums are full of people with the same problems so its a lottery if you get a working one or not.
 

rlitman

Well-known member
Joined
Oct 18, 2010
Messages
24,576
Location
Long Island
If you get one be aware that quality control is lacking. I am on my second one. The first one worked for a few hours then would stop intermittently for no reason. I checked it for dirt, tried different settings in Marlin, etc. A month of chasing my problems. Finally one thread mentioned you can modify Marlin to report the counts from the sensor to a terminal in pronterface. I did that an it was all messed up. It would read then not at all, then read about half counts, then back to reading again. I sent it back to amazon and got another. Six months later not one issue, this last one was made OK. The internet forums are full of people with the same problems so its a lottery if you get a working one or not.
I never had any trouble with mine, but I suspect the issue you saw could be one of only a few things.

1) Perhaps a hair got into the encoder wheel. The technology is nothing different than an old fashioned mouse with a ball, and is easily fooled by contamination that can be impossible to see, or
2) It could be an electrical signal issue. I'm reading the output on a GPIO and not through the printer, so Marlin doesn't do any counting. I can directly watch the change of state via "gpio readall" on the RPi, and I wonder if the encoded signal is something the RPi triggers on well, when the printer mainboard fails.
3) It could be a wiring issue, with some unreliable connection that was swapped with your replacment.
 
To avoid these ads, REGISTER NOW!

Don-F

Well-known member
Joined
Oct 4, 2014
Messages
98
Location
Oregon
I never had any trouble with mine, but I suspect the issue you saw could be one of only a few things.

1) Perhaps a hair got into the encoder wheel. The technology is nothing different than an old fashioned mouse with a ball, and is easily fooled by contamination that can be impossible to see, or
2) It could be an electrical signal issue. I'm reading the output on a GPIO and not through the printer, so Marlin doesn't do any counting. I can directly watch the change of state via "gpio readall" on the RPi, and I wonder if the encoded signal is something the RPi triggers on well, when the printer mainboard fails.
3) It could be a wiring issue, with some unreliable connection that was swapped with your replacment.
And you would be wrong on all counts. Like I said all that was checked the first day. You dont have to look far to find QC issues with the sensor on different forums.
 

nicholam77

Well-known member
Joined
Dec 18, 2016
Messages
2,655
Location
Minneapolis, MN
I run OctoPrint on a Pi 3a+. If you want to run on a Pi Zero, and your printer supports Klipper, you could flash Klipper and run Fluidd or similar on the Pi instead of OctoPrint. Fluidd is pretty nice

Thanks. I haven't really looked into Fluidd as I didn't know about it until recently, but the new Zero 2 uses the same processor from the series 3 Pis I believe, and it's officially supported by Octoprint.

Fluidd does look nice. I couldn't tell if it supports a timelapse feature but that's definitely something I want (like Octoprint's Octolapse).

I should have the Zero 2 board fairly soon so I'll post up when I get it going and let you know how Octoprint runs. But if I'm to believe the internet it should be fine.
 

PelicanPines

ALLIANCE MEMBER
Joined
Apr 30, 2014
Messages
38,104
Location
New Jersey, USA, Earth, My own reality
I had that issue. I also had an issue with filament breaking at the extruder, and since the runout sensor is always between the extruder and the filament spool, the sensor doesn't even know anything is wrong.

I have since upgraded to a Bigtreetech smart filament sensor that goes inline in the bowden, and that uses a roller inside flipping a switch on and off (like a tachometer) to indicate filament movement. Connect that to a GPIO and couple it with the Smart Filament Sensor plugin, and you're good to go. This will also trigger if you have a clogged nozzle (since filament will stop moving). i.e. it will pause your prints exactly at the moments you need something to pause them.
Bigtreetech is the one I bought a few months back ... on your recommendation, I believe. I just started to rebuild my setup and will include it in the "New and Improved" Pines Printer.

FYI... the reason I'm rebuilding the system: Mother of ALL clogs from a spool of bad filament. Got annoyed having to clear it after the 3rd fatal clog. Filament complained about and returned. Won't give the brand but they sent me 2 new spools and STICKERS !!!
 

vavet

Well-known member
Joined
Mar 6, 2012
Messages
5,318
Location
Ashland, VA
My latest creation…a holder that screws onto a french clear hanger for my loppers. It looks much better than the hook that was in the before.
 

Attachments

  • FC76E4B9-C98F-4E8E-B47C-7324E07647CA.jpeg
    FC76E4B9-C98F-4E8E-B47C-7324E07647CA.jpeg
    246.3 KB · Views: 55
  • 1BA90D10-3EC0-4F2A-A578-0754DB4BB036.jpeg
    1BA90D10-3EC0-4F2A-A578-0754DB4BB036.jpeg
    176 KB · Views: 55

loganb

ALLIANCE MEMBER
Joined
Dec 29, 2011
Messages
5,494
Location
Omaha, NE
Found this model today on Thangs and had to give it a shot

20211206_195352.jpg

20211206_195326.jpg

20211206_195457.jpg

20211206_195017.jpg

Link to model here

Was a 4.5 hr print with .3mm layer height. Very functional, snapped together and good fits, sides fold down as designed... at this size not personally very useful. Not a fan of the fancy grid on the sides, it should be cheaper and faster to simplify that and just make it a solid a couple print layers thick but I understand what the designer was going for. I like the concept of a "scaled up" one that's larger....but the increase in filament cost probably isn't personally worth it and I don't have the CAD time to design it with plywood drop in panels... but the thought has crossed my mind!
 

Jim_No_Garage

Well-known member
Joined
Jan 15, 2011
Messages
3,299
Location
Millington NJ
So I saw a 3d file that allows you to use Wago flip connectors in a terminal block type of setup. Pic below is from Thingiverse . . .

1638882077475.png

I do lots of temporary wiring while working on projects and this is neater than wire nutting to a cut off extension cord which is what I normally end up doing. It printed in 90 minutes and is a perfect fit.


Cheers

Jim
 

nicholam77

Well-known member
Joined
Dec 18, 2016
Messages
2,655
Location
Minneapolis, MN
Anyone have any quick ideas on what could be causing this?

IMG-5100.jpg

IMG-5099.jpg

On the last 4-5 prints I've done, what should be straight verticals are all over the place.

I had the bright idea to tighten the belts a little this morning. Haven't tested yet, but they didn't seem overly loose.

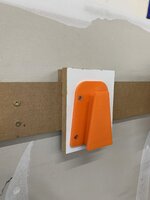
Weird thing is I had one successful print in between a number of bad ones with the same settings. And, sometimes they start out ok and then get wonky (like below image). Seems like the longer the print the more likely it goes off course.

IMG-5098.jpg

Nothing unusual in the slicing, or at least it's settings I've used for successful prints, too.

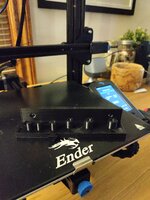
Ender 3 V2, printing PLA

Layer Height - 0.2mm
# of Walls / Perimeters - 3
# of Top / Bottom Layers - 5

10% Infill - Gyroid Pattern

200° C Print Temp
60° C Build Plate Temp

Print Speed 65 mm/s
Wall Speed 32.5 mm/s
Initial Layer Speed 20 mm/s

Retraction Enabled
Print Cooling Enabled (Fan Speed 100%)

Thanks!
 

rlitman

Well-known member
Joined
Oct 18, 2010
Messages
24,576
Location
Long Island
I had similar issues with my Ender 6. It turned out that the nozzle would hit a blob on the print, nudging the bed out of position. If your bed is mounted like mine, you have four knobs, springs and leveling screws that are countersunk into the metal plate under the glass bed. My problem was that the screws could freely pivot in those countersunk holes, allowing the bed to float around like a table on loose legs.

My solution was to disassemble the bed levelers and run a nut up the four screws so that the screws were firmly attached to the bed. Now, the leveling screws allow the bed to move up and down, but not side to side.

The down-side to this approach is that you run a higher risk of stepper motor skips if the nozzle hits anything.

Grab your bed and see if you can get it to move horizontally with some force like I described. My Ender 6 is a Core-XY, so the bed is only supposed to move along the Z axis (yet I was getting this undesired horizontal movement). In your case, pushing it up and back may move the belts, but see if it moves side to side as well to get the idea of what I'm talking about.
 

nicholam77

Well-known member
Joined
Dec 18, 2016
Messages
2,655
Location
Minneapolis, MN
@rlitman thanks for the reply.

The first error I had was on a longish (~5 hr print) I came to check on it and the print head was not moving and the nozzle was touching the part, and I couldn't cancel or pause like it had glitched out. I wonder if the nozzle hit the part like you said. Every print after that is when I've been having the layer issues.

I'm running another print right now with increased belt tension to see if that could have been it — but when it finishes I'll check on what you said!
 

sherrillkelby

Member
Joined
Oct 24, 2015
Messages
13
There was a known incidence of overheating stepper drivers on the mainboard causing layer shifts with Ender 3s. People have solved it with better cooling or replacing the mainboard:

https://www.reddit.com/r/ender3v2/comments/kn8u72
 

nicholam77

Well-known member
Joined
Dec 18, 2016
Messages
2,655
Location
Minneapolis, MN
There was a known incidence of overheating stepper drivers on the mainboard causing layer shifts with Ender 3s. People have solved it with better cooling or replacing the mainboard:

Ugggg, I came across this today, too, but the post you linked is super well laid out. I have a feeling this might be it... because I have noticed the "thunks" and the beginning of the print seems to go ok and smaller prints seem to go ok. The long ones end up terrible.

Strange this is just happening just now, as the printer is in the same environment (climate-controlled basement), and I've done successful larger prints before.

I have the mainboard cover cracked open and printing a 200% scaled X-Y-Z cube (about a 2 hr print). If heating is really the problem, I can add the feet and modify the mainboard cover / get a larger fan, but that's annoying it has to be done in the first place!

Anyways, thanks for the article!
 

rlitman

Well-known member
Joined
Oct 18, 2010
Messages
24,576
Location
Long Island
There was a known incidence of overheating stepper drivers on the mainboard causing layer shifts with Ender 3s. People have solved it with better cooling or replacing the mainboard...
That does make a lot of sense. Mine has the silent drivers with heat sinks, but I don't have a 3.

While you're in there, check out the connections. The green screw terminals often have issues with stranded wires.
 

PelicanPines

ALLIANCE MEMBER
Joined
Apr 30, 2014
Messages
38,104
Location
New Jersey, USA, Earth, My own reality
That does make a lot of sense. Mine has the silent drivers with heat sinks, but I don't have a 3.

While you're in there, check out the connections. The green screw terminals often have issues with stranded wires.
I had the "stranded wire" issue upon my initial inspection when originally installing everything. I noticed it and "put a feral" on those wires.

1. it gave me a chance to buy new and interesting tools
2. it gave me something to organize in a "parts box"
3. it gave me something to label
4. it prevented issues that I won't have.
 

rlitman

Well-known member
Joined
Oct 18, 2010
Messages
24,576
Location
Long Island
I had the "stranded wire" issue upon my initial inspection when originally installing everything. I noticed it and "put a feral" on those wires.

1. it gave me a chance to buy new and interesting tools
2. it gave me something to organize in a "parts box"
3. it gave me something to label
4. it prevented issues that I won't have.
I put bootlace crimps on mine. Supposedly this isn't an uncommon failure:
7pQ3lY8mvONr7dRjJPDq_ViKIoYBwcaszfbMtRnals7xXCrU6Q.jpgIMG_4288.jpg.25b46e9cf2725168bfd2504962527669.jpg
 

Bessy

Well-known member
Joined
Dec 18, 2012
Messages
992
Location
Ontario, Canada
V1.2 of the tool holder popped off the printer tonight. Tolerances for the Bondhus drivers is tight, but useable. I had to increase the thickness to 6mm from 4mm on the x and z axis, and the fillet to 2mm I think.

The holder for the cutters is almost right, but needs to be extended a bit so that the blue handles clear, the hole for the X-acto knife to be upsized, as is the spacing and size of the hole for the calipers. The whole part could use a few extra mm on the Y to fit everything properly.
 

Attachments

  • 16389333051886881633539247296695.jpg
    16389333051886881633539247296695.jpg
    421.4 KB · Views: 51
  • 16389333489055577364457275845934.jpg
    16389333489055577364457275845934.jpg
    451.5 KB · Views: 39
To avoid these ads, REGISTER NOW!
Top Bottom