To avoid these ads, REGISTER NOW!

The Fallible Garage

OP
F

FallibleFlyer

Well-known member
Joined
Nov 18, 2011
Messages
159
Location
Arizona
interesting idea with the leveling bolts. i'll have to watch and maybe learn how that works for you cause i hadn't thought of that.

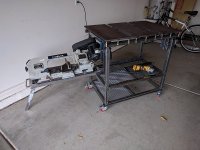
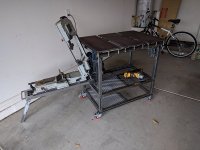
Thank you, though I wish I could claim the idea as my own. I took inspiration from Jim's Welding Table which also feature's Tarmy's. Only real difference is mine are wider slats :)

also just an FYI some of the members have ELVES (friends, kids, clients or help) getting things done so quickly and others are retired and we have 6 SATURDAYS & a SUNDAY every week.
cheers
Ha I figured that might be the case, either way I've been half tracking the hours involved in my project(s). When I've finally got them complete, perhaps I'll post it up. Though I think the progressive posts show the overall investment.

One of the bigger drivers for all of these new projects and trying to track it is to get me out and making things. Decided to skip the normal new years resolution of losing weight and instead set some goals to develop some skills and spend my time in more productive ways than TV and Video Games. Just have to adjust my expectations that I can't turn out a welding table in a day ;)
 
To avoid these ads, REGISTER NOW!
OP
F

FallibleFlyer

Well-known member
Joined
Nov 18, 2011
Messages
159
Location
Arizona
Welding Table - Saw Done
Got a few hours today, got the saw fully mounted. Pulls out easy enough and locks in nice and secure for use. I don't think I'm going to bother painting the touching metal surfaces, likely just keep them lubricated and call it a day. The saw can't open to vertical, but it couldn't in its old setup either, never bothered me then. Did a test cut on a piece of scrap and it was quite solid, no wobbles or vibrations like I was worried about. Overall, I'm super happy with how this came out.

attachment.php


attachment.php


attachment.php


attachment.php


Also got the piece cut out for the lower shelf. It's another piece of steel that was salvaged from that old kiln, not really sure what gauge it is, but its thick. I still need to weld it in, but I'm waiting for final tear down to do that, will just be easier.

attachment.php


I noticed today as well, if you look in the above photo, the upper ride side of the expanded metal... I welded in backwards. I don't know if its worth fixing. It makes no functional difference... but man does that really grind my gears.

Next step? tear it all apart, sand, and paint!

I might also add integrated power, would be convenient for the saw and grinders.
 

Attachments

  • IMG_20180215_091948.jpg
    IMG_20180215_091948.jpg
    135.6 KB · Views: 956
  • IMG_20180215_091956.jpg
    IMG_20180215_091956.jpg
    140.6 KB · Views: 952
  • IMG_20180215_092045.jpg
    IMG_20180215_092045.jpg
    125.7 KB · Views: 950
  • IMG_20180215_092056.jpg
    IMG_20180215_092056.jpg
    122.3 KB · Views: 949
  • IMG_20180215_095856.jpg
    IMG_20180215_095856.jpg
    145.1 KB · Views: 953
Last edited:

drivesitfar

Well-known member
Joined
Oct 23, 2013
Messages
35,998
Location
Pacific Northwest
FF: I love your new welding table and I really like the vertical bandsaw moving shelf. with a couple of hitch mounts for a vise and grinder you've got an ALL IN ONE mobile work station.

i hope you don't mind, but i posted your bench pics and the link to this thread on my grinder vise thread and here's the link:

https://www.garagejournal.com/forum/showthread.php?p=7034210#post7034210

VERY WELL DONE!!!
 
OP
F

FallibleFlyer

Well-known member
Joined
Nov 18, 2011
Messages
159
Location
Arizona
FF: I love your new welding table and I really like the vertical bandsaw moving shelf. with a couple of hitch mounts for a vise and grinder you've got an ALL IN ONE mobile work station.

i hope you don't mind, but i posted your bench pics and the link to this thread on my grinder vise thread and here's the link:

https://www.garagejournal.com/forum/showthread.php?p=7034210#post7034210

VERY WELL DONE!!!

Honored :thumbup:

Got the paint on today after some grinding, should have it reassembled in the next few days with photos.
 
OP
F

FallibleFlyer

Well-known member
Joined
Nov 18, 2011
Messages
159
Location
Arizona
Work Tables Done!
Oh its a fantastic evening for me, at long last both work tables I've been working on are finally painted and reassembled. I still need to get rid of my old welding table (if anyone want a beginner's table in AZ, hit me up) so its just going to be in the way for now. May or may not just cut it up for scrap for another project later on, we'll see. Anyhow, while reassembling these two I gained a real appreciation for how much I feel I've grown my skills just between the two projects. Neither are pieces of are, but there is a substantial progression. Without further ado, the finished tables!

attachment.php


Grinding Table
attachment.php


Welding Table
attachment.php


I didn't bother painting the slide for the saw. Why? most of it is going to be rubbing which will just wear off the paint. So I'm planning to just keep it all oiled.
attachment.php


And if anyone was curious, this was the extent of my planning (notice the poor math that resulted in me purchasing 3x the steel I needed.)
attachment.php


And finally a shot of everything lined up where it's going to live. Overall, I'm quite pleased.
attachment.php


Whats Next??
Alright, I've had my fun building some big projects so I think its time to turn some attention to the garage itself. Step one? hang these darn bicycles. Second step? Light!! my projects have had to stop once the sun sets, this needs to change. I don't know yet how I'm going to add a switch for the work lights without running new wires, but I may play with those new fancy outlets.
 

Attachments

  • IMG_20180219_161129.jpg
    IMG_20180219_161129.jpg
    108.9 KB · Views: 854
  • IMG_20180218_103705.jpg
    IMG_20180218_103705.jpg
    51.2 KB · Views: 853
  • IMG_20180219_160749.jpg
    IMG_20180219_160749.jpg
    136.5 KB · Views: 2,841
  • IMG_20180219_160837.jpg
    IMG_20180219_160837.jpg
    143.5 KB · Views: 1,868
  • IMG_20180219_161322.jpg
    IMG_20180219_161322.jpg
    113.7 KB · Views: 852
  • IMG_20180219_161307.jpg
    IMG_20180219_161307.jpg
    121.1 KB · Views: 863

drivesitfar

Well-known member
Joined
Oct 23, 2013
Messages
35,998
Location
Pacific Northwest
FF: I don't know if you saw my post about the Chinese Wonder Vise or CWV i call them and I notice you own one maybe made by Wilton. that vise is way down on the QUALITY LIST, but UP NEAR THE TOP as a user cause i've yet to meet a guy or gal that owns one that doesn't love theirs.

great work on your benches and thanks for sharing the build with us.

if you have $500 burning a hole in your pocket I hear this light is like bringing the SUN INSIDE YOUR GARAGE.

https://www.bigassfans.com/lights/

i'm not sure where is the best place to buy it if you do so i'll let you do the research.

or a lot of members just go get the cheap LED 4 foot lights that Costco sells and put up a bunch of them.

lots of options that is for certain and hope you find something you like.
 
OP
F

FallibleFlyer

Well-known member
Joined
Nov 18, 2011
Messages
159
Location
Arizona
FF: I don't know if you saw my post about the Chinese Wonder Vise or CWV i call them and I notice you own one maybe made by Wilton. that vise is way down on the QUALITY LIST, but UP NEAR THE TOP as a user cause i've yet to meet a guy or gal that owns one that doesn't love theirs.

great work on your benches and thanks for sharing the build with us.

if you have $500 burning a hole in your pocket I hear this light is like bringing the SUN INSIDE YOUR GARAGE.

https://www.bigassfans.com/lights/

i'm not sure where is the best place to buy it if you do so i'll let you do the research.

or a lot of members just go get the cheap LED 4 foot lights that Costco sells and put up a bunch of them.

lots of options that is for certain and hope you find something you like.

The blue vise is an Irwin, think I got it at Lowes ~8 years ago.

I've actually got a nice led work light from banner technologies that my wife won in a raffle. Just have to get it all wired up
 
Last edited:

drivesitfar

Well-known member
Joined
Oct 23, 2013
Messages
35,998
Location
Pacific Northwest
FF: best of luck with the lighting and since our eyes probably go bad from doing things in bad lighting you might want to spend a little extra and get a few more lights in your garage if you are planning on doing a lot of work out there which with that cool welding table looks almost like that is a given.

cheers
 
OP
F

FallibleFlyer

Well-known member
Joined
Nov 18, 2011
Messages
159
Location
Arizona
Lights and Bicycles
Minor update from today... I finally hung up those darn bicycles. Found these cool pulleys meant for hoisting things out of the way (bicycles) in your garage. Ended up mounting one on each side of the garage door, its a little tight but I think it'll work out okay. I know, it looks like a pita to remove, because it is :D. However, neither my wife or I have ridden them in over eight years.

attachment.php


Also swapped out one of the lights today for an old four bay T8 ballast I had. I'll eventually swap out the other one as well, but wow what a difference!

attachment.php


While I was at home depot I picked up conduit, wire, boxes, and some outlets so I can run some power to the bench side of the garage. Hoping tomorrow morning I can all that installed along with the work light over the welding table area. Next improvement I want to make is to mount a high tier of shelving most the way around the garage for putting up the rare use items. I haven't decided yet if I want to make or buy brackets, we shall see. If anyone has made their own steel shelf brackets, I'd love to see some examples and general input on how painful it was.
 

Attachments

  • IMG_20180224_181847.jpg
    IMG_20180224_181847.jpg
    113.5 KB · Views: 745
  • IMG_20180224_181600.jpg
    IMG_20180224_181600.jpg
    122 KB · Views: 741
Last edited:
OP
F

FallibleFlyer

Well-known member
Joined
Nov 18, 2011
Messages
159
Location
Arizona
Task Light and Power
Today I went out and finished up the new outlets and installing the task light. Fairly pleased with how it all turned out, though I need to finish securing the outlet on the far right, probably wind up using drywall anchors. The light was free from a raffle the my wife won, its an industrial task light by Banner Technologies. It had adjustable light output and at full, man is it bright!

View media item 81263
Haven't decided what the area below the light and above the tables will become, honestly thinking a chalk or whiteboard would be nice.
 

drivesitfar

Well-known member
Joined
Oct 23, 2013
Messages
35,998
Location
Pacific Northwest
FF: while i like the idea of a whiteboard I bet you'll fill up that space in no time with a cabinet, pegboard or maybe some shelving.

while i like the idea of using the ceiling for your bikes I bet that they'd fit vertically up on that wall where the front tire is and then you could have shelving on that wall if you need more.

looks like your bride scored a great light!!
 
OP
F

FallibleFlyer

Well-known member
Joined
Nov 18, 2011
Messages
159
Location
Arizona
FF: while i like the idea of a whiteboard I bet you'll fill up that space in no time with a cabinet, pegboard or maybe some shelving.

while i like the idea of using the ceiling for your bikes I bet that they'd fit vertically up on that wall where the front tire is and then you could have shelving on that wall if you need more.

looks like your bride scored a great light!!

Thanks for the input Drives.

I think I want to keep that area clear of shelving though to ensure I'm not blocking light and also to keep a clear work area above the tables in case I'm working something in place there. Considering just putting up a piece of 16ga steel or something in there to act as a back splash for the welding table as well as could be used to draw in if I chose...

Shelving I'm working out for the wall opposite of what's in the latest photo. Thinking a good use of space would be to craft some shelf brackets that double as tubing and stock storage underneath. Not sure how to describe it but there's some asci art below that might describe my idea...

________
| . . . /
| . . /
| . /
| /
|
|___|
|/
|
|___|
|/
|
 
Last edited:

drivesitfar

Well-known member
Joined
Oct 23, 2013
Messages
35,998
Location
Pacific Northwest
FF: i'm not sure how much weight you'd be storing on your shelving you are talking about, but JasonEOC put up a link to one small unit that Lowes sells on my Organizing thread i think last week or maybe it was 2 weeks ago.

or maybe just make one yourself out of unistrut and bolt it together or get some steel and test out your new welding table and weld something yourself.

have a great weekend and loving the welding table with the saw inside it.
 
OP
F

FallibleFlyer

Well-known member
Joined
Nov 18, 2011
Messages
159
Location
Arizona
Vice Revisit
Alrighty, the vast majority of my day was spent draining and powerwashing the pool... what a pain in the ****. However, I did sneak in a couple of projects, or steps in a project. I decided to tear down my grandfather's old vice to get it ready for its restoration.

In a previous post I had started to take apart the old vice and clean off the deep crusting of old crud. First step was to take off the ring that locks in the... threaded bit? Would be nice if I knew the actual terminology.

View media item 81335
Once that was off I decided to remove the jaws. Two were held in with pins, one with a lag bolt with the threads removed, and the last one with a bit of all thread or something. Ended up drilling out the threaded one.

View media item 81337
Bit rustier on the inside than I had hoped. Tomorrow i'm hoping to plop this all in an electrolysis bath to clean it all up.

View media item 81336
Fire Poker hook repair
The family ranch has had this fire set since I can remember and on my last trip I noticed that someone had busted off the hook on the fire poker :headscrat . So, I gave it a new hook and straightened it all out while I was at it.

View media item 81338
 
OP
F

FallibleFlyer

Well-known member
Joined
Nov 18, 2011
Messages
159
Location
Arizona
Jeep Attack Part I
Alright, Day 1 of the Jeep project. First task was to pull the transmission and transfer case. First of all, I totally should have enlisted help. I considered fabricating a bracket for it all to hold on the jack but decided to just wing it. 225+ lbs of iron wasn't a great idea to just play with.. But, its out. The fluid was this really gnarly yellow.

View media item 81621
View media item 81622
Skid plate a guy in NY made me, has taken a few hits over the years and was nicely full of.. "mud"
View media item 81620
For the project I ended up setting up a temp work space which let me feel out a workbench setup.
View media item 81618
Also found out that the harbor freight parts bins fit perfectly in the large husky toolboxes.
View media item 81619
 
OP
F

FallibleFlyer

Well-known member
Joined
Nov 18, 2011
Messages
159
Location
Arizona
New Shop Addition
I've always used handheld drills for all of my projects and as such, nothing has ever lined up just right. Well, enough of that. I decided to buy myself a proper drill press. Found a variable speed rockwell on craigslist for a reasonable price. Needs a new belt and a little TLC but overall I'm pretty stoked.

1980's Rockwell 15-350 with a not stock looking table. Has T-slots, not sure if I'll ever do anything fun with that.

View media item 82057
 
To avoid these ads, REGISTER NOW!
OP
F

FallibleFlyer

Well-known member
Joined
Nov 18, 2011
Messages
159
Location
Arizona
1974 cj5, has 258, t18, and d20. D44 in the rear. Just bought parts to rebuild the transmission and transfer case, so that's the best main project. Otherwise it's staying as a moderate wheeler and cruiser

Sent from my Nexus 5X using Tapatalk
 
OP
F

FallibleFlyer

Well-known member
Joined
Nov 18, 2011
Messages
159
Location
Arizona
I also need to figure out how to repair or replace the spindle, its got some wobble/bend in it. Ebay will likely be the solution
 

sdavis622

Well-known member
Joined
Mar 19, 2014
Messages
518
Location
Surprise, AZ
Awesome shop you’ve got! Been looking over your thread the last few days. I’m out in Surprise, AZ.


Sent from my iPhone using Tapatalk
 
OP
F

FallibleFlyer

Well-known member
Joined
Nov 18, 2011
Messages
159
Location
Arizona
I also need to figure out how to repair or replace the spindle, its got some wobble/bend in it. Ebay will likely be the solution

Got this fixed, found a local shop to do it. More Here

Awesome shop you’ve got! Been looking over your thread the last few days. I’m out in Surprise, AZ.


Sent from my iPhone using Tapatalk

Just updated mine, we're down in Avondale actually so not too too far. Read through a lot of your thread, I love the cabinets you've got all around. Very well laid out!

Hoping tonight/tomorrow to get the transmission and transfer case wrapped up (got the parts in yesterday.) Once that's done I can shove that stuff out of the way. Decided I need to add some high shelf storage all around, my goal is get get rid of at least one of the big floor shelves if not both; they're just too big and in the way all the time. Would be really nice to be able to put the jeep justified to one side and a worksurface on the other with shelf storage underneath. Though I will need more tools to do that, I lack most woodworking tools ha.
 
Last edited:

sdavis622

Well-known member
Joined
Mar 19, 2014
Messages
518
Location
Surprise, AZ
Just updated mine, we're down in Avondale actually so not too too far. Read through a lot of your thread, I love the cabinets you've got all around. Very well laid out!

Hoping tonight/tomorrow to get the transmission and transfer case wrapped up (got the parts in yesterday.) Once that's done I can shove that stuff out of the way. Decided I need to add some high shelf storage all around, my goal is get get rid of at least one of the big floor shelves if not both; they're just too big and in the way all the time. Would be really nice to be able to put the jeep justified to one side and a worksurface on the other with shelf storage underneath. Though I will need more tools to do that, I lack most woodworking tools ha.


That’s a good idea! I’m opposite, I lack a welder and most metal tools. That is my next goal is to get a decent welding setup made. Nothing major but enough to do some metal furniture and trailer stuff. Maybe the HF welder like you have or a garage sale find and o good compact welding table. I’ve got a 6 x 10 utility trailer i’d like to learn to weld on by making a ramp tailgate for it.


Sent from my iPhone using Tapatalk
 
OP
F

FallibleFlyer

Well-known member
Joined
Nov 18, 2011
Messages
159
Location
Arizona
That’s a good idea! I’m opposite, I lack a welder and most metal tools. That is my next goal is to get a decent welding setup made. Nothing major but enough to do some metal furniture and trailer stuff. Maybe the HF welder like you have or a garage sale find and o good compact welding table. I’ve got a 6 x 10 utility trailer i’d like to learn to weld on by making a ramp tailgate for it.


Sent from my iPhone using Tapatalk
I really like my Vulcan so far, but I'm far from a professional. Ramps for a utility trailer actually sounds like a decent project to start.

Sent from my Nexus 5X using Tapatalk
 
OP
F

FallibleFlyer

Well-known member
Joined
Nov 18, 2011
Messages
159
Location
Arizona
Drill Press Fixed
When I bought the drill press I knew it needed some love, but today I got it running with 0.001 runout.

  • Spindle repaired by local machine shop for free!
  • Replaced Bearings
  • Replaced Belt
  • Cleaned and regreased all moving surfaces.

View media item 82175
View media item 82174
View media item 82173
View media item 82176
She runs nice and smooth. I still need to source a new stop collar, I've got the threaded gauge, just not the collar. Part numbers for the DP-270 were identical, but the diameters were way off. So I'll have to keep looking.

Debating one of these: Wixey WR503 Drill Press Depth Gauge
 

BikerDad

Well-known member
Joined
Apr 24, 2014
Messages
975
Location
Utah
:+1:
ff: you might not get a lot of the members doing a ra ra hip hip hooray when you document small improvements after each day, but for the members that are learning and want to see how it is done step by step i guarantee you they will give you kudos later.

So if you have time to take plenty of picture and give your thoughts about each step it will be a valuable tool for some that is for certain.

Good luck and i just noticed you had a thread so i'll go back and read when i have more time.

Cheers
:+1::+1:
 
OP
F

FallibleFlyer

Well-known member
Joined
Nov 18, 2011
Messages
159
Location
Arizona
Transmission Done!
Alrighty, this little garage project took me 10x longer than I really intended it to. I'm sure it was mostly due to lack of experience and tools. The big hangup came when I forgot to put in a small piece on reassembly and didn't notice until I had already pressed in the bearings most of the way... which left me in a pickle of disassembling gracefully.

My cheapo HF puller was modified to grip the snap ring race on the bearing. With enough patience I was able to back it all out and this morning get everything back together and bolted up tight.

View media item 82548
View media item 82549(ignore the gasket laying on top ;) )

View media item 82550
I still need to rebuild the transfer case, but I have other projects that will be jumping the line. Not 100% on order yet, but need to build bookshelves for the wife and some high shelves for me in the garage. :thumbup:
 

drivesitfar

Well-known member
Joined
Oct 23, 2013
Messages
35,998
Location
Pacific Northwest
FF: looks like you are making nice progress on your projects and wanted to say keep up the good work. yes we all love the pictures so take and post more as you have time.

have a great day!!
 
OP
F

FallibleFlyer

Well-known member
Joined
Nov 18, 2011
Messages
159
Location
Arizona
Saw Fix and a new project beginning.
I'm still around and just starting a new project! Wife wants bookcases, so off I go. The saw had been bothering me with it's cuts drifting. So I decided to investigate... The bearings were warn out. Also, I should have measured when building it, 45 miter cuts only barely clear the frame.

IMG_20180511_085032.jpg

IMG_20180511_090655.jpg

IMG_20180511_085020.jpeg

With that rebuilt I cut up much of the new frame for the bookshelf. No progress picture, but I think it'll be cool.
 
Last edited:
OP
F

FallibleFlyer

Well-known member
Joined
Nov 18, 2011
Messages
159
Location
Arizona
Bookshelf Part 1
Today I started on a bookshelf for the house. Idea is steel supports and wooden shelves. This one is a trial run to see if we like the style, if we do I have to make two more along with a cabinet to match. If not, this one will just live in my office :)

The gaps I made in the table between the pieces were very helpful for creating a half assed jig for spacing out the shelf supports evenly. 16" apart, center to center.

View media item 83416
View media item 83417
View media item 83418
Not sure yet if I'm going to grind down the welds or just leave them. Also debating whether or not to paint the supports, but I believe I'll leave that decision until I've got it all together and can take a look (or the wife can)
 

drivesitfar

Well-known member
Joined
Oct 23, 2013
Messages
35,998
Location
Pacific Northwest
FF: nice looking shelving unit. i'm guessing you angled the supports cause you are going to weld more steel to the base?

grinding the welds I'd leave up to my bride if it was going inside the house and maybe your call if going in your office or in the garage, but they look ok from my chair.

keep up the great work and still loving your welding table!!
 
OP
F

FallibleFlyer

Well-known member
Joined
Nov 18, 2011
Messages
159
Location
Arizona
Drive: Thanks for the kind words

Bookshelf Part 2
Went out this morning and finished the metal working. I made an executive decision to leave the welds on the shelf supports since you can't really seem them anyways once the shelves are in place. For the mitered joints on top and bottom I went ahead and ground those down smooth.

The clamping got a little tricky as I had SO much weight counter levered off the edge of the table, but I made due. There may be some table modifications in the future to add pull out supports.

View media item 83420
But its all upright now with the unfinished shelves in their place. Those will get sanded, stained, and varnished. As for the metal supports I'm leaning towards cleaning them up and just leaving them natural with some varnish or simlar to keep them from rusting. :beer:

View media item 83421
View media item 83422
 
To avoid these ads, REGISTER NOW!
Top Bottom