To avoid these ads, REGISTER NOW!

The Gladiator Cabinet/Bench Build Thread --> Part 2

ket-tek

Well-known member
Joined
Jan 28, 2009
Messages
1,289
Well I recently/finally have began to continue on with the gladiator cabinet build I started, oh about 4 years ago! Wow I can't believe it's been that long, life just keeps moving so quick huh?

Oh well, point is I finally purged enough junk out of the garage the past year or so to get to the wall that I was going to extend this bench/cabinet onto.

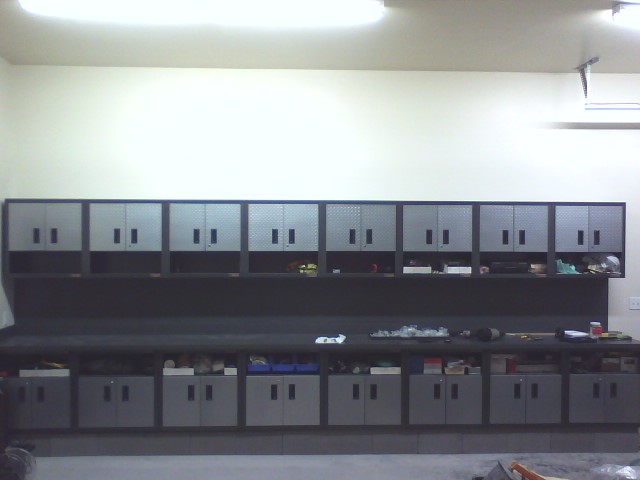
Some of you guys may remember my original thread where I was doing a custom bench with a built-in look using all gladiator upper cabinets from the crazy lowe's clearance fiasco.

Here's the original thread for the first big cabinet section for those that may have missed it and want to see how it was put together:

The 42 Gladiator Cabinets Build Thread!
http://www.garagejournal.com/forum/showthread.php?t=31704

3568915008_8bd8598653_o.jpg


I originally had planned to build in a sink into this new section, but I have since changed my mind and the sink will go on the other side of the garage in a different place. (maybe in another 4 years I'll get to that:) )

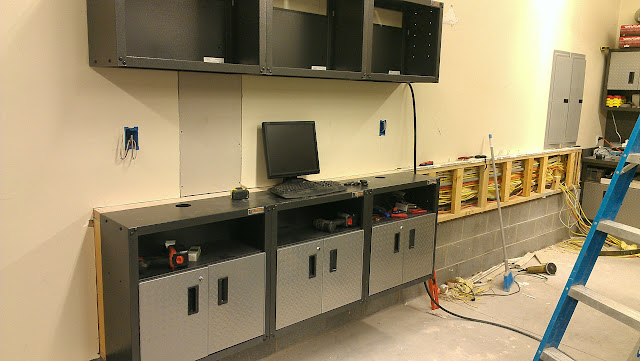
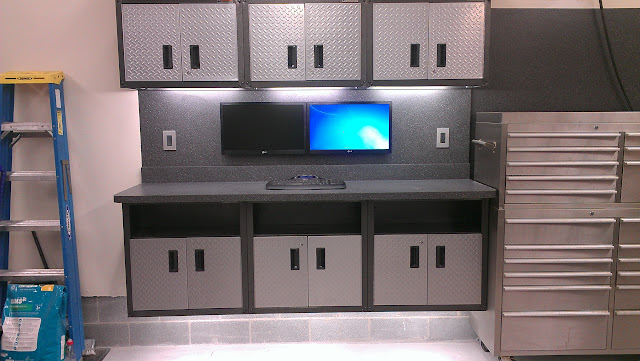
On to the progress pics...
 
Last edited:
To avoid these ads, REGISTER NOW!
OP
K

ket-tek

Well-known member
Joined
Jan 28, 2009
Messages
1,289
So this side is a bit different than the other, since I decided to not do the sink in this section I thought I would do a computer bar/bench area since I constantly need to look things up or use wiring diagrams and service manuals on a pc out there, and have been just using a laptop floating around getting banged up. So sort of a 'clean bench' for computer, paperwork, food, etc.. (we'll see how clean it actually stays)

I decided to not double up the bottom cabinets like I did the first time so that there will be a more leg room when sitting on barstools and using the computer. And going for bar height this time not counter height I did not want to mess with more concrete base building (yes I'm getting lazy). So I hung the lowers from the wall this time.

IMAG1583.jpg
 
OP
K

ket-tek

Well-known member
Joined
Jan 28, 2009
Messages
1,289
I did have a 42" structured network/cable panel in the hole cut out in the pic above, so that had be relocated, I am moving all that to the room that is behind the toolboxes, luckily the wires are all long enough.

I did not get a pic of the framing behind the cabinets in the above pic, but I framed it out with 2x4's to make the cabinets a little deeper off the wall so the counter had more support, and also to give clearance for all the romex coming out of the crawspace and going of to the electric panels. as the lower part of this wall was already furred out to sheetrock over the wires.

Now as you'll see in the pic below the wire chase that goes to my panels, and some other new circuits from elsewhere in the house that still need to be tied in as well. So I had to deal with this in my overall implementation bringing the cabinets from both walls together.

IMAG1587.jpg
 
OP
K

ket-tek

Well-known member
Joined
Jan 28, 2009
Messages
1,289
For my complete vision of this I want to connect the upper cabinets of both walls together so that the bench looks continuous. As since the laminate used for the countertop on the other bench has held great for the past 4 years, and the laminate I glued to the wall as a backslash is easy to clean and helps tie the cabinets together to look builtin I decided to use the same laminate to visually help it look like one continuous workspace.

So being as I'm continually modding my home change/adding rooms, walls, circuits, lighting, etc a friend of mine recommended I make a removable panel for the electrical chase instead of re-sheetrocking it again (I had removed the sheetrock previously to add more wiring).

So I took his great idea and rolled with it. So there is a laminated 1/2" mdf board screwed over the chase so that I can easily take it on and off to get to the bottom of the panels and run additional wire in the future.

Here is the pics of this test fitted.

IMAG1785.jpg
 
OP
K

ket-tek

Well-known member
Joined
Jan 28, 2009
Messages
1,289
So here is a pic of the countertop for the computer desk in place, and backsplash glued up.

IMAG1808.jpg


And here is a pic of the uppers completed and undercab lights installed. You'll see I sectioned the uppers by cutting out 8" which was the storage pocket area, I did this to have good clearance between the counter and bottom of cabinet, but also to keep the tops level with the main bench because they will connect once it's complete.

IMAG1819.jpg
 
Last edited:
OP
K

ket-tek

Well-known member
Joined
Jan 28, 2009
Messages
1,289
So here are some pics of laminating the entire wall between the benches.

IMAG1828.jpg


IMAG1829.jpg


IMAG1839.jpg
 
OP
K

ket-tek

Well-known member
Joined
Jan 28, 2009
Messages
1,289
Went ahead and added a 50amp and a 30amp welder/plasma plugs while I had the wall open.

IMAG1848.jpg


Starting to come together..

IMAG1856.jpg
 
OP
K

ket-tek

Well-known member
Joined
Jan 28, 2009
Messages
1,289
Got to thank GJ in general as usual and recently Steevo and Akdiesel specifically for the recent unintentional motivation from reading thier cabinet build threads which got me inspired to continue with my build. Seeing those two progress recently really got me thinking about my stale project again. (I have been working on cars and other house projects in the past fours years though, not just watching tv this whole time I swear :) )

So my next steps will be to section down more uppers and they will mount over the tool boxes, and then matching shelving will go across over the electric panels and will be the part that ties the two upper sections together. And of course a pc and monitors to be installed. Hopefully this weekend I can get it finished up.
 

MikeTHIS

Member
Joined
Jan 1, 2013
Messages
21
Location
Long Island, NY
That looks great!

Did you ever consider showing these to Gladiator? I know not everyone is into Twitter or Facebook, but if you share it with them at either place - you may be surprised as to what happens. ;)

Gladiator/Sears/Craftsman are sponsors of the show I do social media for - they're a great sponsor to deal with.

Edit: I just noticed that you have a Fujitsu (or Sanyo?) Ductless mini-split - as someone who's primary job is HVAC.....great move. LOL
 
Last edited:
OP
K

ket-tek

Well-known member
Joined
Jan 28, 2009
Messages
1,289
That looks great!

Did you ever consider showing these to Gladiator? I know not everyone is into Twitter or Facebook, but if you share it with them at either place - you may be surprised as to what happens. ;)

Gladiator/Sears/Craftsman are sponsors of the show I do social media for - they're a great sponsor to deal with.

Edit: I just noticed that you have a Fujitsu (or Sanyo?) Ductless mini-split - as someone who's primary job is HVAC.....great move. LOL

Yeah I wasn't building this for any recognition, I'm just trying to build a nice garage to work in, and thought some of the guys here may be interested in seeing my attempt at thinking outside of the box a little and modifying a bunch of the same upper cabinets into a complete bench. And sometimes a build thread will help keep me motivated to try and make some continual progress. But thank you for the kind words. :)

The mini-split is actually a Klimaire 24,000btu, it uses a Toshiba compressor.
 

MikeTHIS

Member
Joined
Jan 1, 2013
Messages
21
Location
Long Island, NY
Yeah I wasn't building this for any recognition, I'm just trying to build a nice garage to work in, and thought some of the guys here may be interested in seeing my attempt at thinking outside of the box a little and modifying a bunch of the same upper cabinets into a complete bench. And sometimes a build thread will help keep me motivated to try and make some continual progress. But thank you for the kind words. :)

The mini-split is actually a Klimaire 24,000btu, it uses a Toshiba compressor.

Understandable!

That said, it looks very professional!

Never heard of that brand! Heat pump too?
 
OP
K

ket-tek

Well-known member
Joined
Jan 28, 2009
Messages
1,289
So I got sidetracked working on a friends car today, so I didn't get around to cutting down the other cabinets to go over the tool boxes. But I did manage to fish in the hdmi cables for the monitors and get them mounted. And I also added under cabinet lights to the bottom of the base cabinets to illuminate the floor to give it kind of a floating look.

IMAG1883.jpg


IMAG1878.jpg


IMAG1875.jpg
 

marty_p

Well-known member
Joined
Aug 1, 2008
Messages
1,411
Location
SE LoUiSiAna
Wicked awesome cabinet mod and install, k-t! I have four of those cabs still packaged that were awaiting your inspiration!

Two Q:

Exactly which light did you use in your design? They are slim, bright, and just right!

How did you cut the cabinets? They look OEM as can be!
 

Steevo

Well-known member
Joined
Aug 18, 2009
Messages
8,738
Location
43.49600, -112.04300
Beautiful setup, and very nicely executed. I like the continuity of the formica and the way you used the cabinets. I had never seen your original build four years ago, until you linked it in this thread. Bravo! Well done!

I have a question about the chase along the wall with all of the electrical wiring running horizontally through it.
Is this a wall that is between the garage and living space, or an outside wall?
 
OP
K

ket-tek

Well-known member
Joined
Jan 28, 2009
Messages
1,289
Wicked awesome cabinet mod and install, k-t! I have four of those cabs still packaged that were awaiting your inspiration!

Two Q:

Exactly which light did you use in your design? They are slim, bright, and just right!

How did you cut the cabinets? They look OEM as can be!

Cabinets were cut with my trusty 4 1/2" cutoff wheel and a steady hand. You can see it laying in the floor in this pic :)

IMAG1587.jpg


The lights I used are from walmart and are $9.97ea, they are 'Lights of America' brand, 23" long. They are a perfect fit as they slipped inbetween the lip on the bottom edge so only the bulb sticks out not the housing at all. I will take a pic under the cab later so you can see how it's mounted.

http://www.walmart.com/ip/Lights-of-America-23-Under-Cabinet-Light-White/16877935

0075527771140_500X500.jpg
 
OP
K

ket-tek

Well-known member
Joined
Jan 28, 2009
Messages
1,289
Beautiful setup, and very nicely executed. I like the continuity of the formica and the way you used the cabinets. I had never seen your original build four years ago, until you linked it in this thread. Bravo! Well done!

I have a question about the chase along the wall with all of the electrical wiring running horizontally through it.
Is this a wall that is between the garage and living space, or an outside wall?

Thanks, building it like this I've gained a alot of storage for 'stuff', but gained no real good storage for small tools, and that's one reason I really envy your build since I would like some more tool organization space, the two 41" boxes I have are overpacked. :) I hope to sell those two boxes one day and buy a 72" upper/lower and a 18" side cabinet from Extreme or Montezuma unless I find a deal on a used truck brand, but I can't afford that anytime soon. There is about 8' between the computer cabinet and the electric panels, so there is a little room for a wider box(s) to sit in the future..

As for the wire chase, if you look close in some of the pics you'll see where the computer bench stops the wall sets back 1.5" for the rest of the distance to the right. That is because the attached garage is longer than the house, and that is where the house stops but the garage keeps going. So the wires are inside. I assume you where asking if the wires could have been rerouted on the back side of the wall?


There is a 6'x8' mechanical room behind the tool boxes where my water heater and air compressor are, and where I re-ran the ethernet and cable lines to, but it's only 6ft of the 14ft that walls keeps going, it's exterior outside wall after the first 6ft.
 
OP
K

ket-tek

Well-known member
Joined
Jan 28, 2009
Messages
1,289
Here is an old pic back when I was installing the mini-splits showing what's behind the wall with the electrical panels.

images
 
To avoid these ads, REGISTER NOW!

Jim C.

Well-known member
Joined
Jan 8, 2010
Messages
2,598
Here's my "Gladiator Build." I started last Thursday and finished last Thursday. Thirty Gladiator small parts bins and three wall tracks with end caps all for about a hundred bucks. There you have it, total hardware organization in about two hours. This Gladiator stuff is pretty good! :thumbup:

Jim C.
 

Attachments

  • IMG01765-20130106-2315.jpg
    IMG01765-20130106-2315.jpg
    148.9 KB · Views: 386

calereeves

Well-known member
Joined
Dec 31, 2012
Messages
87
Location
Eagle River, Alaska
Great looking setup you've got! Funny that you've just resurrected this, as just last week I read through that entire original post. I'm currently working on finishing my garage so I can install a bunch of gladiator stuff I've been collecting. I'm just waiting for the day that there's another GGG as you called it!
 
OP
K

ket-tek

Well-known member
Joined
Jan 28, 2009
Messages
1,289
Here's my "Gladiator Build." I started last Thursday and finished last Thursday. Thirty Gladiator small parts bins and three wall tracks with end caps all for about a hundred bucks. There you have it, total hardware organization in about two hours. This Gladiator stuff is pretty good! :thumbup:

Jim C.

Looks good, yeah they do have a pretty diverse selection of organizational products outside of the cabinets.

Great looking setup you've got! Funny that you've just resurrected this, as just last week I read through that entire original post. I'm currently working on finishing my garage so I can install a bunch of gladiator stuff I've been collecting. I'm just waiting for the day that there's another GGG as you called it!

Be sure to post up come pics when you get started!
 
OP
K

ket-tek

Well-known member
Joined
Jan 28, 2009
Messages
1,289
Ok, made a little progress. Cut down 3 more cabinets and added them over the toolboxes.

I plan to bridge the gap over the electric panels with matching shelves to make the top of the cabinets continuous.

IMAG1985.jpg


IMAG1992.jpg
 

Matstock4

Active member
Joined
Jan 14, 2013
Messages
40
Location
North Bay Area, CA
I was considering gladiator for storage in my eventual garage build... and it just got easier to do so! What a great build out! Keep up the great work!
 

simonsd123

Member
Joined
Feb 17, 2013
Messages
8
<----Inspired

If you have any more pics please post them Id love to see. What are you thinking about doing with the floor?

Also how do you have the under cabinet lights wired? all to one switch?
 
OP
K

ket-tek

Well-known member
Joined
Jan 28, 2009
Messages
1,289
the only thing missing now is the epoxi floor!


<----Inspired

If you have any more pics please post them Id love to see. What are you thinking about doing with the floor?

Also how do you have the under cabinet lights wired? all to one switch?

For the floor I was going to do epoxy so the block walls and floor would match and look more seemless. But I am really thinking about doing stained/polished concrete now and it's a bit more durable for welding and working on. Not sure what I would do about the block walls and cabinet base if do go that route?

Yes all the cabinet lights in the garage work off of the one switch that is on the left side of the monitors. I ran a connecting feed between the cabinet sections before I glued the laminate across the back wall.
 

lowbucktruck

Well-known member
Joined
Aug 9, 2010
Messages
1,323
Location
Foothills, Northern California
Man that cabinet/workbench of yours came out nice! Looks really sharp, like it was professionally installed.

I kept thinking about getting some Gladiator cabinets for my garage, but at the time I had to spend money on home improvement projects instead. I may need to do a do-over...
 
OP
K

ket-tek

Well-known member
Joined
Jan 28, 2009
Messages
1,289
Man that cabinet/workbench of yours came out nice! Looks really sharp, like it was professionally installed.

I kept thinking about getting some Gladiator cabinets for my garage, but at the time I had to spend money on home improvement projects instead. I may need to do a do-over...

Thanks for the compliment :)
 

Rockuf8

Well-known member
Joined
Dec 24, 2012
Messages
1,166
Location
Northern NJ
Wow, just an awesome build, love everything you've done,, so cool...and I thought I was going to have a lot of storage, geez.
 
OP
K

ket-tek

Well-known member
Joined
Jan 28, 2009
Messages
1,289
Otherwise, I have started a little rebuild on the porch/entry steps to the house as this is an attached garage. It used to be configured a little different and used to have a refrigerator on it, but I've decided I need a sink more than I need a fridge in the garage, so I cut it back some to give more room in front of the lift and am going to rebuild the steps.

I am doing another laminate top to match the cabinets/bench and and a laminate front apron on the front to hide the p-trap as well as adding more laminate backsplash on the wall around the sink with a mirror then doing a large drop-in sink and some gladiator shelving cutdown to fit above that for storage.

So far I've sheetrocked the inside of the area and got a sink brace ready for the top. Hope to get some more done later this week..

Just a couple basic shots of the progress so far:

IMAG2492.jpg


IMAG2495.jpg
 

dubber

Well-known member
Joined
Dec 31, 2012
Messages
5,326
Location
Canada's Capital
Holy Hell that is sweet! Can you post a couple more overall pics of the garage to get a better reference for myself at least :)

BTW is that a 240?
 

premierplayer

Well-known member
Joined
Jan 30, 2010
Messages
869
Location
Maryland, USA
Here's my "Gladiator Build." I started last Thursday and finished last Thursday. Thirty Gladiator small parts bins and three wall tracks with end caps all for about a hundred bucks. There you have it, total hardware organization in about two hours. This Gladiator stuff is pretty good! :thumbup:

Jim C.
This is EXACTLY what I've been shopping for, just ordered from garageappeal.com

You gotta be carefull with this Gladiator stuff, the prices can have a HUGE swing between sellers. Amazon & Sears were NOT a good deal.
 
To avoid these ads, REGISTER NOW!
Top Bottom