
You are using an out of date browser. It may not display this or other websites correctly.
You should upgrade or use an alternative browser.
You should upgrade or use an alternative browser.
The Machine Work Thread
- Thread starter Hephaestus29
- Start date
![IMG_20170120_204534615[1].jpg](/forum/data/attachments/547/547878-875603be494e92d614d1b795956542be.jpg)
Griff93
Well-known member
Brand version 2.0


d.mcfarland
Well-known member
^^ That will now work!
kazlx
Well-known member
6/4 Ti.

Also, posted in my projects thread, but figured I'd drop in here as well.
Stepping up my machining game.

Also, posted in my projects thread, but figured I'd drop in here as well.
Stepping up my machining game.
^ insane! 
Pretty cool and inspiring work in this thread (as well as the tools). Since I'm brand new to machining it'd be awesome if you guys can also include a couple of sentences about how the parts were done to go with the pics. For e.g. the M+K heart branding piece, was that done on a manual mill with a rotary table to do the radius?
Pretty cool and inspiring work in this thread (as well as the tools). Since I'm brand new to machining it'd be awesome if you guys can also include a couple of sentences about how the parts were done to go with the pics. For e.g. the M+K heart branding piece, was that done on a manual mill with a rotary table to do the radius?
6/4 Ti.
Also, posted in my projects thread, but figured I'd drop in here as well.
Stepping up my machining game.
Oh that is badass!
Griff93
Well-known member
^ insane!
Pretty cool and inspiring work in this thread (as well as the tools). Since I'm brand new to machining it'd be awesome if you guys can also include a couple of sentences about how the parts were done to go with the pics. For e.g. the M+K heart branding piece, was that done on a manual mill with a rotary table to do the radius?
The brand was done on a 3 axis cnc mill with a 1/2", 1/4", 1/8" end mills, and 1/4" chamfer mill.
The first branding iron I made back in about 91-92, I took a piece of brass, drew the pattern on it, roughed it out using the handles. Then stuck it in a small, but rigid vise that wasn't bolted to the table and freehanded it. I held the vise in both hands and fed the knee on the mill with my knee. I took small cuts and only had to clean up where I didn't get close while roughing. Went quick and came out great.
The next one I did on a FADAL....much easier.
I have to look for the pics.
The next one I did on a FADAL....much easier.
I have to look for the pics.
OP
Hephaestus29
Well-known member
Griff93
Well-known member
We made this part for a customer this week. It's a piece to hook up a flex duct to an fj45 heater box when installing air conditioning.


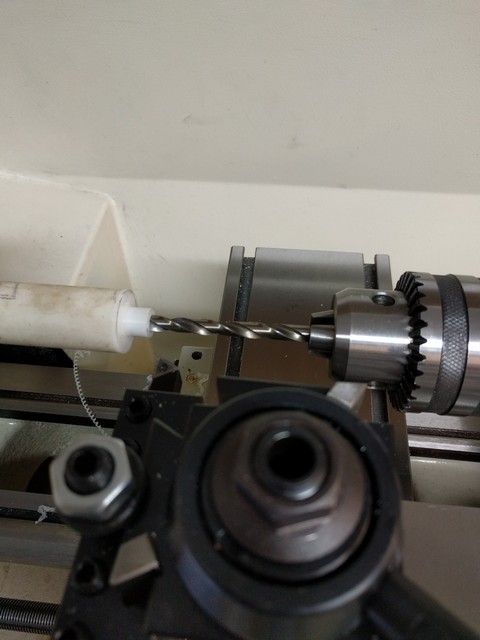
A quick and dirty car-related project today. I did the coolant bypass mod on my truck some time ago. Decided to cap off the tube.
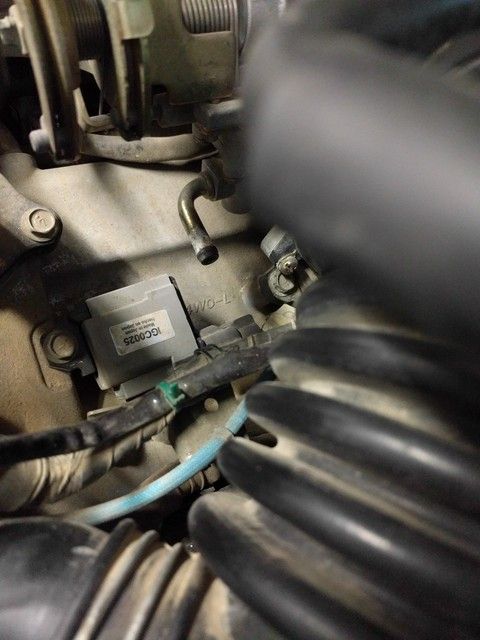
Found a small piece of some type of poly/plastic/delrin rod, perfect for the job and it cut like butter.
All done, total time about 20 mins:

Found a small piece of some type of poly/plastic/delrin rod, perfect for the job and it cut like butter.
All done, total time about 20 mins:
Griff93
Well-known member
We machined another piece for hooking up FJ45 air conditioning for a customer this week.


OP
Hephaestus29
Well-known member
Are you talking about a Toyota Landcruiser FJ45 ?
kazlx
Well-known member
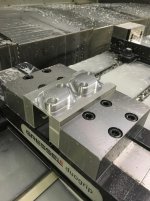
Counterbores on my riser plate.


I made a collet closer for a Monarch 10ee lathe I bought last November. It is modelled directly after a factory closer but with modifications to certain parts because I don't have the ability to harden parts. I'll do a write up at some point.
View media item 70298
View media item 70299
View media item 70298
View media item 70299
OccupantRJ
Well-known member
Beautiful work! You may want to investigate A2 tool steel. It can be flame hardened easily with a torch, and quenched in ambient air. I have been doing this for close to 30 years on small parts for stamping and forming dies along with other tooling.
Griff93
Well-known member
Yes, FJ45 Toyota Landcruiser. I have two customers with them. I think these parts would also fit an FJ40 as they should be the same from the firewall forward.Are you talking about a Toyota Landcruiser FJ45 ?
 so looking at the updates here all is good in the world again
kazlx
Well-known member
kazlx
Well-known member


kazlx
Well-known member
Negative. Just a little practice project that morphed into a little box with a lid. Mainly to practice tool paths and setups. But it's coming out pretty good.
Provincial
Well-known member
Nice iphone case! 
OP
Hephaestus29
Well-known member
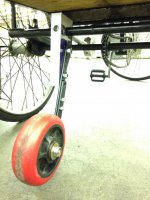
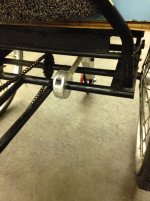
I finished up a little project I've been working on.
This is actually the Millwrights job at work, but he was too busy watching TV
to do it. So I did it myself. I doubt they'll file a grievance.
There was turning, milling, drilling, and sawing in this project.
It's a wheelie bar to keep my trike from tipping over. I don't have that many tools in it right now but I'll have more eventually.
Attachments
This is just me messing around, never turned pens before nor did I plan to and certainly not on the metal lathe. However, I thought let me chuck up a small piece and see if I can even turn it without creating a ton of dust and cloging up the oil passages on my lathe. After about 30mins of messing around with it I was staring at an ugly pen lol
I used an end mill in the chuck to turn the thing, worked great. However, I'm sure there's a tool out there to hold a wood piece like that in a lathe.


The cleanup wasn't bad at all with a vacuum and it was surprisingly fun to turn wood on the metal lathe.
I used an end mill in the chuck to turn the thing, worked great. However, I'm sure there's a tool out there to hold a wood piece like that in a lathe.
The cleanup wasn't bad at all with a vacuum and it was surprisingly fun to turn wood on the metal lathe.
kazlx
Well-known member
Hello,
a lot of great machine work. I love it.
I found some of my machine work pictures too.
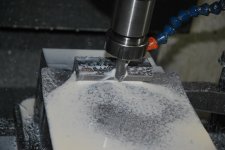
The big chunk of aluminium is 7075 and the small one ist out of 6061.
I use a CNC mill, made by CHIRON Germany and program all that stuff with Autodesk FUSION 360.
Cheers Alex
a lot of great machine work. I love it.
I found some of my machine work pictures too.
The big chunk of aluminium is 7075 and the small one ist out of 6061.
I use a CNC mill, made by CHIRON Germany and program all that stuff with Autodesk FUSION 360.
Cheers Alex
Attachments


kazlx
Well-known member
Want to send me a couple of those Gressel vises 

KMScott
Well-known member
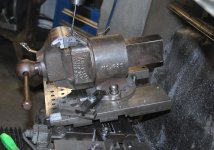
I was asked by two GJ members to repair their Parker 439 Swivel vises. Both were used without jaws. I have a small machine shop in the basement of my home and work on vises to keep me busy. I thought these two 439 Parker jaws would be the same but I was wrong. They both had different geometry.
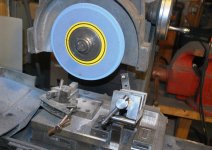
The first cuts I did was to serrate the jaw faces, once the angles are cut then it is difficult to serrate the jaws. I then set up my 8" Bridgeport sine plate to rough out the material before going to the surface grinder. I have to tilt the block at a angle then dress another angle on the grinding wheel to match the face of the vise. I drop the wheel slowly and side wheel the 22 degree angle on these jaws. Parker jaws have a back angle on the top of the vise and makes these jaws difficult to make. Once I get the angles dialed in so the serrated faces are parallel to each other and square to the vise then it is just tweaking the width to fit the vise.
You notice I had to weld the vise faces due to the idiots using this vise without jaws. I used Eutectic 224 TIG rod with plenty of preheating and a slow cool. After the jaws were fit then I had to cut the top radius. I stepped off the radius with my old Master Cam V9 software that I used years ago when I was building molds with a ball endmill.
Attachments
-
 Parker 439 Jaws and repairs (28).jpg129.3 KB · Views: 227
 -
 Parker 439 Jaws and repairs (23).jpg143.9 KB · Views: 261
 -
 Parker 439 Jaws and repairs (22).jpg142.8 KB · Views: 223
 -
 Parker 439 Jaws and repairs (21).jpg143.4 KB · Views: 229
 -
 Parker 439 Jaws and repairs (6).jpg144.2 KB · Views: 216
 -
 Parker 439 Jaws and repairs (7).jpg147 KB · Views: 228
 -
 Parker 439 Jaws and repairs (1).jpg143.1 KB · Views: 235
KMScott
Well-known member
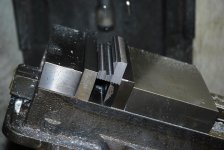
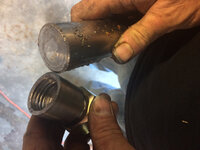
I then had to set up the 8" sine plate and pin the jaws in place missing the original pin holes, both of these vises needed 16 degree angled holes so you can remove the pin from underneath the vise. Once the jaws are pinned in place then the jaws are finished with a 4-1/2 angle sander and a Scotch Brite pad. I made 3/16 pins with a slight knurl to secure the jaws in place permanently once the jaws come back from Heat Treating. I use A2 tool steel since it is very stable. I have been wanting to post my work on this posting for a while and finally took pictures of my progress on this project for the two members here.
Attachments


IHmachinery
Well-known member
I then had to set up the 8" sine plate and pin the jaws in place missing the original pin holes, both of these vises needed 16 degree angled holes so you can remove the pin from underneath the vise. Once the jaws are pinned in place then the jaws are finished with a 4-1/2 angle sander and a Scotch Brite pad. I made 3/16 pins with a slight knurl to secure the jaws in place permanently once the jaws come back from Heat Treating. I use A2 tool steel since it is very stable. I have been wanting to post my work on this posting for a while and finally took pictures of my progress on this project for the two members here.
Very nice
Sent from my iPad using Tapatalk
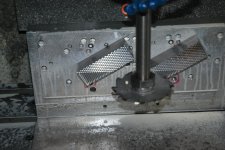
Hey,
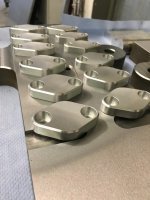
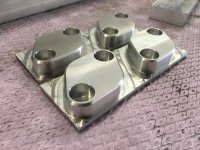
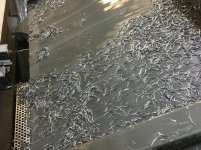
another quick job this morning. Some parts out of SS304 stainless steel.
Programmed with Autodesk Fusion360. I love the Adaptive Clearing strategy and the chips...haha
Cheers Alex
another quick job this morning. Some parts out of SS304 stainless steel.
Programmed with Autodesk Fusion360. I love the Adaptive Clearing strategy
and the chips...hahaCheers Alex
Attachments


Teenager with old tools
Well-known member


Teenager with old tools
Well-known member
What is a good shape for a hss lathe tool to give me a good finish?
Sent from my iPhone using Tapatalk
Sent from my iPhone using Tapatalk
txvwnut
Well-known member
What is a good shape for a hss lathe tool to give me a good finish?
Sent from my iPhone using Tapatalk
Depends on the type of work you are needing to do. Type of material and angle of cut have a lot to do with tool shape.
See if you can find you an old Atlas lathe manual as it has some good information in it.
GLTHFJ60
Well-known member
Subscribed.