To avoid these ads, REGISTER NOW!

The making of a table

OP
R

RivennHewn

Well-known member
Joined
Jun 4, 2011
Messages
10,371
Location
PNW
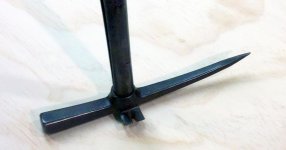
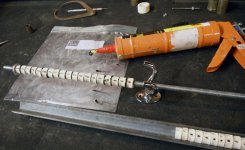
As I got it all clamped into position, I drilled and tapped the mounting bolts.

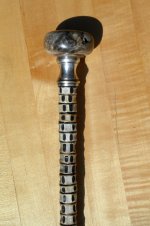
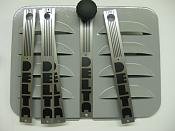
Then I got to use my new JH Williams C-clamps that came in the mail today.

Got them from cripedistributing on Ebay thanks to yevangelis thread:


http://www.garagejournal.com/forum/showthread.php?t=239491&highlight=ebay+sellers

I had never used them before. Thanks for the referral.

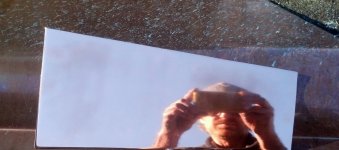
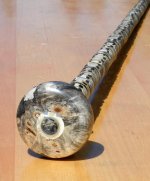
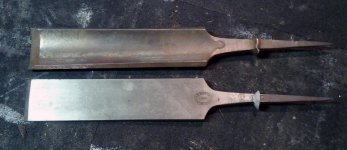
The polishing is going quite well. Thanks to 1/2 cup for the input/motivation.
 

Attachments

  • tappingholes.jpg
    tappingholes.jpg
    134.7 KB · Views: 193
  • mounting.jpg
    mounting.jpg
    138.4 KB · Views: 226
To avoid these ads, REGISTER NOW!
OP
R

RivennHewn

Well-known member
Joined
Jun 4, 2011
Messages
10,371
Location
PNW
A few days of no work on projects gave me time for my other interest.

Obtained some antique tools.

French slater's hammer

Saw filer's vise

Carbide miner's lamp.

If you haven't checked out my photo album, I have a collection of antique tools here:

http://www.garagejournal.com/forum/album.php?albumid=2111
 

Attachments

  • slater1.jpg
    slater1.jpg
    135 KB · Views: 79
  • slater2.jpg
    slater2.jpg
    111.1 KB · Views: 75
  • filer'svise.jpg
    filer'svise.jpg
    114.6 KB · Views: 81
  • lamp.jpg
    lamp.jpg
    150.9 KB · Views: 95

1/2 Cup

Member Emeritus
Joined
Apr 28, 2012
Messages
19,283
Location
Shepparton. Victoria. Australia
A few days of no work on projects gave me time for my other interest.

Obtained some antique tools.

French slater's hammer

Saw filer's vise

Carbide miner's lamp.

If you haven't checked out my photo album, I have a collection of antique tools here:

http://www.garagejournal.com/forum/album.php?albumid=2111

That's one nice collection, in particular the hand crank forge as this reminds me of my grand fathers black smith shop where as kids we fashioned all sorts of stuff and learnt heaps in terms of making neat things.
Your drill bits are another rather interesting and neat collection.:thumbup:
 

Kevin54

MEMBER EMERITUS
Joined
Jan 12, 2005
Messages
29,341
Location
Urbana, Ohio
RIVENN.....Is the miners lamp brass, or is it steel with rust on it? If it's brass, I'm afraid I'd have to polish that up. It sure looks to be in great shape. Give it the proper look it deserves.
 
OP
R

RivennHewn

Well-known member
Joined
Jun 4, 2011
Messages
10,371
Location
PNW
Noooooooooo.......

That lamp earned it's patina the hard way.

Shiny is for new things.
 
OP
R

RivennHewn

Well-known member
Joined
Jun 4, 2011
Messages
10,371
Location
PNW
A couple more antiques from previous outings.

A Howe's cast iron and wood mallet pat'd 1880 and a Brades strapped hammer
 

Attachments

  • Brades.jpg
    Brades.jpg
    145.3 KB · Views: 133
  • Howe's.jpg
    Howe's.jpg
    141.6 KB · Views: 133

1/2 Cup

Member Emeritus
Joined
Apr 28, 2012
Messages
19,283
Location
Shepparton. Victoria. Australia
RIVENN.....Is the miners lamp brass, or is it steel with rust on it? If it's brass, I'm afraid I'd have to polish that up. It sure looks to be in great shape. Give it the proper look it deserves.

Sorry Kevin but we have to agree to disagree on this point.
I leave my polishing stuff to the radiator surround and head lights on the Model A.
But I have to confess its tempting though.:thumbup:
 
Last edited:
OP
R

RivennHewn

Well-known member
Joined
Jun 4, 2011
Messages
10,371
Location
PNW
I'm still not happy with the polishing of the copper and aluminum on the desk, but when I do get it figured out I may polish the inside of the reflector on the lamp.

That would look proper.
 
OP
R

RivennHewn

Well-known member
Joined
Jun 4, 2011
Messages
10,371
Location
PNW
Some of us might be needing that for real.

That's a delta drill gang table leg.


Actually, it's off a large metal cutting chop saw. I still have the table and rotating disc. The arm and motor/blade didn't come with it.

What the heck do you mean by "for real" anyhow?
 

Parabellum

Banned
Joined
Mar 6, 2014
Messages
888
Actually, it's off a large metal cutting chop saw. I still have the table and rotating disc. The arm and motor/blade didn't come with it.

What the heck do you mean by "for real" anyhow?

Should be same leg used on gang drills, they are getting hard to find. Some people just scrap them instead of selling them.
 
OP
R

RivennHewn

Well-known member
Joined
Jun 4, 2011
Messages
10,371
Location
PNW
Ya, they were headed for the recycle bin when I found them.

Lucky for me, the pennies on the pound they pay ain't hard to beat.
 
OP
R

RivennHewn

Well-known member
Joined
Jun 4, 2011
Messages
10,371
Location
PNW
Here's a pic of the copper sitting on what I cut it from.

Shows where I started, and where I'm at with the polish.

Not done, but getting closer.

Second pic is about as close as I'll ever get to a 'selfie'
 

Attachments

  • copper.jpg
    copper.jpg
    148.1 KB · Views: 204
  • selfie.jpg
    selfie.jpg
    145.6 KB · Views: 295

TurboCup87

Well-known member
Joined
Mar 26, 2010
Messages
160
Location
WV
Just found this thread. You truly have a great eye, very creative. I love that you make something out these old industrial pieces that are being scrapped. I love old wood, too. :beer:
 
OP
R

RivennHewn

Well-known member
Joined
Jun 4, 2011
Messages
10,371
Location
PNW
Thanks Turbo.


Found some pics of a little project I did last year. It's a Ship Captain's Shark Vertebrae Cane.

I found the vertebras on Etsy as a necklace.

I sorted them all out, trying to put them in order - largest to smallest. Not an easy task.

Next step was to drill them all thru the center. They actually had a nice divot dead center, so drilling them was easy.

Then I tapped them all at 3/8", to fit all thread.

The ****** part was putting the black rubber caulk between each of them.

The caulk served as a bond, and to take up the flex of the all thread.

once dry, I chucked it up in the lathe and lightly sanded it all smooth.

The handle is Californian Buckeye Burl. I used another vertebrae to cover the nut and washer that hold the handle on.

Not something you see everyday.

I sold it, and used the $$ to buy my rivet gun. Now it's garage related!
 

Attachments

  • canetopsmall.jpg
    canetopsmall.jpg
    146.4 KB · Views: 354
  • cane2small.jpg
    cane2small.jpg
    137.3 KB · Views: 308
  • Canecaulkingsmall.jpg
    Canecaulkingsmall.jpg
    144.7 KB · Views: 260
  • canetapp2small.jpg
    canetapp2small.jpg
    140 KB · Views: 244
  • canedrilldiscsmall.jpg
    canedrilldiscsmall.jpg
    142.6 KB · Views: 252
  • canesizingsmall.jpg
    canesizingsmall.jpg
    146 KB · Views: 271
Last edited:
OP
R

RivennHewn

Well-known member
Joined
Jun 4, 2011
Messages
10,371
Location
PNW
Work has been beating me down this week.

No shop time at all.

I did get a new toy in the mail today. Total impulse buy on Ebay.

A Hultafors shot filled dead blow hammer. I've never heard of them before.

I'm betting I'll be the only guy at work tomorrow with one.

It's 650 grams, or 22.9 ounces. Looks small next to a 32 oz Plumb.

Like the feel, think I'll keep it.
 

Attachments

  • 2heads.jpg
    2heads.jpg
    150.7 KB · Views: 110
  • hultafors.jpg
    hultafors.jpg
    129.5 KB · Views: 105
  • $_3.JPG
    $_3.JPG
    18.4 KB · Views: 111
OP
R

RivennHewn

Well-known member
Joined
Jun 4, 2011
Messages
10,371
Location
PNW
Warning: If you are offended by tool abuse, do not click on the pics!

Wanted to take the polishing to another level. Purchased a polishing kit for stone.

Went from 200 up to 3000 wet sanding.

The vacuum function of my Milwaukee random orbit sander was throwing water about 3'. Didn't matter that it was raining. I was soaked!

I kept the hose filling my wife's baking pan, and worked thru the grits.
 

Attachments

  • wetsand.jpg
    wetsand.jpg
    145.5 KB · Views: 348
  • wetsand2.jpg
    wetsand2.jpg
    139.4 KB · Views: 302

fourjeepin

Well-known member
Joined
Feb 12, 2011
Messages
3,658
Location
Atlanta, GA
I just realized that I missed posting a pic of the round table with the mating base.

Motivation eludes me today, so I spent it with my dog, some fire, and some tequila.

Love your heater! Do you have more details on it somewhere? I recently lost my chiminea due to abuse/too hot of fires and would like a metal project to replace it.
 
To avoid these ads, REGISTER NOW!
OP
R

RivennHewn

Well-known member
Joined
Jun 4, 2011
Messages
10,371
Location
PNW
Main body of the desk is done and assembled. I'll add the polished copper last. Hate to scratch it up before the desk is even done.

I picked up an old beater Tanker desk, and took the top off. Not sure how, but I'll be cladding it in aluminum.

Any thought on thickness? At first I was thinking .060 and wrapping it around the sides and tucking it to the underside.

Now I'm considering just using a flat 1/4" and painting the edges.

I don't have the technology (technical ability) to produce radius corners to completely wrap it with the .060.

Cutting simple radius corners on the 1/4" will be a lot easier.

I did manage to get the workbench cleaned off!
 

Attachments

  • allclean.jpg
    allclean.jpg
    137.4 KB · Views: 344
  • *******.jpg
    *******.jpg
    139.6 KB · Views: 391

metal1313

Well-known member
Joined
Apr 28, 2009
Messages
3,416
Location
clinton NJ
i wish i could find the legs that you do. the last set i found was in williamsburg nyc, and they were in bad shape..dude would not budge off of 1500.
 
OP
R

RivennHewn

Well-known member
Joined
Jun 4, 2011
Messages
10,371
Location
PNW
$1500? Ouch! I'd have to find a new hobby.

I've been pretty lucky. The most I've ever paid was $250 for a set.
 

bsg

Well-known member
Joined
Feb 10, 2009
Messages
329
Location
Imlay City, MI
i wish i could find the legs that you do. the last set i found was in williamsburg nyc, and they were in bad shape..dude would not budge off of 1500.

I have a six foot Delta gang drill table with the same legs, I was going to use it as a welding table I would sell but not for less than $500!

Love the look of the Delta table, to bad I couldn't talk the wife into a new computer desk.:eyecrazy:

Kevin
 
OP
R

RivennHewn

Well-known member
Joined
Jun 4, 2011
Messages
10,371
Location
PNW
Cleared a few projects off the list this week. That made room for me to finally set up my table as a stand for my 48" brake.

Took the top section off to allow me to carry it, and be able to lift it onto the stand.

Still needs to be tweaked and tuned, and install the counter weight.

Looking forward to bending some sheet goods.

If anybody has any tips on setting this up, it would be much appreciated.
 

Attachments

  • straightbrake.jpg
    straightbrake.jpg
    141.7 KB · Views: 250
  • jet1.jpg
    jet1.jpg
    138.4 KB · Views: 231
  • jet3.jpg
    jet3.jpg
    142.2 KB · Views: 221
  • jet2.jpg
    jet2.jpg
    137.9 KB · Views: 227
OP
R

RivennHewn

Well-known member
Joined
Jun 4, 2011
Messages
10,371
Location
PNW
Here's my Jet Shear Break Roll. It's a 42".

Now that I'm getting the straight brake tuned, I'm going to have to give this one some more attention too.

It needs new handles and the rods for the depth stop, as well as a good cleaning.
 

Attachments

  • jetcombo.jpg
    jetcombo.jpg
    137.1 KB · Views: 159
OP
R

RivennHewn

Well-known member
Joined
Jun 4, 2011
Messages
10,371
Location
PNW
Still looking to source the aluminum for the desk, so I thought I'd start on another project.

Picked these legs up a few weeks ago. I was going to strip them down and wire wheel them but the more I looked at them, the more I liked them with the original finish. And the rust.

I pulled the top off an old metal office credenza. The cabinet was beyond repair, but the top is still straight.

I'll be cladding the top with zinc.

Got the legs all cleaned up and started laying everything out. Of course, the ribs on the top and the holes in the legs don't work, so I'm having to place a piece of steel between them and offset the mounting holes.

Time to go drill some holes.........
 

Attachments

  • warsh'n.jpg
    warsh'n.jpg
    149.8 KB · Views: 185
  • layout.jpg
    layout.jpg
    155.9 KB · Views: 157
  • ribs.jpg
    ribs.jpg
    153.8 KB · Views: 154
  • platetop.jpg
    platetop.jpg
    155.6 KB · Views: 154
  • toolbox stand.jpg
    toolbox stand.jpg
    148.6 KB · Views: 171
OP
R

RivennHewn

Well-known member
Joined
Jun 4, 2011
Messages
10,371
Location
PNW
Came home from work, looked at this last table and said "Not work'n for me. These old legs deserve better."

Took it all apart.

Will have to give these some more thought.
 

Attachments

  • toolbox stand.jpg
    toolbox stand.jpg
    148.6 KB · Views: 112

Toxicscrew

Well-known member
Joined
Nov 22, 2006
Messages
296
Location
Saint Louis, MO
I belt sanded everything flat, then masked off all the joints. If you were wondering why I routed all the edges, this will start to explain .

The grooves created with the router are filled with polysulfide rubber. Like the lines on the bow of the boat above.

This takes a good 3-4 days to cure, then it is sanded flush. It turns grey when sanded, but goes back to black when a finish coat is applied.


Thanks for sharing that, will have to incorporate into a future build.

Nice work on all the pieces!
 
OP
R

RivennHewn

Well-known member
Joined
Jun 4, 2011
Messages
10,371
Location
PNW
Toxic,

I really enjoyed going thru your website. Very cool stuff. The beer post in the blog made me thirsty!

I actually get do fairly similar type projects in Seattle.

After working in a creative environment, I'd sure hate to even think about going back to building housing for the masses.

Looking forward to seeing your upcoming projects.
 
Last edited:
OP
R

RivennHewn

Well-known member
Joined
Jun 4, 2011
Messages
10,371
Location
PNW
Some fun at work.

Doing a build out of a space in a 1880's building in Pioneer Square in Seattle.

Came across a little rot in the floor system.

Joist are Douglas Fir 4 X 14. They were in contact with the brick, and rotted the ends.

There was a double joist that was carrying 4 other joist, and it was rotted almost all the way thru. Very close to having a complete failure.

What was interesting was how they constructed the floor. Pictured is the double cut joist seat and how they 'keyed" together. Don't see this kind of craftsmanship on framing jobs these days.

All hand cut.
 

Attachments

  • rot.jpg
    rot.jpg
    144.9 KB · Views: 296
  • rot2.jpg
    rot2.jpg
    88.2 KB · Views: 286
  • joint.jpg
    joint.jpg
    145.9 KB · Views: 287
  • joist.jpg
    joist.jpg
    148.5 KB · Views: 289
OP
R

RivennHewn

Well-known member
Joined
Jun 4, 2011
Messages
10,371
Location
PNW
I don't know the correct name for this kind of joint. Let me know if you do.

Maybe Zeke can chime in, and maybe Outlaw or Bull has a hammer for those nails.
 
Last edited:

DoghouseForge

Well-known member
Joined
May 11, 2013
Messages
374
Location
Lakeland, Fl
loving your sheet metal beast... Its proven one of those tools that i cant figure out "how I lived without it?"

Stuffs rad as usual!

JP
 
OP
R

RivennHewn

Well-known member
Joined
Jun 4, 2011
Messages
10,371
Location
PNW
I pulled a handfull of the larger nails out. They are about 10" long. They look manufactured, and not smitty-made.

When you bend them, they break and have an interesting shiny, crystalized look to them. Almost like cast iron when it breaks.

They'll end up in a project, somewhere, sometime.
 
OP
R

RivennHewn

Well-known member
Joined
Jun 4, 2011
Messages
10,371
Location
PNW
Finally get a day off, and just when I'm getting set up, it starts raining.

I was forced to go inside and organize the shop. I pulled a few things out of storage.

Thought ya'll might be interested.

If anybody knows the history of the Geral spoke shave, I'd love to learn more about it.
 

Attachments

  • toolbox1.jpg
    toolbox1.jpg
    132.4 KB · Views: 102
  • scribes.jpg
    scribes.jpg
    143.4 KB · Views: 100
  • 4hammers.jpg
    4hammers.jpg
    141.6 KB · Views: 96
  • WPlondon.jpg
    WPlondon.jpg
    144.7 KB · Views: 86
  • bartons.jpg
    bartons.jpg
    136.4 KB · Views: 90
  • Geral.jpg
    Geral.jpg
    148.5 KB · Views: 106
Last edited:
To avoid these ads, REGISTER NOW!
Top Bottom