To avoid these ads, REGISTER NOW!

The repurposing thread

falcongarage

Member
Joined
Aug 2, 2012
Messages
24
These job boxes were a special buy at HD recently and I thought it would be just right to re-purpose into a welding cart/station. This is a bit of an experiment but it should be a pretty budget friendly build.


I added a set of heavy duty castors I had on hand.


So the plan is to cut open the front to recess my Mig and add a 3/8" x 30" x 54" table surface spaced 3" off the top of the box. The top will have 96 .626" holes on a 4" grid and should work well with the "Strong Hand" brand of clamps. It will end up with a 3" overhang all around as the box is 24" x 48".

I have ordered the top from my local laser cutter and it should be ready next week. I am hopeful that the top will be pretty flat when delivered...

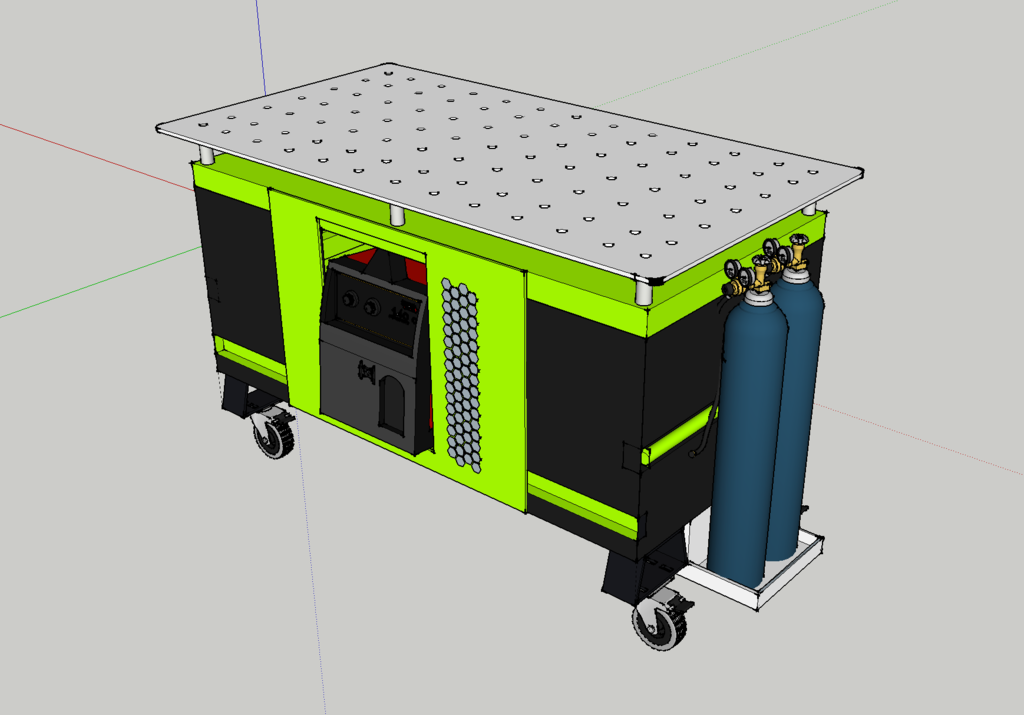
This is what it should look like roughly when complete.


I will fabricate a tank shelf once I have the top on. Also, I am going to try and keep the lid/top operable so I can store wire and other supplies in the box.


Picked up the 3/8" thick laser cut top for the welding station project. Turned out quite nice - only some minor tweaking will be required to get it dead flat.

 
To avoid these ads, REGISTER NOW!

Fyrme

Well-known member
Joined
Nov 28, 2012
Messages
2,231
Location
Green country, Oklahoma
Looks like you're well on your way with that table. May I suggest you abandon the idea of keeping the top as a functional lid for storage access. Beside the fact that it's going to be heavy as hell, It's guaranteed that when you need what's inside it, you will have a welding project in progress.
 

jrod60

Well-known member
Joined
Apr 11, 2006
Messages
75
Location
Katy TX
big ol' box

So the welding machine is on a drawer or something, right? I think Fyrme might be right; drawers on the sides would let you get to stuff mid-project better than flopping up the lid. I like the idea of using a big Jobox like this though.
 

falcongarage

Member
Joined
Aug 2, 2012
Messages
24
Looks like you're well on your way with that table. May I suggest you abandon the idea of keeping the top as a functional lid for storage access. Beside the fact that it's going to be heavy as hell, It's guaranteed that when you need what's inside it, you will have a welding project in progress.


Yes...after feeling the weight wanting to tip the box over when the lid is all the way up I do not think a working lid is going to be practical.

Got the top bolted on so it is now usable. I will cut the side open for the welder but I think I will also allow for a hinged door for access to storage.


Fyrme

Well-known member
Joined
Nov 28, 2012
Messages
2,231
Location
Green country, Oklahoma
Now, here's an idea. Put heavy duty rear hatch shocks on the lid from say a Tahoe, suburban, etc. and put a 45-50* stop on the lid. Mount your welder on the back of the box and you can tilt your CLAMPED down project up for a different welding angle. Although, flat welds tend to be easier than vertical welds.
 

mdbeck1

Well-known member
Joined
Mar 7, 2010
Messages
2,297
Location
Norman, OK
Now, here's an idea. Put heavy duty rear hatch shocks on the lid from say a Tahoe, suburban, etc. and put a 45-50* stop on the lid. Mount your welder on the back of the box and you can tilt your CLAMPED down project up for a different welding angle. Although, flat welds tend to be easier than vertical welds.

Good idea but the shocks are set up to support a specific weight. Probably be better to put a couple rods with a bolt lockdown to clamp them in position.
 

Fyrme

Well-known member
Joined
Nov 28, 2012
Messages
2,231
Location
Green country, Oklahoma
Good idea but the shocks are set up to support a specific weight. Probably be better to put a couple rods with a bolt lockdown to clamp them in position.


Yes, I was suggesting them more for opening assistance than holding. I'd for sure have a means of mechanical holding supports.
 

Fyrme

Well-known member
Joined
Nov 28, 2012
Messages
2,231
Location
Green country, Oklahoma
I've just gotten started on this one, so no real good progress pics yet, but here is a repurpose and start of a fire resistant storage cabinet......3046e9a5f2011a54e0f740b4f7bafff7.jpg1738877965a4bb76ebcd292439aa9906.jpgf104279e992a7143c4d596aef9e4c56a.jpg

It will be lined in 2layers of 5/8" type X drywall as well as 3-1/2" rock wool. The interior should be able to handle a 600-800* outside environment for a hour or less when it's done.
 

mdbeck1

Well-known member
Joined
Mar 7, 2010
Messages
2,297
Location
Norman, OK
...It will be lined in 2layers of 5/8" type X drywall as well as 3-1/2" rock wool. The interior should be able to handle a 600-800* outside environment for a hour or less when it's done.

When I bought my gunsafe they told me that it had a steel outer layer and TWO layers of 3/4 Fire Code Sheetrock... Then on the inside they add a layer of particleboard and carpet.

Let's see... ah.hah.... link to their site... http://www.bearsafes.net/fire-protection/ So yeah... you should get 600°-800°.
 

WoodsTruck

Well-known member
Joined
Jan 12, 2013
Messages
1,019
Picked up the 3/8" thick laser cut top for the welding station project. Turned out quite nice - only some minor tweaking will be required to get it dead flat.

http://s250.photobucket.com/user/red94civic/media/job box lid_zpstozseiq4.jpg.html

I would suggest mounting a power strip to the front of your job box table with a heavy cord to the wall. This should minimize trip hazards if you need to run a grinder or anything else at your table.

Looks awesome by the way.
 

falcongarage

Member
Joined
Aug 2, 2012
Messages
24
I would suggest mounting a power strip to the front of your job box table with a heavy cord to the wall. This should minimize trip hazards if you need to run a grinder or anything else at your table.

Looks awesome by the way.

Thanks - That is a good idea/
 

falcongarage

Member
Joined
Aug 2, 2012
Messages
24
I messed around with the top a little and it is now nice and flat.


Next up is cutting into the side for the welder. I found a middle tool box at HD that I might buy and recess into the box as well.
 

pennsylvaniaboy

Well-known member
Joined
May 28, 2014
Messages
417
What about adding a air hose real inside and outlets etc.. Id love to have air right at a fab station, without it getting welding spalls constantly dropped on it.
 

falcongarage

Member
Joined
Aug 2, 2012
Messages
24
Looking good. How did you go about getting it flat?

It had a slight U to it when I got it from the laser cutter - really minor like just over 1/16" over 52". I bolted one side down first then the other and shimmed to center until it was how you see it. It did not require much to get it really good.
 

happymachinist

Well-known member
Joined
Jul 2, 2015
Messages
118
Location
Central NE
Picked up an old electrical cabinet that was being tossed out. Used some old closet doors (3/4" plywood painted eggshell) from a remodel at the house to make some shelves. Cabinet is 12 GA steel. Freeninintynine save the screws and electricity to cut the wood.

uploadfromtaptalk1470692578686.jpguploadfromtaptalk1470692590042.jpguploadfromtaptalk1470692598775.jpg

Sent from my XT1254 using Tapatalk
 

metalhead212121

Well-known member
Joined
Mar 21, 2010
Messages
2,897
It had a slight U to it when I got it from the laser cutter - really minor like just over 1/16" over 52". I bolted one side down first then the other and shimmed to center until it was how you see it. It did not require much to get it really good.

Funny you should mention this.... I'm building something VERY SIMILAR.

I have a "U" bend as well. :( My steel plate is 1/2 thick (6' by 3') and it is my "guess" is that IF I have one side bolted down the other side will "stick up" 1/2." Its TOO LATE to flip it over (long story). My idea was/is to use the biggest bolts like you used and "pull" the plate straight. I really want a 100% smooth surface... I don't want bolt heads sticking up. The more I think about it the more I think I'm setting myself up for the bolt heads themselves to be LAUNCHED (SOONER OR LATER) TO KINGDOM COME. :( Any ideas??
 
To avoid these ads, REGISTER NOW!

BonzoHansen

Well-known member
Joined
Jun 24, 2005
Messages
1,729
Location
NJ
Is using an old ford king pin as a punch too simplistic for this thread?

Or using the crash bar tube out of th e door of a 4th gen camaro as an extension/persuader? Its so perfect GM must have planned it's secondary use. They even put a small hole in one end to hang it on the wall.
 

rodsnratfinks

Well-known member
Joined
Jan 13, 2015
Messages
1,397
Location
California
Picked up an old electrical cabinet that was being tossed out. Used some old closet doors (3/4" plywood painted eggshell) from a remodel at the house to make some shelves. Cabinet is 12 GA steel. Freeninintynine save the screws and electricity to cut the wood.

uploadfromtaptalk1470692578686.jpguploadfromtaptalk1470692590042.jpguploadfromtaptalk1470692598775.jpg

Sent from my XT1254 using Tapatalk
Awesome. The jealousy is real.
 

falcongarage

Member
Joined
Aug 2, 2012
Messages
24
Funny you should mention this.... I'm building something VERY SIMILAR.

I have a "U" bend as well. :( My steel plate is 1/2 thick (6' by 3') and it is my "guess" is that IF I have one side bolted down the other side will "stick up" 1/2." Its TOO LATE to flip it over (long story). My idea was/is to use the biggest bolts like you used and "pull" the plate straight. I really want a 100% smooth surface... I don't want bolt heads sticking up. The more I think about it the more I think I'm setting myself up for the bolt heads themselves to be LAUNCHED (SOONER OR LATER) TO KINGDOM COME. :( Any ideas??

I think for even one 1/2" bolt to "let go" of it's head you would need SIGNIFICANT pressure - like exponentially more than your warped top could ever produce.
 

m.breen

Well-known member
Joined
Oct 19, 2013
Messages
98
Re: Repurposing old fire hose?

Anybody got ideas on what to do with an unused 20 year old fire hose. If I cut it up, will it be a health issue with the fire retard fabric? Oh ****...sorry, this should have been a new thread.
 
Last edited:

Buckgnarly

Well-known member
Joined
Oct 8, 2010
Messages
7,648
Location
VT
Re: Repurposing old fire hose?

Anybody got ideas on what to do with an unused 20 year old fire hose. If I cut it up, will it be a health issue with the fire retard fabric?

Some people use them for a recovery strap, I guess they have some stretch that helps when pulling out stuck vehicles.
 

12husky

Well-known member
Joined
Feb 23, 2014
Messages
91
Re: Repurposing old fire hose?

Anybody got ideas on what to do with an unused 20 year old fire hose. If I cut it up, will it be a health issue with the fire retard fabric?


If it holds air pressure, they can be handy as a clamp for irregular shapes


Sent from my iPhone using Tapatalk
 

MScott

Well-known member
Joined
Jun 30, 2009
Messages
1,616
Location
Eastern Ontario
Re: Repurposing old fire hose?

Anybody got ideas on what to do with an unused 20 year old fire hose. If I cut it up, will it be a health issue with the fire retard fabric?

I used some to strap plastic barrels (floats) to the bottom of a dock.
 

WoodsTruck

Well-known member
Joined
Jan 12, 2013
Messages
1,019
Re: Repurposing old fire hose?

Anybody got ideas on what to do with an unused 20 year old fire hose. If I cut it up, will it be a health issue with the fire retard fabric? Oh ****...sorry, this should have been a new thread.

Chainsaw and hedge trimmer scabbard for me. They also work good to act as a bumper between a pickup bed and a cross bed tool box. Cut 2 pieces the width of the tool box and lay down before bolting the box to the bed.
 

EdT

Well-known member
Joined
Sep 21, 2010
Messages
1,104
Location
North Georgia
Buddy of mine used some for dock bumpers. Put some foam inside and fastened to the sides of the dock.
 

lakeroadster

Well-known member
Joined
Jan 19, 2015
Messages
5,166
Location
Central Colorado
Mirror.. Mirror

I salvaged the mount from an abandoned Dish TV to make a bracket to hold a mirror for my 2 post lift. Makes getting the vehicle centered a piece of cake...

attachment.php


attachment.php
 

Attachments

  • Mirror Mirror.jpg
    Mirror Mirror.jpg
    77.6 KB · Views: 1,050
  • OGITB 002.jpg
    OGITB 002.jpg
    123.8 KB · Views: 1,047
Last edited:

MemphisR32

Well-known member
Joined
Oct 9, 2014
Messages
155
I broke my ball peen hammer try to get a rotor off. Realizing I didnt have my small sledge ended up using a trailer hitch inset and ball to break it free. Worked better than the hammer or the sledge. Go figure.
 

-Brent-

Well-known member
Joined
Dec 23, 2009
Messages
4,709
Location
Utah
I'm all about repurposing.

20161105_171611.jpg

This bench is made from some pallet shelving I got for $20.

20161106_213647.jpg

And some uni-strut for pry bar storage.

IMG_20161106_154953.jpg

These are Model A Ford door handles I just put on my refurbished cart/cabinet.
 
Last edited:

-Brent-

Well-known member
Joined
Dec 23, 2009
Messages
4,709
Location
Utah
I added a u-bolt from a muffler clamp for a hammer loop. Here is what it looks like now, pretty much.

 
To avoid these ads, REGISTER NOW!
Top Bottom