
You are using an out of date browser. It may not display this or other websites correctly.
You should upgrade or use an alternative browser.
You should upgrade or use an alternative browser.
The repurposing thread
- Thread starter BMB
- Start date
Old Man Roger
Well-known member
Great first post..lol
cpttuna
Well-known member

don long
Well-known member
I finally have something to contribute here.
I've been working on a 1970 el camino these past weeks and want to clean up the engine compartment by smoothing out the firewall
The last area I needed to address was the hole for the steering column and brake booster

After cutting out this area and welding a new piece of steel in the hole and putting the holes in it for the brake booster I needed to come up with some way of mounting the end of the steering column to the firewall.
I had purchased a swivel mount for the column bet he column was too short to reach the firewall
Here is my repurposing project. I found this old road flare out in one of my sheds while looking for something about 6" in diameter

First I sand blasted it to make sure it was solid. Then I took the top plug out to see what was inside
It looked pretty bad but I kept going, next I cut the top and bottom out of it using a die grinder


I placed the swivel bracket in the can to see if it would fit and I was pleasingly surprised how well it fit So I continued on with the project

After sand blasting the inside of the can I welded a piece of steel to the top of the can after cutting a hole in it big enough for the swivel part of the bracket to fit through

I dressed the welds, drilled holes in the steel to bolt the bracket to and cut the can down to 3" tall

Now the road flare is ready for the transformation. It makes a great looking pocket for holding the steering column through the firewall

And here is the finished project after smoothing the rust pits on the inside of the road flare.

I've been working on a 1970 el camino these past weeks and want to clean up the engine compartment by smoothing out the firewall
The last area I needed to address was the hole for the steering column and brake booster
After cutting out this area and welding a new piece of steel in the hole and putting the holes in it for the brake booster I needed to come up with some way of mounting the end of the steering column to the firewall.
I had purchased a swivel mount for the column bet he column was too short to reach the firewall
Here is my repurposing project. I found this old road flare out in one of my sheds while looking for something about 6" in diameter
First I sand blasted it to make sure it was solid. Then I took the top plug out to see what was inside
It looked pretty bad but I kept going, next I cut the top and bottom out of it using a die grinder
I placed the swivel bracket in the can to see if it would fit and I was pleasingly surprised how well it fit So I continued on with the project
After sand blasting the inside of the can I welded a piece of steel to the top of the can after cutting a hole in it big enough for the swivel part of the bracket to fit through
I dressed the welds, drilled holes in the steel to bolt the bracket to and cut the can down to 3" tall
Now the road flare is ready for the transformation. It makes a great looking pocket for holding the steering column through the firewall
And here is the finished project after smoothing the rust pits on the inside of the road flare.
slowtwitch73
Well-known member
Here's a bicycle bottom bracket and headset press I cobbled together. For some reason had a plethora of 7/8 sockets.. packet an old Craftsman with a couple acme nuts, welded them in and pressed in handles made from a rod out of a printer (nice stuff).
slowtwitch73
Well-known member
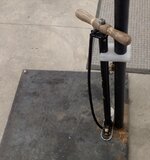
Here's a line lock for tarps, tents etc. Made up a bunch out of an Al crutch I got off the side of the road lol.
REI wanted 40 bucks for 4 and a bit of rope from MSR. This is what I said to that

REI wanted 40 bucks for 4 and a bit of rope from MSR. This is what I said to that

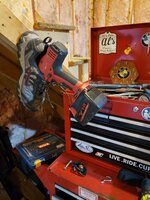
So I have an Old 4 drawer verticle file cabinet and also some off cut pieces of 1/2in plywood. Both were going to be thrown out then I got thinking This might be a good opportunity to organize and store my cordless power tools. I also had some left over drawer line kickimg around so the only thing I bought is the custom tinted paint (tinted to match the tool brands)
Anyway here is what I have come up with so far...

So far all my cordless power tools fit in only 1.5 drawers. So I either need more tools or will have to think of what else should go in the other empty drawers.
Anyway here is what I have come up with so far...
So far all my cordless power tools fit in only 1.5 drawers. So I either need more tools or will have to think of what else should go in the other empty drawers.
WoodsTruck
Well-known member
- Joined
- Jan 12, 2013
- Messages
- 1,029
I had to weld in some repair panels under my enclosed trailer today. Awkward positions put me on the hunt for a pillow or some kind of rest for my head. Came back with an empty 1 gallon oil jug. A little fatter than an antifreeze jug but it had enough flex to make it reasonably comfortable.
cpttuna
Well-known member


I always felt like a cheapskate saving them clips but they’re still useful when they no longer can hang my jeans dry.i am always hanging stuff either in the garage or the jeep. Clips come in handy. Some of my clips started as Wal Mart hangers. If you want them they let you keep them if you want.
It's funny, We use plastic hangers with clothespins to hang wet bathing suits in the RV (on a curtain rod in the shower). Dealing with loose clothespins *****, they're always flying off the hangers.
I really just need to grab some of those hangers with the built-in clips. Probably have some hanging in one of the boys' closets.
Mike
I really just need to grab some of those hangers with the built-in clips. Probably have some hanging in one of the boys' closets.
Mike
555
Well-known member


harley jim
Well-known member
I need to build one of these, I have collected the parts but not the time, lolAll components repurposed. Rotor for the coal. Cheap hair dryer w/ heat coil disabled for air supply.
cpttuna
Well-known member
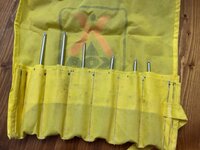
I am always looking for something to make a file handle from. Well, today. I made one using the bottom support from an old mini blind. I was taking out the old string anyway and decided to take off the bottom support and keep them. The support felt nice in my hand so I decided to make a handle. I used fiberglass resin for a filler.
Attachments


captain14
Well-known member
I may have to “steal” that idea!I am always looking for something to make a file handle from. Well, today. I made one using the bottom support from an old mini blind. I was taking out the old string anyway and decided to take off the bottom support and keep them. The support felt nice in my hand so I decided to make a handle. I used fiberglass resin for a filler.
Zeus36
Well-known member
I made one of mine into a poor man's surface grinder. Aluminum plate as a table top cover, machinist vise (drill press vise) to hold the work. Used a fine 6" grinding wheel. You can either move the motor head back and forth along the bearing track, swing it left or right (radial), or leave it in place and just slide the vise holding the work around the aluminum plate after you bump the arm height down. I was able to use a magnetic digital angle gauge to set up an angle vise for regrinding the bevels on a tool.Has anyone repurposed a radial arm saw? Hardly worth putting it on Craigslist.
Wiz02
Well-known member
Thanks, @Zeus36 that's a really cool idea.I made one of mine into a poor man's surface grinder. Aluminum plate as a table top cover, machinist vise (drill press vise) to hold the work. Used a fine 6" grinding wheel. You can either move the motor head back and forth along the bearing track, swing it left or right (radial), or leave it in place and just slide the vise holding the work around the aluminum plate after you bump the arm height down. I was able to use a magnetic digital angle gauge to set up an angle vise for regrinding the bevels on a tool.
Pictures needed!I made one of mine into a poor man's surface grinder. Aluminum plate as a table top cover, machinist vise (drill press vise) to hold the work. Used a fine 6" grinding wheel. You can either move the motor head back and forth along the bearing track, swing it left or right (radial), or leave it in place and just slide the vise holding the work around the aluminum plate after you bump the arm height down. I was able to use a magnetic digital angle gauge to set up an angle vise for regrinding the bevels on a tool.
slowtwitch73
Well-known member
Here's a couple made with plastic I got for free from the local university... there's a plastics manufacturing place in town that drops off thousands of pounds of plastic in all shapes, sizes colors etc. I grabbed a bunch a number of years ago.
A place to put the bike pump (on the bike stand)... not sure why I didn't do this 20 years ago.
And some easy bike storage under the metal shelving.. so easy even my wife and son can use it!


A place to put the bike pump (on the bike stand)... not sure why I didn't do this 20 years ago.
And some easy bike storage under the metal shelving.. so easy even my wife and son can use it!
Attachments
Sweetcorn
Well-known member
A 52" diameter x 8" thick grist mill stone, an old crab winch from the ship yards, and some pieces of beams I got from the demolition of an old Cleveland building = neat yard art for my barn.
Made an adjustable center hub so I could true it up because I wanted it to spin. Spins shockingly easy now. I'll try to add a video later...
I made a crank handle for it that drives the small gear so it turns with minimal effort.

Made an adjustable center hub so I could true it up because I wanted it to spin. Spins shockingly easy now. I'll try to add a video later...
I made a crank handle for it that drives the small gear so it turns with minimal effort.
That is awesome! Add a trough to hold water and get a straight edge on it to sharpen tools.A 52" diameter x 8" thick grist mill stone, an old crab winch from the ship yards, and some pieces of beams I got from the demolition of an old Cleveland building = neat yard art for my barn.
Old Man Roger
Well-known member
When I first saw the picture, that’s exactly what I thought it was.That is awesome! Add a trough to hold water and get a straight edge on it to sharpen tools.

Sweetcorn
Well-known member
Haha, as soon as I got done installing it, my 11 year old son said we needed to sharpen something on it. I grabbed an old ax and we sharpened it. We both had fun.That is awesome! Add a trough to hold water and get a straight edge on it to sharpen tools.
Here are some similar shapes made from some hard Maple that was on hand. They are a perfect size for small files.I am always looking for something to make a file handle from. Well, today. I made one using the bottom support from an old mini blind. I was taking out the old string anyway and decided to take off the bottom support and keep them. The support felt nice in my hand so I decided to make a handle. I used fiberglass resin for a filler.
More DIY handles.
DIY File Handles Without a Lathe.
One of my favorite "free wood" locations had some mahogany (looking) sticks today, so I grabbed a few. They came in various colours and weights, and were part of some crating, probably originating in a country like Indonesia. My project was file handles, using only a plane, rasp, and...
 www.garagejournal.com
Attachments


Last edited:
That plastic has a multiple of uses. Mine also came free via friends that work in a fish processing plant in Newfoundland..Here's a couple made with plastic I got for free from the local university... there's a plastics manufacturing place in town that drops off thousands of pounds of plastic in all shapes, sizes colors etc. I grabbed a bunch a number of years ago.
A place to put the bike pump (on the bike stand)... not sure why I didn't do this 20 years ago.
And some easy bike storage under the metal shelving.. so easy even my wife and son can use it!
Attachments


WoodsTruck
Well-known member
- Joined
- Jan 12, 2013
- Messages
- 1,029
On the plastic theme:
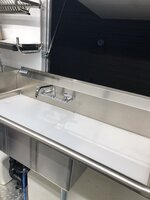
My BIL used to do concrete and had some work to do in a mall where they were disassembling something like a Macy's display that had these large chunks of 3/4" plastic. He gave me some for a sink cover in the high school booster concession trailer I was working on. Once we had those fit where we wanted, I realized we needed a sanitary place to store them when the sink was open. I had repurposed an old fabric sign from a Christmas tree that was delivered to the city of Portland (I had to climb the tree to set the rigging slings), an old carpet edge strip and some U-bolts from weather stations I didn't use. Run through the sewing machine and we now had a storage pocket for the covers. Total cost? $0.05 in thread and time.
Just like the shop, you can never have enough counter surface.
Attachments

slowtwitch73
Well-known member
Here's a quick n dirty Dana 30 spindle puller using two of the mangled nuts from the axle and an orphaned angle grinder handle.

RivennHewn
Well-known member
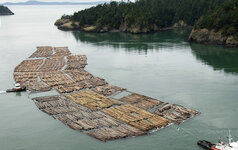
I repurposed a Boom Stick into a solar kiln.
Boom sticks were logs that were chained together (with boom chains) around the perimeter of a log raft to hold the logs together as the were towed across the water to the sawmill.
I retrieved one awhile back and cut it up into lumber, which I used to frame my solar kiln.
It’s Douglass Fir, and it has been in the water for a very long time. Long enough for the Toredo clams to eat tunnels all through it. It’s still amazingly structurally sound material.
Attachments
-
 E0A9CFD2-200F-433B-A151-E6986284E245.jpeg269.4 KB · Views: 150
 -
 416CF98E-D0DC-4356-9C3F-B8714C4438B8.jpeg257.5 KB · Views: 144
 -
 3456D8A1-C397-473D-BBF0-1E0CB85A1FB9.jpeg261 KB · Views: 146
 -
 45C0517E-1637-4740-8C8E-A9AA91936DB4.jpeg645.5 KB · Views: 168
 -
 2308696A-1DB3-4744-A9B4-5B0CB9159618.jpeg1.3 MB · Views: 200
 -
 5CC4840D-AC11-4CDB-BAFA-A0991D9AA8BF.jpeg833.5 KB · Views: 208
 -
 E0F266BD-D843-4D0A-9AD7-701B59F33EBF.jpeg1.1 MB · Views: 211
 -
 BC50E1F4-5343-427D-A89B-37EA265B4697.jpeg1.1 MB · Views: 192
 -
 EFF2D2DC-876E-44D3-82C0-300C7FF1941F.jpeg1.3 MB · Views: 232
WoodsTruck
Well-known member
- Joined
- Jan 12, 2013
- Messages
- 1,029
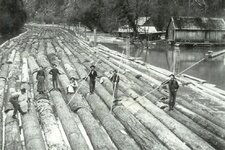
Cool post. When I worked in the woods in Idaho there was a lot of history with the splash dams used to transport logs in the winter run off to get them to the mills. Didn't use many tug boats to hoard them to the mill like the PNW folks do.
Old Man Roger
Well-known member
That worm looks like some kind of alien..lol
RivennHewn
Well-known member
I was reading a bit today on different methods of transportation over water. Different regions had different styles, mostly dependent on the body of water. Rivers would be a different setup than lakes and each had their own variables.Cool post. When I worked in the woods in Idaho there was a lot of history with the splash dams used to transport logs in the winter run off to get them to the mills. Didn't use many tug boats to hoard them to the mill like the PNW folks do.
RivennHewn
Well-known member
Stuff of nightmares. Some varieties grow to 6 feet long!That worm looks like some kind of alien..lol