Miss the Pontiacs
Well-known member
Looks like I have an extra decade under my belt.Way back in the late seventies and early eighties.

Looks like I have an extra decade under my belt.Way back in the late seventies and early eighties.
Thanks Slupie, I have collected a few older PM tools the last few years since adding a bit more room to the shop. Most are the older pea green. I've added a couple more since this pic was taken. The saw is the 12" model 68 though. Not as common as the 66 but a bit more work space in front of the blade. I'm still getting dust collection worked out on some of them. I seriously considered a Saw Stop but I'm all in vintage PM for less than that one SS. Ed.
If you were not so far and still had the chassis I would be interested in buying it. I have that same top and bottom case in good shape but no chassis. I took it with some other stuff in on a trade of a stereo amp repair years ago. I figured eventually I would find someone needing a good case. But if I find a good chassis I would put one in it.A friend gave me this 1928 Majestic Radio that belonged to his Aunt. It didn't work and wouldn't be worth a lot if restored. I removed the radio, middle section and kept the top. I sanded it, fixed the veneer and stained it.
") Ed.
Ed.I held onto the chassis for awhile. I even put it on Craigslist for free. No takers. I wound up just tossing it in the garbage.If you were not so far and still had the chassis I would be interested in buying it. I have that same top and bottom case in good shape but no chassis. I took it with some other stuff in on a trade of a stereo amp repair years ago. I figured eventually I would find someone needing a good case. But if I find a good chassis I would put one in it.
If I am not mistaken a Newby man left McMinnville Tennessee and founded McMinnville Oregon. I think he went there and was a nurseryman. McMinnville is called the Nursery capital of the world or use to be. As far as powermatic and Tennsmith I have relatives who worked in both places and grew up with some kids who were related to the Smiths. When my dad needed parts he for his planer he would get a relative to get them. They would usually give the parts to the workers. I have been in the Powermatic factory but not Tennsmith. The Powermatic factory was huge and had its own furnace. All that is left is the orignal concrete floor.For the wood shop I decided to get everything to match where I could and Powermatic fit the bill with their quality and extensive lineup of tools. Delta and a few other brands would have worked as well but after buying the saw the choice was made. An all Oliver equipped shop would be fun too but they, like other high end manufacturers equipment, doesn't come up for sale very often. I'd agree that Tennsmith makes good quality sheet metal working tools but I didn't know about the Powermatic connection. I think I have a couple pieces. I'm not far from McMinnville Oregon so maybe that was an influencer as well.
Just going back over a few pages and noticed someone else found a use for these cool cardboard box handle "reinforcers".I saw this on the net somewhere so I stole it.
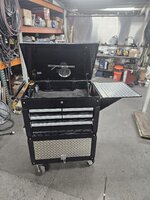
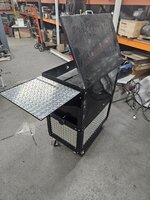
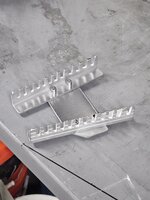
I used the plastic handles on the box my new smoker came in. Turned them into holders for the temp probes.


Larry, I have some of those, mine came from the packaging from some Costco steak knives. I bought the missus a set of knives. After starring at these I decided to use these for grommets on a toolbox project. I was short 2, so after a short walk through Costco later that week I found 3-4 on the floor. These are for material around 1/16" thick but look very similar to yours and Dan's HarryI saw this on the net somewhere so I stole it.
I used the plastic handles on the box my new smoker came in. Turned them into holders for the temp probes.
Did they check your receipt when you left with the free grommets?I have some of those, mine came from the packaging from some Costco steak knives. I bought the missus a set of knives. After starring at these I decided to use these for grommets on a toolbox project. I was short 2, so after a short walk through Costco I found 3-4 on the floor. These are for material around 1/16" thick but look very similar to yours and Dan's. Harry

Costco, the only retailer that sends their customers home with their packaging waste with a smile on their face.No just threw them in the bottom of the cart with the other typical Costco rubbish filled buggies, 4 grommet halves 2 produce bags and some shredded cardboard, with the groceries. Looked like they belonged! Harry

Coffee scoop made from old pill bottle, and lampshade Finial.Turntable for Brawn work-light, to use on bench or desk, made from pill bottle, electrical box cover, shaft, and two, old wore out 6202 bearings.

That's very nice brother! Keep up the good work love to see all the repurposed things.About 20 years ago I was cleaning my parents place up for my mom after my dad passed away. He grew up during the depression so he saved everything, I found a set of springs that I thought was off a horse drawn wagon so I saved it from the scrap pile. I thought they were under the seat but I not so sure. I planned to make a wagon bench seat from them. I finally recently was able to work on it.
I had cut some trees off our property the state took for a road widening project a few years ago. I milled the logs into boards using a Alaskan chainsaw attachment for my chainsaw. I let them air dry and they were ready to use. I didn't have any plans other than the springs themselves, a plastic tray for a sliding box to hold shoes and a few pictures I found on the web. I had some scrap metal I made new holders for the springs. I also made some pieces to add a extra wood piece to the back.
As far as the box I made it so the plastic tray sits down on it. Under it I plan to mount a couple of drawer sliders I salvaged from a point of sale tray under the computer. As far as the bench goes its just about done. I will have to take it apart so I can primer and paint the metal pieces and also to varnish the wood. So other than the bolts and screws I got the bench was mostly made from a tree that was going to be burned by the state that they let me get and scrap metal I saved.


Oh yeah I'm crazyI'm thinking that you might want to get that prescription reevaluated... Seems to be causing hallucinogenic crafting...
How did you Discover that?I make guitar picks out of credit cards too!
Wow, what a niche market this guy has created.
this ls why l love this group!!~!
l was granted a Visa to be resourceful!~!How did you Discover that?
l'm not much of a guitar player, so take it FWIW, but l liked some of my home-made picks, better than the store-brought ones!
It works well too........LOL Funny, I matched it up to the store brought one l have, and it's super close to the measuring size!Coffee scoop made from old pill bottle, and lampshade Finial.


I think it will be cool too.So I have this single post on my back porch... It's been rotting at the bottom for oh, let's say, at least 15 years. It's ugly, but it's not structural. I know because I tripped and knocked it completely over before, lol, so it has no load on it. It's just a square post with 1x6" covering it, and the 1x6" are curling up at the bottom where they rest against the concrete porch.
Anyway, I've been looking for something to replace it with. My house is from the 1860s, but it's been butchered by landlords over the years, and has very little old-world charm left. So when I get a chance, I try to inject some history back into it with renovations.
I found this old cool porch post at a flea market:
It has a little rot on the end, but it's actually at least a foot longer than I need, so I'll be cutting the rot off. I picked it up for $10. So that's a little regular-ol' repurposing. But here's where I added a little resto-mod repurposing.
I used to work at an electronics recycler, and I would scavenge things from the scrap bins. Things of zero value usually, but cool things anyway. One day we were scrapping these displays that had huge slabs of plastic? Acrylic? I don't know. But probably 2" thick heavy plastic. My boss took some home to blow up with firepower, and I took some home to use for "someday" projects. Well, today is that "someday".
I gave the slab to my friend who has a homemade CNC/routing-type thing. He said he'd do my project if I bought him the bit/blade for his machine. Done deal. He cut me two end caps for this wooden porch post out of the acrylic. I had him route a 1/4" deep pocket for the post to sit it, and round off the corner to look old-timey.
Then I had him put a dimple in the middle so I could put an LED in each one. That way it will have a faint, frosty glow at night. Today I was scavenging some white LEDs out of a junk light bar, and mocking up the blocks:
I was wondering how I was going to hide the wiring from the bottom LED to the top... I thought maybe I would cut a slit in the post tuck the wire into it, then fill the slit with wood putty and hand sand it. But today I looked closer at the post, and it's got a hole all the way up the middle! Hallelujah! That will save so much time! I saw the hole in the center when I bought it, but it was full of crud and I didn't know it went all the way through.
So the blocks will run on 12v, and I have a security camera right above where these blocks will go, so I will just tap that 12v power source.
That's all I have today; it's raining so I can't finish the job today. But I just wanted to share my trash-scavenged, resto-mod porch post project as it develops. I literally have $10 in the whole thing (except buying the bit for my friend's CNC, I think that was $40, but you know, on GJ tool costs don't count, lol).
But I figure the plastic blocks will look cool glowing, and they will separate the porch post from the concrete and reduce future rot. And it will look just old-timey enough, but have that futuristic touch, I dunno. I think it's gonna be neat-o.
Yeah, it will see some weather (mainly wind-blown rain- it doesn't rain into the back porch area too often). I was going to put a bead of clear silicone around the where the post fits into the plastic. That should seal it up. Plus the hole up the center of the post is about 1" - 1.5", so I have room to glob some silicone over the LED too, just in case any water makes it past the first silicone layer.CoogarXR,
Will that post get rained on? I'm just wondering if water will run down the post and pool in that recess. If so a small hold drilled on an angle downward to the edge of the plastic would be easy now; impossible later.
Great idea and execution. I agree; please post pix when done.
Weep holes in the bottom would still be a good idea.Yeah, it will see some weather (mainly wind-blown rain- it doesn't rain into the back porch area too often). I was going to put a bead of clear silicone around the where the post fits into the plastic. That should seal it up. Plus the hole up the center of the post is about 1" - 1.5", so I have room to glob some silicone over the LED too, just in case any water makes it past the first silicone layer.
The apparent texture on the surface looks like a dirt catcher. If that's a concern, maybe find a way to smooth it off. But the glowing base thing seems really cool.So I have this single post on my back porch... It's been rotting at the bottom for oh, let's say, at least 15 years. It's ugly, but it's not structural. I know because I tripped and knocked it completely over before, lol, so it has no load on it. It's just a square post with 1x6" covering it, and the 1x6" are curling up at the bottom where they rest against the concrete porch.
Anyway, I've been looking for something to replace it with. My house is from the 1860s, but it's been butchered by landlords over the years, and has very little old-world charm left. So when I get a chance, I try to inject some history back into it with renovations.
I found this old cool porch post at a flea market:
It has a little rot on the end, but it's actually at least a foot longer than I need, so I'll be cutting the rot off. I picked it up for $10. So that's a little regular-ol' repurposing. But here's where I added a little resto-mod repurposing.
I used to work at an electronics recycler, and I would scavenge things from the scrap bins. Things of zero value usually, but cool things anyway. One day we were scrapping these displays that had huge slabs of plastic? Acrylic? I don't know. But probably 2" thick heavy plastic. My boss took some home to blow up with firepower, and I took some home to use for "someday" projects. Well, today is that "someday".
I gave the slab to my friend who has a homemade CNC/routing-type thing. He said he'd do my project if I bought him the bit/blade for his machine. Done deal. He cut me two end caps for this wooden porch post out of the acrylic. I had him route a 1/4" deep pocket for the post to sit it, and round off the corner to look old-timey.
Then I had him put a dimple in the middle so I could put an LED in each one. That way it will have a faint, frosty glow at night. Today I was scavenging some white LEDs out of a junk light bar, and mocking up the blocks:
I was wondering how I was going to hide the wiring from the bottom LED to the top... I thought maybe I would cut a slit in the post tuck the wire into it, then fill the slit with wood putty and hand sand it. But today I looked closer at the post, and it's got a hole all the way up the middle! Hallelujah! That will save so much time! I saw the hole in the center when I bought it, but it was full of crud and I didn't know it went all the way through.
So the blocks will run on 12v, and I have a security camera right above where these blocks will go, so I will just tap that 12v power source.
That's all I have today; it's raining so I can't finish the job today. But I just wanted to share my trash-scavenged, resto-mod porch post project as it develops. I literally have $10 in the whole thing (except buying the bit for my friend's CNC, I think that was $40, but you know, on GJ tool costs don't count, lol).
But I figure the plastic blocks will look cool glowing, and they will separate the porch post from the concrete and reduce future rot. And it will look just old-timey enough, but have that futuristic touch, I dunno. I think it's gonna be neat-o.


1. Please post more pix after installation on the house.I got the post cut to length, holes patched, sanded, painted, and wired up. It's all ready to install. I did go ahead and drill a weep hole in the bottom plastic block, because, after all your encouragement, why not, lol. Here it is, enduring the final test before install:
It's not really that bright, my camera just couldn't adjust to the darkness.
I'll install it on the house probably next week. The weather is all crappy, and I have a ton of other work to do. But at least it's ready to go!