To avoid these ads, REGISTER NOW!

The repurposing thread

Beerhippie

Well-known member
Joined
Oct 13, 2023
Messages
9,606
Location
Far NE Oregon
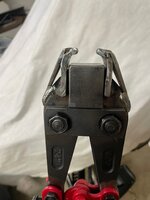
I picked this oddball up in a used tool box purchase last summer:

54171169829_92842406a3_b.jpg

I had no idea just exactly what it was--a circle-cutting trammel made the most sense to me, but what for? Someone here at GJ suggested it was for a cutting torch.

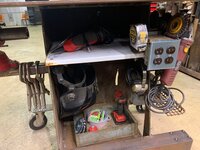
Quite possible--but I very rarely use a cutting torch. I have a Hypertherm plasma cutter.

Mod time!

The "cup" at the end was a pretty close fit:

54169985727_5acc5ab85b_b.jpg

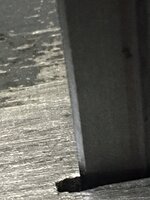
But it was too thick to allow my drag tip to contact the metal and just a tiny bit too tight to fit the tip.

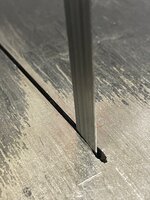
I ground it down to the desired thickness, then drilled it out to 9/16", which is about a perfect fit. I left the lowest step, as it fit the narrow part of the drag tip already.

54232726484_637503b5f4_b.jpg

I found and drilled my center point, set the center tip to a shallower setting, then measured out my circle radius and:

54232487956_2d722d7e6c_b.jpg

54231669302_a8d03fe21e_b.jpg

A little better management of the cable and I'll have some pretty nice circle cuts. As it was, I kept getting snarled up and didn't get a smooth cut all the way around.

Repurposing a farm-built-from-scrap tool is strangely satisfying.

This "new" tool is going in my plasma cutter kit!
 
To avoid these ads, REGISTER NOW!

Oregon rock crusher

Well-known member
Joined
Jun 28, 2016
Messages
1,899
Location
West of Salem
I’ve always tried to do most of my really dirty fab and restoration work outside whenever possible. I decided I needed a light weight rolling work bench that I could easily move around to find a sunny spot in the winter and some shade in the summer. Searching the scrap pile I found this nasty old babbit bearing grinder base. I had removed the shaft years ago and put it in a shop built 5hp belt driven 12” grinder. The green one in the pics. A few more pics of the base as pulled from the scrap heap and after cutting some of the ugly off it with the torch.
 

Attachments

  • IMG_5705.jpg
    IMG_5705.jpg
    1.4 MB · Views: 166
  • IMG_5706.jpg
    IMG_5706.jpg
    1,021.6 KB · Views: 123
  • IMG_5707.jpg
    IMG_5707.jpg
    678.5 KB · Views: 105
  • IMG_5708.jpg
    IMG_5708.jpg
    898 KB · Views: 104
  • IMG_5726.jpg
    IMG_5726.jpg
    853.6 KB · Views: 114

Oregon rock crusher

Well-known member
Joined
Jun 28, 2016
Messages
1,899
Location
West of Salem
I had a couple 40” 3x5 angle iron remnants that made good caster rails. Helped broaden the footprint and added some weight down low where I need it. I added a short piece of 1-1/2” square tube receiver for a vise mount on one end which sets just below the 24” x 42” top plate.
The vise is set up for welding with copper jaws with an extension for the ground clamp. Mounted low like that I can brace my arms on the bench top and get very stable for starting the arc exactly where I want too. Also no interference with items on the bench top. With no perimeter bracing I can get clamps virtually anywhere on the top. The top is set at the same height as most of my other benches.
 

Attachments

  • IMG_5712.jpg
    IMG_5712.jpg
    751.5 KB · Views: 112
  • IMG_5714.jpg
    IMG_5714.jpg
    943.9 KB · Views: 103
  • IMG_5715.jpg
    IMG_5715.jpg
    741.5 KB · Views: 105

Oregon rock crusher

Well-known member
Joined
Jun 28, 2016
Messages
1,899
Location
West of Salem
The other end of the bench got a bar for hanging grinders below the top. The wire mesh shelf under the grinder bar keeps the cords from falling down and getting in the way. I also added a couple of shelfs inside and a few hooks for the helmet and ear muffs. On the back side is a place to coil 25’ of heavy cord that feeds outlet boxes front and rear.
 

Attachments

  • IMG_5716.jpg
    IMG_5716.jpg
    716.8 KB · Views: 103
  • IMG_5717.jpg
    IMG_5717.jpg
    814.6 KB · Views: 93
  • IMG_5718.jpg
    IMG_5718.jpg
    714.5 KB · Views: 93
  • IMG_5719.jpg
    IMG_5719.jpg
    709.1 KB · Views: 116

Oregon rock crusher

Well-known member
Joined
Jun 28, 2016
Messages
1,899
Location
West of Salem
This bench will not win any beauty contest and will often be left outside but I like it anyway. Light enough to easily move around and very comfortable to work at. Pull up a shop stool and the caster rail makes a great footrest. Also everything used on this bench either came out of my scrap pile or other salvaged materials I’ve saved so zero cost. Best of all I get to work where I want to depending on the weather. I expect there will be continuous modifications to fit whatever needs doing. Ed.
 

Attachments

  • IMG_5720.jpg
    IMG_5720.jpg
    754.8 KB · Views: 113
  • IMG_5722.jpg
    IMG_5722.jpg
    456.3 KB · Views: 103
  • IMG_5723.jpg
    IMG_5723.jpg
    733.2 KB · Views: 102
  • IMG_5724.jpg
    IMG_5724.jpg
    857.3 KB · Views: 155

PugetDude

ALLIANCE MEMBER
Joined
Mar 13, 2013
Messages
22,261
Location
Superstition Mountains, AZ
This bench will not win any beauty contest and will often be left outside but I like it anyway. Light enough to easily move around and very comfortable to work at. Pull up a shop stool and the caster rail makes a great footrest. Also everything used on this bench either came out of my scrap pile or other salvaged materials I’ve saved so zero cost. Best of all I get to work where I want to depending on the weather. I expect there will be continuous modifications to fit whatever needs doing. Ed.
Nice! 👍
Reminds me I need to add outlet boxes to my weld table..🤔
 

Beerhippie

Well-known member
Joined
Oct 13, 2023
Messages
9,606
Location
Far NE Oregon
I’ve always tried to do most of my really dirty fab and restoration work outside whenever possible. I decided I needed a light weight rolling work bench that I could easily move around to find a sunny spot in the winter and some shade in the summer. Searching the scrap pile I found this nasty old babbit bearing grinder base. I had removed the shaft years ago and put it in a shop built 5hp belt driven 12” grinder. The green one in the pics. A few more pics of the base as pulled from the scrap heap and after cutting some of the ugly off it with the torch.
You're 20 miles west of Salem, OR and you're going to find a "sunny spot in the winter"? Like, maybe Texas?
 

Oregon rock crusher

Well-known member
Joined
Jun 28, 2016
Messages
1,899
Location
West of Salem
Nice! 👍
Reminds me I need to add outlet boxes to my weld table..🤔
For sure Puget, having easily accessible power receptacles is so much easier than running cords....makes a big difference in usability.
You're 20 miles west of Salem, OR and you're going to find a "sunny spot in the winter"? Like, maybe Texas?
Come on now....the sun still comes out once in a while out here. Sometimes it only stays out for a few minutes and I didn't say it was warm. Better to catch the rare rays than be stuck on the North end of the shop where the sun don't shine from October through May. :)
 

Beerhippie

Well-known member
Joined
Oct 13, 2023
Messages
9,606
Location
Far NE Oregon
For sure Puget, having easily accessible power receptacles is so much easier than running cords....makes a big difference in usability.

Come on now....the sun still comes out once in a while out here. Sometimes it only stays out for a few minutes and I didn't say it was warm. Better to catch the rare rays than be stuck on the North end of the shop where the sun don't shine from October through May. :)
18 years in the Portland area, 8 around Corvallis--I know what winters are like there. So I moved to far NE Oregon, where the sun sets behind the mountains at about 2 PM this time of year--but not so much rain. No, the water that falls from the sky is dry and fluffy and makes driving more interesting.
 

Oregon rock crusher

Well-known member
Joined
Jun 28, 2016
Messages
1,899
Location
West of Salem
18 years in the Portland area, 8 around Corvallis--I know what winters are like there. So I moved to far NE Oregon, where the sun sets behind the mountains at about 2 PM this time of year--but not so much rain. No, the water that falls from the sky is dry and fluffy and makes driving more interesting.
A good day for piddling on the South end deck today....51* with intermittent sunshine. Most days, but not all, there is less fog here than there is along the Willamette River like in Albany. I spent many winters in a cold pit on the banks of that river. Today it was a toss up of starting on a vise project or just working on my tan.... :)
 

Attachments

  • IMG_5727.jpg
    IMG_5727.jpg
    848.9 KB · Views: 132

Fix Until Broke

Well-known member
Joined
Feb 21, 2016
Messages
794
Location
SE Wisconsin
Had to do the same thing again today. Different pair of glasses, but exact same failure.

When this happened a couple years ago, I pushed the center out of another connector and kept it in my pocket while I waited for the new frames to come in, just in case the other side broke in the meantime. As soon as these broke, I remembered exactly where that empty connector was and was able to fix these right away. Can't remember why I walked into a room half the time, but remembered where that thing was..o_O.

Not sure if this counts as re-purposing anymore :)

The bow broke off my glasses the other day at work (while sitting at my desk no less...)

Got a blue adhesive lined crimp connector from the shop, pushed the crimp part out of the center and slid the tube over the bow and frame. Carefully heated it up and it's holding well for over a week now. Actually more solid/stable than it ever was - if you wear glasses, you know how annoying loose frames can be. New frames should be here next week...

Glasses Repair.jpg
 

Beerhippie

Well-known member
Joined
Oct 13, 2023
Messages
9,606
Location
Far NE Oregon
Had to do the same thing again today. Different pair of glasses, but exact same failure.

When this happened a couple years ago, I pushed the center out of another connector and kept it in my pocket while I waited for the new frames to come in, just in case the other side broke in the meantime. As soon as these broke, I remembered exactly where that empty connector was and was able to fix these right away. Can't remember why I walked into a room half the time, but remembered where that thing was..o_O.

Not sure if this counts as re-purposing anymore :)
My father--one of the cheapest men ever born--would break the bridge of his glasses. He'd use a couple of pieces of toothpick, some dental floss and clear epoxy to fix them. I don't recall ever seeing him wearing a pair that hadn't been fixed.
 

alwaysFlOoReD

Well-known member
Joined
Sep 24, 2013
Messages
2,375
Location
Airdrie, Alberta, Canada
Just remembered this when answering a different thread about melting ice. Used an old circular stove element and an extension cord to make my own "trough" heater. Crimped on female spade connectors onto the correct end of the cord, used heat shrink tubing to make sure they didn't come loose form the element. Works like a hot damn.... Pun intended.
 

atch

Well-known member
Joined
Apr 4, 2006
Messages
842
Location
Columbia, Missouri
Kinda repurposed.

I've had these Ford wrenches cluttering up a bench for a long long time.

I grabbed an old white composite shelf board and hung most of them over a bench. Just the board and a bunch of sheetrock screws. Took about 20 minutes.

Some day I'll remount them on oak or walnut or something but for now they look presentable and are no longer in my way.

The spud wrenches and one or two others aren't Ford.


20250118_220054.jpg
I've been watching the "Cleaning Hand Tools" thread started by @HPRifleman and when I remount these wrenches I'll clean them into tip top condition. Also at that point I'll probably hang them in the house somewhere.
 

atch

Well-known member
Joined
Apr 4, 2006
Messages
842
Location
Columbia, Missouri
Also at that point I'll probably hang them in the house somewhere.

Single?
Nope. Got the most understanding wife in the world.

After my wife of 28 years left me I knew that if I ever got remarried it would be to a lady who likes hot rods and Harleys. Sherry, the new wife, loves them both and we've gotten along beautifully for over 20 years.

She would probably object if I wanted to rebuild a H-D engine on the dining room table but short of that just about anything goes.
 

PowerWagonBuilder

Well-known member
Joined
Jan 21, 2025
Messages
82
Location
NW of Richmond, Va
I needed a custom weird but somewhat matching air filter housing for a Restomod project I was working on. I decided to repurpose two rather cheap Aluminum cake pans.

IMG_20161029_215830175.jpg

IMG_20161030_101749949.jpg

IMG_20161030_125028.jpg

A few functional Aircraft solid rivets (set with an air hammer too)
IMG_20161105_170032904.jpg

IMG_20161105_170420.jpg

Not shown is the other tube that goes to a scupper to try and pull cooler air in out from the inner fender.
 
To avoid these ads, REGISTER NOW!

mikeinri

Well-known member
Joined
Nov 29, 2019
Messages
8,206
Location
MA
I needed a custom weird but somewhat matching air filter housing for a Restomod project I was working on. I decided to repurpose two rather cheap Aluminum cake pans.

IMG_20161029_215830175.jpg

IMG_20161030_101749949.jpg

IMG_20161030_125028.jpg

A few functional Aircraft solid rivets (set with an air hammer too)
IMG_20161105_170032904.jpg

IMG_20161105_170420.jpg

Not shown is the other tube that goes to a scupper to try and pull cooler air in out from the inner fender.

I have one of those Craftsman screwdrivers, and a similar tape measure. Sadly, that's where the coincidence (and tools and skills) ends.

Nice job!

Mike
 

Beerhippie

Well-known member
Joined
Oct 13, 2023
Messages
9,606
Location
Far NE Oregon
I felt the need for a camera case that's water, dust, and EMF proof. I keep a rather spendy Nikon DSLR handy beside my desk in the shop and the damned things keep dying on me--I get a little over a year out of them, when it should be well over five years. I just bought my latest as the last one has started to show the same symptoms as the previous two: Pushbutton controls on the body stop working, then functions start vanishing and pretty soon, the camera is just an inert object.

I'm guessing it has to do with exposure to the environment of my shop, which is full of some powerful EMF--especially when welding--metal and regular dust and a fairly high humidity.

So what would do the trick? Hmmm.....

Solved:

54282881322_54c0af5a04_b.jpg

The ground stud is an SS 5mm machine screw (I grabbed an assortment box of these at a yard sale) through a hole, with some bare metal exposed around the hole and an internal star washer to ensure good grounding.

I added some dense foam padding (and need some more) and an industrial-strength dessicant pack and :

54282881297_cc88b82a1f_b.jpg

An M2A1 ammo can fits a Nikon D7500 w/ 24-70mm f:2.8 just fine! It'll work with a 70-200mm f:2.8 with the lens hood reversed.

PS: First pics with my new camera body, which is also a D7500. ;)

As a bonus, the can has EMPTY stenciled on top, so no one would ever think to look for an expensive camera and lens in it!

Now I'm off to work on my tinfoil beenie....
 
Last edited:

mikeinri

Well-known member
Joined
Nov 29, 2019
Messages
8,206
Location
MA
How often does that get used? Maybe store it outside of the shop (or in your vehicle)?

Mike
 

Beerhippie

Well-known member
Joined
Oct 13, 2023
Messages
9,606
Location
Far NE Oregon
How often does that get used? Maybe store it outside of the shop (or in your vehicle)?

Mike
Daily.

Storing it in the rig would mean:

A) Great place to get something stolen--and a broken window if I ever locked my doors (not sure just how to do that).

B) Extreme temperature cycling, resulting in condensation and other problems--ever bring a -10F camera inside and try to use it?
 

willy3486

Well-known member
Joined
Jan 14, 2010
Messages
1,592
Location
Middle Tennessee
I saved some side mounts from rack mount computer equipment. I used one as a hammer holder and I needed a way to hold some brooms. So I cut the end of a mount then I bent it up. I mounted it to a wall and it holds my two brooms. My camera isn't the best so I had to work on two pictures but you can see them better now.

IMG_0032.JPG
This is one of the mounts, I used a grinder to cut off the piece between the holes on the left side. I then bent these two pieces down at a angle. On the right hand side the area bent to a 90 degree angle has holes where the piece was mounted to a rack. So I had to do very little to reuse it.

This is how it is on the wall, I just put in screw to hold it. These next pictures are not the best but hopefully you can make it out.

aab.jpg


And this is the bracket with the brooms on.

aaab.jpg


I have been going through my shop and trying to get stuff in order. I have lots of hand tools but never had a good way to store them. I would store them, forget about them and buy another. I also inherited tools from my dad and father in law, one reason I have so many levels. One of the best ways I found to hold stuff is with a lazy susan type holder. How I make them is to use a heavy duty swivel type base and mount it to a board then mount it to the tool cart. I then make a piece at the top with some type of pin that goes through the ceiling,I have a tin ceiling. In the cart I put a 4x4 post then mount plywood on each side of the plywood. I can mount the tools and spin it to the other sides. Almost all of this was scrap, the post was from a carport,the plywood was from shipping crates, the base was the bottom of a digital piano. I had the screws and all I had to buy was the swivel. Its really handy.

IMG_0044.JPG


This is the bottom of one side to give you a idea.

IMG_0045.JPG
 
Last edited:

FullRaceMerc

Well-known member
Joined
Jan 9, 2015
Messages
3,830
Location
SoCal (SGV)
Mostly made from junk found when we bought our retirement place. The sawbuck lumber is from parts that were an old kid's bedfame. The plywood for the shear came from the center of the headboard.
20250105_075044.jpg

The strap was in the shed & 5 lb. weight was laying in the dirt. Together they make a hold down when I need an extra hand. Plus a 10 lb. weight found in the dirt if needed.
20250105_075152.jpg

20250105_075204.jpg
 

FullRaceMerc

Well-known member
Joined
Jan 9, 2015
Messages
3,830
Location
SoCal (SGV)
Wow, that weight / strap is a GREAT idea!

Mike
Thanks. Yeah, it's been very handy. The strap is also good for holding several smaller pieces in place for group cutting.
20250202_141947.jpg

The strap is doubled so there is a loop to feed thru the weight. I used a store bought quick link in the loop to hold the weight. Originally it was just a stick, but it always seemed like it might slip out as I flopped the weight back & forth.
20250202_141836.jpg
 

cpttuna

Well-known member
Joined
Oct 31, 2014
Messages
13,158
Location
napoleon ohio
this is old stainless can track cable that my former employer got rid of(Campbell Soup) and I picked up about 500 feet of for $.05/lb. I used it for security cable and fencing at my remote property/hunting camp. It did help keep stray cows off my property
 

Attachments

  • IMG_0193.JPG
    IMG_0193.JPG
    38.3 KB · Views: 46
  • IMG_0192.JPG
    IMG_0192.JPG
    48.7 KB · Views: 44

danielbuck

Well-known member
Joined
Apr 15, 2014
Messages
916
Thanks. Yeah, it's been very handy. The strap is also good for holding several smaller pieces in place for group cutting.


The strap is doubled so there is a loop to feed thru the weight. I used a store bought quick link in the loop to hold the weight. Originally it was just a stick, but it always seemed like it might slip out as I flopped the weight back & forth.
That's a great idea, I think I'm going to have to do that!
 

willy3486

Well-known member
Joined
Jan 14, 2010
Messages
1,592
Location
Middle Tennessee
I had a old metal cart about the size of a rolling toolbox that was given to me. My wife wanted a cart to use in our shop so she can cut fabric on. Our shop has two areas roughly 11x13,she has one for sewing and I have the other for electronic repairs. So we don't have a lot of room. She needed a cart that the top could partly fold down when not in use. She had pictures of similar to what she wanted but it was too big.

So I asked her if she could use this cart. It has doors in the front and a shelf. She said it would work fine if it had a top. So I made a base I could wrap around the top and then screw the wood form into where the handles had been on the cart. I made two legs and attached them with hinges. I had milled the wood using a Alaska chainsaw attachment. The wood is roughly the size of a 2x4.

IMG_0097.JPG

The legs can roll back into the cabinet so the top can drop down. The next thing I did was to make the top. I had a sheet of plywood I got for a top. This is the only thing I had to buy other than wheels. I had a couple of piano hinges and I cut one down to make it fit.

IMG_0107.JPG


I also made a couple of stops I attached under the table. You slide the legs out and they go up the ramp area and lock them in place.


IMG_0094.JPG


And this is with it out. It adds about 14 inches to the top but we couldn't have it out all the time as its too tight there. But it rolls out and gives enough room to cut fabric. I basically made it for the exact area it will be. It will replace a small folding table and give a extra 15 inches. This is the top right before I sanded the top and added the edge side trim that was oak. The other photo was too dark. All that I had to buy for this project specifically was the plywood for the top and the 3 buck wheels from HF. I had the lumber I milled, screw I keep, hinges from some project I don't remember and didn't get around to and the cart that was a freebee. So another honeydo project to check off the list.

IMG_0102.JPG
 

Jayman17

Well-known member
Joined
Feb 6, 2017
Messages
3,793
Location
Seattle, Wa
I needed a custom weird but somewhat matching air filter housing for a Restomod project I was working on. I decided to repurpose two rather cheap Aluminum cake pans.

IMG_20161029_215830175.jpg

IMG_20161030_101749949.jpg

IMG_20161030_125028.jpg

A few functional Aircraft solid rivets (set with an air hammer too)
IMG_20161105_170032904.jpg

IMG_20161105_170420.jpg

Not shown is the other tube that goes to a scupper to try and pull cooler air in out from the inner fender.
Nice job installing those rivets with an air hammer, I don't see any die cuts. 👌
 

WoodsTruck

Well-known member
Joined
Jan 12, 2013
Messages
1,019
I had a project where I needed to cut some 3/8" neoprene foam and wanted a decent edge.
Look around to see what I had available and the idea of repurposing a damaged portaband blade came to mind. Chuck up the bad blade and fire up the peanut grinder with a flapper disc and turned both the sander and portaband on and went to sharpening. I then used a piece of 1/4" plywood, circa 1950's from the FIL and cut out a template, radiused the corners, sanded the edges, and cut out some windows.
Rough cut the neoprene to size, tape the template down to the foam using painters tape through the template holes and cut around the template to make my piece. Easy Peazy as they say. Contact cement to lock it into place. (Knee pads on the console)
I also had to add some wide clips to a sled track and the tool was cost prohibitive for a DIY guy, so an $18 set of bolt cutter from HF got sacrificed.
Fire me if I shared these before.
 

Attachments

  • Track Clip Tool.jpg
    Track Clip Tool.jpg
    360 KB · Views: 70
  • IMG_5160.jpg
    IMG_5160.jpg
    1 MB · Views: 71
  • IMG_5093.jpg
    IMG_5093.jpg
    1.4 MB · Views: 69
  • IMG_7063.JPG
    IMG_7063.JPG
    531 KB · Views: 65
  • IMG_7062.JPG
    IMG_7062.JPG
    297.8 KB · Views: 65
  • IMG_5210.jpg
    IMG_5210.jpg
    567.7 KB · Views: 67

Beerhippie

Well-known member
Joined
Oct 13, 2023
Messages
9,606
Location
Far NE Oregon
Today's silly repurpose: Making a lighting panel from an old computer monitor.

54345937501_71e64ebf26_b.jpg

There are lots of YouTube vids on doing this with flat panel monitors and TVs. The diffuser/Fresnel lens combo makes for an ideal light for general uses and photography. The LEDs that lit the panel are an odd voltage--I tried to drive them off my variable bench PS--0-32VDC--and nothing, so I decided to try using the driver built into the control board. It does light up--for about ten seconds, then shuts down as it needs an input signal. Now I have to decode the D-Sub pin-out and try to figure out how to fool the controller into thinking it has a continuous input signal.

Lit up, briefly:

54346195353_61cd0db059_b.jpg

I had to rush it so couldn't get any farther away.

I do have the YouTube-approved ultra-bright, daylight-balanced, high CRI LED strips on the way, but because the frame on this panel is so slim, I'll have to build a deeper frame to accommodate them--but they'll be much brighter than the single strip of LEDs currently on the monitor.
 

WoodsTruck

Well-known member
Joined
Jan 12, 2013
Messages
1,019
Today's silly repurpose: Making a lighting panel from an old computer monitor.

54345937501_71e64ebf26_b.jpg

There are lots of YouTube vids on doing this with flat panel monitors and TVs. The diffuser/Fresnel lens combo makes for an ideal light for general uses and photography. The LEDs that lit the panel are an odd voltage--I tried to drive them off my variable bench PS--0-32VDC--and nothing, so I decided to try using the driver built into the control board. It does light up--for about ten seconds, then shuts down as it needs an input signal. Now I have to decode the D-Sub pin-out and try to figure out how to fool the controller into thinking it has a continuous input signal.

Lit up, briefly:

54346195353_61cd0db059_b.jpg

I had to rush it so couldn't get any farther away.

I do have the YouTube-approved ultra-bright, daylight-balanced, high CRI LED strips on the way, but because the frame on this panel is so slim, I'll have to build a deeper frame to accommodate them--but they'll be much brighter than the single strip of LEDs currently on the monitor.
Nice. I've used my monitor to trace maps and such.
With your new super bright LED's, are they dimmable?
 
To avoid these ads, REGISTER NOW!
Top Bottom