PugetDude
ALLIANCE MEMBER
Make sure you use plenty of anti-sieze.Aw, after looking at it some, I've decided to screw it...

Make sure you use plenty of anti-sieze.Aw, after looking at it some, I've decided to screw it...
Let's see... I think I used anti-seize three, maybe four times today. Something, something, snow thrower spark plug, oil drain cap....Make sure you use plenty of anti-sieze.


Possibly a medical IV stand ?The incandescent light base is very heavy, not sure from where, perhaps medical. The top is an old desk lamp.
The incandescent light base is very heavy, not sure from where, perhaps medical. The top is an old desk lamp.

I was at one of my doctors offices on Monday and I saw a similiar lamp base by the dumpster. I thought about it, but I have enough projects for a while to finish first.The incandescent light base is very heavy, not sure from where, perhaps medical. The top is an old desk lamp.
 From a generation greater than mine, over 50 years old. An air compressor passed down to me through my family made of an AC motor, tank, a well pump pressure switch, some old copper, and a 1973 ford air conditioning compressor. When men build things instead of ordering them off Amazon. What have we become.
An old buddy of mine ran an on-road repair van. It was a Bay-window VW. He repurposed the AC comp as an air compressor. Everyone told him it would blow up in no time due to lack of lubrication. He ran it for years.

That kit brings back memories. I worked in the repair shop at a major furniture retailer during the summer of 1979 when I was in college. Did a lot of burn-in wax repairs, faux grain painting, and sprayed quite a few cans of toner and lacquer leveler.Minor repurposing here. This is my wood touch up kit. Almond stick & stain markers center left. Wax sticks center right. Stain & glue brushes center center. Assorted stains around the perimeter.
The repurposed tuna cans sitting in front fit in a bin. Used to hold glue for brush application. The used denim & shirt sleeve scraps are for building friction & heat working in, blending, & cleaning up the wax stick filler.
Thats awesome. Im not saying this is the best or safest, but it has served 4 house holds and held strong. The weak point actually was the well pump switch. With the vibration and high current it needs replaced once in a blue moon. One thing is for sure though, its not dry air lol.An old buddy of mine ran an on-road repair van. It was a Bay-window VW. He repurposed the AC comp as an air compressor. Everyone told him it would blow up in no time due to lack of lubrication. He ran it for years.
Then he must have greased it or made an oiler system. Lol.Everyone told him it would blow up in no time due to lack of lubrication. He ran it for years.
Interesting! I would love some more info on that if you have any!Some of the Sanden compressors have a sump, they are newer than the Yorks and Tecumseh, and cheaper. They are available rebuilt also.

We've got the burn-in laquer sticks at work too. Good product depending on the situation. This is the 3rd job where I've been the touch up guy. The 1st was right behind you in 1980. Not usually required at the current job, but every once in awhile it comes up on some old furniture. Most often used now as I'm reclaiming old furniture to use at our retirement place.That kit brings back memories. I worked in the repair shop at a major furniture retailer during the summer of 1979 when I was in college. Did a lot of burn-in wax repairs, faux grain painting, and sprayed quite a few cans of toner and lacquer leveler.


I have the same lathe. My wife bought it for me as a Christmas present in 1974. She brought it home in our VW bug and somehow managed to get it the house, All hundred pounds of her. One of my favorite possessions! 2x6s compliments of our old cabin, resulting in my lathe bench. Had the screws (about 200 of them), stain, poly urethane, PVC brick

@Oregon rock crusher:
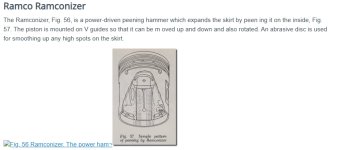
Please tell me you left that name plate on the base! Any idea how old it was?
Mike
Thanks Mike. The tag does get to stay with the table but it would aIso look pretty good on a plaque with an ovesize black pen... I am not sure on the age but likely from the 50's. I think a lot of the engines that would have benefitted from piston skirt knurling were much earlier.@Oregon rock crusher:
That's very cool, and an interesting rigging setup with the strap and hand truck, I'll need to remember that!
Please tell me you left that name plate on the base! Any idea how old it was?
Mike
Tommy's Neuralyzer worked a little differently than this one. I'm pretty sure they had the Ramco version in the arsenal as well that had been confiscated from the early aliens....but that was used much differently.Yes; and also put a pic of Tommy Lee Jones and Will Smith on it.
")


Yes! I hate waste but have to balance that feeling with limited storage space and the need to keep things organized.Nicely done! I try to save materials like that to use on future projects.


How the underside looks. Its really dirty due to being stored. You can see how the boards were bolted on and holes were drilled on the cart frame to allow the bolts to hold the board to it.
I like the rat-rod look.Paint will go a long way in making it look better, and making it easier to clean in the future.,
Of course you do.I like the rat-rod look.
Just wait 'til you see the finished Brick--it'll take a while to rat that out.Of course you do.
Yes it would. But for now it rolls good, the wood top you can sit on it fine. So for now I will leave it as I have so many projects. I am making a couple of wood glider chairs out of pecan I need to finish. Then I have to finish up a bandsaw mill I made so I can saw some cedar logs in the spring. I mainly posted it in case someone had a old cart and wondered what to do with it.Paint will go a long way in making it look better, and making it easier to clean in the future.,