To avoid these ads, REGISTER NOW!

The roughest Craftsman 150 drill press?

MikeyMakey

Active member
Joined
Sep 12, 2024
Messages
27
Location
Muncie, IN
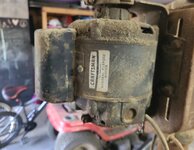
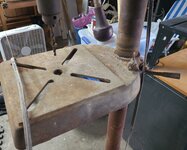
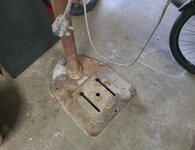
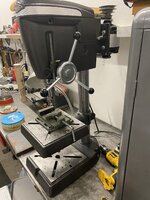
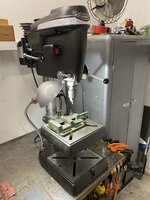
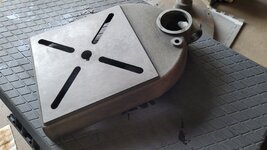
I bought a Craftsman 150 drill press at an online auction. I won it for $27 and happily drove the 45 minutes away to pick it up, only to find that the auction photos did not really tell the condition. When I arrived, I found that it had been stored since time immemorial in an open barn on that white powdery compacted gravel type floor. It's filthy and covered in rust. I loaded it up and brought it home, with my excitement draining away. I had assumed I'd want to do some cleanup and refurbishing, but this was a bit extreme. When my teenage son saw it, he said, "Why did you buy it?"

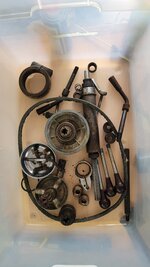
After exploring it further at home, the bad news is that the quill is siezed and won't travel up and down (no, it's not locked). The lock handle to move the head up and down is also stuck. And the chuck itself is seized. The good news - it seems to be 100% complete, including chuck key. The drill and pulleys turn. The depth stop works (not that you can lower the quill). The table unlocks and moves fairly easily. And, surprise, surprise, the motor works, although the power cord needs replaced at minimum because the insulation is cracked in several places.

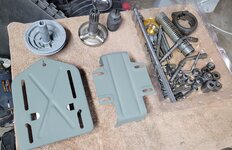
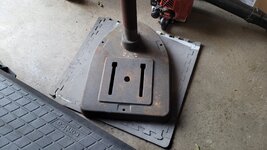
I've eventually come back around from excitement in buying a cool old drill press, to disappointment that it's essentially unusable without significant work, and now back around to excitement again at the prospect of refurbishing it. It'll be quite a transformation if I can get the siezed parts freed up and proceed with a full tear down, cleanup, and repaint.

BTW it's a '64-'66 model, from what I've read in these forums.

Anyway, this got me wondering what's the roughest shape that you've seen in a vintage tool or drill press that was able to be rescued and restored?

(Forgive my messy garage in the pics...)
 

Attachments

  • IMG_20240911_184828~2.jpg
    IMG_20240911_184828~2.jpg
    353.4 KB · Views: 186
  • IMG_20240911_185057.jpg
    IMG_20240911_185057.jpg
    655.8 KB · Views: 171
  • IMG_20240911_185021.jpg
    IMG_20240911_185021.jpg
    408.8 KB · Views: 169
  • IMG_20240911_184849.jpg
    IMG_20240911_184849.jpg
    776.3 KB · Views: 165
  • IMG_20240911_184245.jpg
    IMG_20240911_184245.jpg
    568.3 KB · Views: 164
  • IMG_20240911_184232.jpg
    IMG_20240911_184232.jpg
    724.5 KB · Views: 168
To avoid these ads, REGISTER NOW!

Davefr

Well-known member
Joined
Jan 7, 2010
Messages
11,833
Location
OR
Anyway, this got me wondering what's the roughest shape that you've seen in a vintage tool or drill press that was able to be rescued and restored?

(Forgive my messy garage in the pics...)
I agree with Frank. IMHO, you did very well. I'd take one like that any day over a unit with missing parts, jury rigged mods, big arc of shame, layers of non OEM paint, etc, etc. Your restoration is mostly just labor. Just work on one section at a time. It's really fun to bring these old machines back to life.

My latest Delta before and after.

00J0J_4YF9DBzpK7_0t20CI_1200x900rev1.jpgP1110430.jpg
 

FrankLee

Well-known member
Joined
Sep 13, 2010
Messages
3,602
Location
seMI, 48317
I'd take one like that any day over a unit with missing parts, jury rigged mods, big arc of shame, layers of non OEM paint, etc, etc. Your restoration is mostly just labor. Just work on one section at a time.
This ^...


It's really fun to bring these old machines back to life.
and especially this ^.
 

RTM

Well-known member
Joined
May 13, 2019
Messages
13,190
Location
SF Bay Area
Anyway, this got me wondering what's the roughest shape that you've seen in a vintage tool or drill press that was able to be rescued and restored?
I live very close to the great Pacific rusty fog generator, right next to agricultural areas. Yours is almost pristine by some of what I’ve seen, but not bought. I have no idea if any were refurbed, but I’ve seen a few that supposedly got sent to metal salvage. Just lumps of rust where fasteners should be, pitted columns, very heartbreaking.
 
OP
M

MikeyMakey

Active member
Joined
Sep 12, 2024
Messages
27
Location
Muncie, IN
You have your work cut out for you, but it's very do-able and rewarding.

Below are a couple of my ugly ducklings.

DP#3 was my first complete refurb.
IMG_6007.JPG IMG_5930.JPG

DP#6. IMO, overhauling a poorly repainted machine is the worst.
IMG_6995.JPG IMG_7151.JPG
Wow! Those are lovely. Thanks, I'm looking forward to digging into this thing. I hope this weekend to get the stuck parts un-stuck.

I am curious though, what constitutes a "poor" repaint? (Just so I don't do it myself!) I'd strip it down to bare metal, prime and paint.
 
OP
M

MikeyMakey

Active member
Joined
Sep 12, 2024
Messages
27
Location
Muncie, IN
I live very close to the great Pacific rusty fog generator, right next to agricultural areas. Yours is almost pristine by some of what I’ve seen, but not bought. I have no idea if any were refurbed, but I’ve seen a few that supposedly got sent to metal salvage. Just lumps of rust where fasteners should be, pitted columns, very heartbreaking.
Thanks! It's helpful for me to get a feel for where this thing lives on the rust spectrum. I am realizing it's not as extreme as my initial thought. 😀
 
OP
M

MikeyMakey

Active member
Joined
Sep 12, 2024
Messages
27
Location
Muncie, IN
I agree with Frank. IMHO, you did very well. I'd take one like that any day over a unit with missing parts, jury rigged mods, big arc of shame, layers of non OEM paint, etc, etc. Your restoration is mostly just labor. Just work on one section at a time. It's really fun to bring these old machines back to life.

My latest Delta before and after.

00J0J_4YF9DBzpK7_0t20CI_1200x900rev1.jpgP1110430.jpg
Gorgeous! Thanks for sharing. Love the style of that one.
 

FrankLee

Well-known member
Joined
Sep 13, 2010
Messages
3,602
Location
seMI, 48317
I am curious though, what constitutes a "poor" repaint?
A poor paint job to me is when a machine is not completely dismantled, not properly prepped and/or not properly masked.
Often times these are done with a brush and parts are cemented together with paint. Other times, the entire machine is spray-bombed.

363732438_6367873696623095_8587921989118447550_n.jpg 431140519_354625033593456_4338017560914095539_n.jpg 431618256_1121941199151032_3824562161013295584_n.jpg 308658752_8798945863464657_4864445391474115136_n.jpg
 
Last edited:

xnology

Well-known member
Joined
Nov 5, 2021
Messages
97
When I picked my 150 up it was also stuck. A lot of penetrating oil and cleaning and it runs great even if it isn’t the prettiestIMG_6464.jpeg

Started running some of the uglier parts through a rust removal bath. Now I don’t know how far I’m going to take it…

IMG_2830.jpeg
 

Firstram

Well-known member
Joined
May 16, 2017
Messages
1,391
 

xnology

Well-known member
Joined
Nov 5, 2021
Messages
97
That would be me...
 

TxSteve

Well-known member
Joined
Aug 22, 2023
Messages
121
Location
Granbury, Texas
If it was mine, Here's what I'd do first thing:

Find a 55 gallon drum. You can find them for about $10 on FB marketplace.

Look at this thread and make a big batch. Rust removal alternative

Remove the motor/ and take the top off the base/etc to fit in the barrel. I wouldn't worry about wiring.

Soak in the solution overnight.

See where that takes you. It might completely transform your feelings about this project.
 

Jayman17

Well-known member
Joined
Feb 6, 2017
Messages
3,809
Location
Seattle, Wa
There has been some amazing transformations I've seen on GJ, I'm sure yours will be another one.
A soak in Simple green will degrease and remove paint on these parts, then use that formula posted above with citric acid and washing soda to remove the rust.
 
To avoid these ads, REGISTER NOW!

Firstram

Well-known member
Joined
May 16, 2017
Messages
1,391
Some people are using baking soda and some are using washing soda. I guess it doesn’t matter?

wrong thread!
 

FrankLee

Well-known member
Joined
Sep 13, 2010
Messages
3,602
Location
seMI, 48317
I use straight citric acid in water. In general, I found that warm water works well for cast iron parts and the hottest tap water works best for steel parts.
 
OP
M

MikeyMakey

Active member
Joined
Sep 12, 2024
Messages
27
Location
Muncie, IN
I'm happy with this morning's progress. After liberal hosing with PB, WD-40, and Simple Green, all of the siezed parts are now un-stuck. Including the chuck, the depth stop fine-adjust knob, the head lock, a safety collar, the hub, and the quill. All were stuck before and now move more or less as they should.

One casualty - the rubber gasket at the top of the quill ripped at some point (I didn't notice until I saw it laying on the ground). What purpose does that serve? Is it just a bumper when the quill returns upward?
 

FrankLee

Well-known member
Joined
Sep 13, 2010
Messages
3,602
Location
seMI, 48317
I'm happy with this morning's progress. After liberal hosing with PB, WD-40, and Simple Green, all of the siezed parts are now un-stuck. Including the chuck, the depth stop fine-adjust knob, the head lock, a safety collar, the hub, and the quill. All were stuck before and now move more or less as they should.
That's very good progress!
One casualty - the rubber gasket at the top of the quill ripped at some point (I didn't notice until I saw it laying on the ground). What purpose does that serve? Is it just a bumper when the quill returns upward?
Yes, just a quill return bumper. Not sure why that part is called a gasket.
 
OP
M

MikeyMakey

Active member
Joined
Sep 12, 2024
Messages
27
Location
Muncie, IN
Seriously, MikeyMakey - go to the above links.

That stuff will make your life sooo much easier!
Thanks! I'll definitely be trying that. I have used straight citric acid in the past on a hand plane that I de-rusted, but sounds like the baking soda and dawn addition works even better!
 
OP
M

MikeyMakey

Active member
Joined
Sep 12, 2024
Messages
27
Location
Muncie, IN
I agree with Frank. IMHO, you did very well. I'd take one like that any day over a unit with missing parts, jury rigged mods, big arc of shame, layers of non OEM paint, etc, etc. Your restoration is mostly just labor. Just work on one section at a time. It's really fun to bring these old machines back to life.

My latest Delta before and after.

00J0J_4YF9DBzpK7_0t20CI_1200x900rev1.jpgP1110430.jpg
This is beautiful!! What year is yours? I'm guessing mid-'40s?
 
OP
M

MikeyMakey

Active member
Joined
Sep 12, 2024
Messages
27
Location
Muncie, IN
I made some more progress today. My weekends have been busy since I brought this home, and today's the first day I found myself with nothing demanding my time. So, I was able to dig back in.

I got the bits and pieces removed from the head, removed the motor, and got the head casting and table removed from the mast. Those were a little challenging, but came off after a brief fight.

I tried tentatively to tap out the fasteners holding the headband on while the head was still on the mast, but they seemed stubborn so I decided to wait until I can get the head on a table.

I could NOT get the mast to move in the base at all. I've hosed it with PB blaster and my motivation was waning by then so I'm leaving it to sit until tomorrow. I may have to hit it with heat. Any advice beyond that?
 

Attachments

  • 20240928_160138.jpg
    20240928_160138.jpg
    751.6 KB · Views: 30
  • 20240928_160054.jpg
    20240928_160054.jpg
    935.1 KB · Views: 28
  • 20240928_160152.jpg
    20240928_160152.jpg
    645.9 KB · Views: 32
  • 20240928_160210.jpg
    20240928_160210.jpg
    479.5 KB · Views: 31
  • 20240928_160130.jpg
    20240928_160130.jpg
    998.1 KB · Views: 33
  • 20240928_160201.jpg
    20240928_160201.jpg
    746.5 KB · Views: 34
  • 20240928_160204.jpg
    20240928_160204.jpg
    1,005.2 KB · Views: 35

FrankLee

Well-known member
Joined
Sep 13, 2010
Messages
3,602
Location
seMI, 48317
I made some more progress today. My weekends have been busy since I brought this home, and today's the first day I found myself with nothing demanding my time. So, I was able to dig back in.

I got the bits and pieces removed from the head, removed the motor, and got the head casting and table removed from the mast. Those were a little challenging, but came off after a brief fight.

I tried tentatively to tap out the fasteners holding the headband on while the head was still on the mast, but they seemed stubborn so I decided to wait until I can get the head on a table.

I could NOT get the mast to move in the base at all. I've hosed it with PB blaster and my motivation was waning by then so I'm leaving it to sit until tomorrow. I may have to hit it with heat. Any advice beyond that?
What is your motor model number?

Please post a photo of the bottom of the column from the underside of the base.

This was one of the first techniques I used to remove stuck columns:

column.jpg
 
OP
M

MikeyMakey

Active member
Joined
Sep 12, 2024
Messages
27
Location
Muncie, IN
What is your motor model number?

Please post a photo of the bottom of the column from the underside of the base.

This was one of the first techniques I used to remove stuck columns:

column.jpg

The motor is 113.19656. Thanks for the advice!!
 

Attachments

  • 20240928_185117.jpg
    20240928_185117.jpg
    616.6 KB · Views: 49
  • 20240928_185146.jpg
    20240928_185146.jpg
    548.2 KB · Views: 36
  • 20240928_185020.jpg
    20240928_185020.jpg
    669 KB · Views: 46

FrankLee

Well-known member
Joined
Sep 13, 2010
Messages
3,602
Location
seMI, 48317
The motor is 113.19656. Thanks for the advice!!
Thanks for the new photos.

The date code on the motor, M63, is December 1963, so the machine is likely a '64 model, which corroborates your estimate above.

Here's the motor in the '64 catalog: www.vintagemachinery.org/pubs/222/2874.pdf#page=18

The thick coat of oily sawdust is probably a good thing. IME, the motor will clean up beautifully. Also IME, that style of motor is the very easiest to dismantle and clean.


The bottom of the column looks pretty good; no crusty rust and not mushroomed. I'm optimistic that the 2x4 method will work.
 
Last edited:

Davefr

Well-known member
Joined
Jan 7, 2010
Messages
11,833
Location
OR
I wouldn't worry too much about separating the column from the base. I find it easier to polish the column standing upright already attached to the base. Use 1" wide sandpaper rolls. Wrap a strip completely around the column and just pull back and forth top to bottom as you progress thru the grits. Once the base is prepared for painting just mask off the bottom of the column prior to painting.
 

cgrutt

Well-known member
Joined
Mar 4, 2016
Messages
8,306
Doesn't look that bad to me. I restored an old Walker Turner from the 40s that appeared to be in much worse condition. There's a recent thread with a homemade rust solution (acidic acid and baking soda/powder) I made a batch and was surprised how great it worked. Might try disassembling parts and letting it soak a couple days. Transmission fluid and acetone mixed 50/50 also works wonders. Good luck!
 
OP
M

MikeyMakey

Active member
Joined
Sep 12, 2024
Messages
27
Location
Muncie, IN
Thanks for the new photos.

The date code on the motor, M63, is December 1963, so the machine is likely a '64 model, which corroborates your estimate above.

Here's the motor in the '64 catalog: www.vintagemachinery.org/pubs/222/2874.pdf#page=18

The thick coat of oily sawdust is probably a good thing. IME, the motor will clean up beautifully. Also IME, that style of motor is the very easiest to dismantle and clean.


The bottom of the column looks pretty good; no crusty rust and not mushroomed. I'm optimistic that the 2x4 method will work.
Thank you! I've run the motor a few times, and it's quite noisy, so I'll replace the bearings. I've been searching to find the size of the bearings for this motor and have come up empty so far. Any advice on finding the bearing size, aside from taking them out and measuring with calipers?
 

FrankLee

Well-known member
Joined
Sep 13, 2010
Messages
3,602
Location
seMI, 48317
That motor has sleeve bearings which are generally not replaceable. Usually sleeve bearing motors are quiet .
Maybe a good cleaning will help.
 

y'sguy

Well-known member
Joined
May 1, 2010
Messages
1,325
Location
Tulsa, Oklahoma
that one should work out fine, depending on how far you want to take it. I've been impressed with Frank Lee's method of just cleaning the castings thoroughly without repainting. They turn out very well and are certainly good enough to work with in one's garage, without becoming an unnecessary showpiece. I repainted mine but I'm pretty sure I could have kept it original if I had tried it. The column restore is what I think helps out the look. If you can figure out a way to rig a lath-type affair to spin the column, you have got it made.

here's mine. I do things a little differently now, but I am really happy to have it.
 

Attachments

  • IMG_6419.jpeg
    IMG_6419.jpeg
    874.4 KB · Views: 39
  • IMG_6420.jpeg
    IMG_6420.jpeg
    890.6 KB · Views: 57
OP
M

MikeyMakey

Active member
Joined
Sep 12, 2024
Messages
27
Location
Muncie, IN
that one should work out fine, depending on how far you want to take it. I've been impressed with Frank Lee's method of just cleaning the castings thoroughly without repainting. They turn out very well and are certainly good enough to work with in one's garage, without becoming an unnecessary showpiece. I repainted mine but I'm pretty sure I could have kept it original if I had tried it. The column restore is what I think helps out the look. If you can figure out a way to rig a lath-type affair to spin the column, you have got it made.

here's mine. I do things a little differently now, but I am really happy to have it.
That looks great!!
 
OP
M

MikeyMakey

Active member
Joined
Sep 12, 2024
Messages
27
Location
Muncie, IN
Well, it's coming along nicely. I sprayed primer on the first couple of pieces today. There's still lots to do, but I'm making progress. I wasn't able to get the column out of the base and gave up after trying off and on for several days, but was able to soak the base in citric acid. I'll have to spend some quality time on the base with a wire wheel, and will have to work on the column standing up, but I'm good with that and I have faith it'll come out well in the end.
 

Attachments

  • 20241009_200157.jpg
    20241009_200157.jpg
    908.3 KB · Views: 74
  • 20241009_200133.jpg
    20241009_200133.jpg
    900.6 KB · Views: 35
  • 20241009_183054.jpg
    20241009_183054.jpg
    738.5 KB · Views: 31
  • 20241009_183050.jpg
    20241009_183050.jpg
    621.5 KB · Views: 30
  • 20241009_200315.jpg
    20241009_200315.jpg
    522.2 KB · Views: 35
To avoid these ads, REGISTER NOW!
Top Bottom